consul与eureka 区别
consul 下载
consul agent 命令
-
-data-dir 指定agent储存状态的数据目录
-
-config-dir 指定service的配置文件和检查定义所在的位置
-
-config-file 指定一个要装载的配置文件
-
-dev 创建一个开发环境下的server节点
-
-bootstrap-expect 通知consulserver我们现在准备加入的server节点个数,该参数是为了延迟日志复制的启动直到我们指定数量的server节点成功的加入后启动
-
-node 指定节点在集群中的名称
-
-bind 作用:指明节点的IP地址
-
-server 指定节点为server 每个数据中心(DC)的server数推荐至少为1,至多为5 所有的server都采用raft一致性算法来确保事务的一致性和线性化,事务修改了集群的状态,且集群的状态保存在每一台server上保证可用性
-
-client 指定节点为client,指定客户端接口的绑定地址,包括:HTTP、DNS、RPC
-
-join 将节点加入到集群
-
-datacenter 指定机器加入到哪一个数据中心中
consul 启动
单机模式
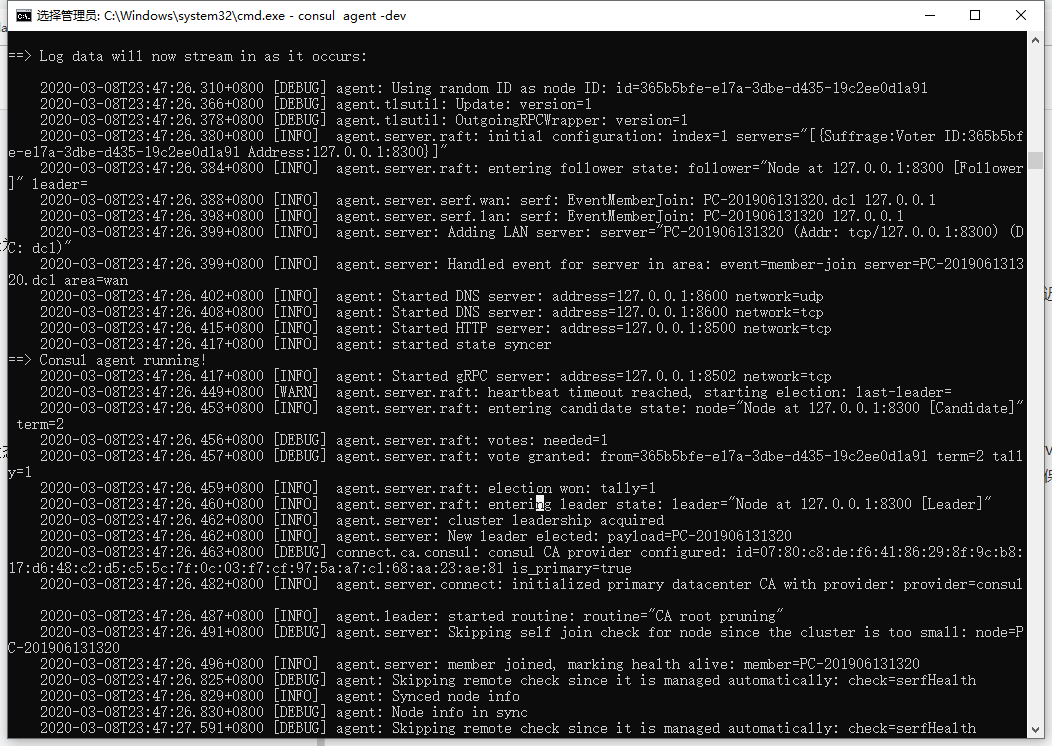
consul agent -dev
集群模式(3 service 节点 1 client 节点)
1、创建对应节点文件夹

2、每个文件夹中创建basic.json 文件
consul-service-1
{
  "bind_addr": "127.0.0.1",
  "data_dir": "./data",
  "bootstrap_expect": 2,
  "server": true,
  "ports": {
    "server": 9300,
    "serf_lan": 9301,
    "serf_wan": 9302,
    "http": 9500,
    "dns": 9600
  }
}

bind_addr 指明节点的IP地址
data_dir 指定consul service 数据存储位置
bootstrap_expect 声明等待几个consul service 加入集群后启动
server 是否作为service 启动
ports 指定端口
consul-service-2
{
  "bind_addr": "127.0.0.1",
  "data_dir": "./data",
  "bootstrap_expect": 2,
  "retry_join": ["127.0.0.1:9301"],
  "server": true,
  "ports": {
    "server": 8300,
    "serf_lan": 8301,
    "serf_wan": 8302,
    "http": 8500,
    "dns": 8600
  }

}

retry_join 加入集群并且加入失败时自动重试
consul-service-4
{
  "bind_addr": "127.0.0.1",
  "data_dir": "./data",
  "bootstrap_expect": 2,
  "retry_join": ["127.0.0.1:9301"],
  "server": true,
  "ports": {
    "server": 6300,
    "serf_lan": 6301,
    "serf_wan": 6302,
    "http": 6500,
    "dns": 6600
  }

}
consul-client-3
{
  "bind_addr": "127.0.0.1",
  "data_dir": "./data",
  "retry_join": ["127.0.0.1:9301"],
  "ports": {
    "server": 7300,
    "serf_lan": 7301,
    "serf_wan": 7302,
    "http": 7500,
    "dns": 7600
  }

}
3、创建号对应节点的配置文件后依次启动
consul-service-1 命令:
consul agent -config-dir ./ -node consul-service-1 -ui
consul-service-2 命令:
consul agent -config-dir ./ -node consul-service-2 -ui
consul-service-4 命令:
consul agent -config-dir ./ -node consul-service-4 -ui
consul-client-3 命令:
consul agent -config-dir ./ -node consul-client-3 -ui
-
-node 表示集群中节点名称
-
-config-dir 表示选用的配置文件夹路径
-
当两个以上节点加入集群后控制台输出下图命令表明leader 节点选举成功,此时consul 集群可访问

-
可输入consul members 查看集群状态

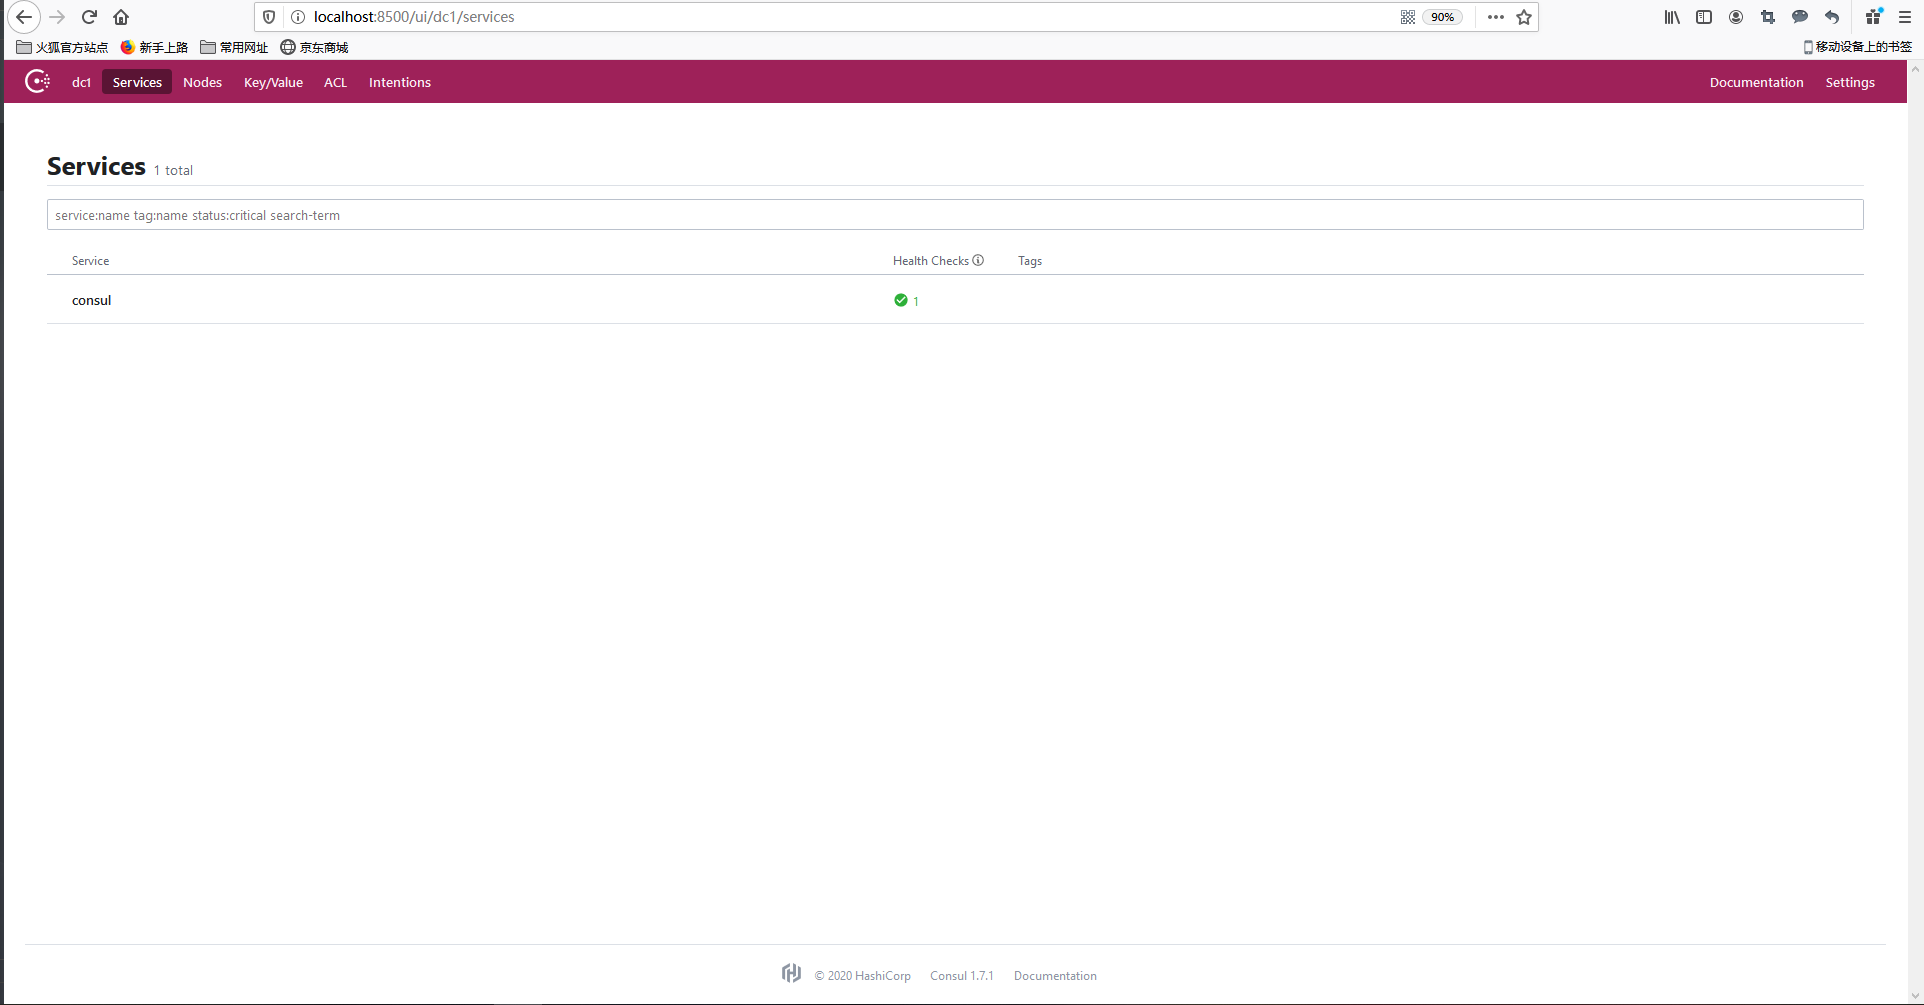
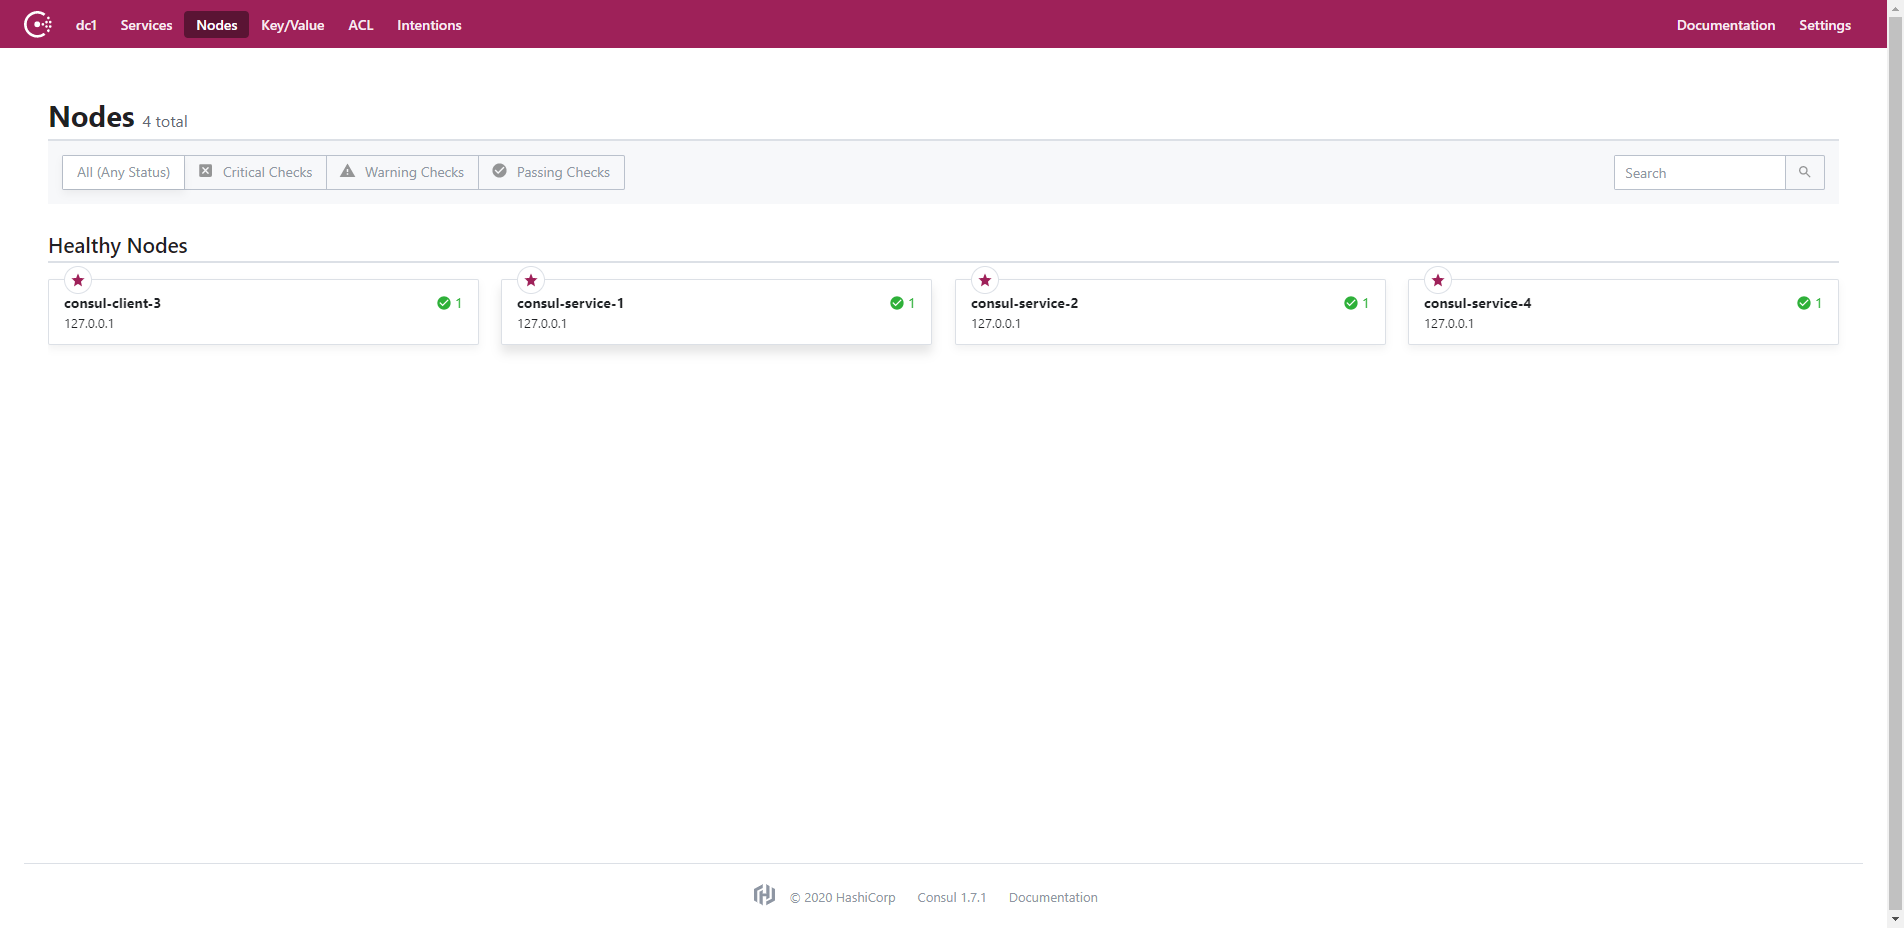
- 或登录任意节点的consul ui查看节点
spring cloud 集成 consul 并使用 openfeign 进行服务调用
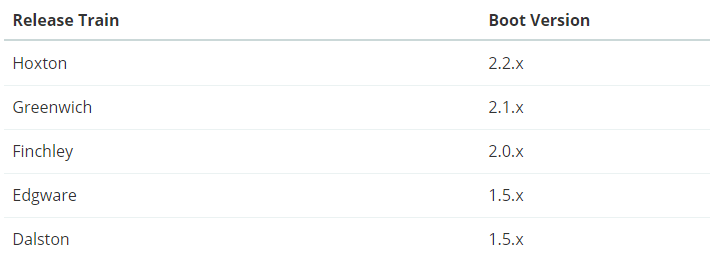
- spring cloud - spring boot 版本对应关系demo 选用 Hoxton 版本
1、pom 文件
<dependencyManagement>
        <dependencies>
            <dependency>
                <groupId>org.springframework.cloud</groupId>
                <artifactId>spring-cloud-dependencies</artifactId>
                <version>Hoxton.SR3</version>
                <type>pom</type>
                <scope>import</scope>
            </dependency>
        </dependencies>
    </dependencyManagement>

    <dependencies>
        <!--consul 注册中心-->
        <dependency>
            <groupId>org.springframework.cloud</groupId>
            <artifactId>spring-cloud-starter-consul-discovery</artifactId>
        </dependency>

        <!--feign-->
        <dependency>
            <groupId>org.springframework.cloud</groupId>
            <artifactId>spring-cloud-starter-openfeign</artifactId>
        </dependency>

        <dependency>
            <groupId>org.springframework.boot</groupId>
            <artifactId>spring-boot-starter-actuator</artifactId>
        </dependency>

        <dependency>
            <groupId>org.springframework.boot</groupId>
            <artifactId>spring-boot-starter-web</artifactId>
        </dependency>

        <dependency>
            <groupId>org.springframework.boot</groupId>
            <artifactId>spring-boot-starter-test</artifactId>
            <scope>test</scope>
            <exclusions>
                <exclusion>
                    <groupId>org.junit.vintage</groupId>
                    <artifactId>junit-vintage-engine</artifactId>
                </exclusion>
            </exclusions>
        </dependency>
    </dependencies>
2、yml 文件
spring:
  application:
    name: spring-cloud-consul
  profiles:
    active: dev
  cloud:
    consul:
      host: localhost
      port: 9500
      #开启健康检查
      discovery:
        #心跳检测地址
        healthCheckPath: ${server.servlet.context-path}/actuator/health
        #轮询时间
        healthCheckInterval: 15s


server:
  port: 8082
  servlet:
    context-path: /spring-cloud-consul
3、application 启动类
- 增加注解
@EnableFeignClients
@EnableDiscoveryClient
4、使用openfeign 进行服务调用
由于偷懒不想写两个服务所有提供者消费者在同一项目里,直接启动两个服务实例来测试即可
1、服务提供者代码
import org.springframework.beans.factory.annotation.Value;
import org.springframework.web.bind.annotation.GetMapping;
import org.springframework.web.bind.annotation.RestController;

/**
 * @desc: 服务提供者
 * @author: xupy
 * @create: 2020-03-08 20:14
 **/
@RestController
public class ProvideController {
    @Value("${server.port}")
    private String port;

    @GetMapping("hello1")
    public String hello1(){
        return this.port+":hello1";
    }
}
2、服务消费者代码
controller
import com.yxy.springcloudconsul.service.OpenFeignService;
import org.springframework.beans.factory.annotation.Autowired;
import org.springframework.beans.factory.annotation.Value;
import org.springframework.cloud.context.config.annotation.RefreshScope;
import org.springframework.web.bind.annotation.GetMapping;
import org.springframework.web.bind.annotation.RestController;

/**
 * @desc: 消费者
 * @author: xupy
 * @create: 2020-03-08 20:26
 **/
@RestController
public class ConsumerController {
    @Autowired
    private OpenFeignService openFeignService;

    @GetMapping("consumerHello1")
    public String consumerHello1(){
        return openFeignService.hello1();
    }
}
service
import org.springframework.cloud.openfeign.FeignClient;
import org.springframework.web.bind.annotation.GetMapping;
//value=服务注册名称 , path=前缀地址
@FeignClient(value = "spring-cloud-consul",path = "${server.servlet.context-path}")
public interface OpenFeignService {
    @GetMapping("/hello1")
    String hello1();

    @GetMapping("/hello2")
    String hello2();

    @GetMapping("/hello3")
    String hello3();

}
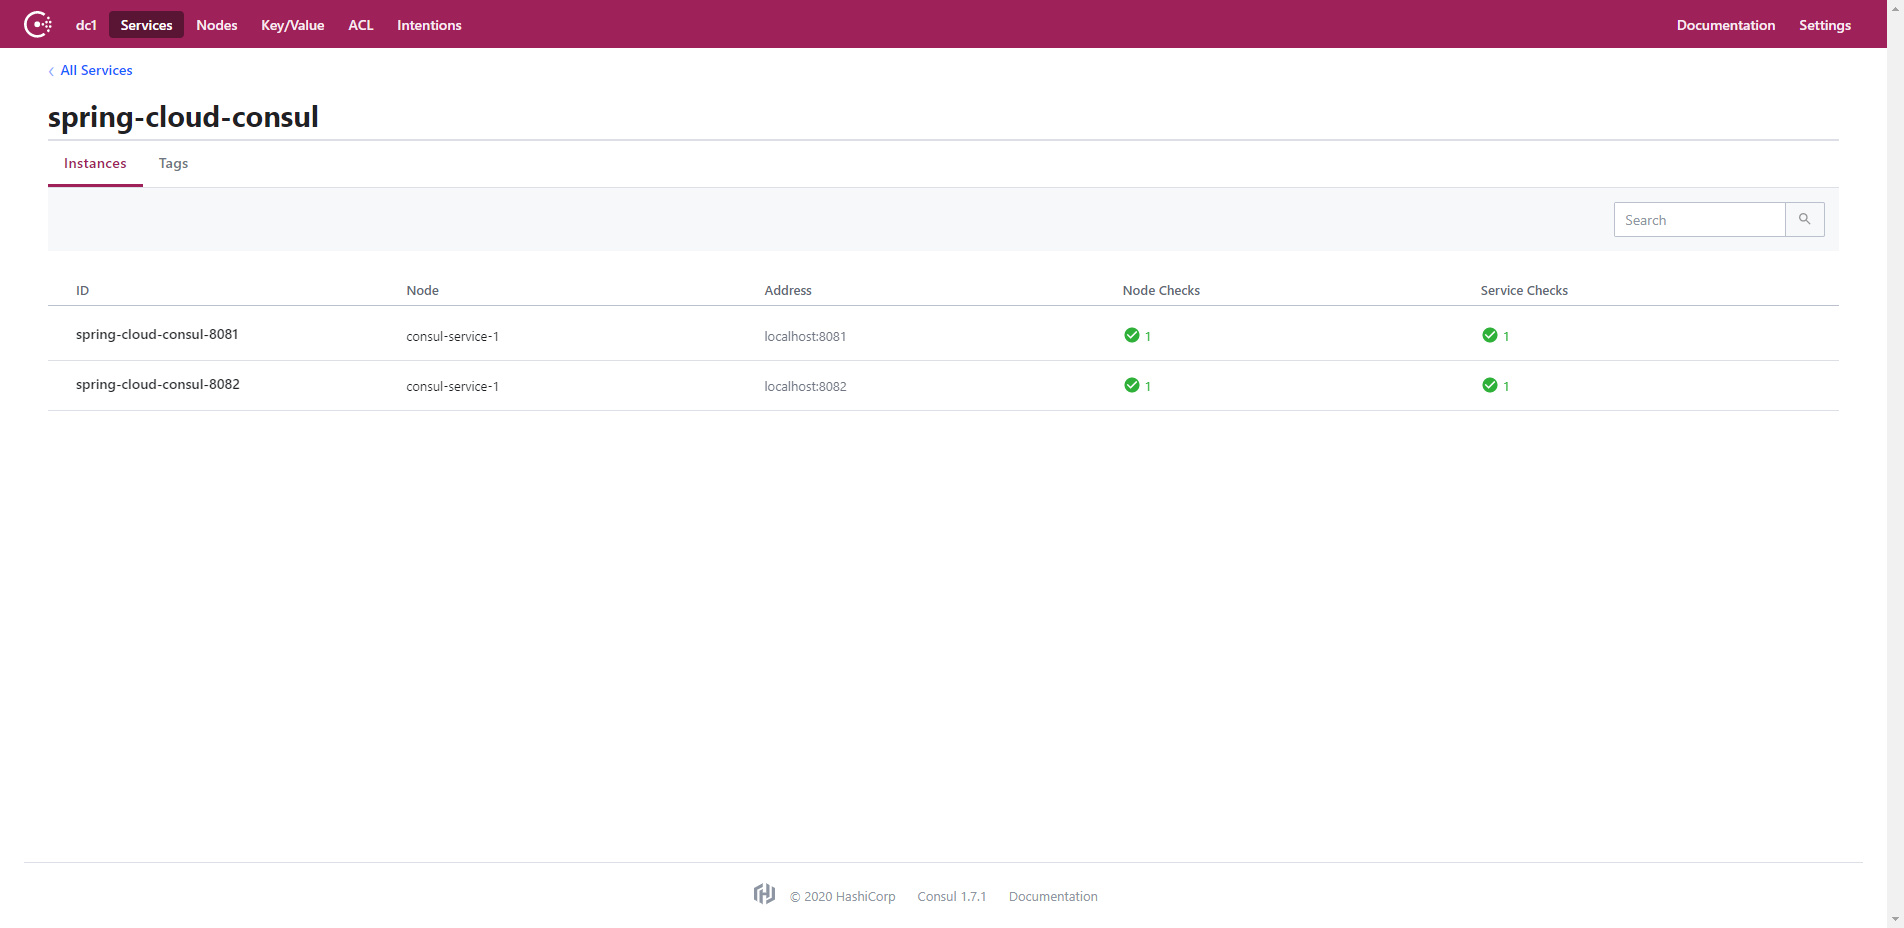
3、启动两个服务实例端口分别为8081、8082
-
通过控制台可以看到两个服务已完成注册
-
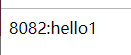
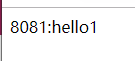
访问 http://localhost:8081/spring-cloud-consul/consumerHello1 并且频繁刷新可以看到实现负载均衡分别轮询两个服务
spring cloud 使用consul 作为配置中心 (替代 spring cloud config的解决方案)
1、pom 文件增加
   <!--consul 配置中心-->
        <dependency>
            <groupId>org.springframework.cloud</groupId>
            <artifactId>spring-cloud-starter-consul-config</artifactId>
        </dependency>
2、yml 文件需要变更为 bootstrap.yml 并增加
application.yml 与 bootstrap.yml 区别
consul:
    config:
            #开启文件配置中心
            enabled: true
            #配置文件夹前缀
            prefix: config
            #配置默认文件夹
            defaultContext: ${spring.application.name}
            #配置默认key
            data-key: data
            #配置文件环境分隔符
            profileSeparator: ','
            #配置文件格式 eg: 1.8 jdk 可能存在冲突需要更新版本
            format: YAML
            #定时刷新配置
            watch:
              delay: 1000
              enabled: true
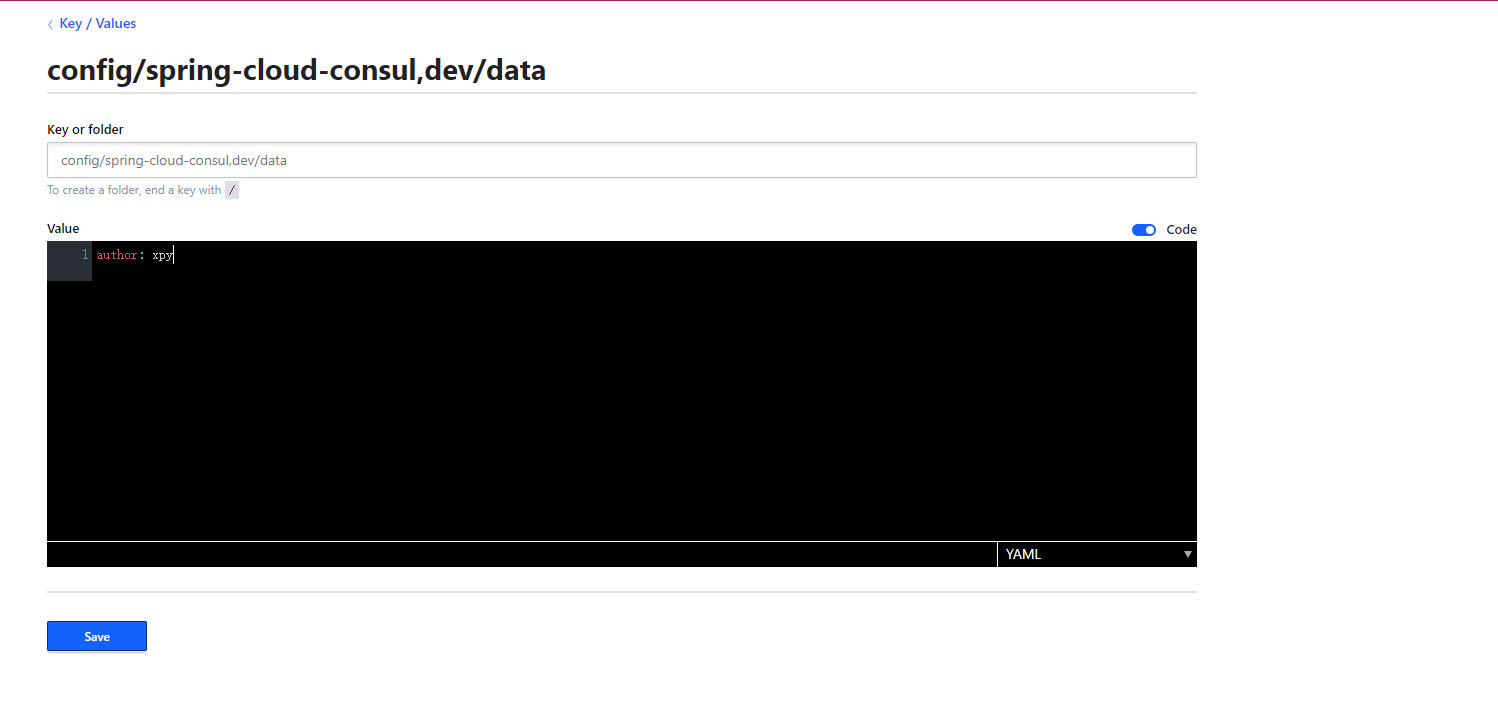
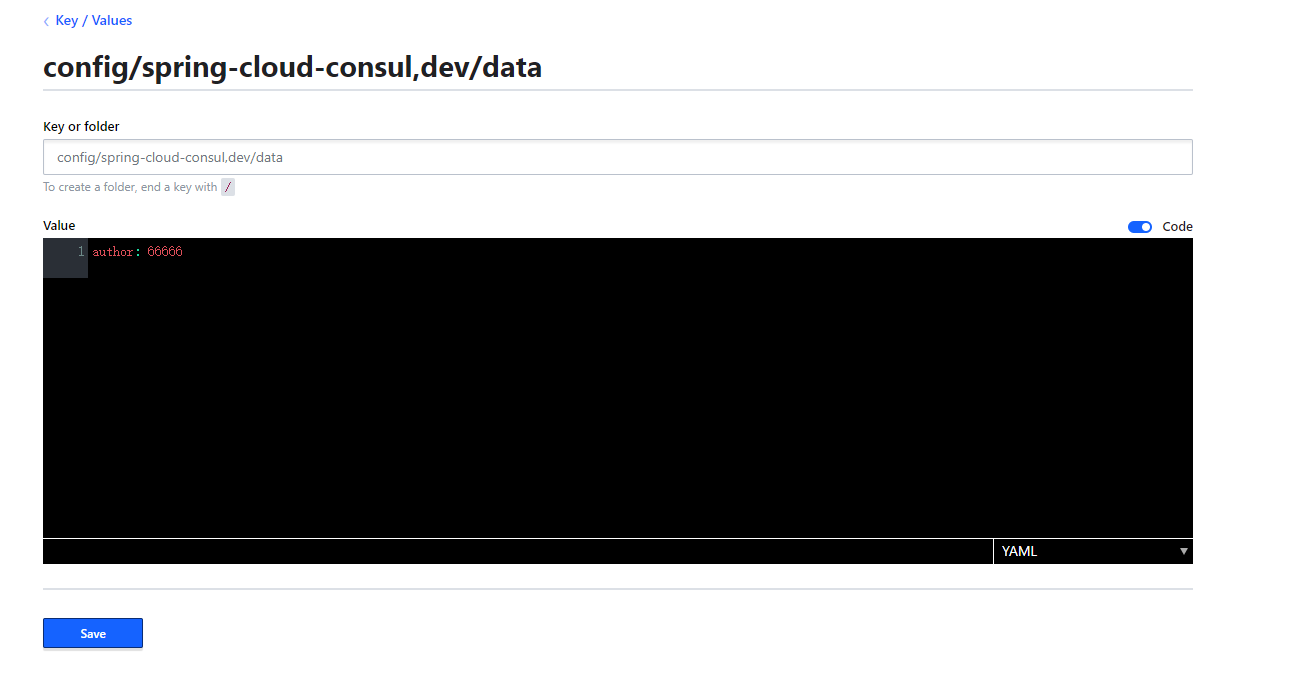
3、在consul 中创建对应数据
key = prefix+"/"+defaultContext+profileSeparator+active+"/"+data = config/spring-cloud-consul,dev/data
4、消费者完整代码
import com.yxy.springcloudconsul.service.OpenFeignService;
import org.springframework.beans.factory.annotation.Autowired;
import org.springframework.beans.factory.annotation.Value;
import org.springframework.cloud.context.config.annotation.RefreshScope;
import org.springframework.web.bind.annotation.GetMapping;
import org.springframework.web.bind.annotation.RestController;

/**
 * @desc: 消费者
 * @author: xupy
 * @create: 2020-03-08 20:26
 **/
@RestController
//配置文件修改自动刷新
@RefreshScope
public class ConsumerController {
    //配置在consul 中的数据
    @Value("${author}")
    private String author;

    @Autowired
    private OpenFeignService openFeignService;

    @GetMapping("consumerHello1")
    public String consumerHello1(){
        return openFeignService.hello1();
    }

    @GetMapping("getAuthor")
    public String getAuthor(){
        return this.author;
    }
}
5、访问服务输出配置
访问 http://localhost:8081/spring-cloud-consul/getAuthor
输出:

- 修改consul配置内容
输出: