

学习一下早已打算又惧怕的vue源码。
首先让我们写个入口页面和webpack配置启动一个本地的页面
页面准备
import Vue from 'vue'
let vm = new Vue({
    el:'#app',
    data(){
        return{
            msg:'我会好好的',
            person:{
                name:'pepsi',
                age:'24'
            },
            list:['p','e','p']
        }
    },
    computed:{},
    watch:{}
})
//webpack.config.js
const path = require('path')
const HtmlWebpackPlugin = require('html-webpack-plugin')
module.exports={
entry:'./src/index.js',
output:{
filename:'bundle.js',
path:path.resolve(__dirname,'dist')
},
devServer:{
open:true
},
devtool:'source-map',
resolve:{
modules:[path.resolve(__dirname,'source'),path.resolve('node_modules')]
},
plugins:[
new HtmlWebpackPlugin({
template:path.resolve(__dirname,'./index.html')
})
]}//index页面
<!DOCTYPE html>
<html lang="en">
<head>
<meta charset="UTF-8">
<meta name="viewport" content="width=device-width, initial-scale=1.0">
<title>vue-hand</title></head>
<body>
<div id="app"></div>
</body>
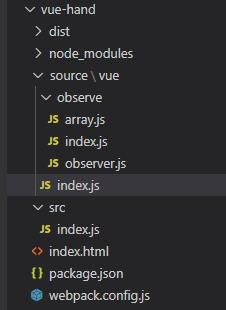
</html>ok 现在页面启动了 新建vue源码的文件夹 文件目录如下
初始化数据
vue的入口页面我们会写一个vue的构造函数,在原型上增加_init方法中的initState去初始化配置项
import {initState} from './observe'
function Vue(options){ //接受传入的配置
    this._init(options) //初始化方法
}
Vue.prototype._init = function(options){
    let vm = this;
    vm.$options = options;
    initState(vm)
}
export default Vue
//observe index.js
import Observer from './observer'
export function initState(vm) {
let opts = vm.$options
if (opts.data) {
initData(vm)
}
if (opts.computed) {
initComputed()
}
if (opts.watch) {
initWatch()
}}
export function observe(data) {
if (typeof data !== 'object' || data == null) {
return //判断是不是对象
}
return new Observer(data)
}
function proxy(vm, source, key) {
Object.defineProperty(vm, key, {
get() {
return vm[source][key]
},
set(newValue) {
if (vm[source][key] === newValue) {
return
}
vm[source][key] = newValue
}
})
}
function initData(vm) { //将用户传入的数据用object.defineProperty重新定义
let data = vm.$options.data
data = vm._data = typeof data === 'function' ? data.call(vm) : data || {}
for (let key in data) {
proxy(vm, '_data', key) //代理数据
}
observe(vm._data)//观察数据
}
function initComputed() {}
function initWatch() {}1.观测对象
在observe index.js中 initState方法是对传来的配置分类处理,initData方法对data数据处理接受传来的数据对象 并代理了数据 然后使用Observer类接受数据去观测
import { arrayObject } from './array'
import { observe } from './index'
export default class Observer {
    constructor(data) { //将用户数据重新定义
        if (Array.isArray(data)) {
            data.forEach(item=>{
                observe(item)
            })            //数组的监控
            data.__proto__ = arrayObject
        } else {
            this.walk(data) //对象的监控
        }
    }
    walk(data) {
        let keys = Object.keys(data)
        keys.forEach(item => {
            let key = item;
            let value = data[item]
            defineReactive(data, key, value)
        })
    }}
export function defineReactive(data, key, value) {
    observe(value) //递归判断是不是对象
    Object.defineProperty(data, key, {
        get() {
            console.log('获取数据')
            return value
        },
        set(newValue) {
            console.log('设置数据')
            observe(newValue)
            if (value === newValue) {
                return
            }
            value = newValue
        }
    })
}
2.观测数组
在接受参数时会判断是数组或者是对象,对象会通过defineReactive方法使用Object.defineProperty的get,set方法把对象数据变成响应式,其中包括递归对象中的对象或者往对象里面塞对象的这种情况。数组我们会劫持并改写数组的七种方法,因为如果是插入操作 可能出现'push','unshift','splice'插入的数据是对象所以还要对插入的对象观测并变成响应式,数组在刚开始的时候也会对每一项判断是不是对象进行观测
import { observe } from './index'
let oldArrayObject = Array.prototype;
/** * 会观测数组内的对象 * 直接修改数组索引的值或者修改length不能被观测到 * 使用数组的其中方法会被观测到 * vm.$set内部使用的就是数组的splice方法 */
export let arrayObject = Object.create(oldArrayObject)
let methods = [
    'push',
    'pop',
    'shift',
    'unshift',
    'sort',
    'splice',
    'reverse'
]
function observerArray(inserted){//要对数组插入的每一项观测
    inserted.forEach(item=>{
        observe(item)
    })
}
methods.forEach(method => {
    arrayObject[method] = function (...args) {
        console.log('重写数组')
        let r = oldArrayObject[method].apply(this, args) //切片编程
        let inserted
        switch (method) {
            case 'push':
            case 'unshift':
                inserted = args
                break;
            case 'splice':
                inserted = args.slice(2)
                break;
           default:
                break;
        }
        if(inserted){
            observerArray(inserted)
        }
        return r
    }
})
挂载数据、渲染和更新页面
1.vue1.0挂载
目前我们对data数据的观测就结束了 观测结束后我们就开始初始化把数据渲染到页面上使用vue的$mount方法,这里面我们会获取挂载的元素然后创建个渲染watcher去执行渲染的函数。在vue1.0中渲染函数会遍历挂载元素下面的每个子节点并生成文档碎片,文档碎片中匹配到{{}}表达式会替换data中的数据以达到数据的挂载,挂载完成之后重新放到挂载元素上完成渲染。
vue index.js
import { initState } from './observe'
import Watcher from './observe/watcher';
import {compiler} from './observe/util'
function Vue(options) { //接受传入的配置
    this._init(options) //初始化方法
}
Vue.prototype._init = function (options) {
    let vm = this;
    vm.$options = options;
    initState(vm)    //初始化
    if (vm.$options.el) {
        vm.$mount()
    }}
function query(el) {
    if (typeof el === 'string') {
        return document.querySelector(el)
    }
    return el
}
Vue.prototype.$mount = function () {
    let vm = this
    let el = vm.$options.el //获取元素
    el = vm.$el = query(el) //获取当前挂载的节点
     //渲染是通过watcher来渲染的,首先渲染有个渲染watcher
    let updateComponent = () => { //更新 渲染的逻辑
        vm._update() //更新组件
    }
    new Watcher(vm, updateComponent)
    //我需要对每个数据 他更改了需要收集起来
}
Vue.prototype._update = function () {    //用用户传入的数据去更新视图
    /**     * vue1.0写法     */
    let vm = this;
    let el = vm.$el
    // console.log(el)
    //------------------vue 2.0会用虚拟dom重写
    //遍历el下面的每一项
     let node = document.createDocumentFragment();
    let firstChild;
    while (firstChild = el.firstChild) {
        node.appendChild(firstChild)
    }
    compiler(node, vm) //编译文档碎片
    el.appendChild(node)
    //匹配{{}}的方式去替换
}
export default Vue
const defaultRE = /\{\{((?:.|\r?\n)+?)\}\}/g
let defultValue;
const util = {
    getValue(vm, expr) {
        let keys = expr.split('.')
        return keys.reduce((memo, current) => {
            memo = memo[current]
            return memo
        }, vm)
    },
    compilerText(node, vm) {
        if(!defultValue){
            defultValue = node.textContent //给节点增加一个自定义属性
        }
        node.textContent = defultValue.replace(defaultRE, function (...args) {
            return util.getValue(vm, args[1])
        })
    }}
export function compiler(node, vm) {
    //找到文本并替换
    let childNodes = node.childNodes;
    [...childNodes].forEach(child => { //child是元素或者文本
        if(child.nodeType == 1) { //1元素
            compiler(child, vm)
        } else if(child.nodeType == 3) {//3文本
            util.compilerText(node, vm)
        }
    })
}
2.watcher类
下面是watcher类的代码,每个watcher都有个id,以便于后面我们用它来过滤重复的watcher 它接受4个参数渲染watcher的时候第二个参数接受的是一个函数,在watcher中我们让他执行
let id = 0
class Watcher {
    //渲染 watch computed都会创建个watcher,每个watcher都有一个id
    /**
     *
     * @param {*} vm //当前组件实例
     * @param {*} exprOrfn //用户传入的表达式或者函数
     * @param {*} cb //回调函数
     * @param {*} opts //一些其他参数
     */
    constructor(vm, exprOrfn, cb = () => { }, opts = {}) {
        this.vm = vm
        this.exprOrfn = exprOrfn
        this.cb = cb
        this.opts = opts
        this.id = id++
        //判断如果exprOrfn是个函数
        if (typeof exprOrfn === 'function') {
            this.getter = exprOrfn
        }
        this.get()
    }
    get() {
        //默认执行传进来的函数
        this.getter()
    }}
export default Watcher
这时候页面就渲染成功了
index.html页面
 <div id="app">
        <span>{{msg}}</span>
        <span>{{person.name}}</span>
 </div>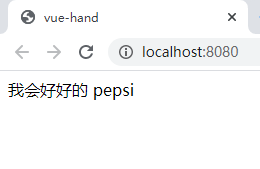
接下来就是如果我们修改数据 让页面再次更新渲染 我们在入口文件最下面写这么一段代码那么如何去达到更新的效果并只更新一次呢?
src index.js
setTimeout(()=>{
    vm.msg = 'hello'
    vm.msg = 'hel1'
    vm.msg = 'hel2'
    vm.msg = 'hell3'
    vm.person.name = '511'
},1000)
首先我们会想到在msg set方法的时候再次让他去调watcher中的更新方法,那么现在我们需要一个容器去收集watcher 然后也因为需要过滤重复的watcher 我们在dep中收集watcher 也在watcher收集dep 这就是依赖收集
3.对象的依赖收集
dep类也具有唯一性 每个都会有自己的id 使用了发布订阅模式 下面并暴露两个函数用来确定当前watcher
//dep.js
let id = 0;
class Dep {
    constructor() {
        this.id = id++
        this.subs = []
    }
    addSub(watcher) {
        this.subs.push(watcher)
   }
    notify() {
        this.subs.forEach(watcher => {
            watcher.update()
        })
    }
    depend(){
        if(Dep.target){
            Dep.target.addDep(this) //watcher去收集dep
        }
    }}
let stack = []
export function pushTarget(watcher) {
    Dep.target = watcher
    stack.push(watcher)
}
export function popTarget() {
    stack.pop()
    Dep.target = stack[stack.length - 1]
}
export default Dep //用来收集watcher
observer.js
export function defineReactive(data, key, value) {
observe(value) //递归判断是不是对象
let dep = new Dep() //收集watcher依赖 如果数据变化让watcher依次执行
Object.defineProperty(data, key, {
get() {
// debugger
if(Dep.target){
//对每个观测的数据新建dep收集watcher依赖,不能重复收集
dep.depend() //想让dep存多个watcher 也想让watcher存多个dep 实现多对多的关系
// dep.addSub(Dep.targrt)
}
return value
},
set(newValue) {
// console.log('设置数据')
observe(newValue)
if (value === newValue) {
return
}
value = newValue
dep.notify()
}
})
}//wathcer.js
get() {
pushTarget(this)
//默认执行传进来的函数
this.getter()
popTarget()
}
update() {
//如果立即调用get会导致页面刷新 使用异步来更新
// this.get()
queueWatcher(this);
}
run(){
console.log('更新操作')
this.get()
}
let has = {}
let queue = []
function queueWatcher(watcher) { //对watcher进行过滤 同名watcher执行一个就行
let id = watcher.id
if(has[id] == null){
has[id] = true
queue.push(watcher)
//延迟清空队列
nextTick(flushQueue)
}}
function flushQueue(){
queue.forEach(watcher=>watcher.run())
has={}
queue=[]
}
let callBacks=[]
function flushCallbacks(){
callBacks.forEach(cb=>cb())
}
function nextTick(cb){
callBacks.push(cb)
//异步刷新
let timeFn = ()=>{
flushCallbacks()
}
if(Promise){
return Promise.resolve().then(timeFn)
}
if(MutationObserver){
let observe = new MutationObserver
let textNode = document.createTextNode(1)
observe.observe(textNode,{characterData:true})
textNode.textContent = 2
return
}
if(setImmediate){
return setImmediate(timeFn)
}
if(setTimeout){
return setTimeout(timeFn)
}}我们在给每个数据响应式都new一个dep 每次刚进来时栈中必定会有一个渲染的watcher,然后我们调用depend的方法也让watcher去收集dep,我们在这个方法去对dep做了去重那么dep收集时即也做了去重
//watcher.js
 addDep(dep) {
        let id = dep.id
        if (!this.depsId.has(id)) {
            this.depsId.add(id)
            this.deps.push(dep) //让watcher记住了dep
            dep.addSub(this)
        }
    }
所以我们现在去更新数据的时候调用了数据的set方法 中会触发dep.notify()会调用这个数据收集的watcher并直接去调用它的update方法 之前的update执行的是get方法去立即执行现在为一个异步执行的函数这时候如果是多次执行同一个数据的话我们在异步之前就进行过滤。过滤之后就使用nextTick函数进行异步刷新,里面我们会依次使用promise,MutationObserver,setImmediate和setTimeout进行判断之后使用也是为了速度更快所以优先使用微任务没有的情况下,会去使用宏任务。
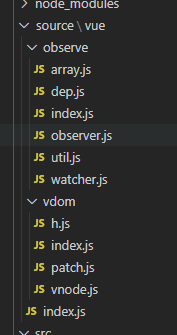
4.数组的依赖收集
接下来是对数组的依赖收集,不同与数据更新的时候会调用响应式set方法,所以我们在监控数组的时候就给他实例上一个__ob__属性上面赋予dep属性用来收集依赖 当然对象也会有__ob__属性但是不影响,此处专门为数组所用。然后在调用数组的七种方法时我们去更新刷新视图,但是我们虽然调用了dep.notify方法因为没有收集依赖,所以我们需要去数组的响应式的时候去收集依赖,现在就完成了对数组依赖收集刷新页面了
//observer.js
export default class Observer {
    constructor(data) { //将用户数据重新定义
        this.dep=new Dep() //此dep只为数组所用
        //每个对象 包括数组都有一个__ob__属性 返回的是当前Observer实例
        Object.defineProperty(data,'__ob__',{
            get:()=>this
        })
        if (Array.isArray(data)) {
            data.forEach(item=>{
                observe(item)
            })
            //数组的监控
            data.__proto__ = arrayObject
        } else {
            this.walk(data) //对象的监控
        }
    }}
export function defineReactive(data, key, value) {
    let childOb = observe(value) //递归判断是不是对象 如果是数组也让它去收集依赖
    let dep = new Dep() //收集watcher依赖 如果数据变化让watcher依次执行
    Object.defineProperty(data, key, {
        get() {
            // debugger
            if(Dep.target){
                //对每个观测的数据新建dep收集watcher依赖,不能重复收集
                dep.depend() //想让dep存多个watcher 也想让watcher存多个dep 实现多对多的关系
                // dep.addSub(Dep.targrt)
                if(childOb){ //为数组收集watcher依赖
                    childOb.dep.depend()
                    dependArray(value) //收集数组儿子的依赖
                }
            }
            return value
        },
        set(newValue) {
            // console.log('设置数据')
            observe(newValue)
            if (value === newValue) {
                return
            }
            value = newValue
           dep.notify()
        }
    })
}
//array.js

methods.forEach(method => {
    arrayObject[method] = function (...args) {
        console.log('重写数组')
        let r = oldArrayObject[method].apply(this, args) //切片编程 函数劫持
        let inserted
        switch (method) {
            case 'push':
            case 'unshift':
                inserted = args
                break;
            case 'splice':
                inserted = args.slice(2)
                break;
            default:
                break;
        }
        if(inserted){
            observerArray(inserted)
        }
        this.__ob__.dep.notify() //通知视图刷新
        return r
    }
})
5.watch的实现
以上我们就完成了对数据的依赖收集 试图渲染及更新,下面我们来处理一下watch对象的实现
//src index.js
 watch: {
        msg(newVaule, oldValue) {
            console.log(newVaule, oldValue)
        }
    }
页面中我们添加上watch的用法 然后在初始化的时候获取使用vue原型上的$watch方法去新建一个watcher的实例
//observe index.js
function initWatch(vm) {
    let watch = vm.$options.watch;
    for (let key in watch) {
        let handler = watch[key]
        createWatcher(vm, key, handler)
    }}
function createWatcher(vm, key, handler) {
    return vm.$watch(key, handler)}

//vue index.js
//watch创建watcher
Vue.prototype.$watch = function (key, handler) {
    let vm = this
    //原理也是创建个wathcer
    new Watcher(vm, key, handler, { user: true })
}
//watch.js
//watch cb为(newVaule,oldValue){console.log(newVaule,oldValue)}
//构造函数中修改如下
        //判断如果exprOrfn是个函数
        if (typeof exprOrfn === 'function') {
            this.getter = exprOrfn
        } else {
            this.getter = function () {
                return util.getValue(vm, exprOrfn)
            }
        }
        if (opts.user) {//watch的watcher
            this.user = true
       }
        //watch的时候 this.value用来获取老值
        //computed的时候第一遍不执行get方法
        this.value = this.lazy ? undefined : this.get()
我们先用this.value获取初始化的值也就是老值 在更新值的时候我们会走到update方法去异步刷新页面
  run() {
        console.log('更新操作')
        let value = this.get() //value是watch的改变的值
        if (this.value !== value) {
            this.cb(value, this.value)
        }
   }
run方法中获得新的值然后让回调函数执行就行
watch总的比较简单,接下来我们看下computed对象
6.computed的实现
//src index.js
 computed: {
        fullName() {
           return this.firstName + this.lastName
        }
    },

//observe index.js
function initComputed(vm, computed) {
    //将计算属性的配置放到vm上
    let watchers = vm._watchersComputed = Object.create(null) //存计算属性的wathcer的对象    for (let key in computed) {        let def = computed[key]        watchers[key] = new Watcher(vm, def, () => { }, { lazy: true }) //加个标志位lazy 默认第一遍不执行        Object.defineProperty(vm, key, { //将计算的值定义到vm上            get: createComputedGetter(vm, key)        })    }}function createComputedGetter(vm, key) {    let watcher = vm._watchersComputed[key] //这个watcher就是计算属性的wathcer    return function () { //用户取值时会执行此方法        if (watcher) {            //如果dirty是false不需要去执行wathcer的计算            if (watcher.dirty) {                watcher.evaluate()            }            if(Dep.target){//计算属性watcher                watcher.depend()            }            return watcher.value        }    }}//watcher.js
//computed opts={lazy:true}
//constructor配置如下
 this.lazy = opts.lazy
 this.dirty = this.lazy
//computed的时候第一遍不执行get方法
 this.value = this.lazy ? undefined : this.get()

//方法修改如下
   update() {
        //如果立即调用get会导致页面刷新 使用异步来更新
        if(this.lazy){
            //计算属性依赖的值变化 需要dirty变true
            this.dirty = true
       }else{
           queueWatcher(this);
        }
   }
    depend(){
        let i = this.deps.length
       // console.log( this.deps)
        while(i--){
            this.deps[i].depend()
        }
    }
实现computed首先在初始化的时候新建一个watcher,然后会把key在vm上响应化一下 get返回一个闭包也就是createComputedGetter函数中return的函数。第一次的时候传入的lazy为true不会触发get函数 然后在evaluate的时候计算它的值并置dirty为false,计算值之后在watcher上新建一个depend方法让计算属性的依赖的属性去收集计算属性的watcher,随后依赖属性发生变化时又会先收集渲染watcher然后在set方法时触发notify()依次执行watcher的update。第一个watcher是计算属性的watcher,它会把dirty变成true然后出栈后,渲染watcher执行update方法的时候会重新evaluate一下fullName的值,至此就改变了视图。computed比watch复杂许多,比watch多了一个缓存的功能 如果依赖的值不发生变化的时候不会重新计算。
虚拟dom和dom diff算法
1.虚拟dom
在vue2.0 就使用虚拟dom去取代文档碎片 代码结构如下
h函数就是创建虚拟节点的createElement函数 render是把虚拟dom节点渲染到页面上,在写vue代码的时候我们写一个组件常常会用template包裹 但是我们这边只是处理到render函数。是因为我们在调vuejs包的时候常常会有runtime-with-compiler.js和runtime.js,而前面的js中就包括编译template成ast语法树再优化之后成为虚拟dom 然后再经过render函数渲染到页面上。而后者则是直接到虚拟dom然后render函数渲染,所以我们常会在vue中有2中写法,另一种就是直接写render函数的这种。
然后让我们来看下h函数跟render函数做了什么
h方法主要是将传入的一个个代码块转成虚拟dom 虚拟dom是一个js对象它含有tag、props、key、children和text,如果没有就是undefined。因为我们在页面渲染后元素上不会有key所以我们只把他保留在虚拟dom上而在真是dom上删除了。
2.render渲染
render方法接受了虚拟dom和需要挂载的节点
通过createElm方法判断vnode的tag是不是undefined,如果是就是文本节点不是就去新生成一个dom元素然后更新它的属性再去递归循环它的children生成真实节点。
通过updateProperties方法更新元素时会循环props上面的属性然后挂载到它的el元素上,但是style class id都需要分别判断,更新时也是需要分开判断是不是能复用。
//h.js
import {vnode} from './vnode'
export function h(tag, props, ...children) {
    let key = props.key
    delete props.key
    children = children.map(child => {
        if (typeof child === 'object') {
            return child
        } else {
            return vnode(undefined, undefined, undefined, undefined, child)
        }
    })
    return vnode(tag, props, key, children)}
//vnode.js
export function vnode(tag, props, key, children, text) {
    return {
        tag,
        props,
        key,
        children,
        text
    }}
//patch.js
export function render(vnode, container) {
    let el = createElm(vnode)
    container.appendChild(el)
}
//1.创建真实节点
function createElm(vnode) {
    let { tag, props, children, key, text } = vnode
    if (typeof tag === 'string') {//标签
        vnode.el = document.createElement(tag)
        updateProperties(vnode) //更新属性
        children.forEach(child => {
            return render(child, vnode.el)
        })
    } else {//文本
        vnode.el = document.createTextNode(text)
    }
    return vnode.el
}
//2.更新属性
function updateProperties(vnode, oldProps = {}) {
    let { props } = vnode
    let el = vnode.el //当前的真实节点
    //属性的更新 根据新的虚拟节点更改dom属性
    let newStyle, oldStyle
    if (props && props.style) {
        newStyle = props.style || {}
    }
    if (oldProps.style) {
        oldStyle = oldProps.style || {}
    }
    for (let key in oldStyle) {
        if (!newStyle[key]) {
            el.style[key] = ''
        }
    }
    for (let key in oldProps) {
        if (!props[key]) {
            delete el[key]
        }
    }
    for (let key in props) {
        if (key === 'style') {
            for (let styleName in props['style']) {
                el.style[styleName] = props['style'][styleName]
            }
        } else { //给当前元素加属性
            el[key] = props[key]
        }
    }}
下面我们看下页面运行结果

3.dom diff
OK,至此我们的渲染就完成了 下面开始我们的更新操作其中就包括核心的dom diff算法
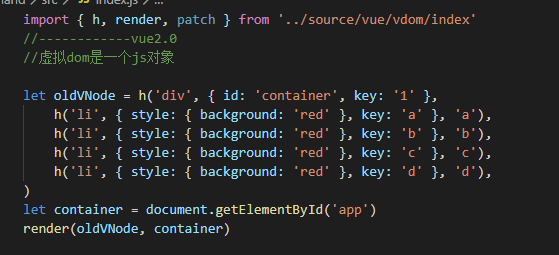
//src index.js
import { h, render, patch } from '../source/vue/vdom/index'
//------------vue2.0//虚拟dom是一个js对象
let oldVNode = h('div', { id: 'container', key: '1' },
    h('li', { style: { background: 'red' }, key: 'a' }, 'a'),
    h('li', { style: { background: 'red' }, key: 'b' }, 'b'),
    h('li', { style: { background: 'red' }, key: 'c' }, 'c'),
    h('li', { style: { background: 'red' }, key: 'd' }, 'd'),
)
let container = document.getElementById('app')
render(oldVNode, container)

//patch用新的虚拟节点 和老的虚拟节点比较 更新domlet
newVNode = h('div', { id: 'aaa', key: '1' },
    h('li', { style: { background: 'green' }, key: 'm' }, 'm'),
    h('li', { style: { background: 'green' }, key: 'd' }, 'd'),
    h('li', { style: { background: 'green' }, key: 'a' }, 'a'),
    h('li', { style: { background: 'green' }, key: 'c' }, 'c'),
    h('li', { style: { background: 'green' }, key: 'n' }, 'n'),
)
setTimeout(function () {
    patch(oldVNode, newVNode)
}, 1000)
入口页面代码如上,然后我们就来看下patch方法做了什么
//patch.js
export function patch(oldVnode, newVnode) {
    //1.先比对标签是否一样,标签不一样新的直接所有内容替换老的
    if (oldVnode.tag !== newVnode.tag) {
        oldVnode.el.parentNode.replaceChild(createElm(newVnode), oldVnode.el)
    }
    //2.标签都没有 比较文本是否一样
    if (!oldVnode.tag) {
        if (oldVnode.text !== newVnode.text) {
            oldVnode.el.textContent = newVnode.text
        }
    }
    //3.标签一样,对比属性
    let el = newVnode.el = oldVnode.el
    updateProperties(newVnode, oldVnode.props)
    //4.比较子节点了
    let oldChildren = oldVnode.children || []
    let newChildren = newVnode.children || []
    //1)老的有孩子,新的有孩子
    if (oldChildren.length > 0 && newChildren.length > 0) {
        updateChildren(el, oldChildren, newChildren)
    }
    //2)老的有孩子,新的没孩子
    else if (oldChildren.length > 0) {
       el.innerHTML = ''
    }
    //3)老的没孩子,新的有孩子
    else if (newChildren.length > 0) {
        newChildren.forEach(child => {
            el.appendChild(createElm(child))
        })
    }
    return el
}
function isSameVnode(oldVnode, newVode) {
    return oldVnode && newVode && (oldVnode.tag === newVode.tag) && (oldVnode.key === newVode.key)
}
function updateChildren(parent, oldChildren, newChildren) {
        //vue增加了很多优化策略 因为在浏览器中操作dom最常见的是在开头结尾插入 或者讲数组正序倒序
    //老的节点指针
    let oldStartIndex = 0
    let oldStartVnode = oldChildren[oldStartIndex]
    let oldEndIndex = oldChildren.length - 1
    let oldEndVnode = oldChildren[oldEndIndex]
    //新的节点指针
    let newStartIndex = 0
    let newStartVnode = newChildren[newStartIndex]
    let newEndIndex = newChildren.length - 1
    let newEndVnode = newChildren[newEndIndex]
    function makeIndexByKey(children){
        let map ={}
        children.forEach((item,index)=>{
            map[item.key] = index
        })
        return map
    }
    let map = makeIndexByKey(oldChildren)
    while (oldStartIndex <= oldEndIndex && newStartIndex <= newEndIndex) {
        if(!oldStartVnode){ //在第五步移动旧孩子节点时会置undefined
            oldStartVnode = oldChildren[++oldStartIndex]
        }else if(!oldEndVnode){
            oldEndVnode = oldChildren[--oldEndIndex]
        } else if (isSameVnode(oldStartVnode, newStartVnode)) {
            patch(oldStartVnode, newStartVnode)
            oldStartVnode = oldChildren[++oldStartIndex]
            newStartVnode = newChildren[++newStartIndex]
        }
        else if (isSameVnode(oldEndVnode, newEndVnode)) {
            patch(oldEndVnode, newEndVnode)
            oldEndVnode = oldChildren[--oldEndIndex]
            newEndVnode = newChildren[--newEndIndex]
        }
        else if (isSameVnode(oldStartVnode, newEndVnode)) {
            patch(oldStartVnode, newEndVnode)
            parent.insertBefore(oldStartVnode.el, oldEndVnode.el.nextSibling)
            oldStartVnode = oldChildren[++oldStartIndex]
            newEndVnode = newChildren[--newEndIndex]
        }
        else if (isSameVnode(oldEndVnode, newStartVnode)) {
            patch(oldEndVnode, newStartVnode)
            parent.insertBefore(oldEndVnode.el, oldStartVnode.el)
            oldEndVnode = oldChildren[--oldEndIndex]
            newStartVnode = newChildren[++newStartIndex]
        }else{
            //上面4种都找不到的话就拿新的孩子第一个去旧的孩子里面找 找不到就直接插入到旧的孩子开始
            //然后新孩子的开始节点往后去一位再次进入循环
            let moveIndex =map[newStartVnode.key]
            if(moveIndex == undefined){
                parent.insertBefore(createElm(newStartVnode), oldStartVnode.el)
            }else{
                let moveVnode = oldChildren[moveIndex]
                oldChildren[moveIndex] = undefined
                parent.insertBefore(moveVnode, oldStartVnode.el)
                patch(moveVnode,newStartVnode)
            }
            newStartVnode = newChildren[++newStartIndex]
        }
            }
    if (newStartIndex <= newEndIndex) {
        for (let i = newStartIndex; i <= newEndIndex; i++) {
            // parent.appendChild(createElm(newChildren[i]))
            //可能是往前插入也可能是往后插入
            let ele = newChildren[newEndIndex + 1] == null ? null : newChildren[newEndIndex + 1].el
            parent.insertBefore(createElm(newChildren[i]), ele)
        }
    }
    if(oldStartIndex<=oldEndIndex){
        for (let i = oldStartIndex; i <= oldEndIndex; i++) {
            // parent.appendChild(createElm(newChildren[i]))
            //可能是往前插入也可能是往后插入
           if(oldChildren[i]){
               parent.removeChild(oldChildren[i].el)
           }
        }
    }}
patch方法分别接收老的和新的虚拟dom,
- 先比对标签是否一样,标签不一样新的直接所有内容替换老的
- 标签都没有 比较文本是否一样
- 标签一样,对比属性并更新(使用了updateProperties)
- 把标签属性完成之后就来处理孩子节点
- 老的有孩子,新的有孩子的话这种是最复杂的情况我们使用updateChildren方法并接受当前的el,老的孩子数组,新的孩子数组
- 老的有孩子,新的没孩子这种情况就直接让老的el内容为空
- 老的没孩子,新的有孩子这种情况就往el添加子元素
- 老的开始节点和新的开始节点如果一样的话,新旧开始指针和指针节点都向后移动
- 老的结束节点和新的结束节点如果一样的话,新旧开始指针和指针节点都向前移动
- 老的开始节点和新的结束节点如果一样的话,旧开始指针和指针节点向后移动,新结束指针和指针节点向后移动
- 新的开始节点和旧的结束节点如果一样的话,新开始指针和指针节点向后移动,新结束指针和指针节点向后移动
- 上面4种都找不到的话就拿新的孩子第一个去旧的孩子里面找 找不到就直接插入到旧的孩子开始,然后新孩子的开始节点往后去一位再次进入循环,找到的话就把旧孩子对应的索引值放到旧开始指针前,原索引元素置成undefined,新的指针向后移动。一直比较到新的数组结束后,如果老的孩子开始索引仍小于结束索引就把相对应索引节点删除。
至此dom diff算法就结束了。
