

背景
我们知道 Vue 是单页面应用,路由不再是后端帮我们配置,而是基于 Vue 的 vue-router 插件来实现路由的跳转。那具体怎么实现的,其中 hash 模式下,核心是监听了 hashchange 方法。那具体是如何实现 hash 更换,页面视图更新的,本文从源码进行分析,通过本文分析加之于自己的实践,希望对你你有所收获。
配置路由页面
本文通过实践,故需要模拟一定的例子,我们创建几个路由,最终我们的 router.js 如下
import Vue from 'vue'
import Router from './vue-router'
import Login from './views/login.vue'
import List from './views/list/list.vue'
import ListA from './views/list/a.vue'
import ListA1 from './views/list/a1.vue'

Vue.use(Router)

export default new Router({
  routes: [
    {
      path: '*',
      component: {
        render(h){ return <h1>404</h1> }
      }
    },
    {
      path: '/',
      component: {
        render(h){ return <h1>首页</h1> }
      }
    },
    {
      path: '/list',
      component:List,
      children:[
        {
          path:'a',
          component:ListA,
          children:[
            {
              path:'a1',
              component:ListA1,
            },
            {
             path:'a2',
             component:{
               render(h){return <h1>this is an list/a/a2</h1>}
             }
           }
         ]
        },
        {
         path:'b',
         component:{
           render(h){return <h1>this is an list/b</h1>}
         }
       }
     ]
    },
    {
      path: '/login',
      component:Login,
    },
  ]
})
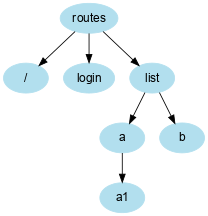
太喜欢语雀绘图工具了,上面路由代码那么长,简单绘制一个图来表示路由的关系吧。
install 安装路由
通常,组件开发第一步少不了 install Vue.mixin Vue.beforeCreate 这几个方法,Vue 是怎么调用 router,我们把模块合并,大概就是下面的代码,我们是 new Rouer(),
new Vue({
	router: new Router({
		routes: [...]
	}),
  store,
	render: h => h(App)
}).$mount('#app')
Vue.use(Router) // 会默认调用 Router 的 install 方法,故 install 方法实在 Router 上的。当然方法有很多你也可以想 Vuex 那样,每个人不同的风格。vue-router 源码 就是这样写的。
install 干了什么,可以分为下面几个步骤: 在调用 vue.use(Router) 的时候会找 Router 的 install 方法,并把组件实例传递到 install 方法的参数中。
beforeCreate 中的 this:
- 我们需要知道 beforeCreate 方法里面的 this 指的当前实例,也需要知道 Vue.mixin 会在每个 Vue 组件调用前混合方法,即每个实例产生前执行 beforeCreate 方法,此时 this 指的 vue 实例。
this.$options.router 是谁:
- 看到源码的知道,this.$options 指的 new Vue(options), 这里 options,看上面的代码块,故这里指的是 new Router({ routes: [ ... ]}),
为什么通过 this.$options.router 判断,操作干了什么:
判断是否为根实例的。
- 若是根实例:保存当前实例, 放到根实例属性的 _routerRoot,实例 _router 为 new Router 得到的实例。
- 若非根实例:通过父子关系找到 $parent 找到 _routerRoot, 放到非根实例的 _routerRoot 上。
class Router {

}

Router.install = (Vue) => {
   Vue.mixin({
    beforeCreate(){
      if (this.$options.router) { // 判断是否为根实例
        this._routerRoot = this // _routerRoot 保存了 根 Vue 实例
        this._router = this.$options.router // _router 保存了 Router 实例
        this._router.init(this) // 即 new Router(..).init 调用初始化操作
      }else {
        this._routerRoot = this.$parent && this.$parent._routerRoot // 每个实例都保存了根实例
      }
    }
  })
}

export default Router
create-matcher
插件安装完了,我们需要处理一下用户传入的 router 方法。Vue 源码是写到 create-matcher.js 中的
import install from './install'
import createMatcher from './create-matcher'

class Router {
  constructor(options) {
    this.matcher = createMatcher(options.routes) // 格式化用户传入的 routes
  }
  init (Vue) {
  	// 每次初始化根实例的时候回调用
  }
}

Router.install = install
export default Router
那 create-matcher 主要做了什么?
- 路由数据格式处理为 pathList pathMap
- 并实现 addRoutes 的方法,是的可以追加路由,写路由权鉴的知道,主要应用了该方法。
- 实现 match 的方法,传入当前路由信息,返回当前路由所有信息,若有父路由则一并返回。
路由数据格式处理为 pathList pathMap?
- 转化前,很熟悉这是用户传入的 routes
/// ....
{
      path: '/list',
      component:List,
      children:[
        {
          path:'a',
          component:ListA,
          children:[
            {
              path:'a1',
              component:ListA1,
            },
            {
             path:'a2',
             component:{
               render(h){return <h1>this is an list/a/a2</h1>}
             }
           }
         ]
        },
     ]
}
//....
- 转化后,这样当我们 match 方法就好实现了 直接 pathMap[path] 即可获取。具体实现见下面 create-route-map 模块
create-route-map
该模块主要实现 pathList, pathMap 实现的方法也有几种,格式处理基本上都是递归,也比较简单。若业务中经常处理后端返回的数据格式,这就是一件很容易的事。
export default function createRouteMap (routes, oldPathList, oldPathMap) {
let pathList = oldPathList || [];
let pathMap = oldPathMap || Object.create(null);
const addRouteRecord = (routes = [], path = [], parent) => {
if(routes.length <= 0) return;
routes.map(route => {
const allPath = path.concat(route.path).join('/')
let recode = {
path: allPath,
component: route.component,
parent,
}
if (!pathMap[allPath]) {
pathList.push(allPath)
pathMap[allPath] = recode
}
if (route.children) {
addRouteRecord(route.children, path.concat(route.path), recode)
}
})
}
addRouteRecord(routes)
return {
pathList,
pathMap
}
}
////////////////////////////////////////////////////////////////
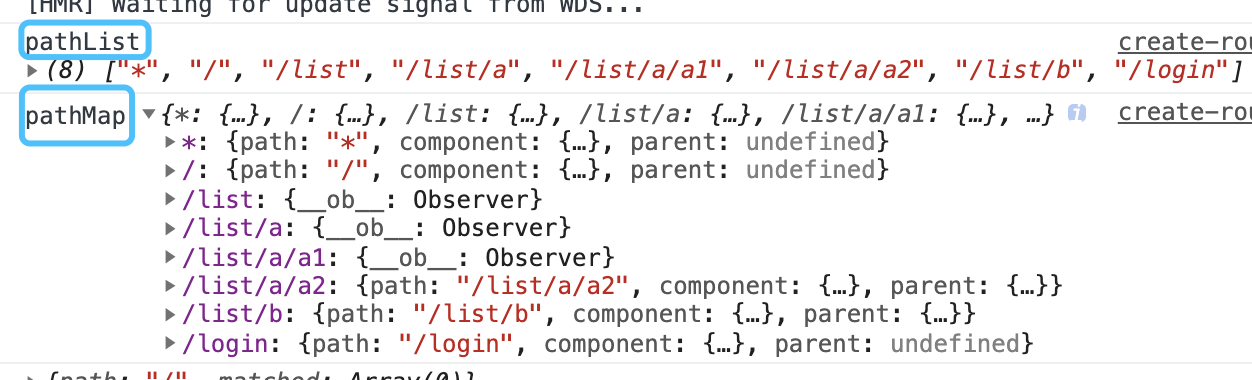
/*
pathList [*, /list, /list/a, /list/a/a1, /list/b, /login]
pathMap {
* : {
path: '*',
component: component,
parent: undefined,
},
/list: {
path: '/list',
component: component,
parent: undefined,
},
/list/a: {
path: '/list/a',
component: component,
parent: {
path: '/list',
component: component,
parent: undefined,
},
}
}
*/
create-match
该模块主要实现有 addRoute 方法,match 匹配所有路由方法。
import { createRoute } from './history/base'
import createRouteMap from './create-route-map'

export default function createMatcher (routes) {

  const { pathList, pathMap } = createRouteMap(routes)

  const addRoute = (routes) => {
    createMatcherMaps(value, pathList, pathMap)
  }
  const match = (location) => { // /list/a/a1
    let record = pathMap[location]; // 找到当前路由
    return createRoute(record, {path: location}) // 核心:找父亲
  }

  return {
    addRoute,
    match
  }
}
createRoute
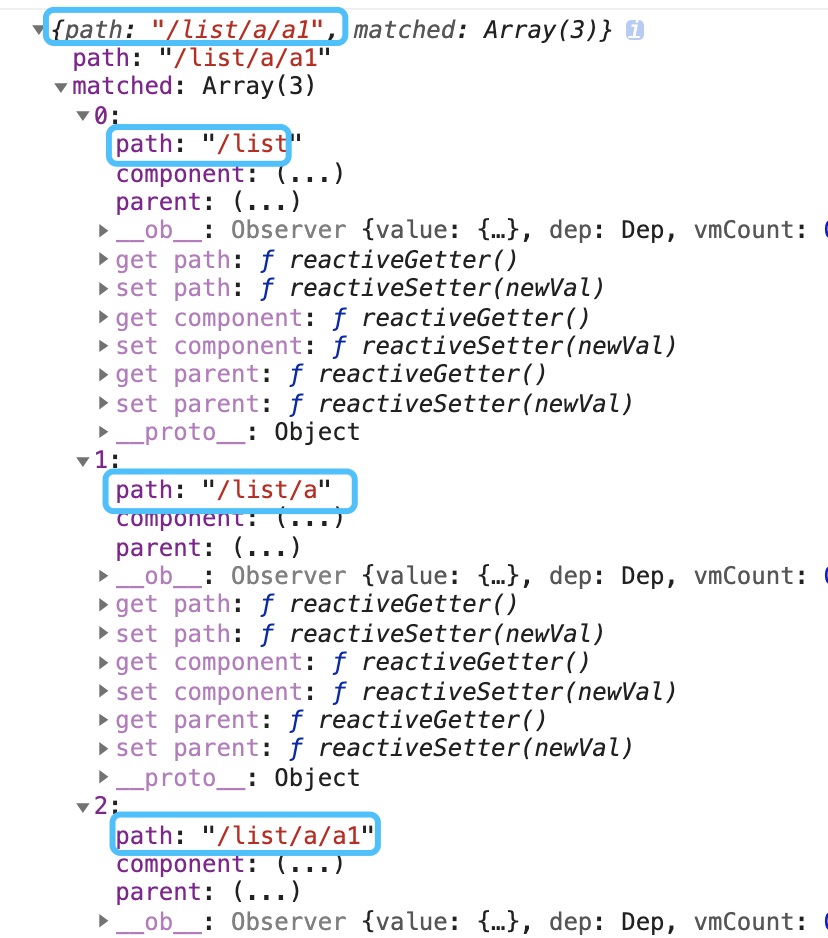
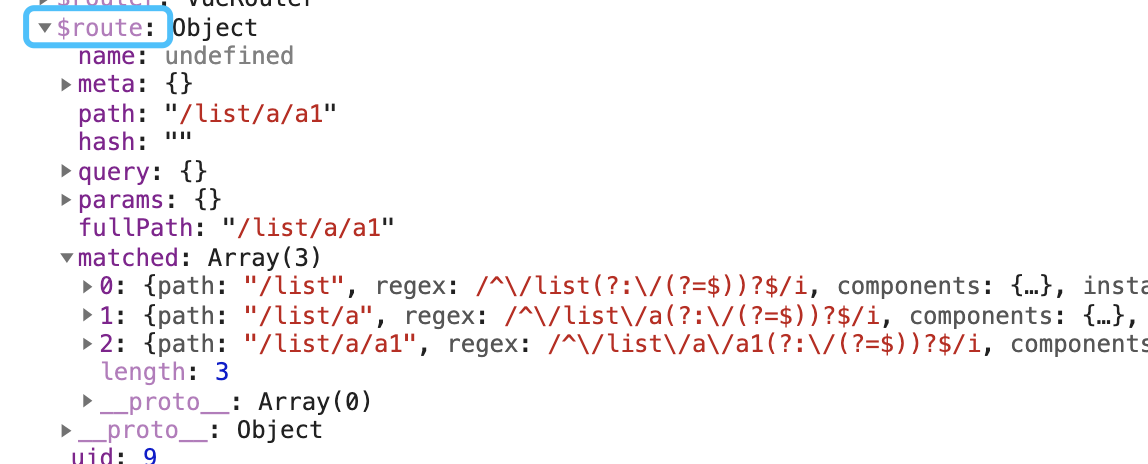
它的功能主要是:通过传入当前路由,返回当前路由依赖的所有父亲,因为pathMaps 中存储的只是它本身,我们通过它本身找到,依赖的所有父亲。 例如本文例子 list/a/a1,它的父亲就又 /list 和 /list/a ,我打印一下格式处理后的值见下图,方便理解。 具体可以看 源码,这里只是核心简单的抽离。
export function createRoute (routes, location) {
  if (!routes) return { ...location, matched: [] }
  let res = []
  while(routes) { // 循环找父
    res.unshift(routes)
    routes = routes.parent // 我们在处理用户的路由时候,在 pathMap 中存入了每一个路由项的父亲,见下 create-route-map 方法
  }
  return {
    ...location,
    matched: res,
  }
}
hash 上场
路由格式处理好了,我们该监听路由变化来做一些操作了。因为路由模式有多种,hash history 方式,故我们写代码公共模块需要抽离。可参见源码。 主要讨论一下 hash 方式,那主要做了什么呢
- 默认需要跳转到 /#/
- 监听 hashchange 发生变化,getCurrentLocation 获取到当前匹配的路由, transitionTo 跳转过去
- 每当实例 beforeCreate 默认回调用获取当前匹配路由方法,在重新注册监听 hashchange。
base
class History {
  constructor (router) {
    this.router = router;
    this.current = createRoute(null,{ // this.current 是有默认值的 返回值和上图很像 返回 path: '/', matched:[]
      path:'/'
    });
    console.log(this.current)
  }
  // 获取当前路由信息,存到 current.
  transitionTo (location, cb) {
    let r = this.router.match(location)
    if(location == this.current.path && r.matched.length == this.current.matched.length) {
      return;
    }
    this.current = r; //
    this.cb && this.cb(r) // 地址发生改变,通知 Vue.$route
    cb && cb();
  }
  setupListener () { // 监听路由
    window.addEventListener('hashchange', () => {
      this.transitionTo(window.location.hash.slice(1));
    })
  }
  listen (cb) { // 订阅
    this.cb = cb
  }
}
export default History
hash
import History from './base'

class HashHistory extends History{
  constructor (router) {
    super(router)
    this.router = router;
    if(window.location.hash){
      return
    }
    window.location.hash = '/' // 默认跳转 到 /#/
  }
  getCurrentLocation () {
    return window.location.hash.slice(1) // 获取 /#/list/a/a1 hash 值
  }
}
export default HashHistory
Router.js
import install from './install'
import createMatcher from './create-matcher'
import HashHistory from './history/hash'

class Router {
  constructor(options) {
    this.matcher = createMatcher(options.routes)
    this.history = new HashHistory(this)
  }
  match(location){
    return this.matcher.match(location)
  }
  init (Vue) { // 我们知道每个实例 beforeCreate 执行回调用 init
    this.history.transitionTo(
      this.history.getCurrentLocation(), // 获取当前 hash 值
      ()=>{
        this.history.setupListener(); // 获取到当前地址后的回调,即重监听 hashchange
      }
    )
    this.history.listen((route)=>{ //当路由 route 发生改变,重新设置 Vue._route 响应式
      Vue._route = route
    })
  }
  push (location) {
    this.history.transitionTo(location, ()=>{ // 路由跳转主要方法
      window.location.hash = location
    })
  }
}

Router.install = install
export default Router
$route $router
还在分不清楚两个方法么?看源码 实际是做了几层代理,方法用户访问
const install = (Vue) => {
  Vue.mixin({
    beforeCreate(){
      if (this.$options.router) {
        this._routerRoot = this
        this._router = this.$options.router
        this._router.init(this)

        Vue.util.defineReactive(this, '_route', this._router.history.current) // $route 做成响应式的
      }else {
        this._routerRoot = this.$parent && this.$parent._routerRoot
      }
    }
  })
  Object.defineProperty(Vue.prototype, '$route', {
    get() {
      return this._routerRoot._route
    }
  })
  Object.defineProperty(Vue.prototype, '$router', {
    get () {
      return this._routerRoot._router
    }
  })
}
export default install
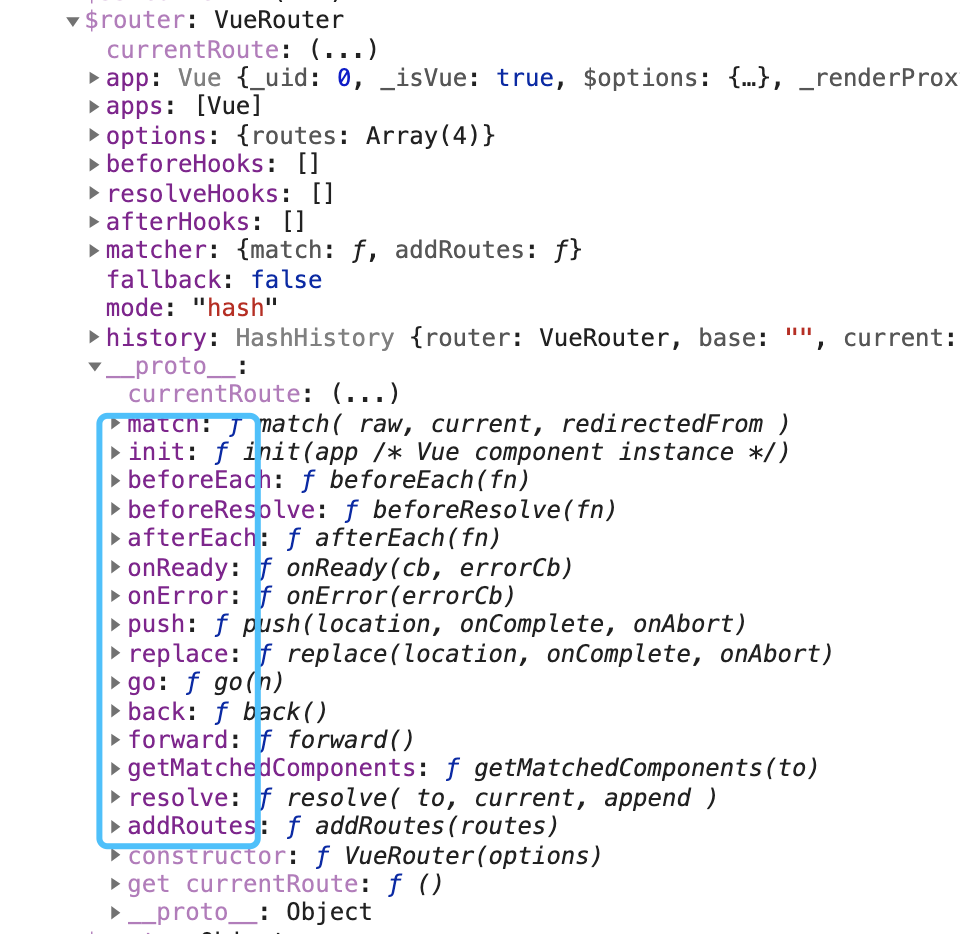
通过看上面代码可以看出 $router $router 区别
$router
$router
  => this._routerRoot._router
  	=> this.$options.router
  		=> new Router() 的实例
				=> {
						history,
						matcher,
						push: fn,
						...
					}
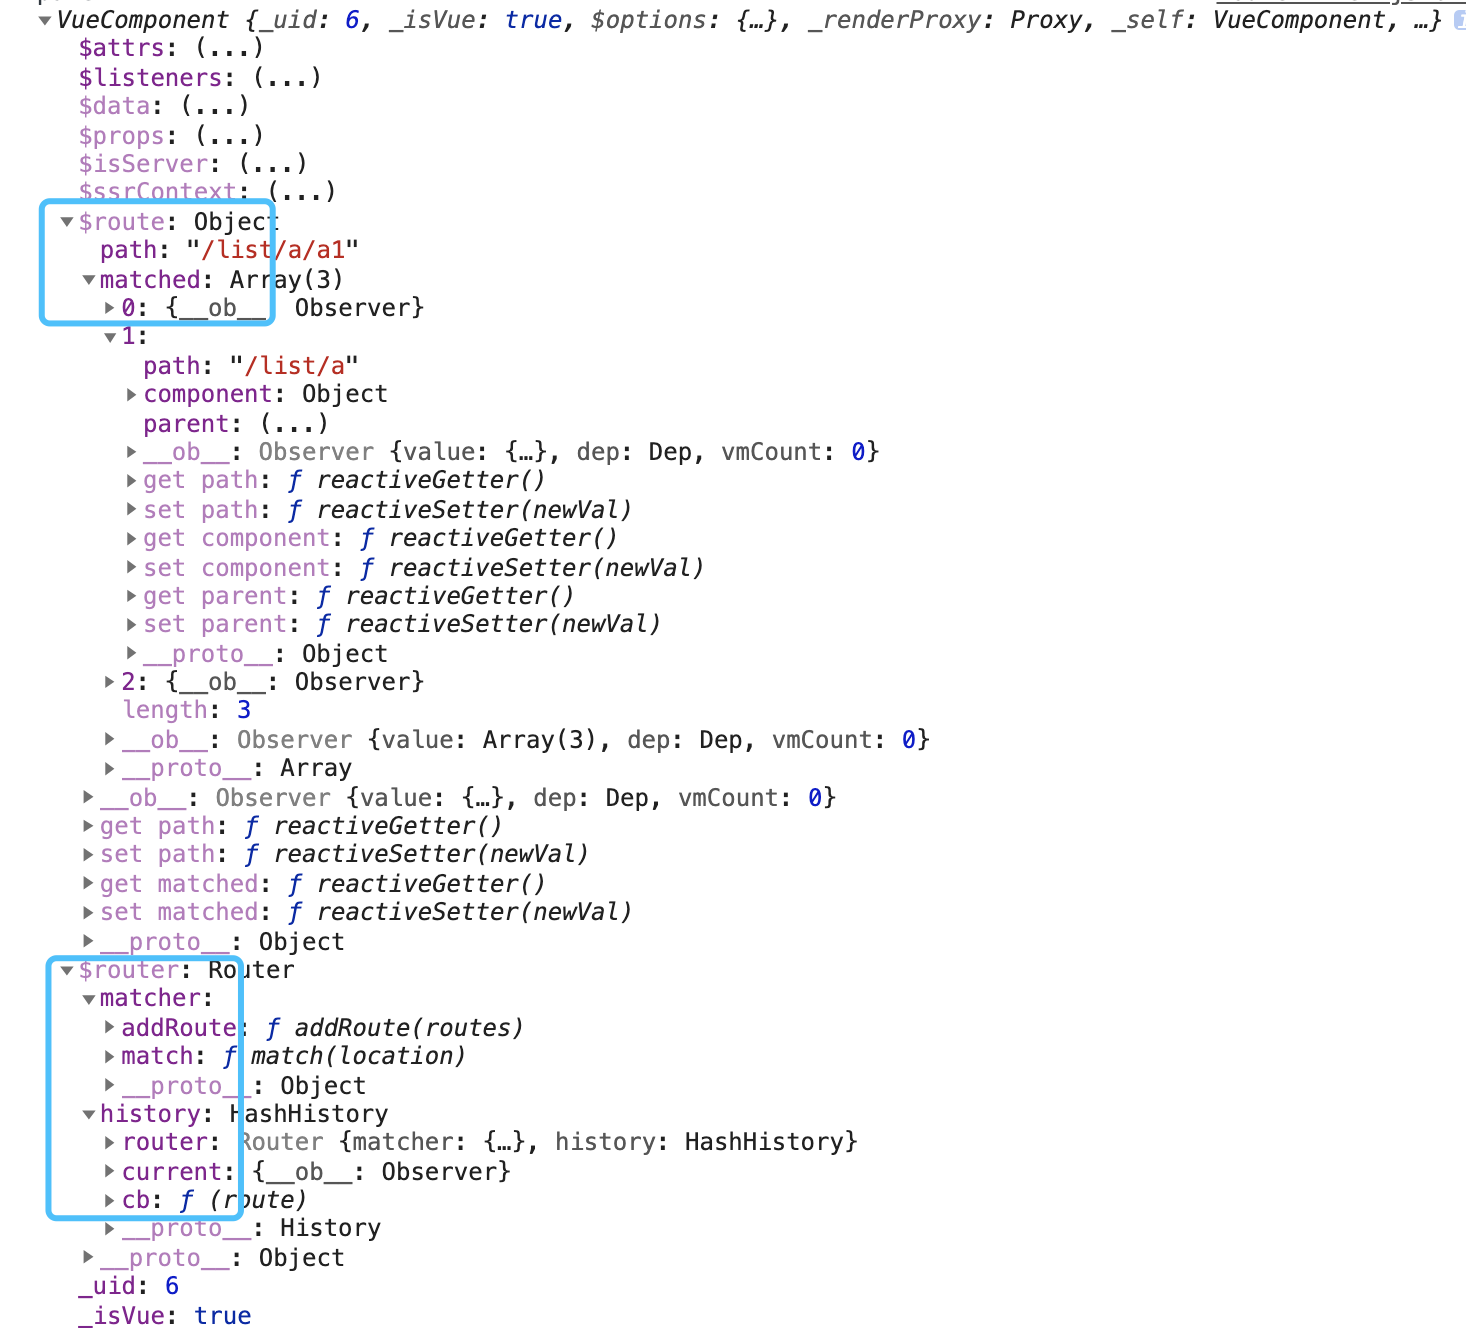
- $route
$route
  => this._routerRoot._route
  	=> this._router.history.current
  		=> new HashHistory().current
				=> {
						path: '/list/a/a1', 就是上面哪个图片
						matched: [ // 当前地址下的所有父亲
						    [],
						    [],
						    [],
						]
					}
如果不够直观看下图片打印的 Vue 实例数据把
路由组件上场
我们知道 Vue 为我们提供了两个组件: router-link, router-view
注册
注册比较简单,全局注册
import RouterLink from './components/router-link'
import RouterView from './components/router-view'

const install = (Vue) => {
  // .... 省略
  Vue.component('RouterLink', RouterLink)
  Vue.component('RouterView', RouterView)
}
export default install
router-link
具体细节可以看源码,核心默认转移称 a 标签
export default {
  props: {
    to: {
      type: String,
      require: true,
    },
    tag: {
      type: String,
      default: 'a'
    }
  },
  methods: {
    handler() {
      this.$router.push(this.to)
    }
  },
  render (h) {
    return <a onClick ={this.handler}>{this.$slots.default}</a>
  }
}
router-view
源码 传送门。最主要的一步,就是把路由下面的 component 渲染到页面上,前面我们做了处理路由数据格式的操作,就是为了在这个组件获取使用。
export default {
  functional:true,
  render(h,{parent,data}){
      let route = parent.$route // 每个组件都有 $route 属性,里面有 matched path;
      let depth = 0; // 假设我们渲染的是 /list/a/a1
      while(parent){ // 当执行到 router-view 组件,循环找父,目的知道我们在第几层。/list/a/a1 从 0 开始,就是低二层。
          if(parent.$vnode && parent.$vnode.data.routerView =='ok'){
              depth++;
          }
          parent = parent.$parent;
      }
      data.routerView = 'ok';
      let record = route.matched[depth]; // 匹配到 第二层,找matched 第二个数据
      if(!record){
          return h();
      }
      return h(record.component,data) 返回路由的 component
  }
}
路由钩子函数
路由权鉴的时候,经常用 beforeEach ,路由的钩子函数怎么实现呢
用法列举
调用 next 渲染页面
router.beforeEach((from,to,next)=>{
  new Promise(()=>{}).finally(()=>{
    next();
  })
})
class Router  {
  constructor () {
  	this.beforeEachs = [];
  }
  beforeEach(cb){
    this.beforeEachs.push(cb);// 发布订阅用起来
  }
}
beforeEach 核心进行抽离。
// queue : beforeEachs 队列
// callBack: 到头了,更新路由 把
function runQueue(queue,iterator,callback){
    function step(index){
        if(index === queue.length) return callback() // 到头了,执行回调
        let hook = queue[index]; // 去除当前 beforeEachs 方法
        iterator(hook,()=>step(index+1)); // 让 hook 执行,next 操作交给用户
    }
    step(0)
}

class History {
  transitionTo(location,callback){
      let r = this.router.match(location) ; // /about
      let queue = this.router.beforeEachs; // 获取路由实例所有的 beforeEachs

    	const iterator = (hook,next) =>{
          hook(this.current,r,next) // 客户需要参数 上一次路由,下一次路由,next 下一步
      }
      runQueue(queue,iterator,()=>{
				 this.current = r; // 在更新路由
         this.cb && this.cb(r); // 通知 Vue._route
      })
  }
}
最后
上面实践代码在这里,我们来看下真正 vue-router 中 route 有哪些东西吧。
- $router
- $route
总结
通过上面一波分析查看,你还分不清 route 么,每次 push 的时候还会,两个都试一试么,这次一下记住了吧。还是当我们在看源码的时候,要有一个主线和思想,先贯通起来,在看细节。我们需要找到哪些是核心,哪些是为了提供健壮性,核心理解透彻,再对自己关注的感兴趣的点细致查看。
