Component是 Directive的子类:它是一个装饰器,用于把某个类标记为
Angular 组件,并为它配置一些元数据,以决定该组件在运行期间该如何处理、实例化和使用。
| 选项 |
|---|
moduleId :包含该组件的那个模块的 ID。该组件必须能解析模板和样式表中使用的相对 URL。 SystemJS 在每个模块中都导出了 __moduleName 变量。在 CommonJS 中,它可以设置为 module.id。 |
template :Angular 组件的内联模板 templateUrl :Angular 组件模板文件的 URL。两者二选一即可。 |
styleUrls :一个或多个 URL,指向包含本组件 CSS 样式表的文件。 |
styles :本组件用到的一个或多个内联 CSS 样式。 |
animations :一个或多个动画 trigger()调用,包含一些 state()和 transition()定义。 参见动画和相关的 API 文档。 |
interpolation :改写默认的插值表达式起止分界符({{ 和 }}) |
entryComponents :这个NgModule中也有,在Component中用的应该不多 |
preserveWhitespaces :为 true 则保留,为 false 则从编译后的模板中移除可能多余的空白字符。 空白字符就是指那些能在 JavaScript 正则表达式中匹配 \s 的字符。默认为 false |
changeDetection:用于当前组件的变更检测策略。该策略是下列值之一:
-
ChangeDetectionStrategy.OnPush把策略设置为CheckOnce(按需)。 ChangeDetectionStrategy.Default把策略设置为CheckAlways。
encapsulation :供模板和 CSS 样式使用的样式封装策略。取值为:
ViewEncapsulation.Native:使用Shadow DOM。它只在原生支持Shadow DOM的平台上才能工作。ViewEncapsulation.Emulated:使用垫片(shimmed)CSS来模拟原生行为。ViewEncapsulation.None:Use global CSS without any encapsulation.ViewEncapsulation.None:使用全局CSS,不做任何封装。 如果没有提供,该值就会从CompilerOptions中获取它。默认的编译器选项是ViewEncapsulation.Emulated`
viewProviders :定义一组可注入对象,它们在视图的各个子节点中可用。参见例子。重点看下这里:
template: `<needs-greeter></needs-greeter>`
class Greeter {
   greet(name:string) {
     return 'Hello ' + name + '!';
   }
}

@Directive({
  selector: 'needs-greeter'
})
class NeedsGreeter {
  greeter:Greeter;

  constructor(greeter:Greeter) {
    this.greeter = greeter;
  }
}

@Component({
  selector: 'greet',
  viewProviders: [
    Greeter
  ],
  template: `<needs-greeter></needs-greeter>`
})
class HelloWorld {
}
继承自 Directive 装饰器
| 选项 |
|---|
selector :这个 CSS选择器用于在模板中标记出该指令,并触发该指令的实例化。 |
inputs :列举某个指令的一组可供数据绑定的输入属性; outputs :列举一组可供事件绑定的输出属性。(这俩属性一般不用了,用对应的装饰器替代) |
providers :一组依赖注入令牌,它允许 DI 系统为这个指令或组件提供依赖。这个在NgModule一节已有较详细介绍 |
exportAs :定义一个名字,用于在模板中把该指令赋值给一个变量。 |
queries :已有对应的属性装饰器,后面具体介绍 |
host :使用一组键-值对,把类的属性映射到宿主元素的绑定(Property、Attribute 和事件)。也已有对应的属性装饰器,后面具体介绍 |
jit :如果为 true,则该指令/组件将会被 AOT 编译器忽略,始终使用 JIT 编译。 |
几种元数据(属性装饰器)详解
A. 组件的输入 inputs & @Input
angular允许使用两种形式来定义组件的输入,一种是在装饰器@Component中使用inputs来定义,另一种是使用@Input来定义。
首先先介绍在装饰器中使用的输入。inputs接收的是一个字符串数组,用来指定我们输入的键名。
@Component({
    selector: 'my-component',
    inputs: ['name']
})
class MyComponent {
    name: string;
}
name就会对应我们组件中的name变量。
然后我们定义一个组件,当然不可避免有的时候会在其他的组件的模板中使用,所以就可以这样写。
上级组件:
export class AppComponent {
    myName = 'zhangsan';
    ...
}
上级组件的模板:
<app-messages [name]="myName"></app-messages>
方括号
[]:数据绑定,也叫输入绑定。将等号右边的变量绑定在左边[]中的变量上。
我们的组件:
@Component({
    selector: 'app-messages',
    inputs: ['name'],
    templateUrl: './messages.component.html',
    styleUrls: ['./messages.component.css']
})

export class MessagesComponent implements OnInit {
    name: string;
}
这里我们就用name接受了上级组件的myName。

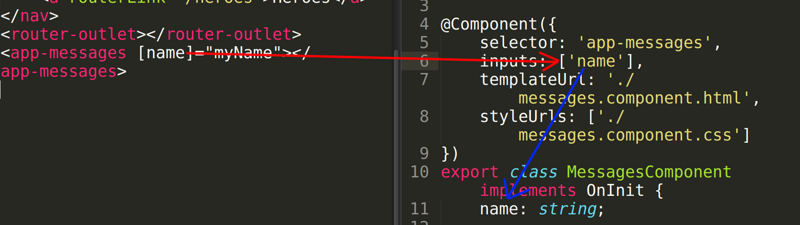
通过上面的图,就很容易看输入数据的对应关系。
然后我们打印一下看看变量是否成功输入了。
export class MessagesComponent implements OnInit {
    name: string;
    ngOnInit() {
      console.log(this.name);
    }
}
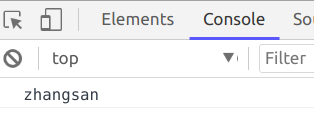
成功输入!
@Input:上面我们实现了组件的数据输入,但是angular并没有满足现状,还提供另外一种输入的方法,就是@Input。
@Component({
    selector: 'my-component'
})

class MyComponent {
    @Input() name: string;
}
只要在我们的组件中定义变量的时候使用@Input装饰器就行了。对比上面我们使用inputs时,少了一个二次声明。这种方法感觉数据的传递少了一层关系,更加易于理解,而且代码也更加的工整。
B. 组件输出outputs & @Output
说完了组件的输入,下面我们就该聊聊组件的输出了。要将数据从组件中传递出去,就要使用输出绑定。
<button (click)="display()"></button>
圆括号(): 事件绑定,又叫输出绑定。这里我们监听click事件,然后触发display方法。
除了click,angular还有很多内置的事件,当然,我们在编写自己的组件的时候,也可以自定义一个事件,来与外部通信。
自定义事件,需要做三件事情:
- 1.在
@Component配置中,制定outputs配置项 - 2.在配置的属性中,设置一个
EventEmitter(事件触发器) - 3.在适当的时候,也就是要触发的方法中,通过
EventEmitter触发事件
下面看一下示例:
@Component({
    selector: 'my-component',
    outputs: ['newEvent']
})

export class MyComponent {
    newEvent: EventEmitter<string>;
    constructor() {
        this.newEvent = new EventEmitter();
    }
    display(): void {
        this.newEvent.emit("test event");
    }
}
然后我们就可以通过上面模板中的代码实现输出了。
如果想在一个父级的组件中使用这个输出,就要使用我们自己的事件了。下面看一个示例:
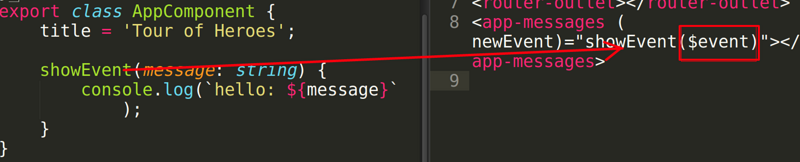
父级组件:
export class AppComponent {
    ...
    showEvent(message: string) {
        console.log(hello: ${message});
    }
}
父级模板:
<app-messages (newEvent)="showEvent($event)">
</app-messages>
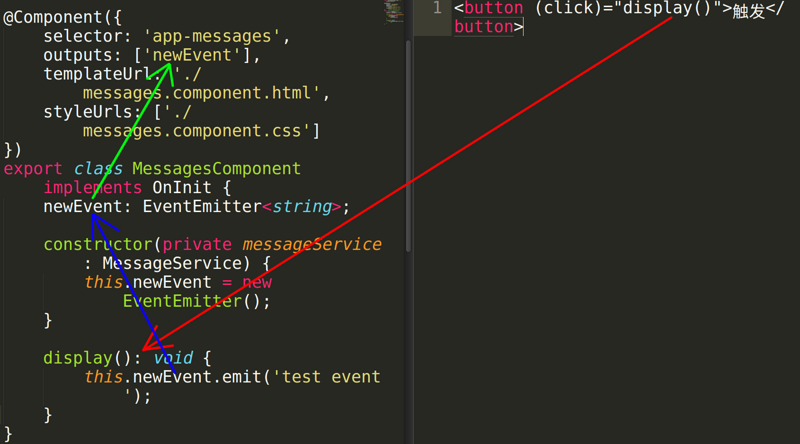
我们的组件:
@Component({
    selector: 'app-messages',
    outputs: ['newEvent'],
    templateUrl: './messages.component.html'
})
export class MessagesComponent {
    newEvent: EventEmitter<string>;
    constructor(private messageService: MessageService) {
        this.newEvent = new EventEmitter();
    }
    display(): void {
        this.newEvent.emit('test event');
    }
}
我们的组件模板:
<button (click)="display()">触发</button>
然后点击触发,可以看到输出hello:test event。数据输出成功!
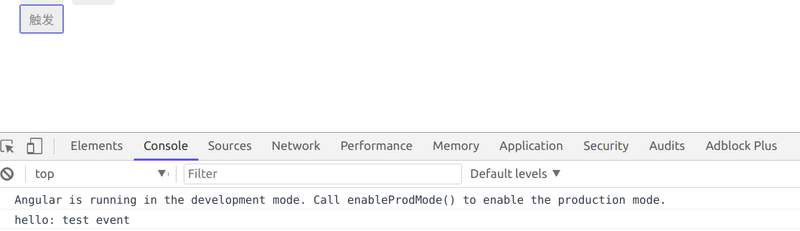
好了我们再来梳理整个输出过程:
1.我们自定以一个组件,通过内置的click事件触发display方法,这时就会触发我们自定义的事件:newEvent。
2.当事件触发的时候,他会执行上一级的方法:showEvent。
3.我们的事件输出了一个字符串test event,然后通过$event获取这个输出结果,并当做参数传给上一级的方法showEvent
@Output:同输入相同,angular也为我们提供了输出的第二种方式:@Output。用法与@input类似
export class MessagesComponent {
    @Output() newEvent: EventEmitter<string>;
}
C. host
@HostBinding()和@HostListener()在自定义指令时非常有用。@HostBinding()可以为指令的宿主元素添加类、样式、属性等,而@HostListener()可以监听宿主元素上的事件。
@Component({
  selector: 'demo-component',
  host: {
    '(click)': 'onClick($event.target)', // 事件
    'role': 'nav', // 属性
    '[class.pressed]': 'isPressed', // 类
  }
})
export class DemoComponent {
  isPressed: boolean = true;

  onClick(elem: HTMLElement) {
    console.log(elem);
  }
}
等价于@HostBinding、@HostListener:
@Component({
  selector: 'demo-component'
})
export class DemoComponent {
  @HostBinding('attr.role') role = 'nav';
  @HostBinding('class.pressed') isPressed: boolean = true;

  @HostListener('click', ['$event.target'])
  onClick(elem: HTMLElement) {
    console.log(elem);
  }
}
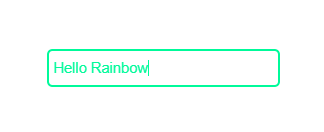
举例说明:实现一个在输入时实时改变字体和边框颜色
import { Directive, HostBinding, HostListener } from '@angular/core';
@Directive({
    selector:'[appRainbow]'
})

export class RainbowDirective{
possibleColors = [
  'darksalmon', 'hotpink', 'lightskyblue', 'goldenrod',
  'peachpuff', 'mediumspringgreen', 'cornflowerblue',
  'blanchedalmond', 'lightslategrey'
];
@HostBinding('style.color') color: string;
@HostBinding('style.borderColor') borderColor: string;
@HostListener('keydown') onKeydown() {
    const colorPick =
       Math.floor(Math.random()*this.possibleColors.length);
    this.color = this.borderColor
               = this.possibleColors[colorPick];
}}
说一下上面代码的主要部分:
- ① 为我们的指令取名为
appRainbow - ② 定义我们需要展示的所有可能的颜色
- ③ 定义并用
@HostBinding()装饰color和borderColor,用于设置样式 - ④ 用
@HostListener()监听宿主元素的keydown事件,为color和borderColor随机分配颜色
在页面上使用这个指令:
<input appRainbow>
效果如下:
D. queries :类似于Vue中的slot相关的知识点
ContentChild
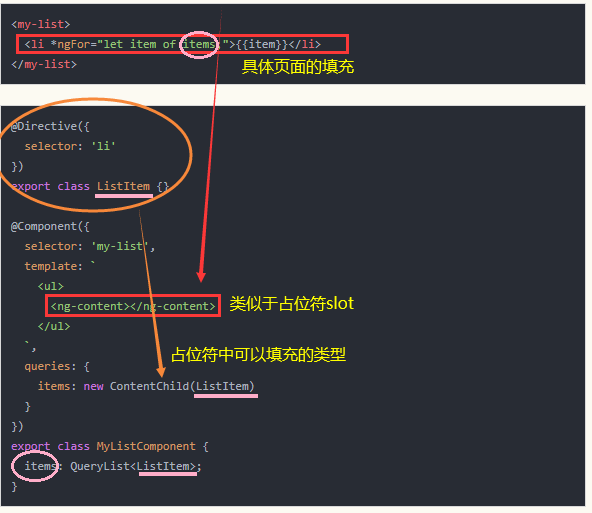
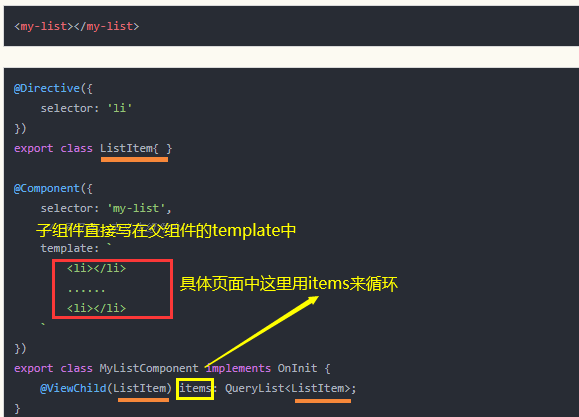
等价于@ContentChild:
@Directive({
    selector: 'li'
})
export class ListItem{ }

@Component({
  selector: 'my-list',
  template: `
    <ul>
      <ng-content></ng-content>
    </ul>
  `
})
export class MyListComponent {
  @ContentChild(ListItem) items: QueryList<ListItem>;
}
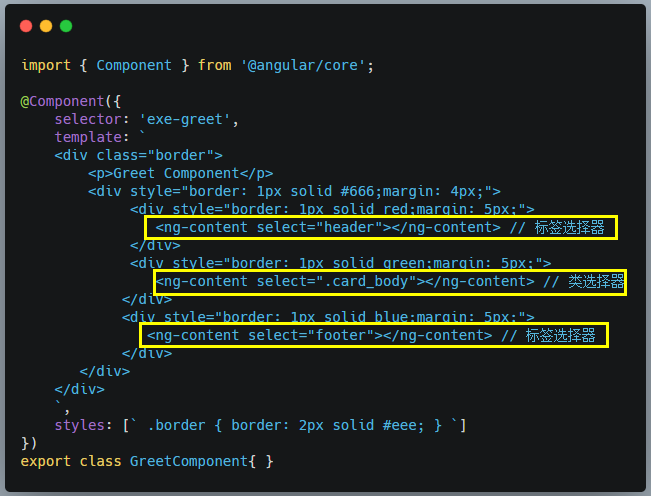
占位符ng-content支持select属性,即类似vue中的slot的name属性,可以占多个位置。
ContentChildren:通过 Content Projection 方式设置的视图中获取匹配的多个元素,返回的结果是一个 QueryList 集合。
parent.component.ts
import {
  Component, ContentChildren, QueryList, AfterContentInit
} from '@angular/core';
import { ChildComponent } from './child.component';

@Component({
    selector: 'exe-parent',
    template: `
      <p>Parent Component</p>
      <ng-content></ng-content>
    `
})
export class ParentComponent implements AfterContentInit {

    @ContentChildren(ChildComponent)
    childCmps: QueryList<ChildComponent>;

    ngAfterContentInit() {
        console.dir(this.childCmps);
    }
}
app.component.ts
import { Component } from '@angular/core';
@Component({
  selector: 'my-app',
  template: `
    <h4>Welcome to Angular World</h4>
    <exe-parent>
      <exe-child></exe-child>
      <exe-child></exe-child>
    </exe-parent>
  `,
})
export class AppComponent { }
ViewChild和ContentChild的区别是啥呢?ContentChild是通过占位标签<ng-content>来将子组件嵌入父组件;而ViewChild是直接写在父组件的template中(viewChildren就不多加说明喽!)
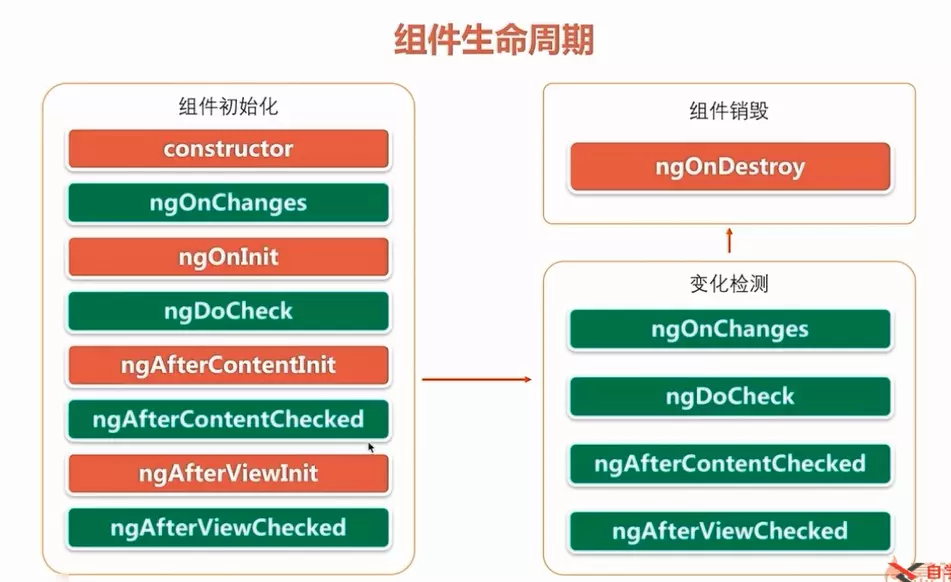
生命周期钩子
点击上述链接,查看原文...
生命周期的顺序如下图:红色部分钩子angular只会触发一次,而绿色钩子会触发多次。(我不懂:一般情况下,如果要实现check钩子,代码一定要非常简洁&轻量级,不然,分分钟内存泄露。)
import {
Component, OnInit, Input, DoCheck, AfterContentInit, OnChanges,
AfterContentChecked, AfterViewInit, AfterViewChecked, OnDestroy
} from '@angular/core';
import { SimpleChanges } from '@angular/core/src/metadata/lifecycle_hooks';
let nextId: number = 1;
@Component({
selector: 'app-test-demo',
templateUrl: './test-demo.component.html',
styleUrls: ['./test-demo.component.css']
})
export class TestDemoComponent implements
OnChanges, OnInit, DoCheck,
AfterContentInit, AfterContentChecked, AfterViewInit,
AfterViewChecked, OnDestroy {
@Input()
public stock: string = "";
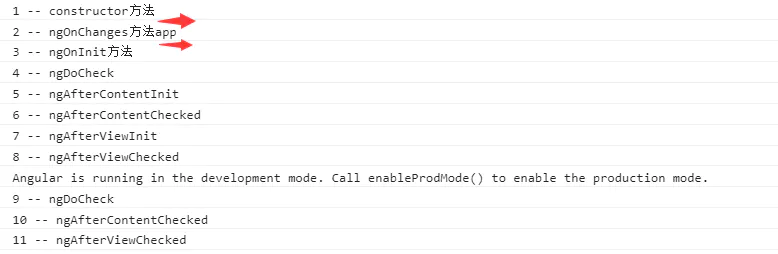
logIt(msg: string) {
console.log(`${nextId++} ${msg}`);
}
constructor() {
this.logIt('-- constructor方法' + this.stock);
}
/**当被绑定的输入属性的值发生变化时调用,
首次调用一定会发生在ngOnInit()之前。*/
ngOnChanges(changes: SimpleChanges) {
let currentVal = changes['stock'].currentValue;
this.logIt('-- ngOnChanges方法' + this.stock);
}
/**当Angular完成组件的创建和引入时,将调用此回调。
它也会在Angular显示数据绑定属性时初始化*/
ngOnInit() {
this.logIt('-- ngOnInit方法');
}
//需要检查组件或指令的输入属性时
ngDoCheck() {
this.logIt('-- ngDoCheck');
}
//当把内容投影进组件之后调用
ngAfterContentInit() {
this.logIt('-- ngAfterContentInit');
}
//每次完成被投影组件内容的变更检测之后调用
ngAfterContentChecked() {
this.logIt('-- ngAfterContentChecked');
}
//初始化完组件视图及其子视图之后调用
ngAfterViewInit() {
this.logIt('-- ngAfterViewInit');
}
//每次做完组件视图和子视图的变更检测之后调用
ngAfterViewChecked() {
this.logIt('-- ngAfterViewChecked');
}
/**当Angular每次销毁指令/组件之前调用并清扫。
一般切换路由的时候,就会调用该组件的ngOnDestroy接口*/
ngOnDestroy() {
this.logIt('-- ngOnDestroy');
}
}
//调用:
<app-test-demo [stock]="title" ></app-test-demo>
运行效果: