

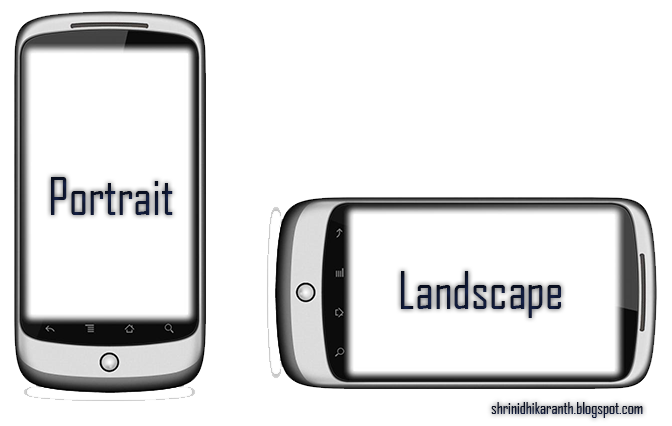
如何监测移动设备方向改变?
手机根据拿在手里的方向不同,分两种模式:portrait 和 landscape。
本文作者在制作一款手机游戏时,研究了现有的一些监测手机方向改变的 API,方案包括:
- 对屏幕方向改变能做出响应的
- CSS 媒体查询
@media (orientation: portrait) { ... }@media (orientation: landscape) { ... }
orientationchange事件window.addEventListener("orientationchange", callback)window.orientation等于90或-90时,表示处于 landscape 模式;否则处于 portrait 模式
- JS matchMedia API:
window.matchMedia("(orientation:landscape)") - Device Orientation API
- CSS 媒体查询
- 能够控制屏幕方向改变的
- Screen Orientation API
- Web Application Manifest
作者认为 Screen Orientation API 是最好用的。
下面是它的使用案例:
screen.orientation.addEventListener('change', function() {
	console.log('new orientation is ', screen.orientation.type)
})
这里 type 的可能取值包括:
portrait-primaryportrait-secondary(upside down)portrait(either straight or upside down)landscape-primary(device is sideways, with the bottom of device on the right)landscape-secondary(sideways with the bottom of device on the left)landscape(bottom of device either left or right)natural(device manufacturer's considered default orientation)any(unlocks orientation, allowing both portrait and landscape)
使用这个 API 的一个好处是:可以锁住(lock)网页不自动改变方向。
var onGameStart = function() {
  document.documentElement.requestFullscreen();
  screen.orientation.lock('portrait').then(null, error => document.exitFullscreen())
}
退出游戏时,unlock 一下就行了。
document.exitFullscreen()
screen.orientation.unlock()
但是这个接口的支持程度不太好。我写了一个 demo:codepen.io/zhangbao/pe…,在我的安卓手机上测试,发现只支持 portrait-primary、landscape-primary、landscape-secondary 这三个值。
我觉得还是使用 orientationchange 事件比较靠谱一点:
window.addEventListener("orientationchange", function() {
	if (window.orientation == 90 || window.orientation == -90) {
		// landscape mode
	} else {
		// portrait mode
	}
})
单侧阴影的实现过程
内部上阴影
- 内部上面有高 6px 的实心阴影
/* 插页(阴影向内) | x偏移量 | y偏移量 | 阴影模糊半径 | 阴影扩散半径 | 阴影颜色 */
.box { box-shadow: inset 0 6px 0 0 #ddd; }
- 添加 6px 模糊效果
.box { box-shadow: inset 0 6px 6px 0 #ddd; }

- 扩散半径反向(往上)收 6px——两边的模糊阴影被雪藏,顶部因为有 6px 实心阴影,往回收 6px 后,就剩下后面设置的 6px 模糊阴影了。
.box { box-shadow: inset 0 6px 6px -6px #ddd; }

外部上阴影
- 外部上面有高 6px 的实心阴影
.box { box-shadow: 0 -6px 0 0 #ddd; }

- 添加 6px 模糊效果
.box { box-shadow: 0 -6px 6px 0 #ddd; }
- 扩散半径反向(往下)收 6px——两边的模糊阴影被雪藏,顶部因为有 6px 实心阴影,往回收 6px 后,就剩下后面设置的 6px 模糊阴影了。
.box { box-shadow: 0 -6px 6px -6px #ddd; }
外部右阴影
- 外部右面有宽 6px 的实心阴影
.box { box-shadow: 6px 0 0 0 #ddd;}
- 添加 6px 模糊效果
.box { box-shadow: 6px 0 6px 0 #ddd; }
- 扩散半径反向(往左)收 6px——上下两边的模糊阴影被雪藏,右面因为有 6px 实心阴影,往回收 6px 后,就剩下后面设置的 6px 模糊阴影了。
.box { box-shadow: 6px 0 6px -6x #ddd; }
演示地址
await-to-js
Go 语言的错误处理方式非常干净。
data, err := db.Query("SELECT ...")
if err != nil { return err }
作者借鉴这种形式,引入了一个工具函数 to,为 Promise 引入了一种新的错误处理方式。
// to.js
export default function to(promise) {
   return promise.then(data => [null, data]).catch(err => [err])
}
// 之前
try {
	const user = await UserModel.findById(1)
  // ...
} catch(err) {
  throw new CustomerError('No user found')
}

// 之后
const [err, user] = await to(UserModel.findById(1))
if(!user) throw new CustomerError('No user found')
// ...
一句话技巧
- 失焦当前文档中的聚焦对象:
document.activeElement && document.activeElement.blur() - 🔗 在 Vue 的
<keep-alive>中切换组件时,会触发对应的生命周期函数:activated和deactivated。
(正文完)
广告时间(长期有效)
我有一位好朋友开了一间猫舍,在此帮她宣传一下。现在猫舍里养的都是布偶猫。如果你也是个爱猫人士并且有需要的话,不妨扫一扫她的【闲鱼】二维码。不买也不要紧,看看也行。

(完)
