

我们知道在我们进行项目开发的时候,我们一般都会将项目环境分为开发环境、测试环境、开发环境,甚至还会有预发布环境。不同的环境项目的配置会有差别,比如在数据库上,我们肯定不希望测试的时候是通过正式库进行的测试,因为那样会存在一定的风险。那么怎么样才能在不同的环境下方便的切换环境,且尽量少的改动代码呢?
@Profile组件在就在其中起到了很大的作用,它主要可以根据当前的环境,动态的切换和激活一系列组件的功能,如果加了该组件则只能在某种环境下才会注册到容器当中用于注入,否则未指定时,在任何情况下都会注册到容器当中用于注入。
就以数据库配置来举栗 ,看看@Profile注解的使用方法吧:
@Configuration
@PropertySource("classpath:/datasource.properties")
public class ProfileConfig implements EmbeddedValueResolverAware {

    @Value("${datasource.username}")
    private String username;

    private StringValueResolver resolver;

    private String driverClass;

    @Profile("test")
    @Bean("devDataSource")
    public DataSource devDataSource(@Value("${datasource.password}") String password) throws PropertyVetoException {
        ComboPooledDataSource dataSource = new ComboPooledDataSource();
        dataSource.setUser(username);
        dataSource.setPassword(password);
        dataSource.setJdbcUrl("jdbc:mysql://localhost:3306/test");
        dataSource.setDriverClass(driverClass);
        return dataSource;
    }

    @Profile("prod")
    @Bean("prodDataSource")
    public DataSource prodDataSource(@Value("${datasource.password}") String password) throws PropertyVetoException {
        ComboPooledDataSource dataSource = new ComboPooledDataSource();
        dataSource.setUser(username);
        dataSource.setPassword(password);
        dataSource.setJdbcUrl("jdbc:mysql://localhost:3306/sys");
        dataSource.setDriverClass(driverClass);
        return dataSource;
    }

    @Bean("dataSource")
    public DataSource dataSource() throws PropertyVetoException {
        ComboPooledDataSource dataSource = new ComboPooledDataSource();
        dataSource.setUser("root");
        dataSource.setPassword("123456");
        dataSource.setJdbcUrl("jdbc:mysql://localhost:3306/sys");
        dataSource.setDriverClass("com.mysql.jdbc.Driver");
        return dataSource;
    }

    public void setEmbeddedValueResolver(StringValueResolver resolver) {
        this.resolver = resolver;
        driverClass = resolver.resolveStringValue("${datasource.driver}");
    }
}这里主要有测试环境test、和生成环境prod两个环境作为实例,他们的区别主要在于url有所不同。用户名、密码和数据库驱动的获取方式结合@PropertySource和@Value进行获取,这里值得一提的是驱动的获取方式是通过setEmbeddedValueResolver解析出配置文件当中的值来获取的。两个环境的配置的datasource上分别添加了标注了环境类别的Profile注解。此时进行测试
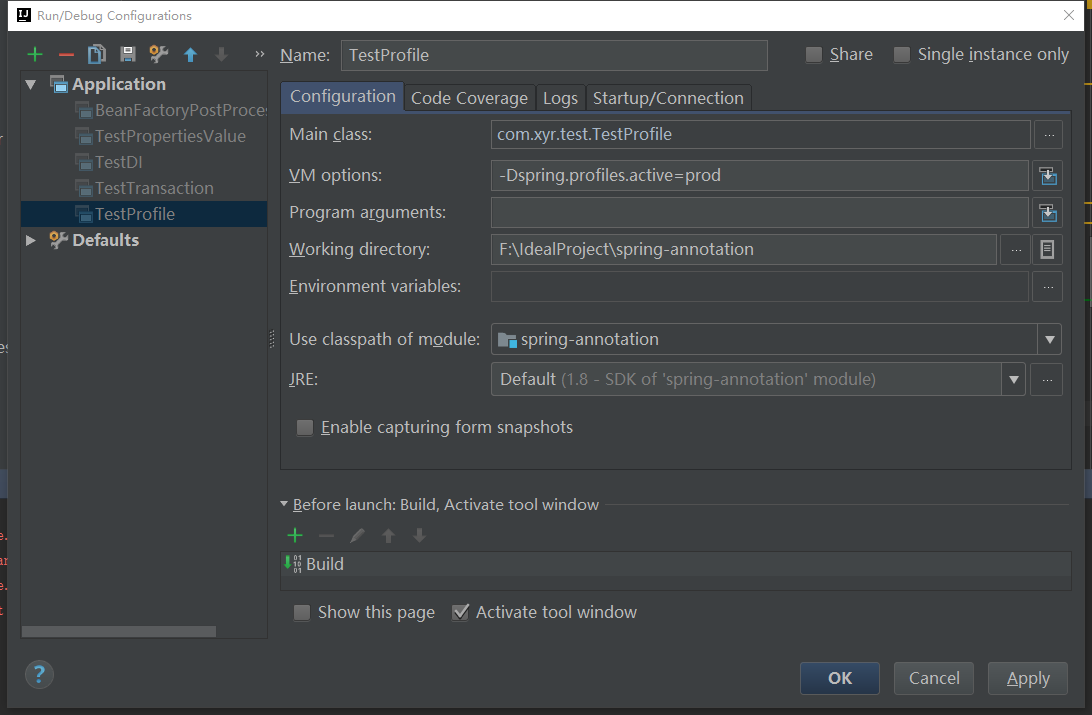
首先配置环境,我们可以在idea启动的配置当中添加配置,如下:
当前也可以直接代码设置配置环境,比如下面在测试中获取上下午来设置:
public class TestProfile {

    /**
     * 配置环境的方式:
     *  1.通过在虚拟机配置上加上命令参数 -Dspring.profiles.active=test
     *  2.通过无参构造器生成上下文,设置环境
     *      AnnotationConfigApplicationContext applicationContext = new AnnotationConfigApplicationContext();
     *      applicationContext.getEnvironment().setActiveProfiles("prod");
     *      applicationContext.register(ProfileConfig.class);
     *      applicationContext.refresh();
     * @param args
     */
    public static void main(String[] args) {

        //通过无参构造器生成上下文,设置环境
        AnnotationConfigApplicationContext applicationContext = new AnnotationConfigApplicationContext();
        applicationContext.getEnvironment().setActiveProfiles("prod");
        applicationContext.register(ProfileConfig.class);
        applicationContext.refresh();

        String[] datasourceNames = applicationContext.getBeanNamesForType(DataSource.class);
        for (String name : datasourceNames) {
            System.out.println(name);
        }
    }

}
执行这段内容,输出如下内容:
prodDataSource
dataSource
即此时容器当中只注册了一个prod环境的dataSource以及未配置@Profile环境的dataSource。
当然@Profile注解不仅可以加在bean上,也可以加在配置类上:
@Profile("test")
@Configuration
@PropertySource("classpath:/datasource.properties")
public class ProfileConfig implements EmbeddedValueResolverAware {

    @Value("${datasource.username}")
    private String username;

    private StringValueResolver resolver;

    private String driverClass;

    @Profile("test")
    @Bean("devDataSource")
    public DataSource devDataSource(@Value("${datasource.password}") String password) throws PropertyVetoException {
        ComboPooledDataSource dataSource = new ComboPooledDataSource();
        dataSource.setUser(username);
        dataSource.setPassword(password);
        dataSource.setJdbcUrl("jdbc:mysql://localhost:3306/test");
        dataSource.setDriverClass(driverClass);
        return dataSource;
    }

    @Profile("prod")
    @Bean("prodDataSource")
    public DataSource prodDataSource(@Value("${datasource.password}") String password) throws PropertyVetoException {
        ComboPooledDataSource dataSource = new ComboPooledDataSource();
        dataSource.setUser(username);
        dataSource.setPassword(password);
        dataSource.setJdbcUrl("jdbc:mysql://localhost:3306/sys");
        dataSource.setDriverClass(driverClass);
        return dataSource;
    }

    @Bean("dataSource")
    public DataSource dataSource() throws PropertyVetoException {
        ComboPooledDataSource dataSource = new ComboPooledDataSource();
        dataSource.setUser("root");
        dataSource.setPassword("123456");
        dataSource.setJdbcUrl("jdbc:mysql://localhost:3306/sys");
        dataSource.setDriverClass("com.mysql.jdbc.Driver");
        return dataSource;
    }

    public void setEmbeddedValueResolver(StringValueResolver resolver) {
        this.resolver = resolver;
        driverClass = resolver.resolveStringValue("${datasource.driver}");
    }
}
这个时候在执行上面的main方法,输出:
就会发现配置类当中的bean都没输出。
而当改成test环境时,就会有内容输出:
devDataSource
dataSource
小结
- @Profile注解可以根据当前的环境,动态的切换和激活一系列组件
- 加了该组件则只能在某种环境下才会注册到容器当中用于注入,否则未指定时,在任何情况下都会注册到容器当中用于注入。
- 该注解可以用于bean上以及配置类上,加在bean上能在某种环境下才会注册到容器当中用于注入,加在配置类上只能在某种环境下才会配置生效。写在配置类上的权重大于写在bean上。
