

1.AutoLayout的原理,性能如何
- iOS 6 系统时就引入了 Auto Layout,其布局算法是Cassowary。Cassowary 开发了一种规则系统,通过约束来描述视图间的关系。约束就是规则,这个规则能够表示出一个视图相对于另一个视图的位置。由于 Cassowary 算法让视图位置可以按照一种简单的布局思路来写,这些简单的相对位置描述可以在运行时动态地计算出视图具体的位置。这一整套布局引擎系统叫作 Layout Engine ,是 Auto Layout 的核心,主导着整个界面布局。每个视图在得到自己的布局之前,Layout Engine 会将视图、约束、优先级、固定大小通过计算转换成最终的大小和位置。在 Layout Engine 里,每当约束发生变化,就会触发 Deffered Layout Pass,完成后进入监听约束变化的状态。当再次监听到约束变化,即进入下一轮循环中。
- iOS 12 上用到了 Cassowary 算法的界面更新策略,使得 Auto Layout 的性能得到了大幅提升。
2.UIView & CALayer的区别
- 每个 UIView 内部都有一个 CALayer 在背后提供内容的绘制和显示,并且 UIView 的尺寸样式都由内部的 Layer 所提供。两者都有树状层级结构,layer 内部有 SubLayers,View 内部有 SubViews.但是 Layer 比 View 多了个AnchorPoint
- 在 View显示的时候,UIView 做为 Layer 的 CALayerDelegate,View 的显示内容由内部的 CALayer 的 display
- CALayer 是默认修改属性支持隐式动画的,在给 UIView 的 Layer 做动画的时候,View 作为 Layer 的代理,Layer 通过 actionForLayer:forKey:向 View请求相应的 action(动画行为)
- layer 内部维护着三分 layer tree,分别是 presentLayer Tree(动画树),modeLayer Tree(模型树), Render Tree (渲染树),在做 iOS动画的时候,我们修改动画的属性,在动画的其实是 Layer 的 presentLayer的属性值,而最终展示在界面上的其实是提供 View的modelLayer
- 两者最明显的区别是 View可以接受并处理事件,而 Layer 不可以
3.事件响应链
- UIResponder是所有可以响应事件的类的基类(从名字应该就可以看出来了),其中包括最常见的UIView和UIViewController甚至是UIApplication,所以我们的UIView和UIViewController都是作为响应事件的载体。
- 每个view都有自己的superView,包括controller的topmost view(controller的self.view)。当一个view被add到superView上的时候,他的nextResponder属性就会被指向它的superView,当controller被初始化的时候,self.view(topmost view)的nextResponder会被指向所在的controller,而controller的nextResponder会被指向self.view的superView,这样,整个app就通过nextResponder串成了一条链,也就是我们所说的响应链。
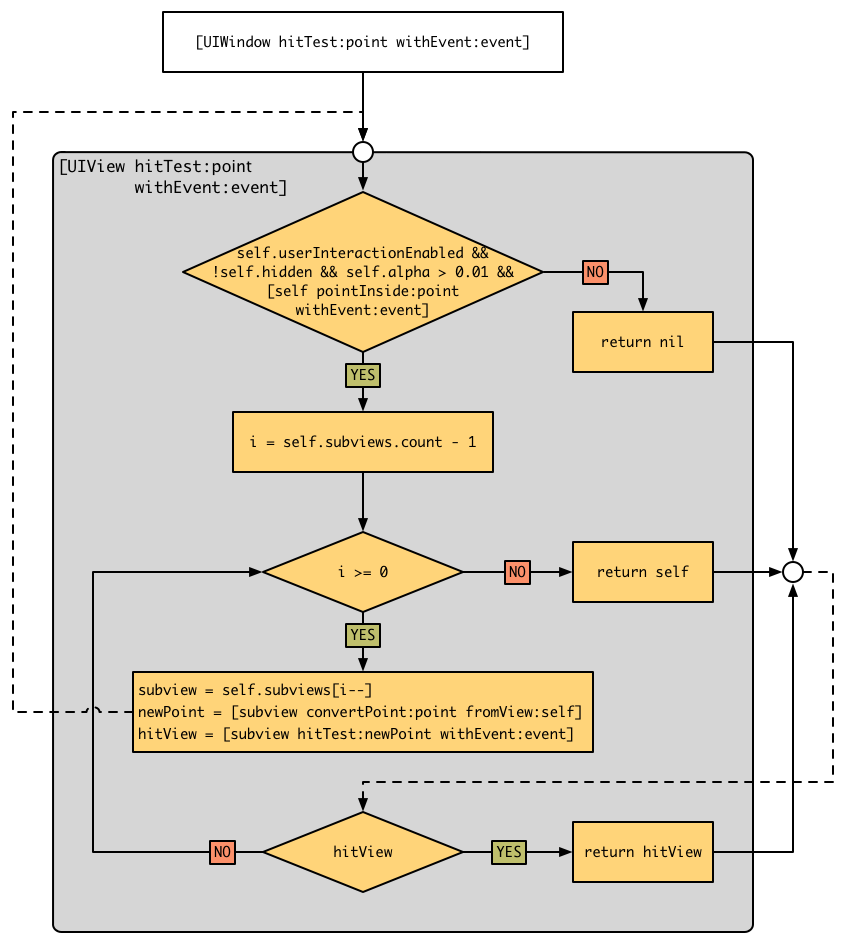
- 每当手指接触屏幕,UIApplication接收到手指的事件之后,就会去调用UIWindow的hitTest:withEvent:,看看当前点击的点是不是在window内,如果是则继续依次调用subView的hitTest:withEvent:方法,直到找到最后需要的view。
- 递归是向界面的根节点UIWindow发送hitTest:withEvent:消息开始的,从这个消息返回的是一个UIView,也就是手指当前位置最前面的那个 hittest view。 当向UIWindow发送hitTest:withEvent:消息时,hitTest:withEvent:里面所做的事,就是判断当前的点击位置是否在window里面,如果在则遍历window的subview然后依次对subview发送hitTest:withEvent:消息(注意这里给subview发送消息是根据当前subview的index顺序,index越大就越先被访问)。如果当前的point没有在view上面,那么这个view的subview也就不会被遍历了。
4.drawrect & layoutsubviews调用时机
layoutSubviews:
- init初始化不会触发layoutSubviews
- addSubview会触发layoutSubviews
- 设置view的Frame会触发layoutSubviews,当然前提是frame的值设置前后发生了变化
- 滚动一个UIScrollView会触发layoutSubviews
- 旋转Screen会触发父UIView上的layoutSubviews事件
- 改变一个UIView大小的时候也会触发父UIView上的layoutSubviews事件
- 直接调用setLayoutSubviews
drawrect:
- 如果在UIView初始化时没有设置rect大小,将直接导致drawRect不被自动调用。 drawRect 掉用是在Controller->loadView, Controller->viewDidLoad 两方法之后掉用的.所以不用担心在 控制器中,这些View的drawRect就开始画了.这样可以在控制器中设置一些值给View(如果这些View draw的时候需要用到某些变量 值).
- 该方法在调用sizeT o Fit后被调用,所以可以先调用sizeToFit计算出size。然后系统自动调用drawRect:方法
- 通过设置contentMode属性值为UIViewContentModeRedraw。那么将在每次设置或更改frame的时候自动调用drawRect:
- 直接调用setNeedsDisplay,或者setNeedsDisplayInRect:触发drawRect:,但是有个前提条件是rect不能为0
drawRect方法使用注意点:
- 若使用UIView绘图,只能在drawRect:方法中获取相应的contextRef并绘图。如果在其他方法中获取将获取到一个invalidate 的ref并且不能用于画图。drawRect:方法不能手动显示调用,必须通过调用setNeedsDisplay 或 者 setNeedsDisplayInRect,让系统自动调该方法
- 若使用calayer绘图,只能在drawInContext: 中(类似鱼drawRect)绘制,或者在delegate中的相应方法绘制。同样也是调用setNeedDisplay等间接调用以上方法
- 若要实时画图,不能使用gestureRecognizer,只能使用touchbegan等方法来掉用setNeedsDisplay实时刷新屏幕
5.UI的刷新原理
6.隐式动画 & 显示动画区别
- 显式动画是指用户自己通过beginAnimations:context:和commitAnimations创建的动画。 隐式动画是指通过UIView的animateWithDuration:animations:方法创建的动画
- 隐式动画是系统框架自动完成的。Core Animation在每个runloop周期中自动开始一次新的事务,即使你不显式的用[CATransaction begin]开始一次事务,任何在一次runloop循环中属性的改变都会被集中起来,然后做一次0.25秒的动画。在iOS4中,苹果对UIView添加了一种基于block的动画方法:+animateWithDuration:animations:。这样写对做一堆的属性动画在语法上会更加简单,但实质上它们都是在做同样的事情。CATransaction的+begin和+commit方法在+animateWithDuration:animations:内部自动调用,这样block中所有属性的改变都会被事务所包含
- 显式动画,Core Animation提供的显式动画类型,既可以直接对退曾属性做动画,也可以覆盖默认的图层行为。我们经常使用的CABasicAnimation,CAKeyframeAnimation,CATransitionAnimation,CAAnimationGroup等都是显式动画类型,这些CAAnimation类型可以直接提交到CALayer上
7.什么是离屏渲染
GPU渲染机制:
- CPU 计算好显示内容提交到 GPU,GPU 渲染完成后将渲染结果放入帧缓冲区,随后视频控制器会按照 VSync 信号逐行读取帧缓冲区的数据,经过可能的数模转换传递给显示器显示
GPU屏幕渲染有以下两种方式:
- On-Screen Rendering意为当前屏幕渲染,指的是GPU的渲染操作是在当前用于显示的屏幕缓冲区中进行
- Off-Screen Rendering意为离屏渲染,指的是GPU在当前屏幕缓冲区以外新开辟一个缓冲区进行渲染操作
8.imageName & imageWithContentsOfFile区别
- imageNamed默认加载图片成功后会内存中缓存图片,这个方法用一个指定的名字在系统缓存中查找并返回一个图片对象.如果缓存中没有找到相应的图片对象,则从指定地方加载图片然后缓存对象,并返回这个图片对象
9.多个相同的图片,会重复加载吗
10.图片是什么时候解码的,如何优化
- 给imageView.image赋值时候,才会发生图片解码,如果不执行这代码,发现没产生什么卡顿,证明imageNamed等的图片加载方法耗时不多,主要的耗时操作是在解码阶段
- 对图片解码的性能优化,可以考虑把图片解码操作放到子线程执行。然后再把解码后的图片赋值给imageView.image,如果发现图片已经是解码过的,就不会再发生解码操作,就可以达到优化效果
11.图片渲染怎么优化
图片的加载过程:
1.假设我们使用 +imageWithContentsOfFile:方法从磁盘中加载一张图片,这个时候的图片并没有解压缩;
2.然后将生成的 UIImage赋值给 UIImageView;
3.接着一个隐式的 CATransaction捕获到了 UIImageView图层树的变化;
4.在主线程的下一个 runloop到来时,Core Animation提交了这个隐式的 transaction,这个过程可能会对图片进行 copy操作,而受图片是否字节对齐等因素的影响,这个 copy操作可能会涉及以下部分或全部步骤:
- 分配内存缓冲区用于管理文件 IO 和解压缩操作;
- 将文件数据从磁盘读到内存中;
- 将压缩的图片数据解码成未压缩的位图形式,这是一个非常耗时的 CPU 操作;
- 最后 Core Animation中CALayer使用未压缩的位图数据渲染 UIImageView的图层。
- CPU计算好图片的Frame,对图片解压之后.就会交给GPU来做图片渲染
5.渲染流程
- GPU获取获取图片的坐标
- 将坐标交给顶点着色器(顶点计算)
- 将图片光栅化(获取图片对应屏幕上的像素点)
- 片元着色器计算(计算每个像素点的最终显示的颜色值)
- 从帧缓存区中渲染到屏幕上 我们提到了图片的解压缩是一个非常耗时的 CPU 操作,并且它默认是在主线程中执行的。那么当需要加载的图片比较多时,就会对我们应用的响应性造成严重的影响,尤其是在快速滑动的列表上,这个问题会表现得更加突出。
- SD两大机制:异步和缓存
- (nullable UIImage *)sd_decompressedAndScaledDownImageWithImage:(nullable UIImage *)image {
    if (![[self class] shouldDecodeImage:image]) {
        return image;
    }

    if (![[self class] shouldScaleDownImage:image]) {
        return [self sd_decompressedImageWithImage:image];
    }

    CGContextRef destContext;

    // autorelease the bitmap context and all vars to help system to free memory when there are memory warning.
    // on iOS7, do not forget to call [[SDImageCache sharedImageCache] clearMemory];
    @autoreleasepool {
        CGImageRef sourceImageRef = image.CGImage;

        CGSize sourceResolution = CGSizeZero;
        sourceResolution.width = CGImageGetWidth(sourceImageRef);
        sourceResolution.height = CGImageGetHeight(sourceImageRef);
        float sourceTotalPixels = sourceResolution.width * sourceResolution.height;
        // Determine the scale ratio to apply to the input image
        // that results in an output image of the defined size.
        // see kDestImageSizeMB, and how it relates to destTotalPixels.
        float imageScale = kDestTotalPixels / sourceTotalPixels;
        CGSize destResolution = CGSizeZero;
        destResolution.width = (int)(sourceResolution.width*imageScale);
        destResolution.height = (int)(sourceResolution.height*imageScale);

        // current color space
        CGColorSpaceRef colorspaceRef = [[self class] colorSpaceForImageRef:sourceImageRef];

        // kCGImageAlphaNone is not supported in CGBitmapContextCreate.
        // Since the original image here has no alpha info, use kCGImageAlphaNoneSkipLast
        // to create bitmap graphics contexts without alpha info.
        destContext = CGBitmapContextCreate(NULL,
                                            destResolution.width,
                                            destResolution.height,
                                            kBitsPerComponent,
                                            0,
                                            colorspaceRef,
                                            kCGBitmapByteOrderDefault|kCGImageAlphaNoneSkipLast);

        if (destContext == NULL) {
            return image;
        }
        CGContextSetInterpolationQuality(destContext, kCGInterpolationHigh);

        // Now define the size of the rectangle to be used for the
        // incremental blits from the input image to the output image.
        // we use a source tile width equal to the width of the source
        // image due to the way that iOS retrieves image data from disk.
        // iOS must decode an image from disk in full width 'bands', even
        // if current graphics context is clipped to a subrect within that
        // band. Therefore we fully utilize all of the pixel data that results
        // from a decoding opertion by achnoring our tile size to the full
        // width of the input image.
        CGRect sourceTile = CGRectZero;
        sourceTile.size.width = sourceResolution.width;
        // The source tile height is dynamic. Since we specified the size
        // of the source tile in MB, see how many rows of pixels high it
        // can be given the input image width.
        sourceTile.size.height = (int)(kTileTotalPixels / sourceTile.size.width );
        sourceTile.origin.x = 0.0f;
        // The output tile is the same proportions as the input tile, but
        // scaled to image scale.
        CGRect destTile;
        destTile.size.width = destResolution.width;
        destTile.size.height = sourceTile.size.height * imageScale;
        destTile.origin.x = 0.0f;
        // The source seem overlap is proportionate to the destination seem overlap.
        // this is the amount of pixels to overlap each tile as we assemble the ouput image.
        float sourceSeemOverlap = (int)((kDestSeemOverlap/destResolution.height)*sourceResolution.height);
        CGImageRef sourceTileImageRef;
        // calculate the number of read/write operations required to assemble the
        // output image.
        int iterations = (int)( sourceResolution.height / sourceTile.size.height );
        // If tile height doesn't divide the image height evenly, add another iteration
        // to account for the remaining pixels.
        int remainder = (int)sourceResolution.height % (int)sourceTile.size.height;
        if(remainder) {
            iterations++;
        }
        // Add seem overlaps to the tiles, but save the original tile height for y coordinate calculations.
        float sourceTileHeightMinusOverlap = sourceTile.size.height;
        sourceTile.size.height += sourceSeemOverlap;
        destTile.size.height += kDestSeemOverlap;
        for( int y = 0; y < iterations; ++y ) {
            @autoreleasepool {
                sourceTile.origin.y = y * sourceTileHeightMinusOverlap + sourceSeemOverlap;
                destTile.origin.y = destResolution.height - (( y + 1 ) * sourceTileHeightMinusOverlap * imageScale + kDestSeemOverlap);
                sourceTileImageRef = CGImageCreateWithImageInRect( sourceImageRef, sourceTile );
                if( y == iterations - 1 && remainder ) {
                    float dify = destTile.size.height;
                    destTile.size.height = CGImageGetHeight( sourceTileImageRef ) * imageScale;
                    dify -= destTile.size.height;
                    destTile.origin.y += dify;
                }
                CGContextDrawImage( destContext, destTile, sourceTileImageRef );
                CGImageRelease( sourceTileImageRef );
            }
        }

        CGImageRef destImageRef = CGBitmapContextCreateImage(destContext);
        CGContextRelease(destContext);
        if (destImageRef == NULL) {
            return image;
        }
        UIImage *destImage = [[UIImage alloc] initWithCGImage:destImageRef scale:image.scale orientation:image.imageOrientation];
        CGImageRelease(destImageRef);
        if (destImage == nil) {
            return image;
        }
        return destImage;
    }
}
大致流程:
- 创建上下文CGContextRef
- 拿到CGImageRef及对应的参数
- 调用解码函数CGBitmapContextCreate
- 通过 CGBitmapContextCreateImage拿到解码后的CGContextRef
