

今天内容包括:高可用入口七层负载,高可用集中式NFS存储rsync+inotify实时同步。 优化会在架构所有部署完成后,再开篇幅讲解。 所有内容均不包括优化,优化会在后面整个架构完毕后,再开篇幅。关于错字能忍受就忍忍吧。 部署半小时,写文档一整天,关键是手冷发抖。
局部架构图
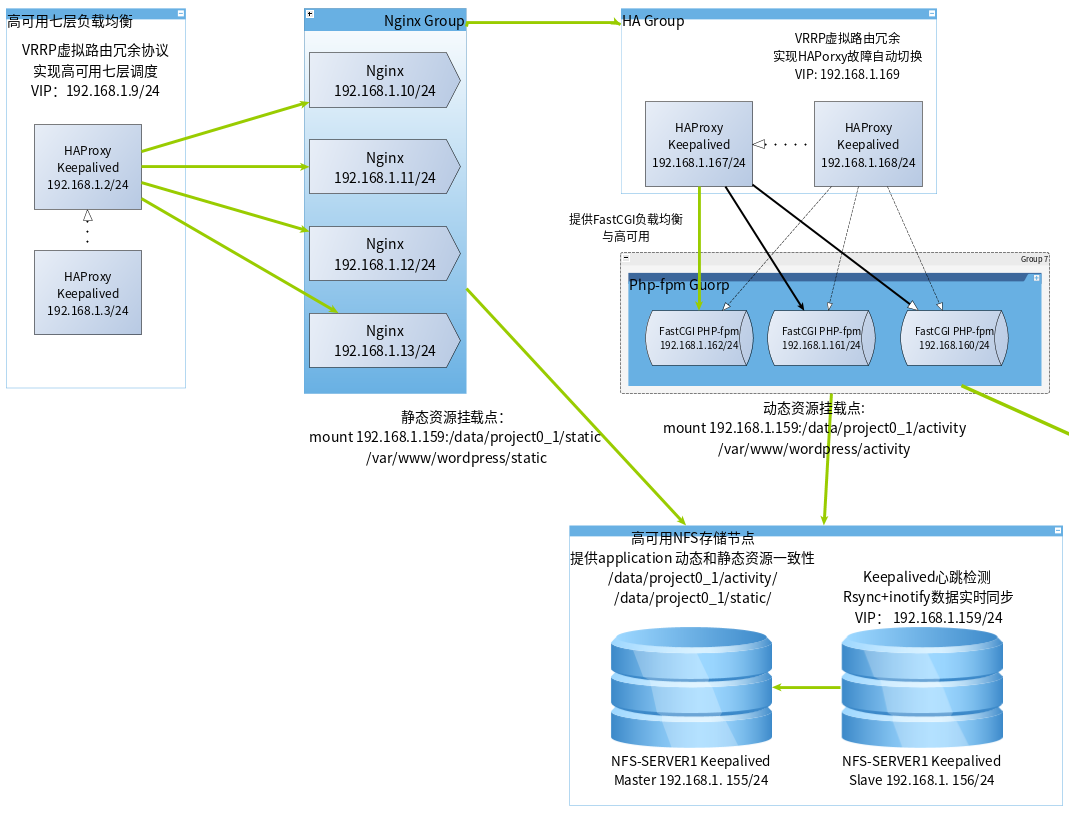
资源详情
| 主机名 | IP规划 | 用途 | 备注 |
|---|---|---|---|
| 0_access_ha_01 | 192.168.1.2/24 | 入口调度高可用 | VIP:192.168.1.9/24 |
| 0_access_ha_02 | 192.168.1.3/24 | ||
| 0_nfs-server1 | 192.168.1.155/24 | 高可用集中式存储nfs rsync+inotify | VIP:192.168.1.159 |
| 0_nfs-server2 | 192.168.1.156/24 | 实时同步nfs-server1 |
高可用集中式存储NFS
- 安装软件rpcbind(req)、nfs-utils
[root@nfs-server2 ~]# yum install -y rpcbind nfs-utils
[root@nfs-server1 ~]# systemctl enable rpcbind nfs-server
# 内核开启IPV6,默认是禁用的,如果不开启的话RPC服务肯定会失败,因为在socket文件里面监听了IPV6地址。
[root@nfs-server1 ~]# echo 'net.ipv6.conf.all.disable_ipv6 = 0' >> /etc/sysctl.conf
[root@nfs-server1 ~]# echo 'net.ipv6.conf.default.disable_ipv6 = 0' >> /etc/sysctl.conf
[root@nfs-server1 ~]# sysctl -p
[root@nfs-server1 ~]# systemctl start nfs-server rpcbind
# 检查rpc服务器
[root@nfs-server1 ~]# rpcinfo -p
   program vers proto   port  service
    100000    4   tcp    111  portmapper
    100000    3   tcp    111  portmapper
    100000    2   tcp    111  portmapper
    100000    4   udp    111  portmapper
    100000    3   udp    111  portmapper
    100000    2   udp    111  portmapper
# 创建共享目录,并设置权限
[root@nfs-server1 ~]# mkdir -p /data/project0_1/activity/
[root@nfs-server1 ~]# mkdir /data/project0_1/static
[root@nfs-server1 ~]# chmod o+rw /data/project0_1/activity/ /data/project0_1/static
# 共享配置文件编辑
[root@nfs-server1 ~]# echo '/data/project0_1/static/ 192.168.1.0/24(rw,sync)' >> /etc/exports
[root@nfs-server1 ~]# echo '/data/project0_1/activity/ 192.168.1.0/24(rw,sync)' >> /etc/exports
# 重新载入共享配置文件
[root@nfs-server1 ~]# exportfs -r
# 检查共享是否成功
[root@nfs-server1 ~]# showmount -e 192.168.1.155
Export list for 192.168.1.155:
/data/project0_1/activity 192.168.1.0/24
/data/project0_1/static   192.168.1.0/24
# 另外一台重复以上操作
# 高可用keepalived配置
[root@nfs-server1 ~]# yum install -y keepalived
# 设置开机启动
[root@nfs-server1 ~]# systemctl enable keepalived.service
- master keepalived 配置文件
! Configuration File for keepalived

global_defs {
   notification_email {
     acassen@firewall.loc
     failover@firewall.loc
     sysadmin@firewall.loc
   }
   notification_email_from Alexandre.Cassen@firewall.loc
   smtp_server 192.168.200.1
   smtp_connect_timeout 30
   router_id LVS_DEVEL
   vrrp_skip_check_adv_addr
   vrrp_garp_interval 0
   vrrp_gna_interval 0
}

vrrp_instance VI_1 {
    state MASTER
    interface eth0
    virtual_router_id 51
    priority 100
    advert_int 1
    authentication {
        auth_type PASS
        auth_pass 1111
    }
    virtual_ipaddress {
        192.168.1.159
    }
}
- backuo配置文件
! Configuration File for keepalived

global_defs {
   notification_email {
     acassen@firewall.loc
     failover@firewall.loc
     sysadmin@firewall.loc
   }
   notification_email_from Alexandre.Cassen@firewall.loc
   smtp_server 192.168.200.1
   smtp_connect_timeout 30
   router_id LVS_DEVEL
   vrrp_skip_check_adv_addr
   vrrp_garp_interval 0
   vrrp_gna_interval 0
}

vrrp_instance VI_1 {
    state BACKUP
    interface eth0
    virtual_router_id 51
    priority 99
    advert_int 1
    authentication {
        auth_type PASS
        auth_pass 1111
    }
    virtual_ipaddress {
        192.168.1.159
    }
}
- 配置rsync和inotify实时同步文件
# 编译安装inotify
[root@nfs-server1 inotify-tools-3.13]# yum install -y gcc
[root@nfs-server1 local]# tar -xf inotify-tools-3.13.tar.gz
[root@nfs-server1 inotify-tools-3.13]# cd inotify-tools-3.13/
[root@nfs-server1 inotify-tools-3.13]# ./config
[root@nfs-server1 inotify-tools-3.13]# make && make install
- rsync脚本,创建并放入
/etc/cron.start这个目录也是需要创建的,并对脚本授权执行权限。
#/bin/bash
host=192.168.1.156
dir="/data/project0_1"
resync_cmd="rsync -az --delete $dir root@$host:/data/"
while inotifywait -rqq -e create,delete,modify,move,attrib $dir
do
    $resync_cmd
done &
- 加入开机启动运行脚本
chmod +x /etc/rc.d/rc.local
[root@nfs-server1 data]# echo '/etc/cron.start/rsync.sh' >> /etc/rc.local
# 配置免密码登录
[root@nfs-server1 ~]# ssh-keygen
Generating public/private rsa key pair.
Enter file in which to save the key (/root/.ssh/id_rsa):
Enter passphrase (empty for no passphrase):
Enter same passphrase again:
Your identification has been saved in /root/.ssh/id_rsa.
Your public key has been saved in /root/.ssh/id_rsa.pub.
The key fingerprint is:
SHA256:82T4okz1VTh3uDm68cg0n2DMvTNGm/9qL5ko/RWAv1s root@nfs-server1
The key's randomart image is:
+---[RSA 2048]----+
|                 |
|            .. . |
|           .o.+ .|
|         .  .+.+ |
|        S o ..+. |
|       . B + oo..|
|      . . +.X+.E.|
|     o . ..+oO&+ |
|      o    .+=BB=|
+----[SHA256]-----+
[root@nfs-server1 ~]# ssh-copy-id root@192.168.1.156
/usr/bin/ssh-copy-id: INFO: Source of key(s) to be installed: "/root/.ssh/id_rsa.pub"
/usr/bin/ssh-copy-id: INFO: attempting to log in with the new key(s), to filter out any that are already installed
/usr/bin/ssh-copy-id: INFO: 1 key(s) remain to be installed -- if you are prompted now it is to install the new keys
root@192.168.1.156's password:

Number of key(s) added: 1

Now try logging into the machine, with:   "ssh 'root@192.168.1.156'"
and check to make sure that only the key(s) you wanted were added.
关于这个集中式存储的问题在于,当nfs-server1 出现故障后,集群中挂载的是vip所以自动切换到nfs-server2上面去使用,如果nfs-server1上面的keepalived自启动了,那么当它恢复的时候VIP会自动恢复到主节点上来,这样的话会导致发生数据改变时会删除掉nfs-server2上面的数据,所以将nfs-server1上的keepalived自启动取消了。
高可用七层调度
[root@access_ha_01 ~]# yum install -y haproxy keepalived
[root@access_ha_01 ~]# systemctl enable haproxy keepalived
- haproxy配置文件
[root@access_ha_01 ~]# egrep -v '^.*#|^$' /etc/haproxy/haproxy.cfg
global
    log         127.0.0.1 local2
    chroot      /var/lib/haproxy
    pidfile     /var/run/haproxy.pid
    maxconn     4000
    user        haproxy
    group       haproxy
    daemon
    stats socket /var/lib/haproxy/stats
defaults
    mode                    http
    log                     global
    option                  httplog
    option                  dontlognull
    option http-server-close
    option forwardfor       except 127.0.0.0/8
    option                  redispatch
    retries                 3
    timeout http-request    10s
    timeout queue           1m
    timeout connect         10s
    timeout client          1m
    timeout server          1m
    timeout http-keep-alive 10s
    timeout check           10s
    maxconn                 3000
listen proxy_status 0.0.0.0:80
    mode http
    cookie SERVERID rewrite
    balance  leastconn
    server  nginx1 192.168.1.10 check inter 5s
    server  nginx1 192.168.1.11 check inter 5s
    server  nginx1 192.168.1.12 check inter 5s
    server  nginx1 192.168.1.13 check inter 5s
- keepalived 配置我就不贴上来了,和前面差不多就是把IP改了。
- 把昨天做的nginx 和 php-fpm 和高可用打开,进行贯穿测试。
lqh@lqh:~$ virsh list
lqh@lqh:~$ virsh list
 Id    Name                           State
----------------------------------------------------
 1     0_access_ha_01                 running
 2     0_nginx_01                     running
 3     0_nginx_02                     running
 4     0_nginx_03                     running
 5     0_nginx_04                     running
 6     0_php-fpm_01                   running
 7     0_php-fpm_02                   running
 8     0_php-fpm_03                   running
 9     0_ha_fpm_02                    running
 10    0_ha_fpm_01                    running
 11    0_access_ha_02                 running
 12    0_nfs-server1                  running
 13    0_nfs-server2                  running
lqh@lqh:~$ for i in {0..100}; do curl 192.168.1.9/test.php ; done
这是PHP的动态测试页面来自机器:192.168.1.11
这是PHP的动态测试页面来自机器:192.168.1.13
这是PHP的动态测试页面来自机器:192.168.1.10
这是PHP的动态测试页面来自机器:192.168.1.12
这是PHP的动态测试页面来自机器:192.168.1.11
这是PHP的动态测试页面来自机器:192.168.1.13
这是PHP的动态测试页面来自机器:192.168.1.10
这是PHP的动态测试页面来自机器:192.168.1.12
这是PHP的动态测试页面来自机器:192.168.1.11
这是PHP的动态测试页面来自机器:192.168.1.13
这是PHP的动态测试页面来自机器:192.168.1.10
这是PHP的动态测试页面来自机器:192.168.1.12
这是PHP的动态测试页面来自机器:192.168.1.11
这是PHP的动态测试页面来自机器:192.168.1.13
这是PHP的动态测试页面来自机器:192.168.1.10
这是PHP的动态测试页面来自机器:192.168.1.12
开始挂载集中式存储。
- 需要把之前的东西都给删了,然后进行挂载,我采用的是使用/etc/rc.d/rc.local进行挂载,为什么不适用fstab挂载呢,
- 因为如果nfs出现问题了,使用rc.local方式挂载不会出现无法开机的情况,但是fstab就会开不了机。
# 删除以前的测试数据
lqh@lqh:~$ for i in {10..13}; do ssh root@192.168.1.$i "rm -rf /var/www/wordpress/static/project.png"; done
lqh@lqh:~$ for i in {160..162}; do ssh root@192.168.1.$i "rm -rf /var/www/wordpress/test.php"; done
# 批量安装nfs-utils
lqh@lqh:~$ for i in 10 11 12 13 160 161 162; do ssh root@192.168.1.$i "yum install -y nfs-utils"; done
# 批量给于/etc/rc.d/rc.local执行权限
lqh@lqh:~$ for i in 10 11 12 13 160 161 162; do ssh root@192.168.1.$i "chmod 775 /etc/rc.d/rc.local"; done
# 写入开机启动文件中
lqh@lqh:~$ for i in {10..13};do ssh root@192.168.1.$i echo 'mount -t nfs -o noexec,nosuid,nodev,noatime 192.168.1.159:/data/project0_1/static /var/www/wordpress/static/ >> /etc/rc.local' ; done
lqh@lqh:~$ for i in 160 161 162 ; do ssh root@192.168.1.$i echo 'mount -t nfs -o noexec,nosuid,nodev,noatime 192.168.1.159:/data/project0_1/activity /var/www/wordpress >> /etc/rc.local';done
# 重启测试
lqh@lqh:~$ for i in 160 161 162 ; do ssh root@192.168.1.$i 'reboot';done
Connection to 192.168.1.160 closed by remote host.
Connection to 192.168.1.161 closed by remote host.
Connection to 192.168.1.162 closed by remote host.
lqh@lqh:~$ for i in 160 161 162 ; do ssh root@192.168.1.$i 'df -h';done
文件系统                                 容量  已用  可用 已用% 挂载点
devtmpfs                                 481M     0  481M    0% /dev
tmpfs                                    492M     0  492M    0% /dev/shm
tmpfs                                    492M  6.6M  486M    2% /run
tmpfs                                    492M     0  492M    0% /sys/fs/cgroup
/dev/vda1                                 10G  2.0G  8.1G   20% /
192.168.1.159:/data/project0_1/activity   10G  1.4G  8.7G   14% /var/www/wordpress
tmpfs                                     99M     0   99M    0% /run/user/0
lqh@lqh:~$ for i in 10 11 12 13 ; do ssh root@192.168.1.$i 'df -h';done
文件系统                               容量  已用  可用 已用% 挂载点
devtmpfs                               481M     0  481M    0% /dev
tmpfs                                  492M     0  492M    0% /dev/shm
tmpfs                                  492M  6.6M  486M    2% /run
tmpfs                                  492M     0  492M    0% /sys/fs/cgroup
/dev/vda1                               10G  1.4G  8.7G   14% /
192.168.1.159:/data/project0_1/static   10G  1.4G  8.7G   14% /var/www/wordpress/static
tmpfs                                   99M     0   99M    0% /run/user/0
文件系统                               容量  已用  可用 已用% 挂载点
devtmpfs                               481M     0  481M    0% /dev
tmpfs                                  492M     0  492M    0% /dev/shm
tmpfs                                  492M  6.6M  486M    2% /run
tmpfs                                  492M     0  492M    0% /sys/fs/cgroup
/dev/vda1                               10G  1.4G  8.7G   14% /
192.168.1.159:/data/project0_1/static   10G  1.4G  8.7G   14% /var/www/wordpress/static
tmpfs
- 在nfs-server上放入文件进行测试。
lqh@lqh:~$ scp '/home/lqh/桌面/2.png' root@192.168.1.155:/data/project0_1/static/
lqh@lqh:/srv/ftp/software/systemctl_file$ scp test.php root@192.168.1.155:/data/project0_1/activity/
lqh@lqh:~$ for i in {1..20}; do curl http://192.168.1.9/test.php;done
这是PHP的动态测试页面来自机器:192.168.1.12
这是PHP的动态测试页面来自机器:192.168.1.13
这是PHP的动态测试页面来自机器:192.168.1.10
这是PHP的动态测试页面来自机器:192.168.1.11
这是PHP的动态测试页面来自机器:192.168.1.12
这是PHP的动态测试页面来自机器:192.168.1.13
这是PHP的动态测试页面来自机器:192.168.1.10
这是PHP的动态测试页面来自机器:192.168.1.11
这是PHP的动态测试页面来自机器:192.168.1.12
这是PHP的动态测试页面来自机器:192.168.1.13
这是PHP的动态测试页面来自机器:192.168.1.10
.............................
出现的大问题,因为我多个keepalived的路由ID身份认证信息一致导致keepalived出现问题!!!
- 修改keepalived路由ID号。
