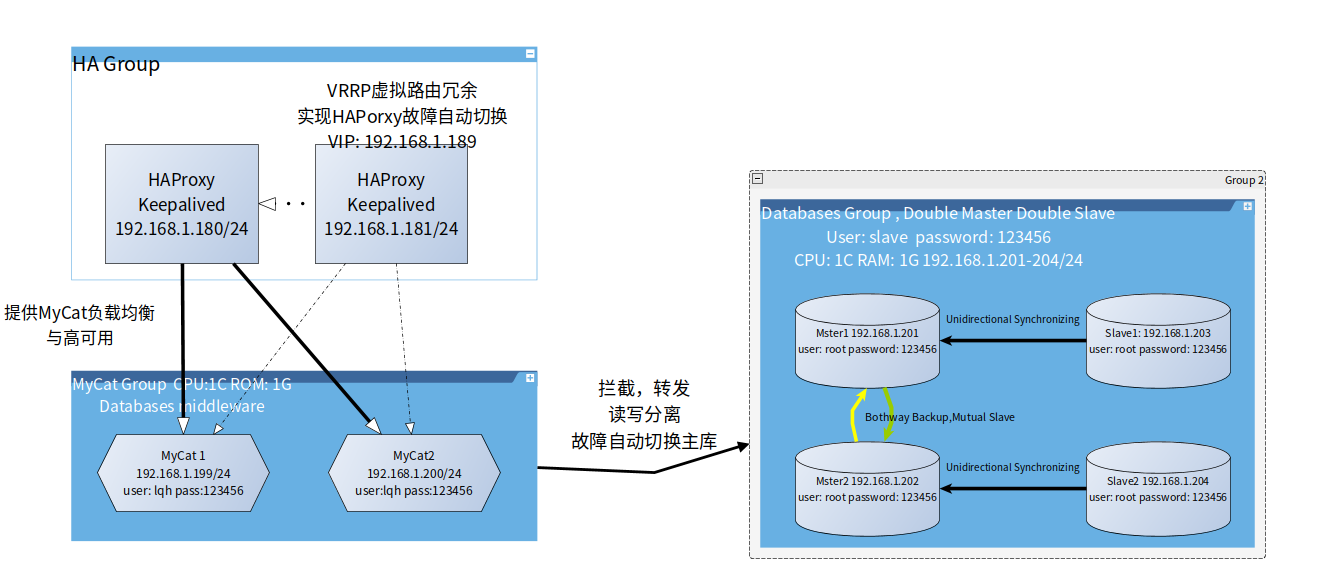
架构图:
项目规划
IP地址规划:本次项目全局不超过254台机器,所以优先选择C类私网地址: 192.168.1.0/24
机型: 采用KVM虚拟化技术,并使用virtIO技术提升虚拟机硬盘性能,由于笔记本内存8G,所以使用KSM技术合并内存页,实现对内存的优化提升使用效果,使用网络桥接技术来实现网络的优化。使用COW2技术深度使用后端盘创建新虚拟机对硬盘节省硬盘容量。
数据库采用双主双从的技术来实现高可靠性,当master1出现故障时,mycat自动切换写主机深度实现数据库的数据一致性保障。
使用MyCat实现数据库的读写分离,来提升使用速度。
使用HAPorxy来实现mycat的负载均衡和故障切换,确保mycat的高可用性。
使用Keepalived来保障HAProxy的高可用性。
由于项目的数据结构不清晰所以并没有分库分表,后面来进行优化和配置。
上面的MyCat1IP写错了是199。
用途
IP规划
配置
备注
主机名
mysql-master1
192.168.1.201
virtual machine 1C,0.8G
mysql5.6.47
0_db01
mysql-master2
192.168.1.202
vm 1C,0.8G
0_db02
mysql-slave1
192.168.1.203
vm 1C,0.8G
0_db03
mysql-slave2
192.168.1.204
vm 1C,0.8G
0_db04
MyCat1
192.168.1.199
vm 1C,0.5G
server-1.6
0_mycat1
MyCat2
192.168.1.200
vm 1C,0.5G
0_mycat2
HA1
192.168.1.180
vm 1C,0.5G
0_ha1
HA2
192.168.1.181
vm 1C,0.5G
0_ha2
mysql环境初始化
本人在后端盘已经对yum仓库,时间同步等初始化已经做好了,所以这里不在涉及初始优化的范围。
此阶段为安装mysql和初始化设置。
lqh@lqh:~$ virsh console 10
Connected to domain 0_db01
Escape character is ^]

CentOS Linux 7 (Core)
Kernel 5.4.2-1.el7.elrepo.x86_64 on an x86_64

localhost login: root
Password:
Last login: Sat Dec  7 22:16:01 on tty1
Virtual host...
[root@localhost ~]# setnet.py 0 192.168.1.201
写入成功,可喜可贺.
[root@localhost ~]# hostnamectl set-hostname 0_db01
[  165.073980] xfs filesystem being remounted at /tmp supports timestamps until 2038 (0x7fffffff)
[  165.076103] xfs filesystem being remounted at /var/tmp supports timestamps until 2038 (0x7fffffff)
[root@localhost ~]# reboot
............................后面几台都是差不多的初始化..................
lqh@lqh:~$ cd /srv/ftp/
centos-1804/ extras/  software/    videos/
lqh@lqh:~$ cd /srv/ftp/software/
lqh@lqh:/srv/ftp/software$ ls
MySQL-5.6.47-1.el7.x86_64.rpm-bundle.tar
lqh@lqh:/srv/ftp/software$ for i in {1..4}; do scp MySQL-5.6.47-1.el7.x86_64.rpm-bundle.tar root@192.168.1.20$i:/usr/local ; done
MySQL-5.6.47-1.el7.x86_64.rpm-bundle.tar      100%  298MB 163.9MB/s   00:01
MySQL-5.6.47-1.el7.x86_64.rpm-bundle.tar      100%  298MB 179.3MB/s   00:01
MySQL-5.6.47-1.el7.x86_64.rpm-bundle.tar      100%  298MB 145.3MB/s   00:02
MySQL-5.6.47-1.el7.x86_64.rpm-bundle.tar      100%  298MB 129.8MB/s   00:02
lqh@lqh:/srv/ftp/software$ for i in {1..4}; do ssh root@192.168.1.20$i "cd /usr/local &&  tar -xf MySQL-5.6.47-1.el7.x86_64.rpm-bundle.tar && yum localinstall -y *.rpm "; done
............此处省略一百万行...........
lqh@lqh:/srv/ftp/software$ ssh root@192.168.1.201
Last login: Sun Feb 16 17:54:16 2020
Virtual host...
[root@0_db01 ~]# sed -i  s#/var/log/mariadb/mariadb.log#/var/log/mysql/mysql.log# /etc/my.cnf
[root@0_db01 ~]# sed -i  s#/var/run/mariadb/mariadb.pid#/var/run/mysql/mysql.pid# /etc/my.cnf
[root@0_db01 ~]# mkdir /var/log/mysql/
[root@0_db01 ~]# mkdir /var/run/mysql
[root@0_db01 ~]# systemctl start mysql
[root@0_db01 ~]# systemctl status mysql
● mysql.service - LSB: start and stop MySQL
   Loaded: loaded (/etc/rc.d/init.d/mysql; bad; vendor preset: disabled)
   Active: active (running) since Sun 2020-02-16 18:56:59 CST; 5s ago
     Docs: man:systemd-sysv-generator(8)
  Process: 11133 ExecStart=/etc/rc.d/init.d/mysql start (code=exited, status=0/SUCCESS)
   CGroup: /system.slice/mysql.service
           ├─11141 /bin/sh /usr/bin/mysqld_safe --datadir=/var/lib/mysql --pid-file=/var/lib/mysql/0_db01.pid
           └─11302 /usr/sbin/mysqld --basedir=/usr --datadir=/var/lib/mysql --plugin-dir=/usr/lib64/mysql/plugin --u...

Feb 16 18:56:58 0_db01 systemd[1]: Starting LSB: start and stop MySQL...
Feb 16 18:56:58 0_db01 mysql[11133]: Starting MySQL.Logging to '/var/log/mysql/mysql.log'.
Feb 16 18:56:59 0_db01 mysql[11133]: SUCCESS!
Feb 16 18:56:59 0_db01 systemd[1]: Started LSB: start and stop MySQL.
[root@0_db01 ~]# cat .mysql_secret
# The random password set for the root user at Sun Feb 16 18:04:08 2020 (local time): vIM84To4Sym6EJlg

[root@0_db01 ~]# mysql_secure_installation


NOTE: RUNNING ALL PARTS OF THIS SCRIPT IS RECOMMENDED FOR ALL MySQL
      SERVERS IN PRODUCTION USE!  PLEASE READ EACH STEP CAREFULLY!

In order to log into MySQL to secure it, we'll need the current
password for the root user.  If you've just installed MySQL, and
you haven't set the root password yet, the password will be blank,
so you should just press enter here.

Enter current password for root (enter for none):
OK, successfully used password, moving on...

Setting the root password ensures that nobody can log into the MySQL
root user without the proper authorisation.

You already have a root password set, so you can safely answer 'n'.

Change the root password? [Y/n]
New password:
Re-enter new password:
Password updated successfully!
Reloading privilege tables..
 ... Success!


By default, a MySQL installation has an anonymous user, allowing anyone
to log into MySQL without having to have a user account created for
them.  This is intended only for testing, and to make the installation
go a bit smoother.  You should remove them before moving into a
production environment.

Remove anonymous users? [Y/n]
 ... Success!

Normally, root should only be allowed to connect from 'localhost'.  This
ensures that someone cannot guess at the root password from the network.

Disallow root login remotely? [Y/n]
 ... Success!

By default, MySQL comes with a database named 'test' that anyone can
access.  This is also intended only for testing, and should be removed
before moving into a production environment.

Remove test database and access to it? [Y/n]
 - Dropping test database...
 ... Success!
 - Removing privileges on test database...
 ... Success!

Reloading the privilege tables will ensure that all changes made so far
will take effect immediately.

Reload privilege tables now? [Y/n]
 ... Success!


All done!  If you've completed all of the above steps, your MySQL
installation should now be secure.

Thanks for using MySQL!


Cleaning up...
..............其他几台机器都如此,此处省略100万行...............
mysql双主双从搭建
此阶段为mysql双主双从搭建,需要注意的是master1和master2在互为主从的情况下需要打开log_slave_updates
[root@0_db01 ~]# vim /etc/my.cnf
# 互为主从的必要配置,当然binlog大小和binlog记录的数据库不是必须的,我只是觉得如果小多看起来不舒服而已。
[mysqld]
server-id=1
log_bin=db_01
max_binlog_size=500m
relay_log=relay_log_db1
log_slave_updates
binlog-do-db=wordpress
[root@0_db01 ~]# scp /etc/my.cnf root@192.168.1.202:/etc/
# 把配置文件拷贝过去修改下
The authenticity of host '192.168.1.202 (192.168.1.202)' can't be established.
ECDSA key fingerprint is SHA256:RoYf2X72BrCWftwVegDG4bzTdN49mrT8GZm1q+MaHMk.
ECDSA key fingerprint is MD5:e2:6b:36:95:04:06:fd:e1:ab:aa:68:53:3b:07:49:19.
Are you sure you want to continue connecting (yes/no)? yes
Warning: Permanently added '192.168.1.202' (ECDSA) to the list of known hosts.
root@192.168.1.202's password:
my.cnf 100% 673 782.4KB/s 00:00
[root@0_db02 ~]# vim /etc/my.cnf
# 修改master2的配置文件
[mysqld]
server-id=2
log_bin=db_02
max_binlog_size=500m
relay_log=relay_log_db2
log_slave_updates
binlog-do-db=wordpress
[root@0_db01 ~]# systemctl restart mysql
# 重启生效
[root@0_db02 ~]# systemctl restart mysql
# 一样
[root@0_db01 ~]# mysql -uroot -p123456
Warning: Using a password on the command line interface can be insecure.
Welcome to the MySQL monitor. Commands end with ; or \g.
Your MySQL connection id is 1
Server version: 5.6.47-log MySQL Community Server (GPL)
Copyright (c) 2000, 2020, Oracle and/or its affiliates. All rights reserved.
Oracle is a registered trademark of Oracle Corporation and/or its
affiliates. Other names may be trademarks of their respective
owners.
Type 'help;' or '\h' for help. Type '\c' to clear the current input statement.
mysql> create database wordpress;
Query OK, 1 row affected (0.00 sec)
mysql> grant replication slave on wordpress.* to slave202@'192.168.1.202' identified by '123456' ;
ERROR 1221 (HY000): Incorrect usage of DB GRANT and GLOBAL PRIVILEGES
# 它居然提示我不正确的数据库授权,和全局授权 应该是 *.* ...... 命名5.7就可以的,这个语句其实在5.7版本是正确的。
mysql> grant replication slave on *.* to slave202@'192.168.1.202' identified by '123456' ;
Query OK, 0 rows affected (0.00 sec)
mysql> flush privileges;
Query OK, 0 rows affected (0.00 sec)
# 每次对权限操作了都要刷新这是我在5.5版本中已经养成了习惯。
# master上一样去这样操作。
[root@0_db02 ~]# mysql -uroot -p
Enter password:
Welcome to the MySQL monitor. Commands end with ; or \g.
Your MySQL connection id is 1
Server version: 5.6.47-log MySQL Community Server (GPL)
Copyright (c) 2000, 2020, Oracle and/or its affiliates. All rights reserved.
Oracle is a registered trademark of Oracle Corporation and/or its
affiliates. Other names may be trademarks of their respective
owners.
Type 'help;' or '\h' for help. Type '\c' to clear the current input statement.
mysql> create database wordpress;
Query OK, 1 row affected (0.00 sec)
mysql> grant replication slave on *.* to slave201@'192.168.1.201' identified by '123456' ;
Query OK, 0 rows affected (0.00 sec)
mysql> flush privileges;
Query OK, 0 rows affected (0.00 sec)
mysql> show master status \G
*************************** 1. row ***************************
File: db_02.000001
Position: 522
Binlog_Do_DB: wordpress
Binlog_Ignore_DB:
Executed_Gtid_Set:
1 row in set (0.00 sec)
mysql> change master to master_host="192.168.1.202" ,master_user='slave201' ,master_password='123456' ,master_log_file='db_02.000001' ,master_log_pos=522;
Query OK, 0 rows affected, 2 warnings (0.18 sec)
mysql> start slave;
Query OK, 0 rows affected (0.02 sec)
mysql> show slave status \G
*************************** 1. row ***************************
Slave_IO_State: Waiting for master to send event
Master_Host: 192.168.1.202
Master_User: slave201
Master_Port: 3306
Connect_Retry: 60
Master_Log_File: db_02.000001
Read_Master_Log_Pos: 522
Relay_Log_File: relay_log_db1.000002
Relay_Log_Pos: 279
Relay_Master_Log_File: db_02.000001
Slave_IO_Running: Yes
Slave_SQL_Running: Yes
Replicate_Do_DB:
Replicate_Ignore_DB:
Replicate_Do_Table:
Replicate_Ignore_Table:
Replicate_Wild_Do_Table:
Replicate_Wild_Ignore_Table:
Last_Errno: 0
Last_Error:
Skip_Counter: 0
Exec_Master_Log_Pos: 522
Relay_Log_Space: 450
Until_Condition: None
Until_Log_File:
Until_Log_Pos: 0
Master_SSL_Allowed: No
Master_SSL_CA_File:
Master_SSL_CA_Path:
Master_SSL_Cert:
Master_SSL_Cipher:
Master_SSL_Key:
Seconds_Behind_Master: 0
Master_SSL_Verify_Server_Cert: No
Last_IO_Errno: 0
Last_IO_Error:
Last_SQL_Errno: 0
Last_SQL_Error:
Replicate_Ignore_Server_Ids:
Master_Server_Id: 2
Master_UUID: 7505d92b-50ab-11ea-b639-5254001f9f4b
Master_Info_File: /var/lib/mysql/master.info
SQL_Delay: 0
SQL_Remaining_Delay: NULL
Slave_SQL_Running_State: Slave has read all relay log; waiting for the slave I/O thread to update it
Master_Retry_Count: 86400
Master_Bind:
Last_IO_Error_Timestamp:
Last_SQL_Error_Timestamp:
Master_SSL_Crl:
Master_SSL_Crlpath:
Retrieved_Gtid_Set:
Executed_Gtid_Set:
Auto_Position: 0
1 row in set (0.00 sec)
# 这里master1搭建好了对master2的从,去设置master2吧。
mysql> show master status \G
*************************** 1. row ***************************
File: db_01.000001
Position: 522
Binlog_Do_DB: wordpress
Binlog_Ignore_DB:
Executed_Gtid_Set:
1 row in set (0.00 sec)
mysql> change master to master_host="192.168.1.201" ,master_user='slave202' ,master_password='123456' ,master_log_file='db_01.000001' ,master_log_pos=522;
Query OK, 0 rows affected, 2 warnings (0.16 sec)
mysql> start slave ;
Query OK, 0 rows affected (0.01 sec)
mysql> show slave status \G
*************************** 1. row ***************************
Slave_IO_State: Waiting for master to send event
Master_Host: 192.168.1.201
Master_User: slave202
Master_Port: 3306
Connect_Retry: 60
Master_Log_File: db_01.000001
Read_Master_Log_Pos: 522
Relay_Log_File: relay_log_db2.000002
Relay_Log_Pos: 279
Relay_Master_Log_File: db_01.000001
Slave_IO_Running: Yes
Slave_SQL_Running: Yes
Replicate_Do_DB:
Replicate_Ignore_DB:
Replicate_Do_Table:
Replicate_Ignore_Table:
Replicate_Wild_Do_Table:
Replicate_Wild_Ignore_Table:
Last_Errno: 0
Last_Error:
Skip_Counter: 0
Exec_Master_Log_Pos: 522
Relay_Log_Space: 450
Until_Condition: None
Until_Log_File:
Until_Log_Pos: 0
Master_SSL_Allowed: No
Master_SSL_CA_File:
Master_SSL_CA_Path:
Master_SSL_Cert:
Master_SSL_Cipher:
Master_SSL_Key:
Seconds_Behind_Master: 0
Master_SSL_Verify_Server_Cert: No
Last_IO_Errno: 0
Last_IO_Error:
Last_SQL_Errno: 0
Last_SQL_Error:
Replicate_Ignore_Server_Ids:
Master_Server_Id: 1
Master_UUID: 0dfde7ff-50ab-11ea-b636-525400ab6d85
Master_Info_File: /var/lib/mysql/master.info
SQL_Delay: 0
SQL_Remaining_Delay: NULL
Slave_SQL_Running_State: Slave has read all relay log; waiting for the slave I/O thread to update it
Master_Retry_Count: 86400
Master_Bind:
Last_IO_Error_Timestamp:
Last_SQL_Error_Timestamp:
Master_SSL_Crl:
Master_SSL_Crlpath:
Retrieved_Gtid_Set:
Executed_Gtid_Set:
Auto_Position: 0
1 row in set (0.00 sec)
# 测试下看有没有问题
mysql> create table wordpress.tab (id int, name varchar(10));
Query OK, 0 rows affected (0.10 sec)
mysql> insert into wordpress.tab (id , name) values(1, @@hostname);
Query OK, 1 row affected, 1 warning (0.02 sec)
mysql> select * from wordpress.tab ;
+------+--------+
| id | name |
+------+--------+
| 1 | 0_db01 |
+------+--------+
1 row in set (0.00 sec)
mysql> select * from wordpress.tab ;
+------+--------+
| id | name |
+------+--------+
| 1 | 0_db02 |
+------+--------+
1 row in set (0.00 sec)
# 看来是没有问题的,因为我binlog日志采用的是STATEMENT日志记录方式,所以这里出现了两个不同的数据,一般情况下我会采用混合模式,但是
由于我笔记本的硬盘已经爆满了,所以这种纯记录SQL语句的方式节省硬盘空间所以呢我采用的就是这种模式。
# 接下来就很简单了,就是将203指向201,204指向202 做主从同步即可。
[root@0_db03 ~]# vim /etc/my.cnf
# 这就很简单了设置服务器ID和设置中继日志文件
[mysqld]
server-id=3
relay_log=relay_log_db3
[root@0_db03 ~]# systemctl restart mysql
# 重启mysql生效
[root@0_db04 ~]# systemctl restart mysql
# 一样
# 需要在master1\2上去添加账号,一个账号一个同步用。
mysql> grant replication slave on *.* to slave203@'192.168.1.203' identified by '123456' ;
Query OK, 0 rows affected (0.00 sec)
mysql> flush privileges;
Query OK, 0 rows affected (0.00 sec)
mysql> grant replication slave on *.* to slave204@'192.168.1.204' identified by '123456' ;
Query OK, 0 rows affected (0.00 sec)
mysql> flush privileges;
Query OK, 0 rows affected (0.00 sec)
mysql> show master status \G
*************************** 1. row ***************************
File: db_01.000001
Position: 2116
Binlog_Do_DB: wordpress
Binlog_Ignore_DB:
Executed_Gtid_Set:
1 row in set (0.00 sec)
mysql> change master to master_host="192.168.1.201" ,master_user='slave203' ,master_password='123456' ,master_log_file='db_01.000001' ,master_log_pos=2116;
Query OK, 0 rows affected, 2 warnings (0.27 sec)
mysql> start slave;
Query OK, 0 rows affected (0.03 sec)
mysql> show slave status \G
*************************** 1. row ***************************
Slave_IO_State: Waiting for master to send event
Master_Host: 192.168.1.201
Master_User: slave203
Master_Port: 3306
Connect_Retry: 60
Master_Log_File: db_01.000001
Read_Master_Log_Pos: 2116
Relay_Log_File: relay_log_db3.000002
Relay_Log_Pos: 279
Relay_Master_Log_File: db_01.000001
Slave_IO_Running: Yes
Slave_SQL_Running: Yes
Replicate_Do_DB:
Replicate_Ignore_DB:
Replicate_Do_Table:
Replicate_Ignore_Table:
Replicate_Wild_Do_Table:
Replicate_Wild_Ignore_Table:
Last_Errno: 0
Last_Error:
Skip_Counter: 0
Exec_Master_Log_Pos: 2116
Relay_Log_Space: 450
Until_Condition: None
Until_Log_File:
Until_Log_Pos: 0
Master_SSL_Allowed: No
Master_SSL_CA_File:
Master_SSL_CA_Path:
Master_SSL_Cert:
Master_SSL_Cipher:
Master_SSL_Key:
Seconds_Behind_Master: 0
Master_SSL_Verify_Server_Cert: No
Last_IO_Errno: 0
Last_IO_Error:
Last_SQL_Errno: 0
Last_SQL_Error:
Replicate_Ignore_Server_Ids:
Master_Server_Id: 1
Master_UUID: 0dfde7ff-50ab-11ea-b636-525400ab6d85
Master_Info_File: /var/lib/mysql/master.info
SQL_Delay: 0
SQL_Remaining_Delay: NULL
Slave_SQL_Running_State: Slave has read all relay log; waiting for the slave I/O thread to update it
Master_Retry_Count: 86400
Master_Bind:
Last_IO_Error_Timestamp:
Last_SQL_Error_Timestamp:
Master_SSL_Crl:
Master_SSL_Crlpath:
Retrieved_Gtid_Set:
Executed_Gtid_Set:
Auto_Position: 0
1 row in set (0.00 sec)
mysql> show master status \G
*************************** 1. row ***************************
File: db_02.000001
Position: 1726
Binlog_Do_DB: wordpress
Binlog_Ignore_DB:
Executed_Gtid_Set:
1 row in set (0.00 sec)
mysql> change master to master_host="192.168.1.202" ,master_user='slave204' ,master_password='123456' ,master_log_file='db_02.000001' ,master_log_pos=1726;
Query OK, 0 rows affected, 2 warnings (0.26 sec)
mysql> start slave ;
Query OK, 0 rows affected (0.02 sec)
mysql> show slave status \G
*************************** 1. row ***************************
Slave_IO_State:
Master_Host: 192.168.1.202
Master_User: slave204
Master_Port: 3306
Connect_Retry: 60
Master_Log_File: db_02.000001
Read_Master_Log_Pos: 1726
Relay_Log_File: relay_log_db4.000001
Relay_Log_Pos: 4
Relay_Master_Log_File: db_01.000001
Slave_IO_Running: No
Slave_SQL_Running: Yes
Replicate_Do_DB:
Replicate_Ignore_DB:
Replicate_Do_Table:
Replicate_Ignore_Table:
Replicate_Wild_Do_Table:
Replicate_Wild_Ignore_Table:
Last_Errno: 0
Last_Error:
Skip_Counter: 0
Exec_Master_Log_Pos: 1726
Relay_Log_Space: 120
Until_Condition: None
Until_Log_File:
Until_Log_Pos: 0
Master_SSL_Allowed: No
Master_SSL_CA_File:
Master_SSL_CA_Path:
Master_SSL_Cert:
Master_SSL_Cipher:
Master_SSL_Key:
Seconds_Behind_Master: NULL
Master_SSL_Verify_Server_Cert: No
Last_IO_Errno: 1236
Last_IO_Error: Slave has read all relay log; waiting for the slave I/O thread to update it
Last_SQL_Errno: 0
Last_SQL_Error:
Replicate_Ignore_Server_Ids:
Master_Server_Id: 2
Master_UUID: 7505d92b-50ab-11ea-b639-5254001f9f4b
Master_Info_File: /var/lib/mysql/master.info
SQL_Delay: 0
SQL_Remaining_Delay: NULL
Slave_SQL_Running_State: Slave has read all relay log; waiting for the slave I/O thread to update it
Master_Retry_Count: 86400
Master_Bind:
Last_IO_Error_Timestamp: 200216 19:40:55
Last_SQL_Error_Timestamp:
Master_SSL_Crl:
Master_SSL_Crlpath:
Retrieved_Gtid_Set:
Executed_Gtid_Set:
Auto_Position: 0
1 row in set (0.00 sec)
# 到此双主双从搭建完毕
双MyCat 搭建,设置读写分离。
使用版本1.6
不分库不分表,只使用读写分离。
开始对mycat进行操作。
lqh@lqh:~$ virsh list
Id Name State
----------------------------------------------------
10 0_db01 running
11 0_db02 running
12 0_db03 running
13 0_db04 running
14 0_mycat1 running
15 0_mycat2 running
lqh@lqh:~$ virsh console 14
Connected to domain 0_mycat1
Escape character is ^]
CentOS Linux 7 (Core)
Kernel 5.4.2-1.el7.elrepo.x86_64 on an x86_64
localhost login: root
Password:
Last login: Sat Dec 7 22:16:01 on tty1
Virtual host...
[root@localhost ~]# setnet.py 0 192.168.1.199
写入成功,可喜可贺.
[root@localhost ~]# hostnamectl set-hostname mycat1
[ 164.789199] xfs filesystem being remounted at /tmp supports timestamps until 2038 (0x7fffffff)
[ 164.791372] xfs filesystem being remounted at /var/tmp supports timestamps until 2038 (0x7fffffff)
[root@localhost ~]# reboot
lqh@lqh:~$ virsh console 15
Connected to domain 0_mycat2
Escape character is ^]
CentOS Linux 7 (Core)
Kernel 5.4.2-1.el7.elrepo.x86_64 on an x86_64
localhost login: root
Password:
Last login: Sat Dec 7 22:16:01 on tty1
Virtual host...
[root@localhost ~]# setnet.py 0 192.168.1.200
写入成功,可喜可贺.
[root@localhost ~]# hostnamectl set-hostname mycat2
[ 219.851575] xfs filesystem being remounted at /tmp supports timestamps until 2038 (0x7fffffff)
[ 219.853634] xfs filesystem being remounted at /var/tmp supports timestamps until 2038 (0x7fffffff)
[root@localhost ~]# reboot
lqh@lqh:~$ scp Mycat-server-1.6-RELEASE-20161028204710-linux.tar.gz root@192.168.1.199:/usr/local
Mycat-server-1.6-RELEASE-20161028204710-linux.tar.gz 100% 15MB 161.6MB/s 00:00
lqh@lqh:~$ scp Mycat-server-1.6-RELEASE-20161028204710-linux.tar.gz root@192.168.1.200:/usr/local
Mycat-server-1.6-RELEASE-20161028204710-linux.tar.gz 100% 15MB 168.9MB/s 00:00
[root@mycat1 conf]# vim server.xml
# 先设置账户,并把只读测试账户关掉。
<user name="lqh">
<property name="password">123456</property>
<property name="schemas">wordpress</property>
<!-- 表级 DML 权限设置 -->
<!--
<privileges check="false">
<schema name="TESTDB" dml="0110" >
<table name="tb01" dml="0000"></table>
<table name="tb02" dml="1111"></table>
</schema>
</privileges>
-->
</user>
<!--
<user name="user">
<property name="password">user</property>
<property name="schemas">TESTDB</property>
<property name="readOnly">true</property>
</user>
-->
# 数据库重新添加一个用户来用于mycat使用
# 因为不分表所以我没有设置rule配置文件,后面再分库分表好了。
[root@mycat1 bin]# ./mycat console
Running Mycat-server...
wrapper | --> Wrapper Started as Console
wrapper | Launching a JVM...
wrapper | JVM exited while loading the application.
jvm 1 | wrapper | Unable to start JVM: No such file or directory (2)
# 缺少jdk环境,安装jdk环境。
[root@mycat1 bin]# yum install -y java-1.8.0-openjdk.x86_64
已加载插件:fastestmirror
Loading mirror speeds from cached hostfile
正在解决依赖关系
--> 正在检查事务
---> 软件包 java-1.8.0-openjdk.x86_64.1.1.8.0.222.b03-1.el7 将被 安装
--> 正在处理依赖关系 java-1.8.0-openjdk-headless(x86-64) = 1:1.8.0.222.b03-1.el7,它被软件包 1:java-1.8.0-openjdk-1.8.0.222.b03-1.el7.x86_64 需要
--> 解决依赖关系完成
依赖关系解决
====================================================================================================================================================================
Package 架构 版本 源 大小
====================================================================================================================================================================
正在安装:
java-1.8.0-openjdk x86_64 1:1.8.0.222.b03-1.el7 local 286 k
为依赖而安装:
7.5-9.el7 local 521 k
事务概要
====================================================================================================================================================================
安装 1 软件包 (+64 依赖软件包)
...................此间省略一万行............
已安装:
java-1.8.0-openjdk.x86_64 1:1.8.0.222.b03-1.el7
[root@mycat1 bin]# ./mycat console
...............省略一万行...........
jvm 1 | 2020-02-16 20:28:13,299 [INFO ][Timer0] no ilde connection in pool,create new connection for hostM2 of schema wordpress (io.mycat.backend.datasource.PhysicalDatasource:PhysicalDatasource.java:413)
jvm 1 | MyCAT Server startup successfully. see logs in logs/mycat.log
[root@mycat1 bin]# ./mycat start
# 进入测试
lqh@lqh:~$ mysql -ulqh -p123456 -h 192.168.1.199 -P8066
mysql: [Warning] Using a password on the command line interface can be insecure.
Welcome to the MySQL monitor. Commands end with ; or \g.
Your MySQL connection id is 2
Server version: 5.6.29-mycat-1.6-RELEASE-20161028204710 MyCat Server (OpenCloundDB)
Copyright (c) 2000, 2020, Oracle and/or its affiliates. All rights reserved.
Oracle is a registered trademark of Oracle Corporation and/or its
affiliates. Other names may be trademarks of their respective
owners.
Type 'help;' or '\h' for help. Type '\c' to clear the current input statement.
mysql> show databases;
+-----------+
| DATABASE |
+-----------+
| wordpress |
+-----------+
1 row in set (0.00 sec)
mysql> use wordpress;
Database changed
mysql> create table tab (id int, name varchar(20));
Query OK, 0 rows affected (0.12 sec)
mysql> insert into tab (id, name) values(1, @@hostname);
Query OK, 1 row affected, 1 warning (0.01 sec)
mysql> insert into tab (id, name) values(2, @@hostname);
Query OK, 1 row affected, 1 warning (0.02 sec)
mysql> insert into tab (id, name) values(3, @@hostname);
Query OK, 1 row affected, 1 warning (0.02 sec)
mysql> insert into tab (id, name) values(4, @@hostname);
Query OK, 1 row affected, 1 warning (0.02 sec)
mysql> select * from tab;
+------+--------+
| id | name |
+------+--------+
| 1 | 0_db02 |
| 2 | 0_db02 |
| 3 | 0_db02 |
| 4 | 0_db02 |
+------+--------+
4 rows in set (0.00 sec)
mysql> select * from tab;
+------+--------+
| id | name |
+------+--------+
| 1 | 0_db03 |
| 2 | 0_db03 |
| 3 | 0_db03 |
| 4 | 0_db03 |
+------+--------+
4 rows in set (0.00 sec)
mysql> select * from tab;
+------+--------+
| id | name |
+------+--------+
| 1 | 0_db04 |
| 2 | 0_db04 |
| 3 | 0_db04 |
| 4 | 0_db04 |
+------+--------+
4 rows in set (0.00 sec)
mysql> select * from tab;
+------+--------+
| id | name |
+------+--------+
| 1 | 0_db03 |
| 2 | 0_db03 |
| 3 | 0_db03 |
| 4 | 0_db03 |
+------+--------+
4 rows in set (0.00 sec)
mysql> select * from tab;
+------+--------+
| id | name |
+------+--------+
| 1 | 0_db03 |
| 2 | 0_db03 |
| 3 | 0_db03 |
| 4 | 0_db03 |
+------+--------+
4 rows in set (0.00 sec)
mysql> select * from tab;
+------+--------+
| id | name |
+------+--------+
| 1 | 0_db02 |
| 2 | 0_db02 |
| 3 | 0_db02 |
| 4 | 0_db02 |
+------+--------+
4 rows in set (0.00 sec)
mysql> select * from tab;
+------+--------+
| id | name |
+------+--------+
| 1 | 0_db03 |
| 2 | 0_db03 |
| 3 | 0_db03 |
| 4 | 0_db03 |
+------+--------+
4 rows in set (0.01 sec)
测试到此结束,我开启了balance为1 除了现在正在使用的写节点外,全部的读节点均分发负载了读的请求。
关于数据不一致的问题,只要切换binlog日志记录模式为混合模式或者为行模式就好了,我这边是想鲜明的体现出效果 对了还有测试switchType,第一个写节点故障时自动切换写节点的测试。
lqh@lqh:~$ ssh root@192.168.1.201
Last login: Sun Feb 16 20:24:42 2020 from 192.168.1.254
Virtual host...
[root@0_db01 ~]# systemctl stop mysql # 我把服务停掉,来测试看看是否自动切换。
[root@0_db01 ~]# systemctl status mysql
● mysql.service - LSB: start and stop MySQL
   Loaded: loaded (/etc/rc.d/init.d/mysql; bad; vendor preset: disabled)
   Active: inactive (dead) since Sun 2020-02-16 20:39:02 CST; 7s ago
     Docs: man:systemd-sysv-generator(8)
  Process: 11879 ExecStop=/etc/rc.d/init.d/mysql stop (code=exited, status=0/SUCCESS)
  Process: 11440 ExecStart=/etc/rc.d/init.d/mysql start (code=exited, status=0/SUCCESS)

Feb 16 19:12:37 0_db01 systemd[1]: Stopped LSB: start and stop MySQL.
Feb 16 19:12:37 0_db01 systemd[1]: Starting LSB: start and stop MySQL...
Feb 16 19:12:38 0_db01 mysql[11440]: Starting MySQL.Logging to '/var/log/mysql/mysql.log'.
Feb 16 19:12:38 0_db01 mysql[11440]: SUCCESS!
Feb 16 19:12:38 0_db01 systemd[1]: Started LSB: start and stop MySQL.
Feb 16 20:38:50 0_db01 systemd[1]: Stopping LSB: start and stop MySQL...
Feb 16 20:39:02 0_db01 mysql[11879]: Shutting down MySQL............ SUCCESS!
Feb 16 20:39:02 0_db01 systemd[1]: Stopped LSB: start and stop MySQL.

mysql> insert into tab (id, name) values(5, @@hostname);
Query OK, 1 row affected, 1 warning (0.02 sec)

mysql> select * from tab;
+------+--------+
| id   | name   |
+------+--------+
|    1 | 0_db04 |
|    2 | 0_db04 |
|    3 | 0_db04 |
|    4 | 0_db04 |
|    5 | 0_db04 |
+------+--------+
5 rows in set (0.00 sec)

mysql> select * from tab;
+------+--------+
| id   | name   |
+------+--------+
|    1 | 0_db04 |
|    2 | 0_db04 |
|    3 | 0_db04 |
|    4 | 0_db04 |
|    5 | 0_db04 |
+------+--------+
5 rows in set (0.00 sec)

mysql> select * from tab;
+------+--------+
| id   | name   |
+------+--------+
|    1 | 0_db04 |
|    2 | 0_db04 |
|    3 | 0_db04 |
|    4 | 0_db04 |
|    5 | 0_db04 |
+------+--------+
5 rows in set (0.01 sec)

mysql> select * from tab;
+------+--------+
| id   | name   |
+------+--------+
|    1 | 0_db04 |
|    2 | 0_db04 |
|    3 | 0_db04 |
|    4 | 0_db04 |
|    5 | 0_db04 |
+------+--------+
5 rows in set (0.00 sec)

mysql> select * from tab;
+------+--------+
| id   | name   |
+------+--------+
|    1 | 0_db04 |
|    2 | 0_db04 |
|    3 | 0_db04 |
|    4 | 0_db04 |
|    5 | 0_db04 |
+------+--------+
5 rows in set (0.00 sec)

mysql> select * from tab;
+------+--------+
| id   | name   |
+------+--------+
|    1 | 0_db04 |
|    2 | 0_db04 |
|    3 | 0_db04 |
|    4 | 0_db04 |
|    5 | 0_db04 |
+------+--------+
5 rows in set (0.01 sec)
进过多轮测试表面: 当master1 写节点出现问题时,自动切换到master2节点,并且查询也自动只分发到slave2上面不会再到slave1上面去查,因为slave1做的是master1的从,master1出现问题后,salve1的数据也就停止更新了,现在恢复服务来查询看是否将查询重新分发到slave1上。
[root@0_db01 ~]# systemctl start mysql
[root@0_db01 ~]# mysql -uroot -p123456
Warning: Using a password on the command line interface can be insecure.
Welcome to the MySQL monitor.  Commands end with ; or \g.
Your MySQL connection id is 7
Server version: 5.6.47-log MySQL Community Server (GPL)

Copyright (c) 2000, 2020, Oracle and/or its affiliates. All rights reserved.

Oracle is a registered trademark of Oracle Corporation and/or its
affiliates. Other names may be trademarks of their respective
owners.

Type 'help;' or '\h' for help. Type '\c' to clear the current input statement.

mysql> show slave status \G
*************************** 1. row ***************************
               Slave_IO_State: Waiting for master to send event
                  Master_Host: 192.168.1.202
                  Master_User: slave201
                  Master_Port: 3306
                Connect_Retry: 60
              Master_Log_File: db_02.000001
          Read_Master_Log_Pos: 3682
               Relay_Log_File: relay_log_db1.000004
                Relay_Log_Pos: 531
        Relay_Master_Log_File: db_02.000001
             Slave_IO_Running: Yes
            Slave_SQL_Running: Yes
              Replicate_Do_DB:
          Replicate_Ignore_DB:
           Replicate_Do_Table:
       Replicate_Ignore_Table:
      Replicate_Wild_Do_Table:
  Replicate_Wild_Ignore_Table:
                   Last_Errno: 0
                   Last_Error:
                 Skip_Counter: 0
          Exec_Master_Log_Pos: 3682
              Relay_Log_Space: 702
              Until_Condition: None
               Until_Log_File:
                Until_Log_Pos: 0
           Master_SSL_Allowed: No
           Master_SSL_CA_File:
           Master_SSL_CA_Path:
              Master_SSL_Cert:
            Master_SSL_Cipher:
               Master_SSL_Key:
        Seconds_Behind_Master: 0
Master_SSL_Verify_Server_Cert: No
                Last_IO_Errno: 0
                Last_IO_Error:
               Last_SQL_Errno: 0
               Last_SQL_Error:
  Replicate_Ignore_Server_Ids:
             Master_Server_Id: 2
                  Master_UUID: 7505d92b-50ab-11ea-b639-5254001f9f4b
             Master_Info_File: /var/lib/mysql/master.info
                    SQL_Delay: 0
          SQL_Remaining_Delay: NULL
      Slave_SQL_Running_State: Slave has read all relay log; waiting for the slave I/O thread to update it
           Master_Retry_Count: 86400
                  Master_Bind:
      Last_IO_Error_Timestamp:
     Last_SQL_Error_Timestamp:
               Master_SSL_Crl:
           Master_SSL_Crlpath:
           Retrieved_Gtid_Set:
            Executed_Gtid_Set:
                Auto_Position: 0
1 row in set (0.00 sec)


mysql> select * from tab;
+------+--------+
| id   | name   |
+------+--------+
|    1 | 0_db01 |
|    2 | 0_db01 |
|    3 | 0_db01 |
|    4 | 0_db01 |
|    5 | 0_db01 |
+------+--------+
5 rows in set (0.00 sec)

mysql> select * from tab;
+------+--------+
| id   | name   |
+------+--------+
|    1 | 0_db03 |
|    2 | 0_db03 |
|    3 | 0_db03 |
|    4 | 0_db03 |
|    5 | 0_db03 |
+------+--------+
5 rows in set (0.00 sec)

mysql> select * from tab;
+------+--------+
| id   | name   |
+------+--------+
|    1 | 0_db03 |
|    2 | 0_db03 |
|    3 | 0_db03 |
|    4 | 0_db03 |
|    5 | 0_db03 |
+------+--------+
5 rows in set (0.00 sec)

mysql> select * from tab;
+------+--------+
| id   | name   |
+------+--------+
|    1 | 0_db04 |
|    2 | 0_db04 |
|    3 | 0_db04 |
|    4 | 0_db04 |
|    5 | 0_db04 |
+------+--------+
5 rows in set (0.00 sec)
测试证明: 当master1节点恢复时,master1 被作为了从写机,并参与select的负载中去。
将整个mycat scp到200节点上去,并对其进行测试。
HAPorxy
[root@ha2 ~]# yum install -y haproxy
已加载插件:fastestmirror
Determining fastest mirrors
local                                                    | 3.6 kB     00:00
(1/2): local/group_gz                                      | 165 kB   00:00
(2/2): local/primary_db                                    | 6.0 MB   00:00
正在解决依赖关系
--> 正在检查事务
---> 软件包 haproxy.x86_64.0.1.5.18-9.el7 将被 安装
--> 解决依赖关系完成

依赖关系解决

================================================================================
 Package          架构            版本                     源              大小
================================================================================
正在安装:
 haproxy          x86_64          1.5.18-9.el7             local          834 k

事务概要
================================================================================
安装  1 软件包

总下载量:834 k
安装大小:2.6 M
Downloading packages:
haproxy-1.5.18-9.el7.x86_64.rpm                            | 834 kB   00:00
Running transaction check
Running transaction test
Transaction test succeeded
Running transaction
  正在安装    : haproxy-1.5.18-9.el7.x86_64                                 1/1
  验证中      : haproxy-1.5.18-9.el7.x86_64                                 1/1

已安装:
  haproxy.x86_64 0:1.5.18-9.el7

完毕!

[root@ha1 haproxy]# cat haproxy.cfg
global
    log         127.0.0.1 local2
    chroot      /var/lib/haproxy
    pidfile     /var/run/haproxy.pid
    maxconn     4000
    user        haproxy
    group       haproxy
    daemon

    # turn on stats unix socket
    stats socket /var/lib/haproxy/stats

defaults
    mode                    tcp#四层代理TCP
    log                     global
    option		    abortonclose
    option                  redispatch
    retries                 3
    timeout connect         3000s
    timeout client          3000s
    timeout server          3000s
    timeout check           4000s
    maxconn                 3000# 最大连接数

listen proxy_status 0.0.0.0:38066  #后端服务器设置
    mode tcp
    balance roundrobin
    server mycat1 192.168.1.199:8066 check inter 5s
    server mycat2 192.168.1.200:8066 check inter 5s

frontend stats 0.0.0.0:33808  #后台统计页面
    mode http
    stats enable
    maxconn 5
    stats refresh 50s
    stats uri /admin
    stats auth admin:123456
    stats hide-version

[root@ha1 haproxy]# systemctl status haproxy
● haproxy.service - HAProxy Load Balancer
   Loaded: loaded (/usr/lib/systemd/system/haproxy.service; disabled; vendor preset: disabled)
   Active: active (running) since Sun 2020-02-16 21:29:01 CST; 5min ago
 Main PID: 11100 (haproxy-systemd)
   CGroup: /system.slice/haproxy.service
           ├─11100 /usr/sbin/haproxy-systemd-wrapper -f /etc/haproxy/haproxy.cfg -p /run/haproxy.pid
           ├─11102 /usr/sbin/haproxy -f /etc/haproxy/haproxy.cfg -p /run/haproxy.pid -Ds
           └─11103 /usr/sbin/haproxy -f /etc/haproxy/haproxy.cfg -p /run/haproxy.pid -Ds

Feb 16 21:29:01 ha1 systemd[1]: Started HAProxy Load Balancer.
Feb 16 21:29:01 ha1 haproxy-systemd-wrapper[11100]: haproxy-systemd-wrapper: executing /usr/sbin/haproxy -f /etc/haproxy/haproxy.cfg -p /run/haproxy.pid -Ds

lqh@lqh:~$ mysql -ulqh -p123456 -h192.168.1.180 -P38066
mysql: [Warning] Using a password on the command line interface can be insecure.
Welcome to the MySQL monitor.  Commands end with ; or \g.
Your MySQL connection id is 5
Server version: 5.6.29-mycat-1.6-RELEASE-20161028204710 MyCat Server (OpenCloundDB)

Copyright (c) 2000, 2020, Oracle and/or its affiliates. All rights reserved.

Oracle is a registered trademark of Oracle Corporation and/or its
affiliates. Other names may be trademarks of their respective
owners.

Type 'help;' or '\h' for help. Type '\c' to clear the current input statement.

mysql> show databases;
+-----------+
| DATABASE  |
+-----------+
| wordpress |
+-----------+
1 row in set (0.01 sec)
keepalived 高可用
[root@ha1 haproxy]# yum install -y keepalived
已加载插件:fastestmirror
Loading mirror speeds from cached hostfile
正在解决依赖关系
--> 正在检查事务
---> 软件包 keepalived.x86_64.0.1.3.5-16.el7 将被 安装
--> 正在处理依赖关系 libnetsnmpmibs.so.31()(64bit),它被软件包 keepalived-1.3.5-16.el7.x86_64 需要
--> 正在处理依赖关系 libnetsnmpagent.so.31()(64bit),它被软件包 keepalived-1.3.5-16.el7.x86_64 需要
--> 正在处理依赖关系 libnetsnmp.so.31()(64bit),它被软件包 keepalived-1.3.5-16.el7.x86_64 需要
--> 正在检查事务
---> 软件包 net-snmp-agent-libs.x86_64.1.5.7.2-43.el7 将被 安装
--> 正在处理依赖关系 libsensors.so.4()(64bit),它被软件包 1:net-snmp-agent-libs-5.7.2-43.el7.x86_64 需要
---> 软件包 net-snmp-libs.x86_64.1.5.7.2-43.el7 将被 安装
--> 正在检查事务
---> 软件包 lm_sensors-libs.x86_64.0.3.4.0-8.20160601gitf9185e5.el7 将被 安装
--> 解决依赖关系完成
依赖关系解决
=====================================================================================================================================================================
Package 架构 版本 源 大小
=====================================================================================================================================================================
正在安装:
keepalived x86_64 1.3.5-16.el7 local 331 k
为依赖而安装:
lm_sensors-libs x86_64 3.4.0-8.20160601gitf9185e5.el7 local 42 k
net-snmp-agent-libs x86_64 1:5.7.2-43.el7 local 706 k
net-snmp-libs x86_64 1:5.7.2-43.el7 local 750 k
事务概要
=====================================================================================================================================================================
安装 1 软件包 (+3 依赖软件包)
总下载量:1.8 M
安装大小:6.0 M
Downloading packages:
(1/4): keepalived-1.3.5-16.el7.x86_64.rpm | 331 kB 00:00:00
(2/4): lm_sensors-libs-3.4.0-8.20160601gitf9185e5.el7.x86_64.rpm | 42 kB 00:00:00
(3/4): net-snmp-agent-libs-5.7.2-43.el7.x86_64.rpm | 706 kB 00:00:00
(4/4): net-snmp-libs-5.7.2-43.el7.x86_64.rpm | 750 kB 00:00:00
---------------------------------------------------------------------------------------------------------------------------------------------------------------------
总计 21 MB/s | 1.8 MB 00:00:00
Running transaction check
Running transaction test
Transaction test succeeded
Running transaction
正在安装 : 1:net-snmp-libs-5.7.2-43.el7.x86_64 1/4
正在安装 : lm_sensors-libs-3.4.0-8.20160601gitf9185e5.el7.x86_64 2/4
正在安装 : 1:net-snmp-agent-libs-5.7.2-43.el7.x86_64 3/4
正在安装 : keepalived-1.3.5-16.el7.x86_64 4/4
验证中 : keepalived-1.3.5-16.el7.x86_64 1/4
验证中 : 1:net-snmp-agent-libs-5.7.2-43.el7.x86_64 2/4
验证中 : lm_sensors-libs-3.4.0-8.20160601gitf9185e5.el7.x86_64 3/4
验证中 : 1:net-snmp-libs-5.7.2-43.el7.x86_64 4/4
已安装:
keepalived.x86_64 0:1.3.5-16.el7
作为依赖被安装:
lm_sensors-libs.x86_64 0:3.4.0-8.20160601gitf9185e5.el7 net-snmp-agent-libs.x86_64 1:5.7.2-43.el7 net-snmp-libs.x86_64 1:5.7.2-43.el7
完毕!
# master 上的配置
[root@ha1 ~]# cat /etc/keepalived/keepalived.conf
! Configuration File for keepalived
global_defs {
notification_email {
acassen@firewall.loc
failover@firewall.loc
sysadmin@firewall.loc
}
notification_email_from Alexandre.Cassen@firewall.loc
smtp_server 192.168.200.1
smtp_connect_timeout 30
router_id LVS_DEVEL
vrrp_skip_check_adv_addr
vrrp_garp_interval 0
vrrp_gna_interval 0
}
vrrp_instance VI_1 {
state MASTER #是master还是backup
interface eth0 #网卡名
virtual_router_id 51 #虚拟路由ID,master和slave必须保持一致
priority 100 #优先级别
advert_int 1
authentication { #同一路由的身份认证
auth_type PASS
auth_pass 1111
}
virtual_ipaddress {
192.168.1.189
}
}
# backup上的配置
[root@ha2 ~]# cat /etc/keepalived/keepalived.conf
! Configuration File for keepalived
global_defs {
notification_email {
acassen@firewall.loc
failover@firewall.loc
sysadmin@firewall.loc
}
notification_email_from Alexandre.Cassen@firewall.loc
smtp_server 192.168.200.1
smtp_connect_timeout 30
router_id LVS_DEVEL
vrrp_skip_check_adv_addr
vrrp_garp_interval 0
vrrp_gna_interval 0
}
vrrp_instance VI_1 {
state BACKUP #是master还是backup
interface eth0 #网卡名
virtual_router_id 51 #虚拟路由ID,master和slave必须保持一致
priority 99 #优先级别
advert_int 1
authentication { #同一路由的身份认证
auth_type PASS
auth_pass 1111
}
virtual_ipaddress {
192.168.1.189
}
}
# 绑定VIP到master上面并启动服务,设置为开机启动
[root@ha1 ~]# ifconfig eth0 add 192.168.1.189
[root@ha1 ~]# systemctl enable haproxy
[root@ha1 ~]# systemctl enable keepalived
# 重启master测试,vip自动绑定到backup上面,恢复master自动绑定到master上很快很棒。
# 最后使用vip连接到mycat上
最后使用VIP连接到mycat
lqh@lqh:~$ mysql -ulqh -p123456 -h192.168.1.189 -P38066
mysql: [Warning] Using a password on the command line interface can be insecure.
Welcome to the MySQL monitor. Commands end with ; or \g.
Your MySQL connection id is 6
Server version: 5.6.29-mycat-1.6-RELEASE-20161028204710 MyCat Server (OpenCloundDB)
Copyright (c) 2000, 2020, Oracle and/or its affiliates. All rights reserved.
Oracle is a registered trademark of Oracle Corporation and/or its
affiliates. Other names may be trademarks of their respective
owners.
Type 'help;' or '\h' for help. Type '\c' to clear the current input statement.
mysql> use wordpress;
Reading table information for completion of table and column names
You can turn off this feature to get a quicker startup with -A
Database changed
mysql> select * from test ;
+------+
| id |
+------+
| 1 |
| 2 |
+------+
2 rows in set (0.00 sec)