

hello world
一个最简单的栗子
html部分
<div id="app">{{word}}</div>
js部分
<script type="text/javascript">
	var app = new Vue({
	    el:'#app',
	    data:{
	    word:'hello world'
	}
    })
</script>
创建一个名为 “app” 的实例
通过el: 'app' 接管id为app的盒子
通过 data 定义盒子内的变量 'word' 并赋值:字符串 “hello world”
采用Vue框架定时修改HTML内容(html部分不变):
<script type="text/javascript">
    var app = new Vue({
        el:'#app',
        data:{
            word:'hello world'
        }
    })

    setTimeout(function(){
        app.$data.word='bye bye'
    },2000)
</script>
这里只需要修改实例app内data属性的word值就可以实现
这体现了Vue框架将精力着重于数据管理而不是DOM操作的特点
做一个ToDoList
TODOList:输入框中输入一段文字,点击提交按钮后提交至下方无序列表。
v-model指令
效果:数据双向绑定
语法:<input type="text" v-model="inputVal">
这时,在输入框中输入的字符(数据),也会响应到实例中data.inputVal的数据。
v-on指令
效果:绑定事件
语法:<button v-on:click="handlebtn">提交</button>
handlebtn为事件名,放置在实例的methods内
v-for指令
效果:通过循环遍历数组
语法:<li v-for="item in list">{{item}}</li>
item为每一项的“代号”,list为数组名
以<li>的形式循环输出 list数组 内的值
ToDoList实现
HTML部分:
<div id="app">
    <input type="text" v-model="inputVal"/>
    <button v-on:click="handlebtn">提交</button>
    <ul>
        <li v-for="item in list">{{item}}</li>
    </ul>
</div>
JS部分:
var app = new Vue({
    el:'#app',
    data:{
    list:[],
    inputVal:''
    },
    methods:{
            handlebtn:function(){
            this.list.push(this.inputVal);
            this.inputVal=' '
            }
	}
})
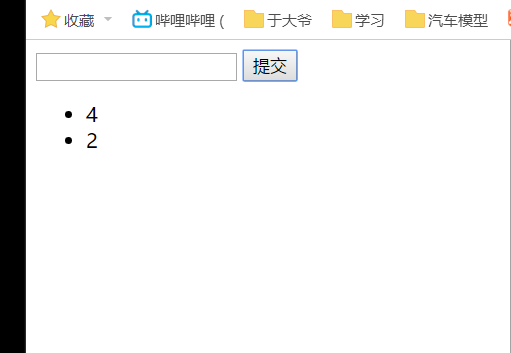
效果如下:
MVVM模式
Vue使用的是MVVM模式,让我们了解一下:
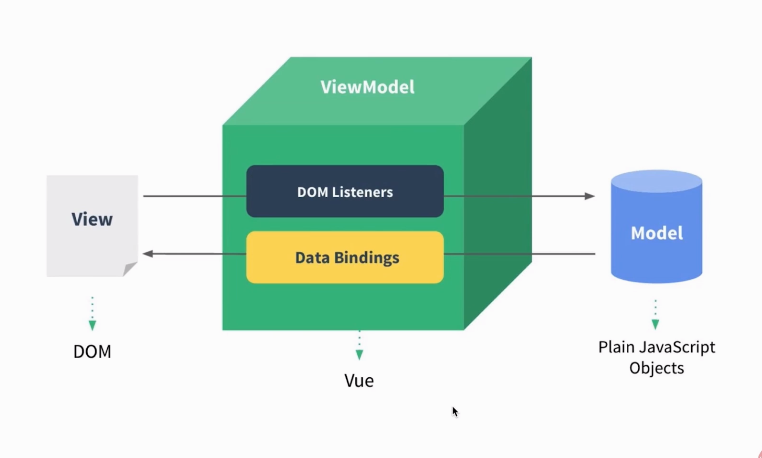
此外还有MVP模式所没有的:ViewModel层,该层属于Vue内置,因此编码时主要关注model层和view层
响应的流向:V层->VM层->M层->VM层->V层
其中最重要最核心的是M层的编写
组件
将页面切分多个部分,每个部分可以称为一个组件,例如一个轮播图,一个按钮......在我看来组件就像CSS中的盒子模型一样,使各部分分离工作,便于开发和维护。
组件化完成上面的ToDoList
使用组件化思想修改上面完成的ToDoList
如何声明组件
Vue.component("组件名",{
    template:"组件内容"
})
这里的Vue.component是创建全局组件的方法
v-bind指令
向组件绑定值,举个例子:
<todoitem v-bind:content="item" v-for="item in list"></todoitem>
v-for 循环中的 item 从 list 取值,v-bind:content="item" 通过 content="item" 将值传递给名为content的变量。
接收绑定的值
props 指从父组件(全局)接收的值
Vue.component("todoitem",{
    props:['content'],
    template:"<li>{{content}}</li>"
})
content值为item,item值又为list中的每一项。也就是list中item 借content传递值给组件。
创建全局组件完成
Vue.component("todoitem",{
    props:['content'],
    template:"<li>{{content}}</li>"
})
组件化完成
html部分:
<input type="text" v-model="inputVal"/>
    <button v-on:click="handlebtn">提交</button>
    <ul>
	<todoitem v-bind:content="item" v-for="item in list">
	</todoitem>
    </ul>
js部分:
Vue.component("todoitem",{
    props:['content'],
    template:"<li>{{content}}</li>"
})

var app = new Vue({
    el:'#app',
    data:{
        list:[],
        inputVal:''
    },
    methods:{
            handlebtn:function(){
            this.list.push(this.inputVal);
            this.inputVal=' '
            }
	}
})
声明局部组件
var todoitem = {
    props:['content'],
    template:"<li>{{content}}</li>"
}
注册局部组件
由于是局部组件,所以需要在实例中注册
var app = new Vue({
    el:'#app',
    components:{
            todoitem:todoitem
    },
    data:{
        list:[],
        inputVal:""
    },
    methods:{
            handlebtn:function(){
            this.list.push(this.inputVal);
            this.inputVal=' '
            }
	}
})
仍然使用components进行声明,由于前面已经注册组件名为:todoitem,这里将其赋值给一个同名变量todoitem,以达到注册的作用
子组件向父组件传值
上面已经通过v-bind完成父组件向子组件传值,以下讲解子组件向父组件传值的问题。
如果我们想通过点击某个选项并删除这个选项,怎么写呢?
- 在子组件模板中加入点击删除事件 "handleitem" 并监听。
template:"<li v-on:click='handleitem'>{{content}}</li>"
- 创建handleitem方法。
var todoitem = {
    props:['content'],
    template:"<li v-on:click='handleitemclick'>{{content}}</li>",
    methods:{
        handleitemclick:function(){
            this.$emit("delete");
        }
    }
  }
其中,$emit("事件名")意为向外触发事件,这时,当我们点击子组件时候,handleitemclick事件会向外触发一个名为 "delete" 的事件。
- 然后我们需要让父组件知道,子组件触发了名为 "delete" 的事件,则在父组件中
添加
@delete="handleitemdelete监听 "delete" 事件,触发后执行 "handleitemdelete" 方法。
<todoitem v-bind:content="item"
          v-for="item in list"
          v-on:delete="handleitemdelete">
</todoitem>
这样就实现: 当点击子组件,通过子组件向外触发一个被父组件监听的事件,让父组件变化的效果。
- 最后再设计出handleitemdelete方法
这时我们发现。想要指定删除的话,需要得知删除项的下标。
- 这时,我们修改父组件的循环为:
v-for="(item,index) in list",这样就可以从list中同时获取item(元素)和index(下标),再在组件中添加一个绑定来获取循环中得到的下标。这样,父组件就变成了:
<todoitem v-bind:content="item"
          v-bind:index="index"
          v-for="(item,index) in list"
          v-on:delete="handleitemdelete">
</todoitem>
- 别忘了修改组件中的接收部分:
props:['content','index'],并且在向外触发时将 this.index 作为参数带给父组件:
var todoitem = {
    props:['content','index'],
    template:"<li v-on:click='handleitemclick'>{{content}}</li>",
    methods:{
        handleitemclick:function(){
            this.$emit("delete",this.index);//前事件名,后传递的参数
        }
    }
  }
- 这样,父组件中触发的handleitemdelete方法就会获得index作为参数。我们将这个方法写为:
handleitemdelete:function(index){
    this.list.splice(index,1)//从下标index开始删除一个元素(数组删除函数)
}
- 最后完成代码
html部分:
<div id="app">
    <input type="text" v-model="inputVal"/>
    <button v-on:click="handlebtn">提交</button>
    <ul>
        <todoitem v-bind:content="item"
                  v-bind:index="index"
		  v-for="(item,index) in list"
		  v-on:delete="handleitemdelete">
        </todoitem>
    </ul>
</div>
JS部分:
var todoitem = {
    props:['content','index'],
    template:"<li v-on:click='handleitemclick'>{{content}}</li>",
    methods:{
        handleitemclick:function(){
  	    this.$emit("delete",this.index);
  	}
    }
}

var app = new Vue({
    el:'#app',
    components:{
        todoitem:todoitem
    },
    data:{
        list:[],
        inputVal:""
    },
    methods:{
        handlebtn:function(){
	    this.list.push(this.inputVal);
	    this.inputVal=' '
        },
        handleitemdelete:function(index){
            this.list.splice(index,1)
	}
    }
})
