

以下内容的代码:前端路由
前端路由的核心:通过一定方式改变URL,但是页面不进行整体的刷新,还在当前页面
实现方式有两种:
- 通过改变URL的hash
- 通过HTML5的history接口实现
通过改变URL的hash
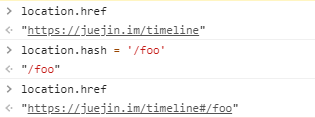
URL的hash也就是锚点(#),通过改变location.hash来改变href属性,但是页面不发生刷新,如下图所示:
通过HTML5的history接口实现
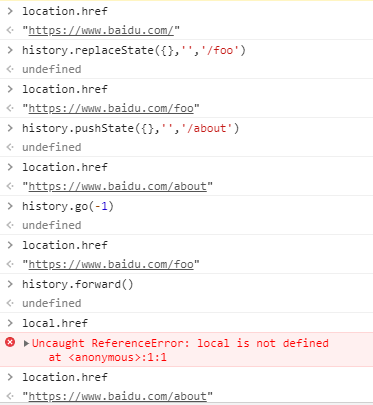
history是HTNL5新增的接口,使用以下几个方法改变URL而不刷新网页
- history.pushState()、history.replaceState()
- history.back()、history.go(-1)
- history.forward()、histroy.go(1)
初识vue-router
vue-router是基于路由和组件的,将路径(url)和组件映射起来。在vue-router的单页面中路径的改变其实就是组件之间的切换。
安装使用vue-router
安装
npm install vue-router --save
使用vue-router分为以下几步:
第一步:创建router.js文件,导入vue和vue-router,调用Vue.use(val)
import Vue from 'vue'
import vueRouter from 'vue-router'

Vue.use(vueRouter);
第二步:创建组件foo.vue和about.vue,创建路由实例,并传入路由映射表
import about from './components/about.vue'
import foo from './components/foo.vue'

const routes = [{
        path: '/about',
        component: about
    },
    {
        path: '/foo',
        component: foo
    }
]

const router = new vueRouter({
    routes,
})

export default router;
特别注意,在这一步中不要将routes写成routers
第三步:将路由传入vue实例
import router from './router.js'

Vue.config.productionTip = false

new Vue({
    render: h => h(App),
    router
}).$mount('#app')
第四步:使用路由
<router-link to="/about" class="routerLink">about</router-link>
<router-link to="/foo" class="routerLink">foo</router-link>

<router-view></router-view>
配置路由
路由重定向
进入页面时显示想要展示组件内容,重定向到某个路由path即可
const routes = [{
        path: '/',
        redirect: '/about'
    },
    {
        path: '/about',
        component: about
    },
    {
        path: '/foo',
        component: foo
    }
]
路由模式
默认情况下,url路径使用的是URL的hash方式
如果使用HTML5的history模式,需要在创建router实例时进行配置即可
const router = new vueRouter({
    routes,
    mode: 'history'
})
router-link几个属性
在上面的例子中,使用了to属性,进行路由的跳转,下面还有几个:
- tag
用于指定router-link渲染成什么元素,默认渲染成<a></a>
用法:<router-link to="/about" class="routerLink" tag='button'>about</router-link> - replace
使用这个属性,内部调用history.replaceState()
用法:<router-link to="/foo" class="routerLink" replace>foo</router-link> - active-class
当对应的路由匹配成功时,会自动给当前元素设置一个 router-link-active的class,可以使用linkActiveClass属性来修改这个默认的class的名字 ,下面更改为: activeconst router = new vueRouter({ routes, // 修改激活路由的class linkActiveClass: 'active', })
push()
在业务中,可能需要在js代码中控制路由的跳转,就会使用push(val)函数
<!--tempalte-->
<button @click="jumpToFoo">跳转到foo</button>

<!--script-->
methods: {
    jumpToFoo() {
      this.$router.push('/foo');
    }
 }
路由懒加载
在路由表中的很组件,这些组件最终会被打包到一个js中,这个js文件会相对比较大。如果我们一次性从服务器请求这个文件,可能会花费一定的时间,甚至在用户端出现短暂的空白,为了缓解这一现象,可以使用路由懒加载
路由懒加载主要做了两件事:
- 将路由表中对应的组件分别打包成一个个js文件
- 只有路由组件被访问时,才会去加载该组件对应的js文件
懒加载实现的方式:
- 结合Vue的异步组件和webpack的代码分析
const foo = resolve => { require.ensure(['./components/foo.vue'], () => { resolve(require('./components/foo.vue')) }) }; - AMD写法
const foo = resolve => require(['./components/foo.vue'], resolve); - ES6写法
const foo = () =>
   import ('./components/foo.vue')
动态路由
在某些情况下,配置路由表时path可能是不确定的,可能根据后台数据动态渲染的,这时就要用到动态路由
首先,新建组件user.vue,在配置路由时,将不确定的地方使用:展位字符串的方式
<!--加载组件-->
const user = () =>
    import ('./components/user.vue')

<!--路由配置-->
{
    path: '/user:id',
    component: user
}
使用路由
 <!-- 动态路由 -->
 <router-link :to="'/user'+ID" class="routerLink">user</router-link>

 data() {
    return {
      ID: '12345'
    }
 }
在user.vue中显示路由的动态参数
<div>
    <h2>这是uesr组件</h2>

    <!-- 获取动态路由参数 -->
    <h2>{{$route.params.id}}</h2>
</div>
路由嵌套
因业务需要,在路由中可能还要需要路由,这就形成了路由嵌套,在路由中嵌套一些路由。下面我们创建两个组件:new.vue和message.vue,将这个组件嵌套在about中,对应的路由是:/about/new和/about/message
使用children属性,在路由映射表中配置相应的子路由
<!--加载组件-->
const about_new = () =>
    import ('./components/about/new.vue')
const about_message = () =>
    import ('./components/about/message.vue')

<!--配置路由-->
{
    path: '/about',
    component: about,
    children: [{
            path: '',
            redirect: 'new'

        },
        {
            path: 'new',
            component: about_new
        },
        {
            path: 'message',
            component: about_message
        }
    ]
},
注意,子路由的
path不带/
在about组件中,使用路由
<div>
    <h2>我是about组件</h2>

    <router-link to="/about/message" class="routerLink">about/message</router-link>
    <router-link to="/about/new" class="routerLink">about/new</router-link>

    <router-view></router-view>
</div>
路由传参
通过路由传递参数,有两种方式:
- 动态路由方式(params)
- query方式
通过动态路由的方式传递方式可以参考:动态路由
query方式
我们在这里通过路由,传递给message.vue一些参数:
<!--about.vue-->
<router-link :to="{path: '/about/message', query: {type:'开会', ID: 189}}"
class="routerLink">about/message</router-link>

<!--message.vue获取参数-->
<div> query:{{$route.query }}</div>
也可以在js中使用push(val)方法传递参数:
<!--2.javascript方式-->
methods:{
  toMessage(){
    this.$router.push({
      path:'/about/message',
      query:{type:'开会', ID: 189}
    })
  }
}
$router 和 $route的区别
$router 是VueRouter实例,想要导航到不同的URL,则使用$router.push方法
$route 是当前router跳转的路由 可以获取name 、path 、query、params等属性值
导航守卫
vue-router提供的导航守卫主要用于监听路由的进入和离开,在路由改变前和改变后分别会触发beforeEach和afterEach钩子函数。
在一个SPA应用中如何改变网页上的标题
网页标题是通过<title>来显示,但是SPA只有一个固定的HTML页面,切换不同的组件,标题并不会改变。那么比较容易想的办法就是在每个路由对应的vue组件中修改,通过mounted周期函数,通过调用JavaScript的window.document.title = "标题"的方法实现
mounted() {
    window.document.title = "关于";
}
这种方法,在很多组件都要写,很分散,也不利于维护代码
我们可以使用beforeEach()函数来实现
首先,在router.js利用meta定义组件对应的标题
{
    path: '/foo',
    component: foo,
    meta: {
        title: 'foo'
    },
}
然后,在beforeEach()中改变标题
/**
 * 路由改变之前
 * to 即将进入的路由
 * from 即将离开的路由
 * next 调用这个方法,进入下一个钩子函数
 */
router.beforeEach((to, from, next) => {
    window.document.title = to.meta.title;
    next();
})
上边使用的是全局导航守卫,导航守卫总共有三种
- 全局导航守卫
- 路由独享守卫
- 组件守卫
具体用法可以参考官网:导航守卫
keep-alive遇见vue-router
keep-alive是vue的一个组件,目的在于
- 缓存组件,避免重复创建和销毁
- 保存组件的浏览状态
用法:
<keep-alive>
  <router-view></router-view>
</keep-alive>
exclude和include
include:字符串或正则表达,只有匹配的组件会被缓存;
exclude:字符串或正则表达,任何匹配的组件都不会被缓存
保持子路由的状态
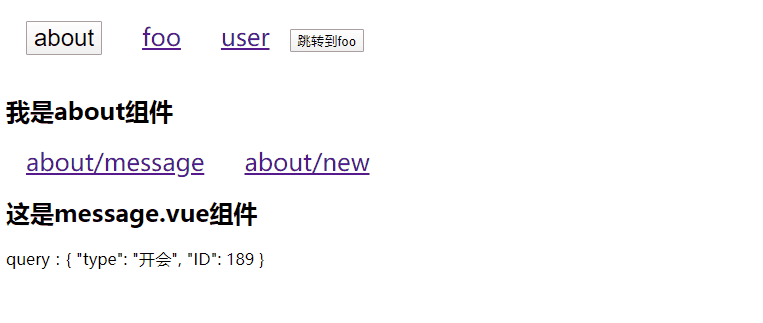
如下图所示,当我们点击foo时,再返回about路由时,有个需求是:还展示/about/message
activated(){
  console.log("--activated-");
  this.$router.push(this.path);

},

// 组件守卫的方法
beforeRouteLeave (to, from, next) {
    this.path = this.$route.path;
    next();
}
