

这篇文章以 Flux 为例,希望通过学习如何简单实现这样一个框架(模式)去,来加深对于 单向数据流 的理解。
实现代码 这是一份按照 Flux 的设计思想,还原了90% API 的代码。
在阅读本文的同时,可以方便查阅代码实现。
这份代码由 TypeScript 编写,类型支持比较完备,比较容易理解一些。
如果掘金上的 markdown 对 TS 语法支持不太友好的话,可以直接查阅 README 。
单向数据流
Flux 既然是一个 单向数据流 的框架(或者说是模式),那么我们有必要要来简单提一下什么是单向数据流
Flux complements React's composable view components by utilizing a unidirectional data flow.
什么是单向数据流
这里借用 Flux 官网的一张图片。前端应用中,类似下图这样不断循环的机制就是单向数据流。
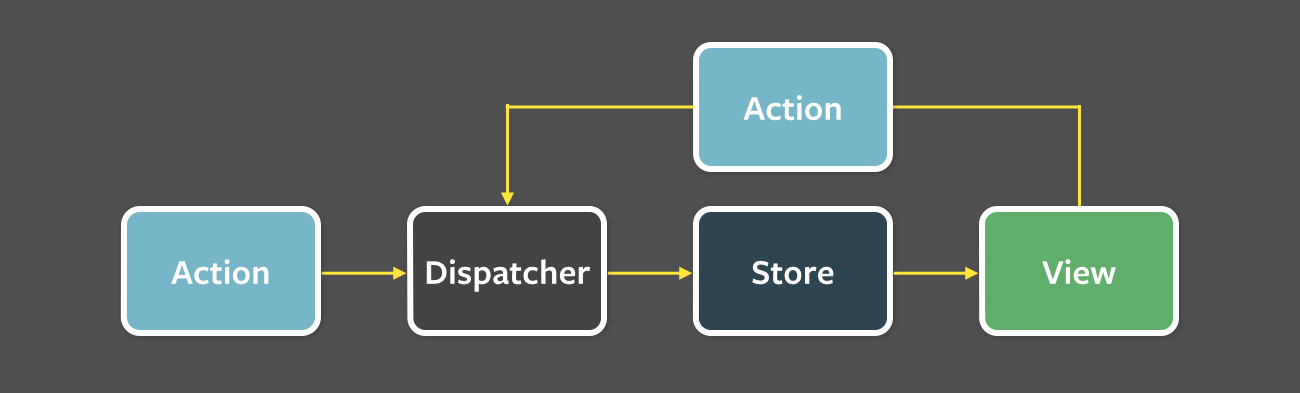
视图(View)中会因为用户的一些交互行为等,发出通知(Action)这样的数据到一个中转的地方(Dispatcher),然后被中转到 Store 这样的结构中。
Store 会根据接受的通知(Action),重新计算自己维护的数据,计算完成后,通知视图进行更新。
几个重要的数据结构
View
视图 View ,并不是 Flux 中的概念。
在 Flux 中,我们狭隘的把它认为是,使用 React 编写的一些视图组件
Action
Action 可以视作是一种通知(描述业务行为/动作的数据结构)。
在 Flux 中,我们约定它是必须含有 type 字段的一个 Object。
type 字段用来标识它自己。
Dispatcher
Dispatcher 是类似中转站的数据结构。
我们可以通过 dispatcher.register() 接口,注册回调函数。
当 dispatcher 接受到一个通知时(dispatcher.dispatch(action)),会执行已注册的全部回调函数,并把这个通知传给每一个回调函数。
在 Flux 中,Dispatcher 就是起到连接 Action 和 Store 这样一个桥梁的作用。
Store
Store 是维护应用数据以及如何更新这些数据(业务逻辑)的一种数据结构
... to the various stores that hold the application's data and business logic ...
Flux 代码是如何设计实现的
Action
Action 应该是 Flux 体系中最简单的一个概念了,它表示一种消息数据,所以只需要最简单的 plain object 表示即可。
同时,为了有一定的规范,我们规定 Action 这种 object 必须有一个 type 字段来标识它自己。
interface Action {
    [key: string]: any,
    type: string;
}
Dispatcher
Dispatcher 也是一种简单的数据结构。它的功能就是接受消息,并将消息转发给注册在自己实例上的所有回调函数。
看一下 Dispatcher 的接口设计,也基本符合我们猜测。
interface Dispatcher {
    /**
     * 注册 callback 函数,会接受到 Dispatcher 实例的广播
     */
    register: (fn: (payload: Action) => void) => string;

    /**
     * 移除已注册的 callback 函数
     */
    unregister: (token: stirng) => void;

    /**
     * 发出消息,调用所有注册的 callback , 并将 payload 传递给他们
     */
    dispatch: (payload: Action) => void;

    /**
     * 判断是不是在广播中
     */
    isDispatching: () => boolean;

    /**
     * 由于 dispatch 时,callbacks 是按照注册的顺序执行的
     * 当用户希望,更新 C 前要保证 A , B 已更新,则可以在 C 的 callback 中使用 waitFor([A, B]) 实现
     *
     * @param tokens 要等待的 tokens
     */
    waitFor: (tokens: string[]) => void;
}
这里值得关注的是 waitFor 接口的设计,这个接口的作用呢就是如注释中所提到的:
由于 dispatch 时,callbacks 是按照注册的顺序执行的,当用户希望,更新 C 前要保证 A , B 已更新,则可以在 C 的 callback 中使用 waitFor([A, B]) 实现
问题在于,这样的更新机制无法解决用户可能写出的循环依赖,即 A 依赖 B ,B 依赖 A 的情况
官方代码中的处理是,给出一个错误,并无视后一个执行的依赖,往下执行
waitFor(tokens: string[]) {
    for (let token of tokens) {
        if (this.isPending[token]) {
            // 进入这里表明陷入了循环依赖,提示一下并往下执行
            // log(`Dispatcher.waitFor(...): Circular dependency detected while waiting for ${token}`);
            continue;
        }
        const listener = this.listeners.find(l => l.token === token);
        this.invokeCallBack(listener)
    }
}
当注册在 dispatcher 上的回调函数,开始执行,且没有执行完的情况下,标记 pending 状态。以此来发现产生循环依赖,避免死锁
/**
  * 执行 callback 的函数
  */
private invokeCallBack(listener: Listener) {
    const { token, fn } = listener;
    this.isPending[token] = true;
    fn(this.payload);
    delete this.isPending[token];
}
Dispatcher 其实是一种独立的数据结构,它完全可以脱离 Flux 体系使用,完成消息通知到执行回调函数的能力。
但是,接下来看到 Store 和 Container 的数据结构,就是完全存在于 Flux 体系里的结构了。
Store
Store 是 Flux 体系中的一个基类,按照其描述它会提供以下几种能力:
1. Cache data                                                            // 保存数据
2. Expose public getters to access data (never have public setters)      // 提供访问数据的方法
3. Respond to specific actions from the dispatcher                       // 响应 dispaching
4. Always emit a change when their data changes                          // 这个也不总是,有 data 是否改变的先觉判断
5. Only emit changes during a dispatch                                   //
官方文档可以参考:facebook.github.io/flux/docs/f…
不过作者在实际设计的时候,拆分了这几部分能力。
我认为大概拆解为两部分:
- 第一部分:和 Dispatcher 建立联系,响应 dispatching , 并触发回调函数(Store 数据结构)
- 第二部分:维护数据,并规定 dispatching 时如何重新计算数据(ReduceStore 数据结构)
Store 数据结构
那 Store 这个数据结构就是完成了第一部分工作:和 Dispatcher 建立联系,响应 dispatching , 并触发回调函数。
abstract class Store {
   constructor(dispatcher: Dispatcher) {
       this.dispatcher = dispatcher;
       this.registToken = dispatcher.register(this.invokeFunc);
   }

   // ...

   abstract onDispatch(payload: Action): void;

   private invokeFunc(payload: Action) {
       this.changed = false;
       this.onDispatch(payload);
       if (this.changed) {
           this.listeners.forEach(fn => fn());
       }
   }
}
每一个 Store 实例化时,都要接受一个 dispatcher 的实例,并注册回调函数。
所以当视图中通过单例 dispatcher 发出消息时,Store 注册在 dispatcher 上的回调函数就会被执行。
这样,Store 就实现了响应 dispatching 的机制。
至于如何响应,我们规定由子类在 onDispatch 方法中实现。
ReduceStore 数据结构
ReduceStore 是继承自 Store 的数据结构,主要用来:维护数据并定义数据该如何修改
abstract class ReduceStore<State> extends Store {
    private state: State;

    constructor(dispatcher: Dispatcher) {
        super(dispatcher);
        this.state = this.getInitialState();
    }

    getState(): State {
        return this.state;
    }

    /**
     * 初始化 state . 必须由用户实现
     */
    abstract getInitialState(): State;

    /**
     * 定义如何根据 Action 计算新的 state
     * @param state
     * @param payload
     */
    abstract reduce(state: State, payload: Action): State;

    // ...
}
首先我们要求用户提供 getInitialState 方法来初始化数据,和 reduce方法,定义每次 dispatching 时,数据如何修改。基本的使用如下:
class CounterStore extends ReduceStore<number> {
  getInitialState(): number {
    return 0;
  }

  reduce(state: number, action: Object): number {
    switch (action.type) {
      case 'increment':
        return state + 1;
      case 'square':
        return state * state;
      default:
        return state;
    }
  }
}
接下来,ReduceStore 里定义好了 onDispatch 方法。
这个里面会调用用户提供好的 reduce 方法计算新的 state , 并比较是否发生了改变。如果改变了,更新 state ,并标记 state 发生了改变。
abstract class ReduceStore<State> extends Store {
    private state: State;

    // ...

    /**
     * 判断前后两个 state 是否相等。
     *
     * 是简单的全等判断,如果是 非基本类型 且不是 immutable 时会有风险,需要用户 override
     *
     * 推崇使用 immutable
     */
    areEqual(one: State, two: State): boolean {
        return one === two;
    }

    /**
     * 响应 dispatching , 由 Store 中的 invokeFunc 函数发起调用
     */
    onDispatch(payload: Action) {
        const oldState = this.state;
        const newState = this.reduce(oldState, payload);

        if (!this.areEqual(oldState, newState)) {
            // 更新 state
            this.state = newState;
            // 标记 state 是修改过的
            this.emitChange();
        }
    }
}
截止到目前,我们已经成功地从,发出消息,到响应消息进行数据改变了。
接下来最重要的一步,我们该如何得知数据的改变,并更新视图呢?
Container
如何得知数据的改变,并更新视图,我们主要用到的就是 Container 上暴露出来的一个 create 接口。
create 是一个高阶函数,接受一个 React 组件作为参数,并返回一个新的组件。
这个新的组件会根据它所声明的和 Store 依赖关系,响应 Store 上的数据变化,来更新组件自己的 state。
Create is used to transform a react class into a container that updates its state when relevant stores change.
function create<Props, State>(Base: ContainerBaseClass<Props, State>) {
    // 检测 Base 组件是否实现了 getStores 和 calculateState 方法
    enforceInterface(Base);

    return class Com extends Base {
        constructor(props: Props, context: any) {
            super(props, context);
            this.listenToStore();
            this.state = Base.calculateState();
        }

        /**
         * 监听 Store 的改变,重新计算组件的 state
         **/
        private listenToStore() {
            const stores = Base.getStores();
            stores.forEach(store => {
                store.addEventListener(this.updateState);
            });
        }

        private updateState = () => {
            this.setState(prevState => Base.calculateState(prevState));
        }
    }
}
上面是一种简单粗暴的实现方法。
首先,我们要求用户提供 getStores 方法声明依赖的 Store,和 calculateState 方法定义如何计算组件的 state。基本使用如下:
class CounterContainer extends React.Component {
  static getStores() {
    return [counterStore];
  }

  static calculateState(prevState) {
    return {
      counter: counterStore.getState(),
    };
  }

  render() {
    return <div>{this.state.counter}</div>;
  }
}

const container = Container.create(CounterContainer);
我们如何监听到 Store 上数据改变的呢?
abstract class Store {
    constructor(dispatcher: Dispatcher) {
        this.dispatcher = dispatcher;
        this.registToken = dispatcher.register(this.invokeFunc);
    }

    // ...

    /**
     * 注册一些监听函数,当 store 改变时会被调用(官网:when the store changes the given callback will be called)
     */
    addEventListener(fn: Function): RemoveListenerFn {
        this.listeners.push(fn);

        // ...
    }

    // ...

    private invokeFunc(payload: Action) {
        this.changed = false;
        this.onDispatch(payload);
        if (this.changed) {
            this.listeners.forEach(fn => fn());
        }
    }
}
可以通过 Store 上的 addEventListener 接口,注册监听函数。
当 Store 收到通知,更新数据后,如果数据产生了变更,就执行已注册的监听函数。Container.create 创建的组件就是通过这种机制监听到 Store 上数据变更的。
那这样是否就足够了??显然是不行的!!
如果用户希望根据 props 的不同,监听不同的 Store 该如何做?
还有,如果组件监听了三个 Store ,一次 dispatching 导致三个 Store 上数据都产生了变更,那么组件上重新计算 state 的函数将会执行三次,而其实只有最后一次是有效的。我们又该如何解决这样的浪费??
由于便有了下面这种设计。
ListenToStores
ListenToStores 是用来辅助 Container组件 监听 stores 变化的结构。(相当于 Flux 中 FluxContainerSubscriptions 和 FluxStoreGroup 的组合)
将这一部分逻辑抽离出来,可以使 Container组件 更关注数据到视图的映射
该结构将承担一下几种能力:
1. 注册所监听的 stores ,并允许 Container组件 更新监听了哪些 stores ( Container 可能因为 props 不同而监听不同 stores)
2. 判断所有 stores 都是注册在同一个 dispatcher 下的 (Flux 的设计思想)
3. 假如所监听的 StoreA , StoreB, StoreC 在一次 dispatching 都发生了数据的变更,那 Container 重新计算 state 的逻辑也只应该执行一次,类似与 debounce 的设计
class ListenToStores {
    constructor(stores: ReduceStore<any>[], callback: () => void) {
        this.callback = callback;
        this.listenToStores(stores);
    }

    // ...

    /**
     * 依靠 dispatcher 的 waitFor 机制,保证所依赖的全部 stores 都更新完毕后,再去执行 Container 回调
     */
    private registerCallBack = () => {
        this.dispatchToken = this.dispatcher.register(() => {
            const storeTokenes = this.stores.map(store => store.getDispatchToken());
            this.dispatcher.waitFor(storeTokenes);
            this.invokeFunc();
        });
    }

    /**
     * 判断有 store 数据发生改变后,再执行回调
     */
    private invokeFunc = () => {
        if (this.hasStoreChanged) {
            this.callback();
            this.hasStoreChanged = false;
        }
    }

    // ...
}
可以看到在 registerCallBack 中,我们向 dispatcher 上同样注册了一个回调,那这个回调函数中,依靠 Dispatcher.waitFor 机制,保证了所有 Store 都更新完毕后,我们的 invokeFunc 的才会执行。
invokeFunc 函数中,又判断当 Store 上的数据实际发生改变,才会让视图组件重新计算 state (callback 是视图组件注册在 ListenToStores 上的回调)。
class ListenToStores {
    // ...

    /**
     * 用于给视图更新所依赖的 Stores
     * @param stores
     */
    setStores(stores: ReduceStore<any>[]) {
        if (shallowEqualArrays(stores, this.stores)) {
            return;
        }

        this.dispose();
        this.listenToStores(stores);
    }

    // ...
}
setStores 方法则是用于给视图来更新所依赖的 Stores 的接口
这样我们对 Container.create 方法进行如下改写:
function create<Props, State>(Base: ContainerBaseClass<Props, State>) {
    // 检测 Base 组件是否实现了 getStores 和 calculateState 方法
    enforceInterface(Base);

    return class Com extends Base {
        private listenToStores: ListenToStores = null;

        constructor(props: Props, context: any) {
            super(props, context);
            const stores = Base.getStores(props, context);
            // 监听 stores , 并注册更新函数
            this.listenToStores = new ListenToStores(stores, this.updateState);
            // 初始化 state
            this.updateState();
        }

        UNSAFE_componentWillReceiveProps(nextProps: Props, nextContext: any) {
            if (super.componentWillReceiveProps) {
                super.componentWillReceiveProps(nextProps, nextContext);
            }

            if (options.withProps || options.withContext) {
                const stores = Base.getStores(nextProps, nextContext);
                this.listenToStores.setStores(stores);
                this.setState(prevState => Base.calculateState(prevState, nextProps, nextContext));
            }
        }


        componentWillUnmount() {
            if (super.componentWillUnmount) {
                super.componentWillUnmount();
            }
            this.listenToStores.dispose();
        }

        private updateState = () => {
            this.setState(prevState => Base.calculateState(prevState, this.props, this.context));
        }
    }
}
这样监听 Store 的逻辑就被我们封装起来了,而 Container 组件只需要 state 的更新以及到视图的映射即可。
本文到这里就全部结束了,希望大家可以有所收获。
有关更多的实现细节,欢迎大家翻阅 代码。
参考:
