

因sentry使用的是WSGI协议, 因此此文先简述此协议;
然后讲解sentry中是如何处理api请求, 以及对应的源码讲解.
简述WSGI协议
首先弄清下面几个概念:
WSGI: 一种通信协议. 全称是Web Server Gateway Interface,python模块,框架,API或者任何软件,只是一种规范,描述web server如何与web application通信的规范。server和application的规范在PEP 3333中有具体描述。要实现WSGI协议,必须同时实现web server和web application,当前运行在WSGI协议之上的web框架有Bottle, Flask, Django。
**uwsgi:**与WSGI一样是一种通信协议,是uWSGI服务器的独占协议,用于定义传输信息的类型(type of information),每一个uwsgi packet前4byte为传输信息类型的描述,与WSGI协议是两种东西,据说该协议是fcgi协议的10倍快。
**uWSGI:**是一个web服务器,实现了WSGI协议、uwsgi协议、http协议等。
WSGI协议主要包括server和application两部分:
WSGI server负责从客户端接收请求,将request转发给application,将application返回的response返回给客户端;WSGI application接收由server转发的request,处理请求,并将处理结果返回给server。application中可以包括多个栈式的中间件(middlewares),这些中间件需要同时实现server与application,因此可以在WSGI服务器与WSGI应用之间起调节作用:对服务器来说,中间件扮演应用程序,对应用程序来说,中间件扮演服务器。
WSGI协议其实是定义了一种server与application解耦的规范,即可以有多个实现WSGI server的服务器,也可以有多个实现WSGI application的框架,那么就可以选择任意的server和application组合实现自己的web应用。例如uWSGI和Gunicorn都是实现了WSGI server协议的服务器,Django,Flask是实现了WSGI application协议的web框架,可以根据项目实际情况搭配使用。
wsgi.py django项目携带的一个wsgi接口文件 如果项目名叫app的话,此文件就位于[app/app/wsgi.py]
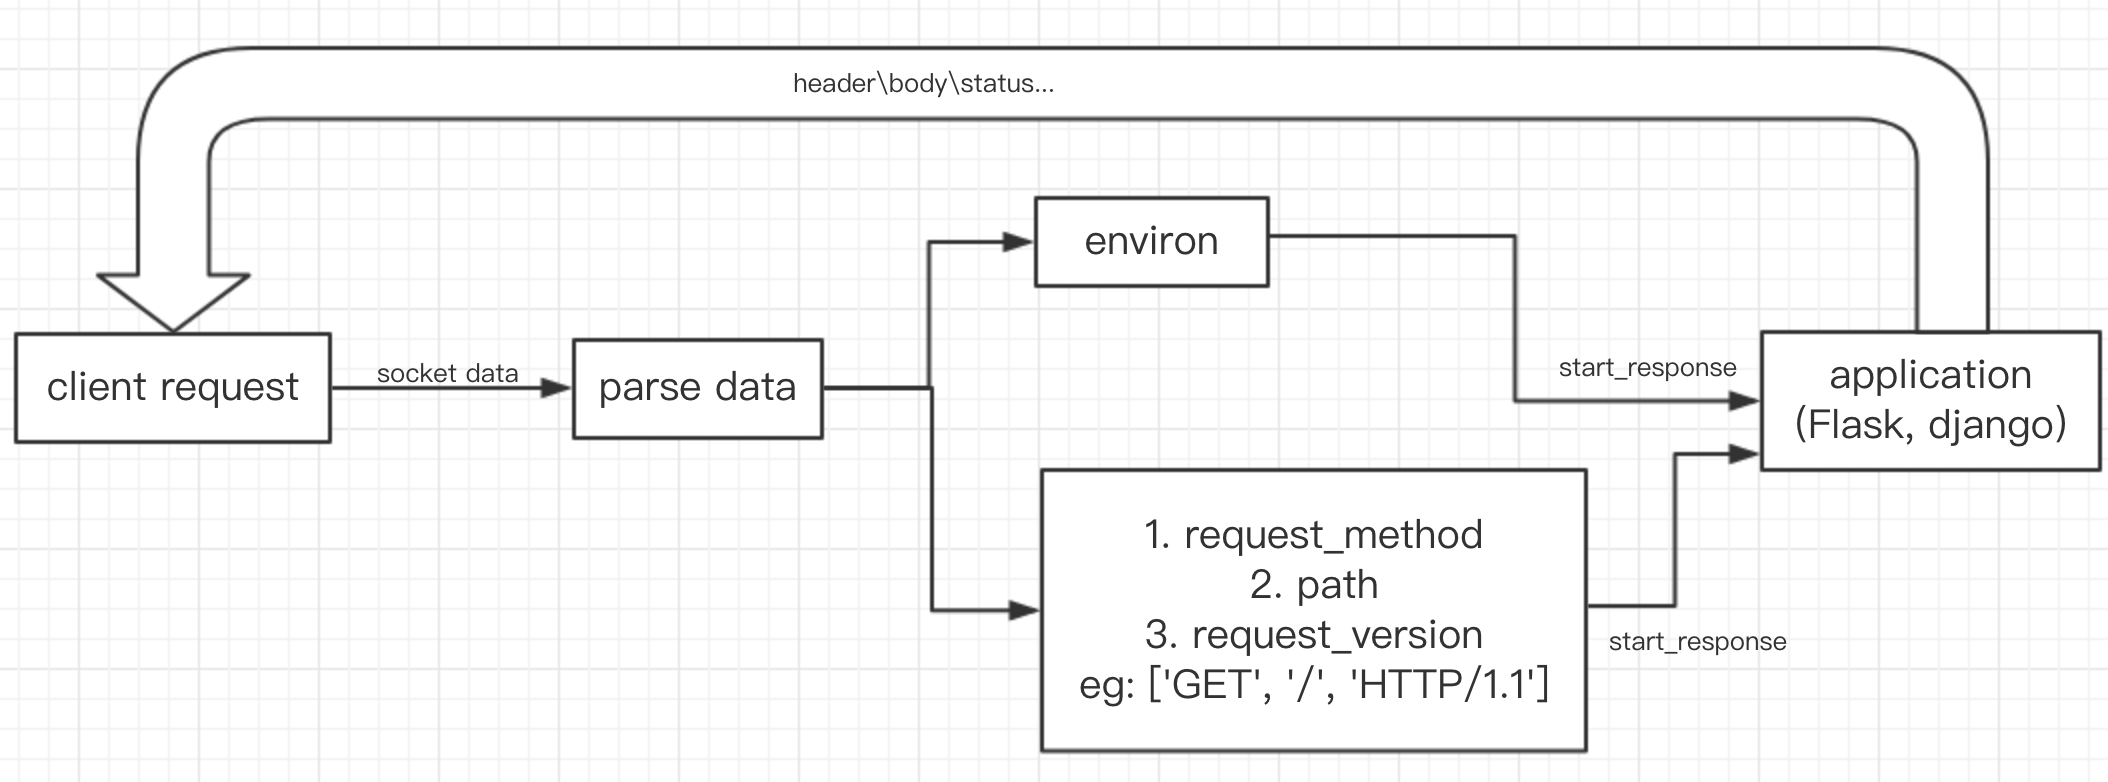
WSGI工作原理
WSGI的工作原理分为服务器层和应用程序层:
- 服务器层:将来自socket的数据包解析为http,调用application,给application提供环境信息environ,这个environ包含wsgi自身的信息(host,post,进程模式等),还有client的header和body信息。同时还给application提供一个start_response的回调函数,这个回调函数主要在应用程序层进行响应信息处理。
- 应用程序层:在WSGI提供的start_response,生成header,body和status后将这些信息socket send返回给客户端。
参考文档:
WSGI&uwsgi: www.jianshu.com/p/679dee0a4…
WSGI工作原理及实现:geocld.github.io/2017/08/14/…
栗子:
server具体成 uwsgi, application具体成django wsgi application (是一个可调用的方法 or class or 函数)
def simple_app(environ, start_response):
    """Simplest possible application object"""
    status = '200 OK'
    response_headers = [('Content-type', 'text/html')]
    start_response(status, response_headers)
    return ['Hello World']
class simple_app_class(object):
  def __call__(self, environ, start_response):
    .....
WSGI应用的规定必须有以下两个参数:
- environ:一个是含有服务器端的环境变量,它是一个字典,包含了客户端请求的信息,如 HTTP 请求的首部,方法等信息,可以认为是请求上下文,一般叫做
environment - start_response:一个用于发送HTTP响应状态(HTTP status )、响应头(HTTP headers)的回调函数。在返回内容之前必须先调用这个回掉函数, 通过回调函数将响应状态和响应头返回给
server,同时返回响应正文(response body),响应正文是可迭代的、并包含了多个字符串
WSGI Server需要实现以下功能:
- 监听端口,接收请求
- 接受HTTP请求后,解析HTTP协议
- 根据HTTP内容,生成env参数,该参数包括HTTP,wsgi信息,可以看作是请求上下文
- 实现一个start_response函数,作为调用application的参数,用作application回调函数,负责http相应头
App.py
def application(env, start_response):
    start_response('200 OK', [('Content-Type', 'text/html'), ('X-Coder', 'Cooffeeli')])
    return ['<h1>你好!!世界</h1>']
wsgi_server.py(python 的 wsgiref 库运行一个 WSGI 服务器)
from wsgiref.simple_server import make_server
from app import application

# 启动 WSGI  服务器
httpd = make_server (
    'localhost',
    9000,
    application # 这里指定我们的 application object)
)
# 开始处理请求
httpd.handle_request()
wsgi_server.py(自己实现复杂的)
#!/usr/bin/env python
# -*- coding: utf-8 -*-
import socket
import sys
import StringIO
from app import application
from datetime import datetime

class WSGIServer(object):

    def __init__(self, server_address):
        """初始构造函数, 创建监听socket"""
        self.listen_sock = socket.socket(socket.AF_INET, socket.SOCK_STREAM)
        self.listen_sock.bind(server_address)
        self.listen_sock.listen(5)
        (host, port) = self.listen_sock.getsockname()
        self.server_port = port
        self.server_name = socket.getfqdn(host)


    def set_application(self, application):
        """设置wsgi application, 供server 调用"""
        self.application = application


    def get_environ(self):
        """构造WSGI环境变量,传给application的env参数"""
        self.env = {
            'wsgi.version': (1, 0),
            'wsgi.url_scheme': 'http',
            'wsgi.errors': sys.stderr,
            'wsgi.multithread': False,
            'wsgi.run_once': False,
            'REQUEST_METHOD': self.request_method,
            'PATH_INFO': self.request_path,
            'SERVER_NAME': self.server_name,
            'SERVER_PORT': str(self.server_port),
            'wsgi.input': StringIO.StringIO(self.request_data),
        }
        return self.env


    def start_response(self, http_status, http_headers):
        """构造WSGI响应, 传给application的start_response"""
        self.http_status = http_status
        self.http_headers = dict(http_headers)
        headers = {
            'Date': datetime.utcnow().strftime('%a, %d %b %Y %H:%M:%S GMT'),
            'Server': 'WSGIServer 1.0'
        }
        self.http_headers.update(headers)


    def parse_request(self, text):
        """获取http头信息,用于构造env参数"""
        request_line = text.splitlines()[0]
        request_info = request_line.split(' ')
        (self.request_method,
        self.request_path,
        self.request_version) = request_info


    def get_http_response(self, response_data):
        """完成response 内容"""
        res = 'HTTP/1.1 {status} \r\n'.format(status=self.http_status)
        for header in self.http_headers.items():
            res += '{0}: {1} \r\n'.format(*header)

        res += '\r\n'

        res_body = ''
        for val in response_data:
            res_body += val

        res += res_body

        return res


    def handle_request(self):
        """处理请求"""
        # 初始版本,只接受一个请求
        conn, addr = self.listen_sock.accept()

        # 获取http 请求的request内容
        self.request_data = conn.recv(1024)
        self.parse_request(self.request_data)

        # 构造调用application需要的两个参数 env, start_response
        env = self.get_environ()
        start_response = self.start_response

        # 调用application, 并获取需要返回的http response内容
        response_data = self.application(env, start_response)

        # 获取完整http response header 和 body, 通过socket的sendall返回到客户端
        res = self.get_http_response(response_data)
        conn.sendall(res)

        # 脚本运行完毕也会结束
        conn.close()


def make_server(server_address, application):
    """创建WSGI Server 负责监听端口,接受请求"""
    wsgi_server = WSGIServer(server_address)
    wsgi_server.set_application(application)

    return wsgi_server


SERVER_ADDRESS = (HOST, PORT) =  '', 8124
wsgi_server = make_server(SERVER_ADDRESS, application)
wsgi_server.handle_request()
WSGI 服务器运行过程为
- 初始化,创建套接字,绑定端口
- 接收客户端请求
- 解析 HTTP 协议
- 构造 WSGI 环境变量(environ)
- 调用 application
- 回调函数 start_response 设置好响应的状态码和首部
- 返回信息
uWSGI+django+nginx的工作原理流程与部署历程
- 首先客户端请求服务资源
- nginx作为直接对外的服务接口,接收到客户端发送过来的http请求,会解包、分析,
- 如果是静态文件请求就根据nginx配置的静态文件目录,返回请求的资源
- 如果是动态的请求,nginx就通过配置文件,将请求传递给uWSGI;uWSGI 将接收到的包进行处理,并转发给wsgi
- wsgi根据请求调用django工程的某个文件或函数,处理完后django将返回值交给wsgi
- wsgi将返回值进行打包,转发给uWSGI
- uWSGI接收后转发给nginx,nginx最终将返回值返回给客户端(如浏览器)。 注:不同的组件之间传递信息涉及到数据格式和协议的转换
作用:
- 第一级的nginx并不是必须的,uwsgi完全可以完成整个的和浏览器交互的流程;
- 在nginx上加上安全性或其他的限制,可以达到保护程序的作用;
- uWSGI本身是内网接口,开启多个work和processes可能也不够用,而nginx可以代理多台uWSGI完成uWSGI的负载均衡;
- django在debug=False下对静态文件的处理能力不是很好,而用nginx来处理更加高效。
Uwsgi 参数配置
-
命令行参数 直接使用—wokers 或者 -w
-
环境变量形式 使用UWSGI_ 开头,然后把所有的参数都大写 UWSGI_WORKERS
-
使用xml配置
<uwsgi>
	<master>
    ...
  	<workers>4</workers>
    ...
  <master/>
</uwsgi>
参考文档:
uwsgi中文文档:uwsgi-docs-zh.readthedocs.io/zh_CN/lates…
uwsgi参数讲解:mhl.xyz/Python/uwsg…
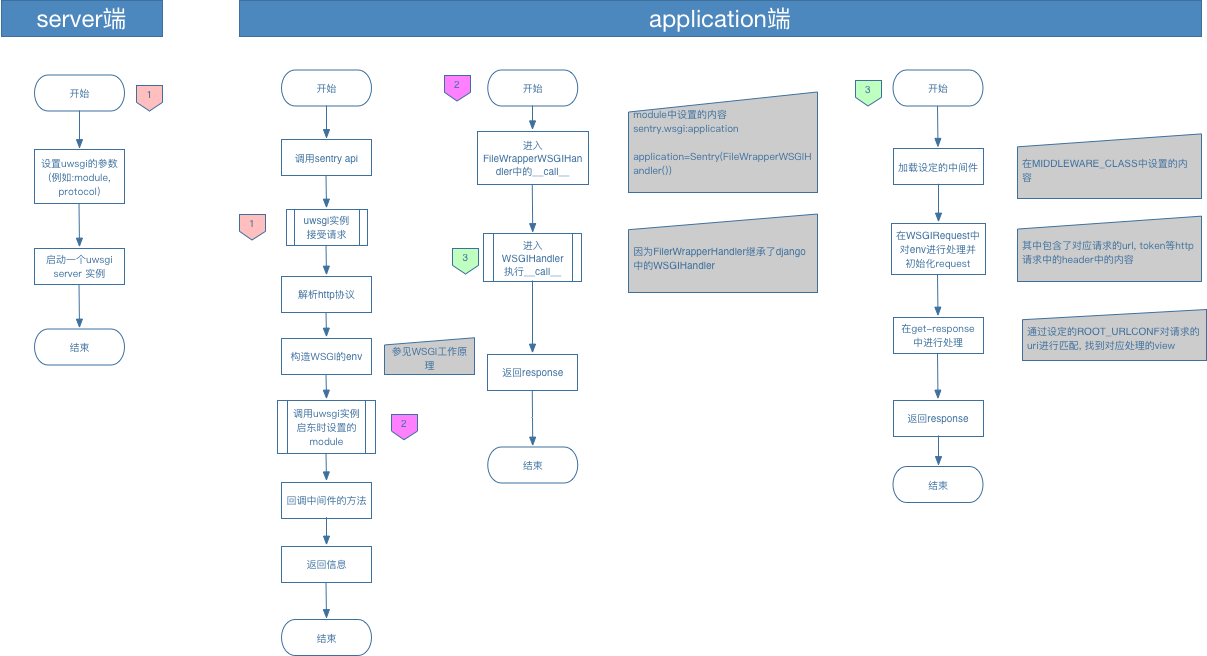
sentry web启动逻辑:
web 启动命令: sentry --config . run web [-w 5 等其他可选命令]
web对应的方法为: runner/commands/run.py 中的web()方法, 此方法中调用了SentryHTTPServer():
-
第一步: 调用__init__对options进行了初始化
-
第二步: 调用此方法中的run()
-
第一步: 准备环境变量, 将uwsgi的options配置设置到环境变量中(参见: Uwsgi 参数配置, 见源码分析); 需要注意的是在options中设置了uwsgi协议中的application "sentry.wsgi:application"
-
第二步: 使用os.execvp直接启动uwsgi服务(创建一个WSGIServer类的实例)
- application位置(sentry/wsgi.py), sentry中的application实现的是FileWrapperWSGIHandler(), django中的实现WSGIHandler(), sentry中的application继承了django中的, 下面讲解核心的WSGIHandler
-
sentry api请求处理流程
源码解析:
组装uwsgi参数:
class SentryHTTPServer(Service):
    name = 'http'

    def __init__(
        self, host=None, port=None, debug=False, workers=None, validate=True, extra_options=None
    ):
        from django.conf import settings
        from sentry import options as sentry_options
        from sentry.logging import LoggingFormat

        if validate:
            self.validate_settings()

        host = host or settings.SENTRY_WEB_HOST
        port = port or settings.SENTRY_WEB_PORT

        options = (settings.SENTRY_WEB_OPTIONS or {}).copy()
        if extra_options is not None:
            for k, v in six.iteritems(extra_options):
                options[k] = v
        # 此配置是uwsgi的参数, 加载一个WSGI模块
        options.setdefault('module', 'sentry.wsgi:application')
  			......
        # 限制请求体 设置为0表示没有限制
        options.setdefault('limit-post', 0)

        # 后面还有一堆的设置 选项:https://uwsgi-docs-zh.readthedocs.io/zh_CN/latest/Options.html
        # 路径 jex-backend/src/sentry/services/http.py
        ......
WSGIHandler.py
class WSGIHandler(base.BaseHandler):
    initLock = Lock()
    request_class = WSGIRequest

    def __call__(self, environ, start_response):
        # 加载中间件 (下面有讲解)
        if self._request_middleware is None:
            with self.initLock:
                try:
                    # Check that middleware is still uninitialized.
                    if self._request_middleware is None:
                        self.load_middleware()
                except:
                    # Unload whatever middleware we got
                    self._request_middleware = None
                    raise

        set_script_prefix(get_script_name(environ))
        # 请求处理之前发送信号
        signals.request_started.send(sender=self.__class__, environ=environ)
        try:
            request = self.request_class(environ)
        except UnicodeDecodeError:
            logger.warning('Bad Request (UnicodeDecodeError)',
                exc_info=sys.exc_info(),
                extra={'status_code': 400,})
            response = http.HttpResponseBadRequest()
        else:
            # 此方法内部对请求的url进行了解析, 执行中间件找到对应的view(几种类型的中间件执行顺序参见最下面的中间件讲解的内容), 此方法为核心方法
            response = self.get_response(request)

        response._handler_class = self.__class__

        status = '%s %s' % (response.status_code, response.reason_phrase)
        response_headers = [(str(k), str(v)) for k, v in response.items()]
        for c in response.cookies.values():
            response_headers.append((str('Set-Cookie'), str(c.output(header=''))))
        # server提供的回调方法,将响应的header和status返回给server
        start_response(force_str(status), response_headers)
        if getattr(response, 'file_to_stream', None) is not None and environ.get('wsgi.file_wrapper'):
            response = environ['wsgi.file_wrapper'](response.file_to_stream)
        return response
可以看出application的流程包括:
- 加载所有中间件
jex-backend/env/lib/python2.7/site-packages/django/core/handlers/base.py class: BaseHandler func:load_middleware(),以及执行框架相关的操作,设置当前线程脚本前缀,发送请求开始信号; - 处理请求,调用
get_response()方法处理当前请求,该方法的的主要逻辑是通过urlconf找到对应的view和callback,按顺序执行各种middleware和callback。 - 调用由
server传入的start_response()方法将响应header与status返回给server。 - 返回响应正文
get_response()
 def get_response(self, request):
        "Returns an HttpResponse object for the given HttpRequest"

        # Setup default url resolver for this thread, this code is outside
        # the try/except so we don't get a spurious "unbound local
        # variable" exception in the event an exception is raised before
        # resolver is set
        urlconf = settings.ROOT_URLCONF
        urlresolvers.set_urlconf(urlconf)
        resolver = urlresolvers.RegexURLResolver(r'^/', urlconf)
        try:
            response = None
            # Apply request middleware
            for middleware_method in self._request_middleware:
                response = middleware_method(request)
                if response:
                    break

            if response is None:
                if hasattr(request, 'urlconf'):
                    # Reset url resolver with a custom urlconf.
                    urlconf = request.urlconf
                    urlresolvers.set_urlconf(urlconf)
                    resolver = urlresolvers.RegexURLResolver(r'^/', urlconf)

                # 如果请求时下面的栗子中的url, 则request.path_info=/api/jd/jone/project/
                resolver_match = resolver.resolve(request.path_info)
                # resolver_match 为ResolverMatch对象, 内容为(func=<function JoneProject at 0x110f17410>, args=(), kwargs={}, url_name='create-new-project', app_name='None', namespace='') 因此callback=JoneProject, callback_args=args, callback_kwargs=kwargs
                callback, callback_args, callback_kwargs = resolver_match
                request.resolver_match = resolver_match

                # Apply view middleware
                for middleware_method in self._view_middleware:
                    response = middleware_method(request, callback, callback_args, callback_kwargs)
                    if response:
                        break

            if response is None:
                wrapped_callback = self.make_view_atomic(callback)
                try:
                  	# 真正调用view,一下面的例子为例 调用的是JoneProject中的Post方法, response为post方法返回的结果, 此方法需要的参数在request.DATA中
                    response = wrapped_callback(request, *callback_args, **callback_kwargs)
                except Exception as e:
                    # If the view raised an exception, run it through exception
                    # middleware, and if the exception middleware returns a
                    # response, use that. Otherwise, reraise the exception.
                    for middleware_method in self._exception_middleware:
                        response = middleware_method(request, e)
                        if response:
                            break
                    if response is None:
                        raise

            # Complain if the view returned None (a common error).
                  ......
解析url
在get_response()方法中调用resolver_match = resolver.resolve(request.path_info)对请求的url进行解析
    def resolve(self, path):
        tried = []
      	# 正则匹配, 此处的regex为get_response中调用urlresolvers.RegexURLResolver(r'^/', urlconf)时传入的表达式 即: 已/开头的内容
        match = self.regex.search(path)
        if match:
          	# 如果请求时下面的例子, path=/api/jd/jone/project/, 则匹配后new_path=api/jd/jone/project/
            new_path = path[match.end():]
            for pattern in self.url_patterns:
              # 遍历的是在配置中设置的ROOT_URLCONF文件中的内容urlpatterns 如果配置中含有inclde会递归遍历 如果请求的url没有找到对应匹配则直接返回失败, 下面例子中的请求的url,第一次遍历找到对应的  url(r'^api/jd/', include('sentry.api.jdapi.urls')), pattern.resolve(new_path)再次进行递归匹配再次得到new_path=jone/project/ 然后再到sentry.api.jdapi.urls文件中再次进行匹配知道找到对应的url(r'^jone/project/$', JoneProject.as_view(), name="create-new-project")

                try:
                    sub_match = pattern.resolve(new_path)
                except Resolver404 as e:
                    sub_tried = e.args[0].get('tried')
                    if sub_tried is not None:
                        tried.extend([[pattern] + t for t in sub_tried])
                    else:
                        tried.append([pattern])
                else:
                    if sub_match:
                        sub_match_dict = dict(match.groupdict(), **self.default_kwargs)
                        sub_match_dict.update(sub_match.kwargs)
                        return ResolverMatch(sub_match.func, sub_match.args, sub_match_dict, sub_match.url_name, self.app_name or sub_match.app_name, [self.namespace] + sub_match.namespaces)
                    tried.append([pattern])
            raise Resolver404({'tried': tried, 'path': new_path})
        raise Resolver404({'path' : path})
JoneProject
class JoneProjectSerializer(serializers.Serializer):
    project_slug = serializers.CharField(min_length=1, max_length=200, required=True)
    organization_slug = serializers.CharField(min_length=1, max_length=200, required=True)
    platform = serializers.CharField(required=False, default="java")
    members = MembersSerializer(many=True)


class JoneProject(APIView):
    permission_classes = (RpcPermission,)

    def post(self, request):
        serializer = JoneProjectSerializer(data=request.DATA)
        error_msg = "参数错误"

        if serializer.is_valid():
            result = serializer.object
            try:
                project_slug = result['project_slug']
                valid_project(project_slug)
                project = create_project(project_slug, result['platform'], result['members'], result['organization_slug'])
                project_key = get_project_key(project)

                if project_key:
                    return response(project_key)
            except Exception as e:
                logger.exception("创建项目失败, params: %s, msg:%s", request.DATA, e)
                error_msg = e.message
        else:
            logger.info("参数错误:{}".format(serializer.errors))

        return response(error_msg, RESPONSE_ERROR_STATUS)
栗子
请求URL: http://127.0.0.1:9000/api/jd/jone/project/ POST
参数:
{
    "members":[
        {
            "email":"pengchang@jd.com",
            "erp":"pengchang5"
        },
        {
            "email":"guohuixin@jd.com",
            "erp":"guohuixin3"
        }
    ],

    "platform":"java",
    "organization_slug":"org_test",
    "project_slug":"pro_test"
}
resolve解析结果: resolver_match:ResolverMatch(func=<function JoneProject at 0x110f17410>, args=(), kwargs={}, url_name='create-new-project', app_name='None', namespace='')
参考文档:
WSGI & uwsgi讲解: www.jianshu.com/p/679dee0a4…
Django从请求到响应的过程: juejin.cn/post/684490…
数据流
当用户向你的应用发送一个请求的时候,一个 WSGI handler 将会被初始化,它会完成以下工作:
- 导入 settings.py 和 django 的异常类
- 使用 load_middleware 方法加载 settings.py 中 MIDDLEWARE_CLASSES 或者 MIDDLEWARES 元组中所用的 middleware classes.
- 创建四个列表 (_request_middleware,_view_middleware, _response_middleware, _exception_middleware),里面分别包含处理 request,view,response 和 exception 的方法。
- WSGI Handler 将实例化一个 django.http.HTTPRequest 对象的子类,django.core.handlers.wsgi.WSGIRequest.
- 循环遍历处理 request 的方法 (_request_middleware 列表),并按照顺序调用他们
- 解析请求的 url
- 循环遍历每个处理 view 的方法 (_view_middleware 列表)
- 如果找的到的话,就调用视图函数
- 处理任何异常的方法 (_exception_middleware 列表)
- 循环遍历每个处理响应的方法 (_response_middleware 列表),(从内向外,与请求中间件的顺序相反)
- 最后得到一个响应,并调用 web server 提供的回调函数
参考文档:
从请求到响应 django 都做了哪些处理: juejin.cn/post/684490…
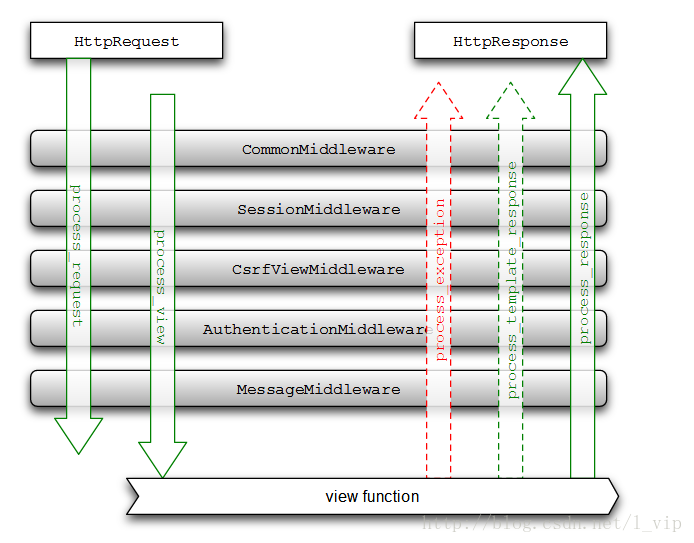
中间件概念
中间件是位于Web服务器端和Web应用之间的,它可以添加额外的功能;
中间件要么对来自用户的数据进行预处理,然后发送给应用;要么在应用将响应负载返回给用户之前,对结果数据进行一些最终的调整。通俗一点,在django中,中间能够帮我们准备好request这个对象,然后应用可以直接使用request对象获取到各类数据,也帮我们将response添加头部,状态码等
创建django项目, 默认会添加中间件 MIDDLEWARE_CLASSES ; 如果有新的可以在此配置中进行添加
process_request
django.contrib.auth.middleware.AuthenticationMiddleware:
def get_user(request):
    if not hasattr(request, '_cached_user'):
        request._cached_user = auth.get_user(request)
    return request._cached_user

class AuthenticationMiddleware(MiddlewareMixin):
    def process_request(self, request):
        assert hasattr(request, 'session'), (
              "The Django authentication middleware requires session middleware "
              "to be installed. Edit your MIDDLEWARE%s setting to insert "
              "'django.contrib.sessions.middleware.SessionMiddleware' before "
              "'django.contrib.auth.middleware.AuthenticationMiddleware'."
        ) % ("_CLASSES" if settings.MIDDLEWARE is None else "")
        request.user = SimpleLazyObject(lambda: get_user(request))
这里我们可以发现 request.user 这个属性是在 AuthenticationMiddleware 中产生的。这个我们稍后再说。
这里我们可以发现,这个中间件只有 process_request,说明它只在 request 这一步处理流入和流出 django 应用的数据流。这个中间件会首先验证会话中间件是否被使用,然后通过调用 get_user 函数来设置用户。当 WSGI 处理程序迭代 process_request 方法列表的时候,它将会构建这个最终会被传递给视图函数的请求对象,并能够使你引用 request.user。一些中间件没有 process_request 方法,在这个阶段,会被跳过。
process_request 应该返回 None 或者 HTTPResponse 对象。当返回 None 时,WSGI handler 会继续加载 process_request 里面的方法,但是后一种情况会短路处理过程并进入 process_response 循环。
解析URL
当所有的 process_request 被调用完之后,我们就会得到一个将被传递给视图函数的 request 对象。当这个事件发生之前,django 必须解析 url 并决定调用哪一个视图函数。这个过程非常简单,只需要使用正则匹配即可。settings.py 中有一个 ROOT_URLCONF 键来指定根 url.py,在这里会包含你所有 app 的 urls.py 文件。如果没有匹配成功,将会抛出一个异常 django.core.urlresolvers.Resolver404, 这是 django.http.HTTP404 的子类。
    def get_response(self, request):
        "Returns an HttpResponse object for the given HttpRequest"

        # Setup default url resolver for this thread, this code is outside
        # the try/except so we don't get a spurious "unbound local
        # variable" exception in the event an exception is raised before
        # resolver is set
        urlconf = settings.ROOT_URLCONF
        urlresolvers.set_urlconf(urlconf)
        resolver = urlresolvers.RegexURLResolver(r'^/', urlconf)
        try:
            response = None
            # Apply request middleware
            for middleware_method in self._request_middleware:
                response = middleware_method(request)
                if response:
                    break
         ......
process_view
到这一步之后 WSGI handler 知道了调用哪一个视图函数,以及传递哪些参数。它会再一次调用中间件列表里面的方法,这次是_view_middleware 列表。所有 Django 中间件的 process_view 方法将会被这样声明:
process_view(request, view_function, view_args, view_kwargs)
和 process_request 一样,process_view 函数必须返回 None 或者 HTTPResponse 对象,使得 WSGI handler 继续处理视图或者’短路’处理流程并返回一个响应。在 CSRF middleware 中存在一个 process_view 的方法。作用是当 CSRF cookies 出现时,process_view 方法将会返回 None, 视图函数将会继续的执行。如果不是这样,请求将会被拒绝,处理流程将会被’短路’,会生成一个错误的信息。
进入视图函数
一个视图函数需要满足三个条件:
- 必须是可以调用的。这可以是基于函数的视图或者是 class-based 的视图(继承自 View 并且使用 as_view() 方法来使它成为可调用的。这些方法的调用依赖 HTTP verb(GET, POST, etc))
- 必须接受一个 HTTPRequest 对象作为第一个位置参数。这个 HTTPRequest 对象是被所有 process_request 和 process_view 中间件方法处理的结果。
- 必须返回一个 HTTPResponse 对象,或者抛出一个异常。就是用这个 response 对象来开启 WSGI handler 的 process_view 循环。
process_exception
如果视图函数抛出一个异常,Handler 将会循环遍历_exception_middleware 列表,这些方法按照相反的顺序执行,从 settings.py 里面列出来的最后一个中间件到第一个。如果一个异常被抛出,处理过程将会被短路,其他的 process_exception 将不会被执行。通常我们依赖 Djnago's BaseHandler 提供的异常处理程序,但是我们也可以使用自定义的异常处理中间件
process_response
在这个阶段,我们得到了一个 HTTPResponse 对象,这个对象可能是 process_view 返回的,也可能是视图函数返回的。现在我们将循环访问响应中间件。这是中间件调整数据的最后的机会。执行的顺序是从内向外执行。 以 cache middleware 的 process_response 为例:它依赖于你的 app 里面的不同的状态(缓存是否打开或者关闭,是否在处理一个数据流),来决定是否缓存你的响应。
参考文档:
django从请求到响应的过程: juejin.cn/post/684490…
