

说在前面
本文将通过代码和控制台的输出结果:
- 简略地介绍this绑定机制和this绑定优先级
- 详细地分析call和apply功能需求并实现
- 详细地分析bind功能需求并实现
直接开始我们的主题。本文有大量代码,能很好地帮助你理解
this绑定机制
我们知道this绑定有四种,分别是:
- 默认绑定
- 隐式绑定
- 显示绑定
- new绑定
并且他们之间在同时使用时会有优先级,我们后面会简单地证明一下。
一、默认绑定
//默认绑定没开启'use strict'的情况
var str = "default";

function log() {
  console.log(this.str);
}

log();//控制台输出default

//默认绑定开启'use strict'的情况,此时默认this指向undefined
"use strict";
let str = "default";

function log() {
  console.log(this.str);
}

log();//控制台报TypeError错误:Cannot read property 'str' of undefined
二、隐式绑定
//全局str
var str = "window-str";

function log() {
  console.log(this.str);
}

var obj = {
  //对象str
  str: "obj-str",
  log: log
};

log();//window-str,默认绑定this指向window
obj.log();//obj-str,作为对象的属性调用时发生隐式绑定,this指向obj
隐式绑定的例子也证明了优先级:隐式绑定>默认绑定
三、显式绑定
//全局str
var str = "window-str";

var obj = {
  //对象str
  str: "obj-str"
};

function log() {
  console.log(this.str);
}

log(); //window-str,默认绑定
log.call(obj);//obj-str,此时函数调用时的this指向obj
log.apply(obj);//obj-str,同理
log.bind(obj)();//obj-str,同理
显式绑定的例子也证明了优先级:显式绑定>默认绑定
四、new绑定
//当对函数进行new构造调用时,会创建一个新的对象
//并把this指向这个对象,并返回这个对象
function Person(age) {
  this.age = age;
}

var a = new Person(18);
console.log(a.age);//18,new构造调用时返回的对象上有age这个属性
console.log(this.age);//undefined,说明this没有绑定到window上
new绑定的例子也证明了优先级:new绑定>默认绑定
四种this绑定的优先级验证
前面四种绑定的例子已经得出默认绑定的优先级是最低的了,现在我们只需证明其他三种绑定的优先级即可
隐式绑定和显式绑定
var obj = {
  str: "obj-str",
  sex: "male"
};

var toBind = {
  str: "bound-str",
  sex: "male"
};

//改变str的方法
function changeStr() {
  this.str = "after-change-str";
}
//改变sex的方法
function changeSex() {
  this.sex = "female";
}

//把changeStr的this绑定到toBind上
var changeStr_bound = changeStr.bind(toBind);

//把绑定this为toBind的函数赋值给obj的changeStr方法
obj.changeStr = changeStr_bound;

//把changeSex函数赋值给obj的changeSex方法
obj.changeSex = changeSex;

//调用obj的changeStr方法
obj.changeStr();
obj.changeSex.call(toBind);

//查看执行结果
console.log(obj.str, obj.sex); //obj-str,male,obj的str和sex都没改变
console.log(toBind.str, toBind.sex); //after-change-str,female,toBind的str和sex都改变了
上面的代码证明了this绑定优先级:显式绑定>隐式绑定
显式绑定和new绑定
var obj = {
  str: "obj-str"
};

function person() {
  this.str = "person-str";
}

//把person的this绑定到obj,显示绑定
var person_bound = person.bind(obj);

//把绑定后的函数进行new构造调用,new绑定
var instance = new person_bound();

//查看结果
console.log(obj.str);//obj-str,obj的str没变
console.log(instance.str);//person-str
上面的代码证明了this绑定优先级:new绑定>显式绑定
结论:new绑定>显式绑定>隐式绑定>默认绑定
call模拟实现
接下来就是我们的重头戏,如何模拟实现call,根据MDN上call的定义:call() 方法使用一个指定的 this 值和单独给出的一个或多个参数来调用一个函数。
所以我们可以知道call做了两件重要的事情:1、改变this指向。2、调用函数
call第一版本
call的第一版本我们需要实现call的基本功能:改变this指向和调用函数。从前面对于隐式调用的观察我们可以得出一个方法,即把函数变成对象的属性,然后调用它,即可改变this指向。而我们给对象额外添加的属性怎么办呢?我们可以用delete删除。下面是我们第一版本的call代码
Function.prototype.call1 = function(context) {
  //this就是调用call的函数
  //obj.fn = log
  context.fn = this;
  //obj.fn()
  context.fn();
  //delete obj.fn
  delete context.fn;
};

//测试call1
var str = "window-str";
var obj = {
  str: "obj-str"
};

function log() {
  console.log(this.str);
}

log.call1(obj); //obj-str,成功打印出obj的str
call第二版本
第一版本的call实现了最基本的改变this指向和调用函数,但这还不够,我们需要可以传递参数和获得返回值,并且call在调用的时候,第一个参数是可以穿undefined和null的,这个时候this指向window,而当传基本类型时,需要对基本类型进行装箱操作,比如当传数字1时会被包装成Nunber对象。下面是我们第二版本的call代码
//这里使用ES6的rest参数,就不用处理恶心的arguments对象了
Function.prototype.call2 = function(context, ...args) {
//当context为undefined或null时,context指向window,否则对基础类型进行装箱
//Object:当传数字时会被包装成Number对象,当传字符串时会被包装成String对象等。
//当传对象时会返回原对象
context = context ? Object(context) : window;
context.fn = this;
let result = context.fn(...args);
delete context.fn;
//函数的有返回值
return result;
};
//测试call2
var str = "window-str";
var obj = {
str: "obj-str"
};
function logAndReturnValue(name, age) {
return {
value: this.str,
name: name,
age: age
};
}
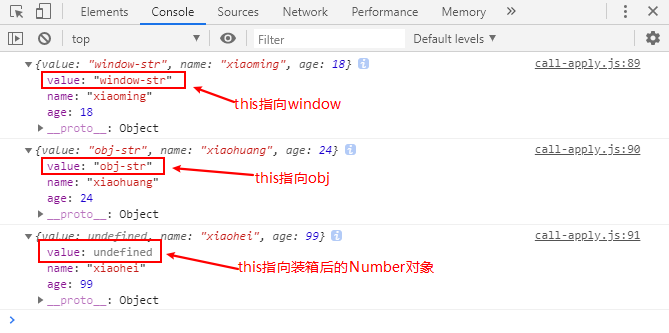
var value1 = logAndReturnValue.call2(null, "xiaoming", 18);
var value2 = logAndReturnValue.call2(obj, "xiaohuang", 24);
var value3 = logAndReturnValue.call2(666, "xiaohei", 99);
console.log(value1);
console.log(value2);
console.log(value3);
下面是控制台的输出结果:
call最终版本
call第二版本看上去已经很完美了,但还有不足的地方,就是我们给对象添加属性的时候使用了属性名fn,这有可能和已存在的属性名发生冲突,有的小伙伴可能会想,我把属性名起特殊一点不就没事了,但再特殊也有冲突的可能,有些博客使用了循环或迭代的方法去检测对象上是否存在对应的属性名如:
function getUniqueName(context) {
  var unique_fn = "fn";
  while (context.hasOwnProperty(unique_fn)) {
    unique_fn = "fn" + Math.random();
  }
  //这个时候返回的就是对象上不存在的属性名
  return unique_fn;
}
但这样很麻烦,ES6引入了新的基本类型Symbol,用来表示第一无二的值。
console.log(Symbol("fn") === Symbol("fn"));//false
于是我们可以用它来当我们的属性名来保证不和原有属性名产生冲突,下面是我们call最终版本的代码
Function.prototype.call = function(context, ...args) {
  context = context ? Object(context) : window;
  //这里不能使用new,因为symbol是基本类型
  var fn = Symbol("fn");
  //需要使用表达式属性名,使用context.fn的话相当于还是在context上生成一个名为fn的属性
  context[fn] = this;
  let result = context[fn](...args);
  delete context[fn];
  return result;
};
apply的实现思路和call一样,不同的只是传参方式,有了ES6的rest参数,我们几乎不用做大的改动,下面直接上apply最终版本的代码
Function.prototype.apply = function(context, args) {
  context = context ? Object(context) : window;
  var fn = Symbol("fn");
  context[fn] = this;
  //apply第二个参数接收数组,我们把它在这里展开就可以了
  let result = context[fn](...args);
  delete context[fn];
  return result;
};
bind模拟实现
实现完call和apply之后,我们来试着实现bind。bind和call/apply不一样,它在调用后不立即执行,而是返回一个绑定了this的函数,而且它可以在绑定this的时候预先传入一些参数,也就是柯里化,接下来我们来实现以下。
bind第一版本
在第一版本的bind中我们实现以下4个基础功能:
- 绑定this
- 返回函数
- 可以传参
- 柯里化
下面是bind第一版本的代码:
Function.prototype.bind1 = function(context, ...curryArgs) {
  //获取调用bind的函数
  let self = this;
  //返回一个函数
  return function(...restArgs) {
    //绑定this并将将柯里化参数和调用时的参数传入,并返回执行结果
    return self.call(context, ...curryArgs, ...restArgs);
  };
};

// 下面测试一下;
var str = "window-str";
var obj = {
  str: "obj-str"
};

function getValue(name, age) {
  return {
    str: this.str,
    name: name,
    age: age
  };
}

var getValueBound = getValue.bind1(obj, "xiaoming");
var value = getValueBound(18);
console.log(value);//{str:"obj-str",name:"xiaoming",age:18}
可以看到我们的第一版本已经实现了bind的基本功能。但还是不够全面,因为在前面this绑定优先级的验证中我们知道new绑定的优先级是大于显示绑定的,我们可以测试一下我们实现的bind的表现
var str = "window-str";
var obj = {
  str: "obj-str"
};

function changeStr() {
  this.str = "after-change-str";
}

var changeStrBound = changeStr.bind1(obj);
var instance = new changeStrBound();

console.log(obj.str);//after-change-str
console.log(instance.str);//undefined
根据控制台的输出结果我们可以看到执行bind1绑定后的函数在进行new调用时的this是指向obj的,所以执行时修改了obj上的str,这不符合我们的预期,现在我们要来实现这个功能。
bind第二版本
我们直接上修改后的代码
Function.prototype.bind2 = function(context, ...curryArgs) {
let self = this;
let fBound = function(...restArgs) {
//这里this instanceof fBound是判断fBound是否被new调用
return self.call(
this instanceof fBound ? this : context,
...curryArgs,
...restArgs
);
};
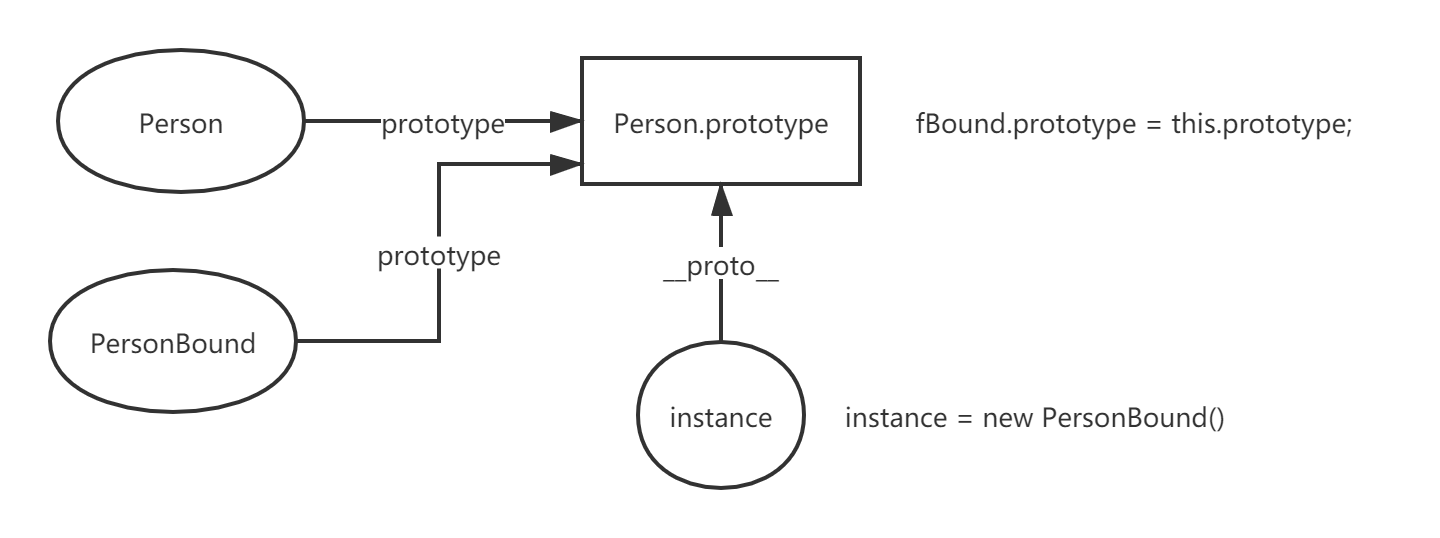
//把返回的函数的原型指向调用bind的函数的原型,以获取原型上的属性
fBound.prototype = this.prototype;
return fBound;
};
//测试一下
var str = "window-str";
var obj = {
str: "obj-str"
};
function Person(name, age) {
this.sex = "male";
this.name = name;
this.age = age;
}
//原型上的属性
Person.prototype.address = "shenzhen";
var PersonBound = Person.bind2(obj, "xiaoming");
var instance = new PersonBound(24);
console.log(obj);//{str:"obj-str"}
console.log(instance);{sex:"male",name:"xiaoming",age:24}
console.log(instance.address); //shenzhen,查看原型上的值
instance.__proto__.address = "guangzhou"; //修改原型上的值
console.log(Person.prototype.address); //guangzhou,原型上的值被污染
在第二版本的bind中我们通过this instanceof fBound来判断是否进行了new构造调用,是的话将该this作为call的第一个参数,否则将传入的context作为call的第一个参数,通过输出我们可以知道我们实现了new绑定优先级大于bind绑定。并且我们还通过连接原型链让instance可以拿到原型链上的属性,但我们在bind绑定后的函数原型上添加/修改属性时,会污染到了Person的原型,因为他们现在是同个引用,这不是我们期望的结果,接下来我们要修复这个问题
bind第三版本
直接上代码:
Function.prototype.bind3 = function(context, ...curryArgs) {
  let self = this;
  let fBound = function(...restArgs) {
    return self.call(
      this instanceof fBound ? this : context,
      ...curryArgs,
      ...restArgs
    );
  };
  //这里声明了一个中间函数,把这个中间函数的原型指向调用bind的函数的原型
  //并使用这个中间函数的实例来充当返回函数的原型,这样就可以通过原型链查找
  //到调用bind的函数的原型属性,并在给返回的函数原型上添加属性时,就相当于
  //在这里中间函数的实例上添加属性,不会污染到原函数
  let middleFun = function() {};
  middleFun.prototype = this.prototype;
  fBound.prototype = new middleFun();
  return fBound;
};

// 下面来测试一下;
var str = "window-str";
var obj = {
  str: "obj-str"
};

function Person(name, age) {
  this.sex = "male";
  this.name = name;
  this.age = age;
}
//原型上的属性
Person.prototype.address = "shenzhen";

var PersonBound = Person.bind3(obj, "xiaoming");
var instance = new PersonBound(24);

console.log(instance);{sex:"male",name:"xiaoming",age:24}
console.log(instance.address); //shenzhen,查看原型上的值
instance.__proto__.address = "guangzhou"; //修改PersonBound原型上的值
console.log(instance.address); //guangzhou,访问PersonBound原型上的值
console.log(Person.prototype.address); //shenzhen,Person原型上的值没有被污染
关于使用中间函数的实例作为返回函数的原型,用下面两张图来解释它的作用。它帮助我们实现了在返回的函数的原型上添加/修改属性时,不会污染到原来的函数,同时还可以获取到原来函数上的属性。
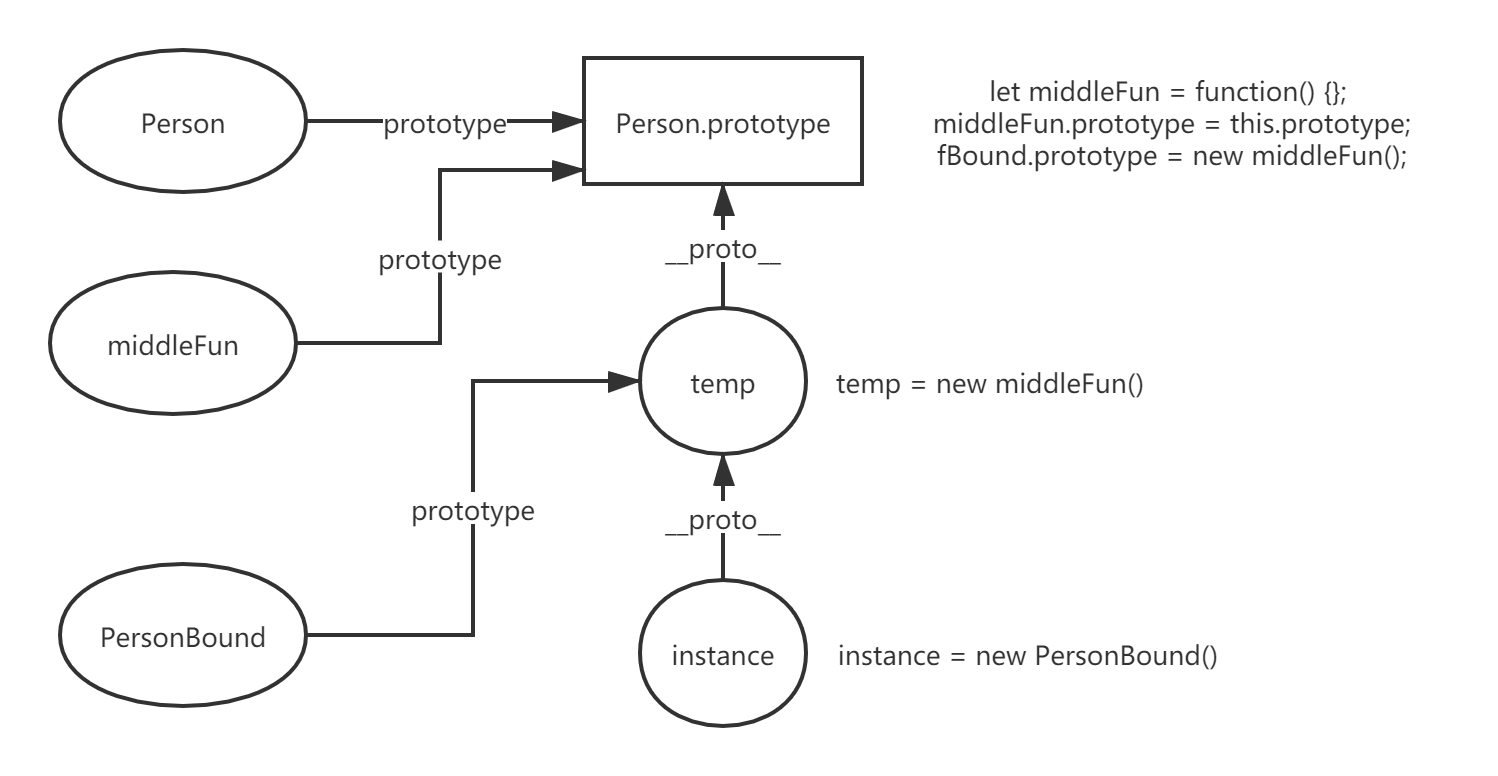
由此可知中间函数的作用就是在原型链上多了一层,这样我们既可以获取Person上的属性(通过原型链查找),也可以在修改instance的原型(temp)时不污染Person(修改了temp)。
现在关于原型链污染的问题也解决了,其实ES5的Object.create帮我们实现这个过程。Object.create使用现有的对象来提供新创建的对象的__proto__,大家可以看看MDN上Object.create的polyfill,做的是同一件事情,所以我们这里可以用Object.create来简化代码。
bind最终版本
所以我们的最终版bind代码如下:
// Function.prototype.bind = function(context, ...curryArgs) {
//   let self = this;
//   let fBound = function(...restArgs) {
//     return self.call(
//       this instanceof fBound ? this : context,
//       ...curryArgs,
//       ...restArgs
//     );
//   };
//   fBound.prototype = Object.create(this.prototype);
//   return fBound;
// };
不用call\apply实现bind
实现完bind之后肯定有小伙伴会说你这样还要依靠call才能实现bind,有没有不考call实现的呢?有,在实现完call之后其实我们已经有了大体思路了,说我之下上不用call\apply实现bind的最终代码。
Function.prototype.bind = function(context, ...curryArgs) {
  let self = this;
  let fBound = function(...restArgs) {
    context = context ? Object(context) : window;
    let fn = Symbol("fn");
    if (this instanceof fBound) {
      //new调用
      let instance = Object.create(fBound.prototype); //模拟new调用,让instance的__proto__指向FBound.prototype
      instance[fn] = self; //模仿隐式调用
      let result = instance[fn](...curryArgs, ...restArgs); //执行函数
      delete instance[fn];
      //如果函数调用有返回值,则返回该值,否则隐式调用时this绑定在instance上
      //对于this的赋值都发生在instance上
      return result ? result : instance;
    } else {
      //普通调用
      context[fn] = self;
      let result = context[fn](...curryArgs, ...restArgs);
      delete context[fn];
      return result;
    }
  };
  fBound.prototype = Object.create(this.prototype);
  return fBound;
};
下面测试一下
// 普通调用测试用例;
var str = "window-str";
var obj = {
  str: "obj-str"
};
function Person(name, age) {
  this.str = "person-str";
  this.name = name;
  this.age = age;
}
let PersonBound = Person.bind(obj, "xiaoming");
PersonBound(18);
console.log(obj);//{str:"person-str",name:"xiaoming",age:18},正确
// new调用测试用例;
var str = "window-str";
var obj = {
  str: "obj-str"
};
function Person(name, age) {
  this.str = "person-str";
  this.name = name;
  this.age = age;
}
let PersonBound = Person.bind(obj, "xiaoming");
let instance = new PersonBound(18);
console.log(instance);//{str:"person-str",name:"xiaoming",age:18}正确
console.log(obj);//{str:"obj-str"}
大功告成!
参考资料:
