

什么是Beans
JavaBeans是Java中一种特殊的类,可以将多个对象封装到一个对象(bean)中。特点是可序列化,提供无参构造器,提供getter方法和setter方法访问对象的属性。名称中的“Bean”是用于Java的可重用软件组件的惯用叫法。
//example
public class StudentBean {
    private String name;

    public StudentBean() {
    }

    public StudentBean(String name) {
        this.name = name;
    }

    public String getName() {
        return name;
    }

    public void setName(String name) {
        this.name = name;
    }

    @Override
    public String toString() {
        return "StudentBean{" +
                "name='" + name + '\'' +
                '}';
    }
}
    <!--在xml中注册-->
    <bean id="student" class="com.wang.pojo.StudentBean">
        <constructor-arg name="name" value="wang"/>
    </bean>
Beans的作用域
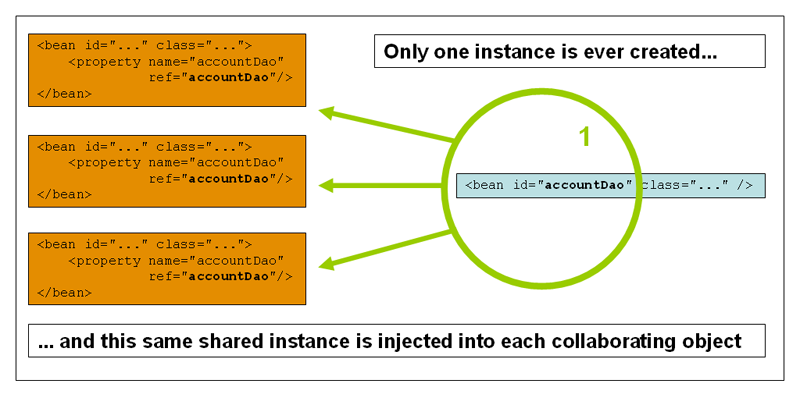
单例(Singleton)(默认)
在IOC容器中只有一个实例。
   <bean id="student" class="com.wang.pojo.StudentBean" scope="Singleton">
        <constructor-arg name="name" value="wang"/>
    </bean>
原型(prototype)
每次从容器中get,都会生成一个新的对象。
   <bean id="student" class="com.wang.pojo.StudentBean" scope="prototype">
        <constructor-arg name="name" value="wang"/>
    </bean>

request session
仅在web中用到。
Bean的自动装配
Spring在上下文中自动扫描,并自动给Bean的属性注入值。
在spring中,有三种依赖注入的方式:
- 在xml中显式注入
- 在Java中显式注入
- 在Spring中隐式注入,即此处的自动装配。
byName 自动装配
byName依靠set方法,会在xml文件中按照id自动寻找setXXX 对应的bean,实现自动装配。
<bean id="cat" class="com.wang.pojo.cat" name="cat"/>
<bean id="dog" class="com.wang.pojo.dog" name="dog"/>
<bean id="student" class="com.wang.pojo.Student" autowire="byName" />
byType 自动装配
byType会在xml文件中按照属性对应的类型自动寻找对应的bean,实现自动装配。
<bean id="cat" class="com.wang.pojo.cat" name="cat"/>
<bean id="dog" class="com.wang.pojo.dog" name="dog"/>
<bean id="student" class="com.wang.pojo.Student" autowire="byType" />
使用注解实现自动装配
导入约束并配置注解的支持。
<!--约束-->
<beans xmlns="http://www.springframework.org/schema/beans"
       xmlns:xsi="http://www.w3.org/2001/XMLSchema-instance"
       xmlns:context="http://www.springframework.org/schema/context"
       xsi:schemaLocation="http://www.springframework.org/schema/beans
        https://www.springframework.org/schema/beans/spring-beans.xsd
        http://www.springframework.org/schema/context https://www.springframework.org/schema/context/spring-context.xsd">

        <!--注册相关的bean-->
        <bean id="cat" class="com.wang.pojo.cat" name="cat"/>
        <bean id="dog" class="com.wang.pojo.dog" name="dog"/>
        <bean id="student" class="com.wang.pojo.Student"  />

        <!--配置注解支持-->
        <context:annotation-config/>

</beans>
在对应属性上加入注解
@Data       //lombok的注解
@AllArgsConstructor //lombok的注解
@NoArgsConstructor  //lombok的注解
public class Student {

    @Autowired(required = false) //required = false表示当前属性可以为null
    private String name;
    @Autowired    //自动装配的注解
    private cat cat;
    @Autowired
    private dog dog;

}
Tips
-
@Qualifier 注解
当当前属性的名称与待注入的bean名称不同时,可以使用@Qualifier显式指定要注入的bean的名称.
<bean id="cat" class="com.wang.pojo.cat" name="cat"/>
<bean id="dog" class="com.wang.pojo.dog" name="dog"/>
<bean id="dog2" class="com.wang.pojo.dog" name="dog2"/>
<bean id="student" class="com.wang.pojo.Student"  />
public class Student { @Autowired(required = false) private String name; @Autowired private cat cat; @Qualifier("dog2") @Autowired private dog dog; } -
@Resource注解
Resource注解也可以放在属性字段上,但是比Autowired更强大.它可以通过name和类型来匹配. AutoWired智能通过name来装配.
 public class Student {
    @Autowired(required = false)
    private String name;
    @Autowired
    private cat cat;

    @Qualifier("dog2")
    @Resource
    private dog dog;
}
使用component-scan 实现Beans的自动扫描
传统方式,每写一个bean,都需要手动在xml中配置,一旦数目较多,就会十分繁琐复杂. 使用自动扫描,可以大大简化这一流程.
配置
<beans xmlns="http://www.springframework.org/schema/beans"
       xmlns:xsi="http://www.w3.org/2001/XMLSchema-instance"
       xmlns:context="http://www.springframework.org/schema/context"
       xsi:schemaLocation="http://www.springframework.org/schema/beans
        https://www.springframework.org/schema/beans/spring-beans.xsd
        http://www.springframework.org/schema/context
        https://www.springframework.org/schema/context/spring-context.xsd">

    <!--注解驱动支持-->
    <context:annotation-config/>

    <!--自动扫描配置-->
    <context:component-scan base-package="com.wang.pojo"/>

</beans>
//在对应的类上添加注解
@Component
public class dog {
    String name="U•ェ•*U";
}
Tips
-
@Value
由于在xml文件中不再出现bean,此使如果对属性进行显式注入可以使用 @Value 注解:
public class Student {
    @Value("wang")//显式注入
    private String name;
    @Autowired
    private cat cat;
    @Qualifier("dog2")
    @Resource
    private dog dog;
}
-
@Component等价的注解
@Repository 用于Dao层
@Service 用于service层
@Controller 用于Controller层
四个注解都是等价的,都是将beans注册到容器中.
使用Java的Configuration实现配置
使用Java的注解 @Configuration 来代替xml的配置,可以取代xml.
建立config文件.
@Configuration //声明当前类是配置类

//扫描路径下的包,相当于xml文件中的 <context:component-scan base-package="com.wang.pojo"/>
@ComponentScan("com.wang.pojo")
public class configuration {


    @Bean   //@Bean相当于xml文件中对于bean的声明, 方法名即bean的id.
    public Student student() {
        //返回值相当于bean标签中的 class 属性
        return new Student();
    }
}
@Data
//表示当前类被Spring接管了,注册到Spring容器中.
@Component
public class Student {
    @Value("wang")
    private String name;
    @Autowired
    private cat cat;
    @Resource
    private dog dog;
}
@Component
public class cat {
    String name="o(=•ェ•=)m";
}

@Component
public class dog {
    String name="U•ェ•*U";
}
在使用时使用 AnnotationConfigApplicationContext 通过反射加载配置类.
public class helloTest {
    public static void main(String[] args) {
        AnnotationConfigApplicationContext annotationConfigApplicationContext = new AnnotationConfigApplicationContext(configuration.class);
        Object obj = annotationConfigApplicationContext.getBean("student");
        System.out.print( obj.toString());
    }
}


//输出 Student(name=wang, cat=cat(name=o(=•ェ•=)m), dog=dog(name=U•ェ•*U))
