

系列文章
分析
通过上一章的介绍,我们知道,vue 可以将 html 代码中的,符合模板语法的字符串 {{ xxx }} 替换成我们创建 vue 实例的时候,在 data 中设置的对应的值。
我们先来创建一个简单的 vue 实例:
<div id="app">
  <p>单层:{{ msg }}</p>
  <p>多层:{{ user.name }}</p>
  <p>不符合:[[ user.name ]]</p>
  v-指令:
  <p v-text="msg"></p>
  错误指令:
  <p v-text1="msg"></p>
</div>
外部:{{ msg }}

<script src="vue.js"></script>
<script>
  var vm = new Vue({
    el: "#app",
    data: {
      msg: "Hello Vue!",
      user: {
        name: "Petter"
      }
    }
  });
</script>
效果如下:
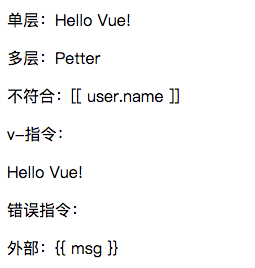
显然,vue 是对 html 进行解析,然后将其中匹配的对象进行替换,而不匹配和在挂载点之外的对象则不作处理。
由于在生成 vue 实例的时候,有传入挂载点,所以我们就能在 vue 中获取到这个节点,对其子节点进行编译解析,将符合要求的进行替换,不符合的则不作处理。
实现
这里先实现一个 Wvue(w: weak) 作为入口模块,用于接收用户传进的参数,随后调用 Compile 模块对 html 进行编译解析。
import Compile from "./compile.js";

class Wvue {
  constructor(options = {}) {
    this.$options = options;
    this.$el = options.el;
    this.$data = options.data;

    if (!this.$el) throw new Error("请指定挂载点");

    this._initCompile();
  }

  _initCompile() {
    new Compile(this.$el);
  }
}

export default Wvue;
接下来实现 Compile 类。通过上面的例子我们已经知道,vue 只会解析渲染挂载点内部的节点,所以我们这里的关注点放在挂载点的子,孙节点即可。子节点直接通过 childNodes 即可获得,而孙节点则需要通过递归来取。
class Compile {
  constructor(el) {
    this.el = this.isElementNode(el) ? el : document.querySelector(el);

    this.compile(this.el);
  }

  compile(node) {
    const childNodes = node.childNodes;
    [...childNodes].forEach(child => {
      if (child.childNodes && child.childNodes.length) {
        this.compile(child);
      }
    });
  }

  isElementNode(node) {
    return node.nodeType === 1;
  }
}

export default Compile;
在对节点进行解析之前,值得一提的是,如果节点进行内容替换,页面会进行回流和重绘,如果需要替换的节点非常多的情况下,性能消耗将会非常可怕,所以这里通过将节点转换成文档碎片,完成编译之后整体渲染进页面:
class Compile {
  constructor(el) {
    this.el = this.isElementNode(el) ? el : document.querySelector(el);

+    const fragment = this.node2Fragment(this.el);
M    this.compile(fragment);
+    this.el.append(fragment);
  }

  compile(node) {
    const childNodes = node.childNodes;
    [...childNodes].forEach(child => {
      if (child.childNodes && child.childNodes.length) {
        this.compile(child);
      }
    });
  }

+  node2Fragment(el) {
+  const f = document.createDocumentFragment();
+    let firstChild;
+    while ((firstChild = el.firstChild)) {
+      f.append(firstChild);
+    }
+    return f;
+  }

  isElementNode(node) {
    return node.nodeType === 1;
  }
}

export default Compile;
对于节点的编译,从 vue 的使用中可以看出,文本节点匹配 {{ }} 模板即可,而元素节点则会有各种 v- 指令,所以二者的编译应该分开处理:
class Compile {
  constructor(el) {
    this.el = this.isElementNode(el) ? el : document.querySelector(el);

    const fragment = this.node2Fragment(this.el);
    this.compile(fragment);
    this.el.append(fragment);
  }

+  compileElementNode(node) {
+    return;
+  }

+  compileTextNode(node) {
+    return;
+  }

  compile(node) {
    const childNodes = node.childNodes;
    [...childNodes].forEach(child => {
+      if (this.isElementNode(child)) {
+        this.compileElementNode(child);
+      } else {
+        this.compileTextNode(child);
+      }
      // get all childnodes
      if (child.childNodes && child.childNodes.length) {
        this.compile(child);
      }
    });
  }

  node2Fragment(el) {
    const f = document.createDocumentFragment();
    let firstChild;
    while ((firstChild = el.firstChild)) {
      f.append(firstChild);
    }
    return f;
  }

  isElementNode(node) {
    return node.nodeType === 1;
  }
}

export default Compile;
这里我们先来分析对元素节点的解析,既然要解析各种不同的 v- 指令,对其分别进行处理,那首先要做的就是拿到这些指令:
class Compile {
  constructor(el) {
    this.el = this._isElementNode(el) ? el : document.querySelector(el);

    const fragment = this.node2Fragment(this.el);
    this.compile(fragment);
    this.el.append(fragment);
  }

+  compileElementNode(node) {
+    const attrs = node.attributes;
+    [...attrs].forEach(attr => {
+      const { name } = attr;
+      if (this._isDirective(name)) {
+        const [, directive] = name.split("-");
+      }
+    });
+  }

  compileTextNode(node) {
    return;
  }

  compile(node) {
    const childNodes = node.childNodes;
    [...childNodes].forEach(child => {
      if (this._isElementNode(child)) {
        this.compileElementNode(child);
      } else {
        this.compileTextNode(child);
      }
      // get all childnodes
      if (child.childNodes && child.childNodes.length) {
        this.compile(child);
      }
    });
  }

  node2Fragment(el) {
    const f = document.createDocumentFragment();
    let firstChild;
    while ((firstChild = el.firstChild)) {
      f.append(firstChild);
    }
    return f;
  }

+  _isDirective(name) {
+    return name.startsWith("v-");
+  }

  _isElementNode(node) {
    return node.nodeType === 1;
  }
}

export default Compile;
大家知道,vue 有各种指令,如 v-text,v-html,v-show,v-if 等等,所以这里我们可以实现一个工具结构体,用于对不同指令进行处理:
class Compile {
  constructor(el) {
    this.el = this._isElementNode(el) ? el : document.querySelector(el);

    const fragment = this.node2Fragment(this.el);
    this.compile(fragment);
    this.el.append(fragment);
  }

  compileElementNode(node) {
    const attrs = node.attributes;
    [...attrs].forEach(attr => {
      const { name } = attr;
      if (this._isDirective(name)) {
        const [, directive] = name.split("-");
+         compileUtil[directive]();
      }
    });
  }

  compileTextNode(node) {
    return;
  }

  compile(node) {
    const childNodes = node.childNodes;
    [...childNodes].forEach(child => {
      if (this._isElementNode(child)) {
        this.compileElementNode(child);
      } else {
        this.compileTextNode(child);
      }
      // get all childnodes
      if (child.childNodes && child.childNodes.length) {
        this.compile(child);
      }
    });
  }

  node2Fragment(el) {
    const f = document.createDocumentFragment();
    let firstChild;
    while ((firstChild = el.firstChild)) {
      f.append(firstChild);
    }
    return f;
  }

  _isDirective(name) {
    return name.startsWith("v-");
  }

  _isElementNode(node) {
    return node.nodeType === 1;
  }
}

+ const compileUtil = {
+   text() {
+     return;
+   }
+ };

export default Compile;
这里的 text 方法需要什么参数呢?
首先我们是对节点进行渲染,那么必然需要节点作为参数,然后我们要去 data 中拿值,所以 wm 实例和 key 也都是需要的,那么需要的参数就确定了:
class Compile {
M  constructor(el, wm) {
    this.el = this._isElementNode(el) ? el : document.querySelector(el);
+    this.wm = wm;

    const fragment = this.node2Fragment(this.el);
    this.compile(fragment);
    this.el.append(fragment);
  }

  compileElementNode(node) {
    const attrs = node.attributes;
    [...attrs].forEach(attr => {
      const { name, value } = attr;
      if (this._isDirective(name)) {
        const [, directive] = name.split("-");
M        compileUtil[directive](node, value, this.wm);
      }
    });
  }

  compileTextNode(node) {
    return;
  }

  compile(node) {
    const childNodes = node.childNodes;
    [...childNodes].forEach(child => {
      if (this._isElementNode(child)) {
        this.compileElementNode(child);
      } else {
        this.compileTextNode(child);
      }
      // get all childnodes
      if (child.childNodes && child.childNodes.length) {
        this.compile(child);
      }
    });
  }

  node2Fragment(el) {
    const f = document.createDocumentFragment();
    let firstChild;
    while ((firstChild = el.firstChild)) {
      f.append(firstChild);
    }
    return f;
  }

  _isDirective(name) {
    return name.startsWith("v-");
  }

  _isElementNode(node) {
    return node.nodeType === 1;
  }
}

const compileUtil = {
M  text(node, exp, wm) {
    return;
  }
};

export default Compile;
到这一步,需要处理的节点也有的,需要替换的值也能取得了,直接取值进行替换即可:
class Compile {
constructor(el, wm) {
this.el = this._isElementNode(el) ? el : document.querySelector(el);
this.wm = wm;
const fragment = this.node2Fragment(this.el);
this.compile(fragment);
this.el.append(fragment);
}
compileElementNode(node) {
const attrs = node.attributes;
[...attrs].forEach(attr => {
const { name, value } = attr;
if (this._isDirective(name)) {
const [, directive] = name.split("-");
compileUtil[directive](node, value, this.wm);
}
});
}
compileTextNode(node) {
return;
}
compile(node) {
const childNodes = node.childNodes;
[...childNodes].forEach(child => {
if (this._isElementNode(child)) {
this.compileElementNode(child);
} else {
this.compileTextNode(child);
}
// get all childnodes
if (child.childNodes && child.childNodes.length) {
this.compile(child);
}
});
}
node2Fragment(el) {
const f = document.createDocumentFragment();
let firstChild;
while ((firstChild = el.firstChild)) {
f.append(firstChild);
}
return f;
}
_isDirective(name) {
return name.startsWith("v-");
}
_isElementNode(node) {
return node.nodeType === 1;
}
}
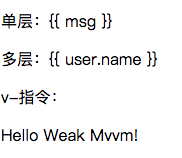
const compileUtil = {
text(node, exp, wm) {
const value = wm.$data[exp];
this.updater.textUpdater(node, value);
},
+ updater: {
+ textUpdater(node, value) {
+ node.textContent = value;
+ }
+ }
};
export default Compile;
效果如下:
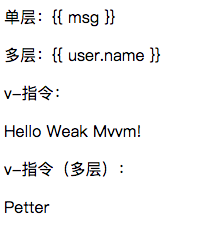
现在已经实现了最基础的 v-text 指令解析和渲染了,不过即便是 v-text,也还存在缺陷,比如绑定的是一个深层次的变量:比如 v-text="user.name",就无法渲染了,那么这个问题该如何解决呢?
通过分析,可以知道,深层次的值也是有规律的,就是使用 . 进行分割,那么这里也可以使用 split(".") 来分割变量,然后迭代这些变量,取得其中最深的值:
class Compile {
  constructor(el, wm) {
    this.el = this._isElementNode(el) ? el : document.querySelector(el);
    this.wm = wm;

    const fragment = this.node2Fragment(this.el);
    this.compile(fragment);
    this.el.append(fragment);
  }

  compileElementNode(node) {
    const attrs = node.attributes;
    [...attrs].forEach(attr => {
      const { name, value } = attr;
      if (this._isDirective(name)) {
        const [, directive] = name.split("-");
        compileUtil[directive](node, value, this.wm);
      }
    });
  }

  compileTextNode(node) {
    return;
  }

  compile(node) {
    const childNodes = node.childNodes;
    [...childNodes].forEach(child => {
      if (this._isElementNode(child)) {
        this.compileElementNode(child);
      } else {
        this.compileTextNode(child);
      }
      // get all childnodes
      if (child.childNodes && child.childNodes.length) {
        this.compile(child);
      }
    });
  }

  node2Fragment(el) {
    const f = document.createDocumentFragment();
    let firstChild;
    while ((firstChild = el.firstChild)) {
      f.append(firstChild);
    }
    return f;
  }

  _isDirective(name) {
    return name.startsWith("v-");
  }

  _isElementNode(node) {
    return node.nodeType === 1;
  }
}

const compileUtil = {
  text(node, exp, wm) {
M    const value = this._getValue(exp, wm);
    this._updater.textUpdater(node, value);
  },
  _updater: {
    textUpdater(node, value) {
      node.textContent = value;
    }
  },
+  _getValue(exp, wm) {
+    return exp.split(".").reduce((d, c) => {
+      return d[c];
+    }, wm.$data);
+  }
};

export default Compile;
效果如下:
接下来,在对文本节点处理之前,我们先做一些小小的优化:
- 将使用后的 v- 指令从节点中删除
- 将 compileUtil 和 _updater 模块化
import compileUtil from "./utils.js";

class Compile {
  constructor(el, wm) {
    this.el = this._isElementNode(el) ? el : document.querySelector(el);
    this.wm = wm;

    const fragment = this.node2Fragment(this.el);
    this.compile(fragment);
    this.el.append(fragment);
  }

  compileElementNode(node) {
    const attrs = node.attributes;
    [...attrs].forEach(attr => {
      const { name, value } = attr;
      if (this._isDirective(name)) {
        const [, directive] = name.split("-");
        compileUtil[directive](node, value, this.wm);
+       node.removeAttribute(`v-${directive}`);
      }
    });
  }

  compileTextNode(node) {
    return;
  }

  compile(node) {
    const childNodes = node.childNodes;
    [...childNodes].forEach(child => {
      if (this._isElementNode(child)) {
        this.compileElementNode(child);
      } else {
        this.compileTextNode(child);
      }
      // get all childnodes
      if (child.childNodes && child.childNodes.length) {
        this.compile(child);
      }
    });
  }

  node2Fragment(el) {
    const f = document.createDocumentFragment();
    let firstChild;
    while ((firstChild = el.firstChild)) {
      f.append(firstChild);
    }
    return f;
  }

  _isDirective(name) {
    return name.startsWith("v-");
  }

  _isElementNode(node) {
    return node.nodeType === 1;
  }
}

export default Compile;
const compileUtil = {
  text(node, exp, wm) {
    const value = this._getValue(exp, wm);
    updaterUtil.text(node, value);
  },

  _getValue(exp, wm) {
    return exp.split(".").reduce((d, c) => {
      return d[c];
    }, wm.$data);
  }
};

const updaterUtil = {
  text(node, value) {
    node.textContent = value;
  }
};

export default compileUtil;
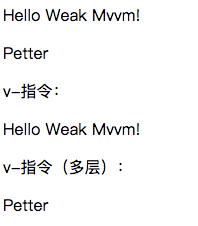
接下来是对文本节点的处理,对于文本节点,思路比较直接,匹配 {{}} 取其中内容即可,渲染方法与 v-text 一致:
import compileUtil from "./utils.js";

class Compile {
  constructor(el, wm) {
    this.el = this._isElementNode(el) ? el : document.querySelector(el);
    this.wm = wm;

    const fragment = this.node2Fragment(this.el);
    this.compile(fragment);
    this.el.append(fragment);
  }

  compileElementNode(node) {
    const attrs = node.attributes;
    [...attrs].forEach(attr => {
      const { name, value } = attr;
      if (this._isDirective(name)) {
        const [, directive] = name.split("-");
        compileUtil[directive](node, value, this.wm);
        node.removeAttribute(`v-${directive}`);
      }
    });
  }

+  compileTextNode(node) {
+    const txt = node.textContent;
+    const reg = /\{\{(.*)\}\}/;
+
+    if (reg.test(txt)) {
+      compileUtil["text"](node, RegExp.$1.trim(), this.wm);
+    }
+  }

  compile(node) {
    const childNodes = node.childNodes;
    [...childNodes].forEach(child => {
      if (this._isElementNode(child)) {
        this.compileElementNode(child);
      } else {
        this.compileTextNode(child);
      }
      // get all childnodes
      if (child.childNodes && child.childNodes.length) {
        this.compile(child);
      }
    });
  }

  node2Fragment(el) {
    const f = document.createDocumentFragment();
    let firstChild;
    while ((firstChild = el.firstChild)) {
      f.append(firstChild);
    }
    return f;
  }

  _isDirective(name) {
    return name.startsWith("v-");
  }

  _isElementNode(node) {
    return node.nodeType === 1;
  }
}

export default Compile;
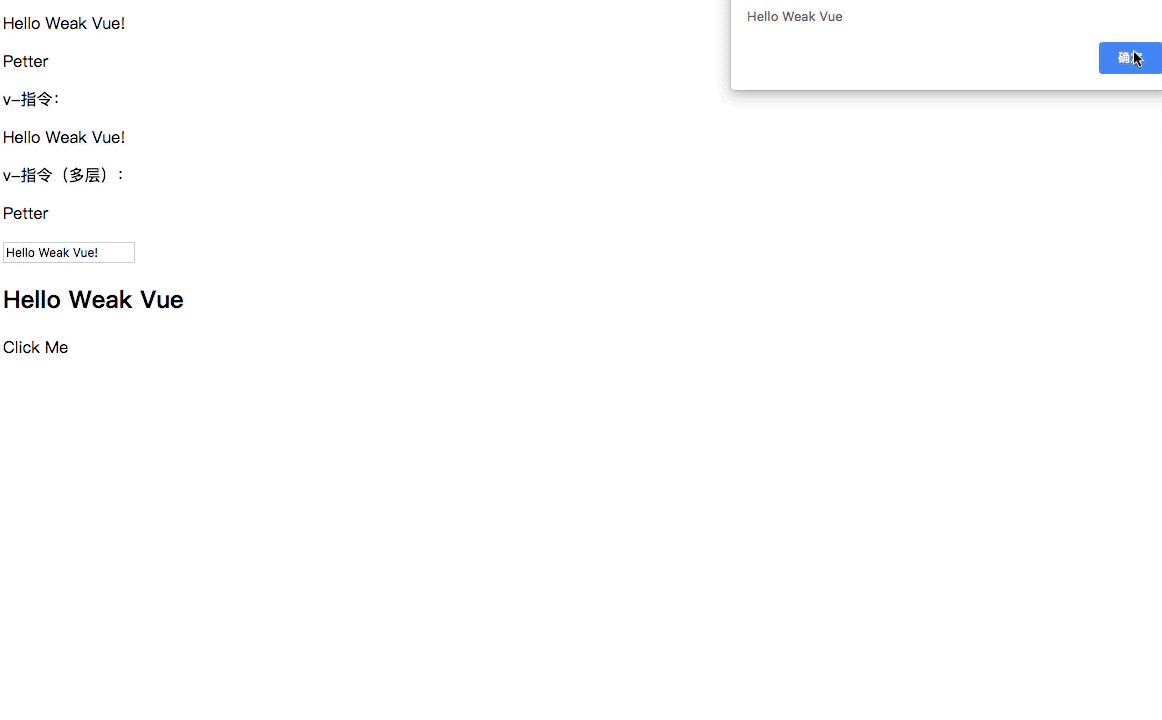
效果如下:
扩展
通过上面的代码,我们已经实现了最基本的 vue 模板解析渲染模块了,当然,我们知道 vue 还有其他众多常用指令,这里我们可以尝试实现一些其他的指令的解析渲染,比如 v-html,v-module,v-on。
其中 v-on 较为特殊,因为绑定事件的全写为 v-on:xxx,后面的 xxx 才是我们要绑定的事件。
结合前面的思路,这里我们同样可以通过 split(":") 来分割指令:
  compileElementNode(node) {
    const attrs = node.attributes;
    [...attrs].forEach(attr => {
      const { name, value } = attr;
      if (this._isDirective(name)) {
        const [, directive] = name.split("-");
 +       const [dir, event] = directive.split(":");
 M       compileUtil[dir](node, value, this.wm, event);
        node.removeAttribute(`v-${directive}`);
      }
    });
  }
现在就可以分别对其进行处理了:
const compileUtil = {
  text(node, exp, wm) {
    const value = this._getValue(exp, wm);
    updaterUtil.text(node, value);
  },

+  html(node, exp, wm) {
+    const value = this._getValue(exp, wm);
+    updaterUtil.html(node, value);
+  },
+  module(node, exp, wm) {
+    const value = this._getValue(exp, wm);
+    updaterUtil.module(node, value);
+  },
+  on(node, exp, wm, event) {
+    const fn = wm.$options.methods && wm.$options.methods[exp];
+    node.addEventListener(event, fn.bind(wm), false);
+  },

  _getValue(exp, wm) {
    return exp.split(".").reduce((d, c) => {
      return d[c];
    }, wm.$data);
  }
};

const updaterUtil = {
  text(node, value) {
    node.textContent = value;
  },
+  html(node, value) {
+    node.innerHTML = value;
+  },
+  module(node, value) {
+    node.value = value;
+  }
};

export default compileUtil;
效果如下:
小结
基础的解析和渲染到这里就告一段落了,上面梳理清楚了 vue 解析 html 的原理的流程,不过暂时还未触碰到 vue 响应式最核心的部分,现在更改 data 中的值,页面并不会发生变化。所以接下来,我们就要去实现一个模块,能够监听 data 中的值,当值发生变化的时候发出通知,再实现一个模块,当接收到变化的通知的时候,去更新视图,具体怎么做,我们下章再谈。
