

vue-element-admin 这个项目真的是一个非常完整的后台管理系统,在参考到markdown编辑器的时候,你有没有发现上传图片时,图片全部都是base64的形式呢?

准备工作
在 vue-element-admin 项目中可以找到 MarkdownEditor 组件,
codemirror 和 tui-editor。接下来,在自己的
.vue文件中引入即可
<template>
  <div class="app-container">
    <markdown-editor ref="markdownEditor" v-model="content" :options="{hideModeSwitch: true}" />
  </div>
</template>
<script>
import MarkdownEditor from '@/components/MarkdownEditor'
export default {
  components: {
    MarkdownEditor
  }
}
</script>
到这里就可以在页面中看到 markdown 组件啦~
正式开始
下面我们正式开始改起来!
- MarkdownEditor/default-options.js
由于我们需要更改上传图片的方式,因此需要把之前的上传按钮先注释掉重新添加
export default {
  minHeight: '200px',
  previewStyle: 'vertical',
  useCommandShortcut: true,
  useDefaultHTMLSanitizer: true,
  usageStatistics: false,
  hideModeSwitch: false,
  toolbarItems: [
    'heading',
    'bold',
    'italic',
    'strike',
    'divider',
    'hr',
    'quote',
    'divider',
    'ul',
    'ol',
    'task',
    'indent',
    'outdent',
    'divider',
    'table',
    // 'image',  // 这个文件就改这一处代码,注释原先的 image 按钮
    'link',
    'divider',
    'code',
    'codeblock'
  ]
}
- MarkdownEditor/index.vue
- template 部分
<template>
  <div>
    <div :id="id" />
    <input ref="files" style="display: none" type="file" accept="image/*" @change="uploadFile">
    <button id="upload-btn" style="display: none" class="custom-button" />
  </div>
</template>
增加我们点击上传的方法,注意事项:
① 此处使用原生的方式将 input 标签的 type 属性设置为"file";
② accept 表示上传类型仅支持 image 开头的文件(也就是只能上传图片喽,可以自己更改的哈);
③ button 标签就是要重新添加进 markdown 的上传按钮;
④ 记得要把它们隐藏哦!!! style="display: none"
- js 部分
methods: {
initEditor() {
this.editor = new Editor({
el: document.getElementById(this.id),
...this.editorOptions
})
if (this.value) {
this.editor.setValue(this.value)
}
this.editor.on('change', () => {
this.$emit('input', this.editor.getValue())
})
/***** 在这个位置调用一个方法,增加自定义button *****/
this.customBtn()
},
/***** 添加自定义按钮,以下三个方法都是新增的哦 *****/
customBtn() {
// 获取编辑器上的功能条
const toolbar = this.editor.getUI().getToolbar()
// 这里获取到的是上面 input 节点(给input设置了ref="files")
const fileDom = this.$refs.files
// 添加事件
this.editor.eventManager.addEventType('uploadEvent')
this.editor.eventManager.listen('uploadEvent', () => {
fileDom.click()
})
// 添加自定义按钮,第二个参数代表要添加的,不传默认放在最后
toolbar.addButton({
name: 'customize',
className: 'tui-image', // 这里直接用 tui-editor 自己的类名,相当于设置了图片的icon样式
event: 'uploadEvent',
tooltip: 'insert image', // hover 时的提示信息
el: document.getElementById('upload-btn') // 点击上传的按钮节点
}, 13)
},
/***** 自定义上传图片处理 *****/
async uploadFile(e) {
const target = e.target
if (!target.files.length) return
const file = target.files[0]
// 这里我们和 input 标签中 accept 属性设置的值保持一致,给它正则一下
if (!/\image\//.test(file.type)) return this.$message.error('文件类型错误')
const formdata = new FormData()
formdata.append('file', file)
// 这是我们往服务器上传图片调接口
const { data } = await uploadFile(formdata)
// 将返回来的 url 添加到 markdown 中
this.addImgToMd(data)
// 重置 input 中 file 的值
target.value = ''
},
/***** 添加图片到 markdown *****/
addImgToMd(data) {
const editor = this.editor.getCodeMirror()
const editorHtml = this.editor.getCurrentModeEditor()
const isMarkdownMode = this.editor.isMarkdownMode()
if (isMarkdownMode) {
// 这里是markdown语法
editor.replaceSelection(``)
} else {
const range = editorHtml.getRange()
const img = document.createElement('img')
img.src = `${data}`
img.alt = 'img'
range.insertNode(img)
}
}
/***** 其他的代码都不用做改动,记得引入自己调接口的方法哦 *****/
}
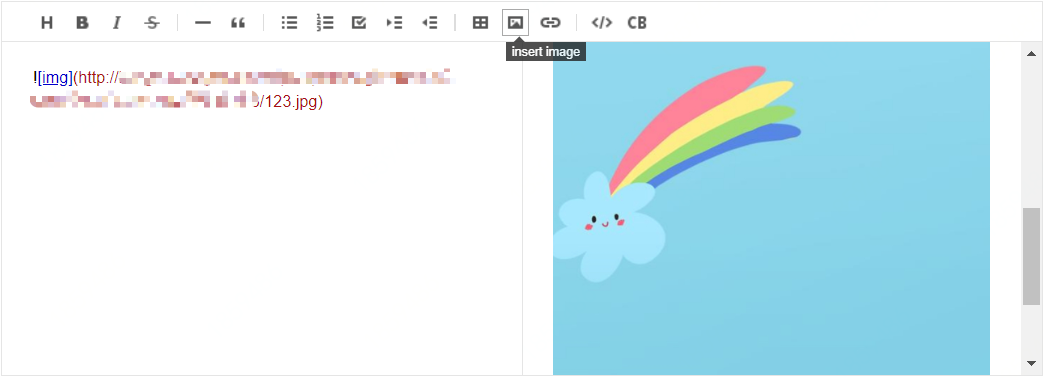
看下效果吧
附上参考链接
