

该Dagger基础页解释Dagger如何能够帮助您在您的应用程序自动依赖注入。使用Dagger,您不必编写乏味且容易出错的样板代码。
最佳做法
注意:如果您已经熟悉Dagger,请查看这些最佳做法。如果不是,请阅读此页面上的其他内容,稍后再返回。
@Inject尽可能使用构造函数注入与向Dagger图添加类型。如果不是:
- 使用
@Binds告诉Dagger的接口应该有哪些实现。 - 使用
@Provides告诉Dagger如何提供类,你的项目没有自己的。
添加依赖项
要在项目中使用Dagger,请将这些依赖项添加到build.gradle文件中的应用程序中。您可以在此GitHub项目中找到最新版本的Dagger 。
dependencies {
    implementation 'com.google.dagger:dagger:2.x'
    annotationProcessor 'com.google.dagger:dagger-compiler:2.x'
}
Android中的Dagger
考虑一个具有图1中的依赖关系图的Android应用示例。
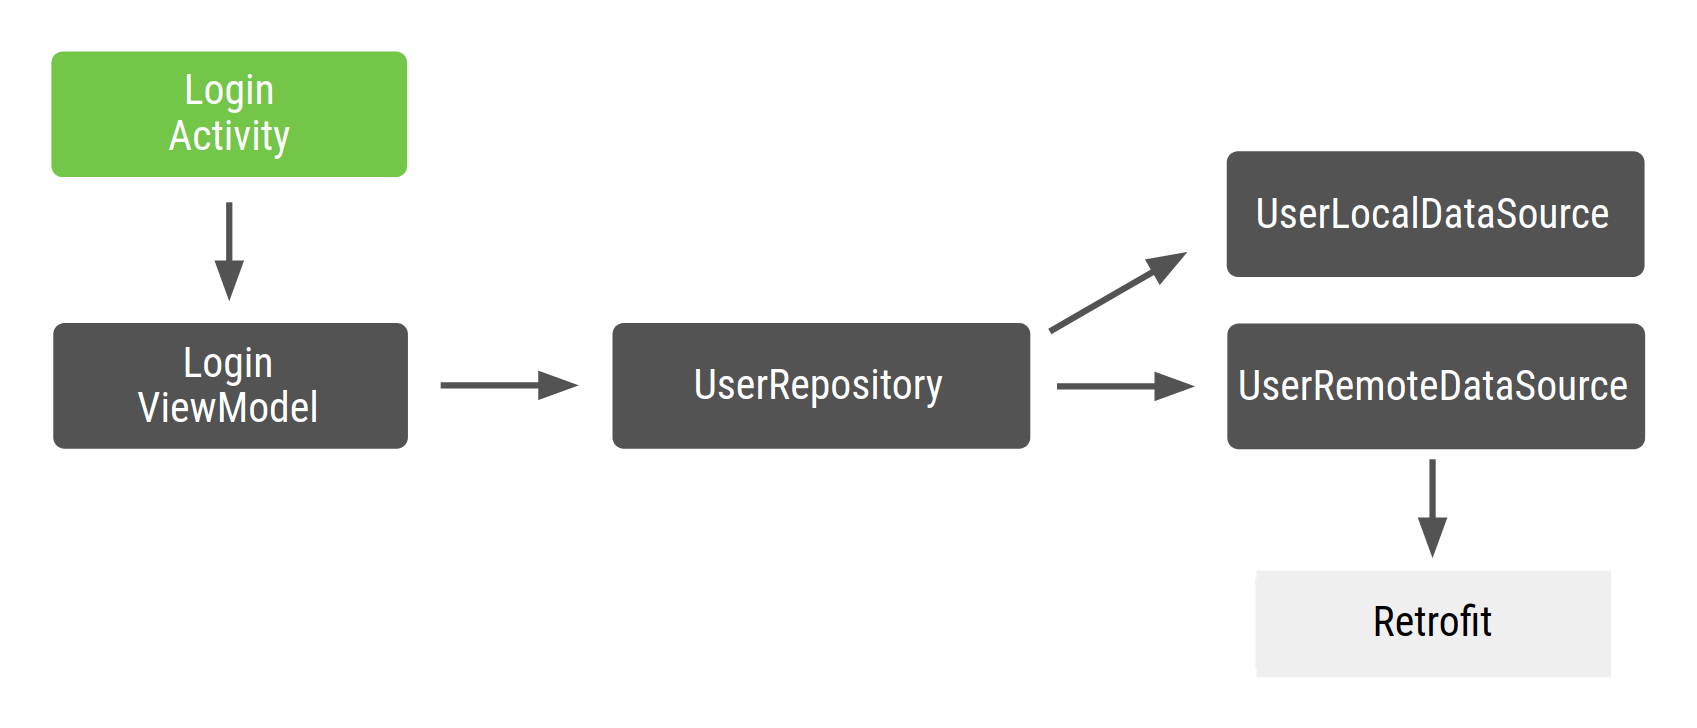
在Android中,您通常会创建一个Dagger图形,该图形存在于您的application类中,因为只要该应用程序在运行,您都希望该图形的实例在内存中。这样,图形便会附加到应用程序生命周期。在某些情况下,您可能还希望在图中使用应用程序上下文。为此,您还需要将图形放在应用程序类中。这种方法的优点之一是该图可用于其他Android框架类。此外,它允许您在测试中使用自定义应用程序类,从而简化了测试。
由于生成图形的接口带有注释@Component,因此可以将其称为ApplicationComponent或ApplicationGraph。通常,您在自定义应用程序类中保留该组件的实例,并在每次需要应用程序图时调用它,如以下代码片段所示:
// Definition of the Application graph
@Component
public interface ApplicationComponent {
}

// appComponent lives in the Application class to share its lifecycle
public class MyApplication extends Application {

    // Reference to the application graph that is used across the whole app
    ApplicationComponent appComponent = DaggerApplicationComponent.create();
}
由于某些Android框架类(例如Activity和Fragment)是由系统实例化的,因此Dagger无法为您创建它们。特别是对于Activity,任何初始化代码都需要进入该onCreate()方法。这意味着您不能@Inject像在前面的示例中那样在类的构造函数中使用注释(构造函数注入)。相反,您必须使用字段注入。
注意:“ Dagger基础”页面介绍了如何@Inject在构造函数中使用Dagger注释。此注释告诉Dagger如何创建类的实例。
您希望Dagger在onCreate()方法中为您填充那些依赖关系,而不是在方法中创建Activity需要的依赖关系。对于字段注入,您可以将@Inject注释应用于要从Dagger图获取的字段。
public class LoginActivity extends Activity {

   // You want Dagger to provide an instance of LoginViewModel from the graph
   @Inject
   LoginViewModel loginViewModel;
}
为简单起见,LoginViewModel不是Android体系结构组件ViewModel;它只是充当ViewModel的常规类。有关如何注入这些类的更多信息,请查看官方的Android Blueprints Dagger实现中的代码。
使用Dagger的考虑之一是注入的字段不能是私有的。它们至少需要像前面的代码中一样具有程序包专用的可见性。
注意:字段注入仅应在无法使用构造函数注入的Android框架类中使用。
Activity注入
Dagger需要知道LoginActivity必须访问图形才能提供ViewModel所需的图形。在Dagger基本信息页面中,您使用了该@Component接口,以通过从图中获取返回类型的函数公开函数来从图中获取对象。在这种情况下,您需要告诉Dagger有关LoginActivity需要注入依赖项的对象(在这种情况下)。为此,您公开了一个将请求注入的对象作为参数的函数。
@Component
public interface ApplicationComponent {
    // This tells Dagger that LoginActivity requests injection so the graph needs to
    // satisfy all the dependencies of the fields that LoginActivity is injecting.
    void inject(LoginActivity loginActivity);
}
此函数告诉Dagger LoginActivity想要访问图形并请求注入。Dagger需要满足LoginActivity所有需要的依赖 (LoginViewModel具有自己的依赖)。如果您有多个请求注入的类,则必须使用其确切类型在组件中专门声明它们。例如,如果您有LoginActivity并RegistrationActivity请求注射,则将 有两种 inject()方法,而不是通用的一种方法,它同时涵盖了两种情况。通用 inject()方法不会告诉Dagger需要提供什么。接口中的函数可以具有任何名称,但是inject()在Dagger中,当它们接收到要作为参数注入的对象时调用它们是可以的。
要将对象注入活动中,可以使用appComponent应用程序类中的定义并调用inject()方法,传入请求注入的活动实例。
使用活动时,onCreate()在调用之前将Dagger插入活动的方法中,super.onCreate()以避免片段恢复问题。在中的还原阶段super.onCreate(),活动会附加可能要访问活动绑定的片段。
使用片段时,在片段的onAttach() 方法中插入Dagger 。在这种情况下,可以在调用之前或之后进行super.onAttach()。
public class LoginActivity extends Activity {

    // You want Dagger to provide an instance of LoginViewModel from the graph
    @Inject
    LoginViewModel loginViewModel;

    @Override
    protected void onCreate(Bundle savedInstanceState) {
        // Make Dagger instantiate @Inject fields in LoginActivity
        ((MyApplication) getApplicationContext()).appComponent.inject(this);
        // Now loginViewModel is available

        super.onCreate(savedInstanceState);
    }
}

public class LoginViewModel {

    private final UserRepository userRepository;

    // @Inject tells Dagger how to create instances of LoginViewModel
    @Inject
    public LoginViewModel(UserRepository userRepository) {
        this.userRepository = userRepository;
    }
}
让我们告诉Dagger如何提供其余的依赖关系来构建图形:
public class UserRepository {

    private final UserLocalDataSource userLocalDataSource;
    private final UserRemoteDataSource userRemoteDataSource;

    @Inject
    public UserRepository(UserLocalDataSource userLocalDataSource, UserRemoteDataSource userRemoteDataSource) {
        this.userLocalDataSource = userLocalDataSource;
        this.userRemoteDataSource = userRemoteDataSource;
    }
}

public class UserLocalDataSource {

    @Inject
    public UserLocalDataSource() {}
}

public class UserRemoteDataSource {

    private final LoginRetrofitService loginRetrofitService;

    @Inject
    public UserRemoteDataSource(LoginRetrofitService loginRetrofitService) {
        this.loginRetrofitService = loginRetrofitService;
    }
}
Dagger模块
对于此示例,您正在使用Retrofit网络库。UserRemoteDataSource依赖LoginRetrofitService。但是,创建的实例的LoginRetrofitService方式与您到目前为止所做的不同。这不是类的实例化;这是调用Retrofit.Builder()并传入不同参数来配置登录服务的结果。
除了@Inject注释之外,还有一种方法可以告诉Dagger如何提供类的实例:Dagger模块内部的信息。Dagger模块是用@Module注释的类。在那里,您可以使用@Provides批注定义依赖项。
// @Module informs Dagger that this class is a Dagger Module
@Module
public class NetworkModule {

    // @Provides tell Dagger how to create instances of the type that this function
    // returns (i.e. LoginRetrofitService).
    // Function parameters are the dependencies of this type.
    @Provides
    public LoginRetrofitService provideLoginRetrofitService() {
        // Whenever Dagger needs to provide an instance of type LoginRetrofitService,
        // this code (the one inside the @Provides method) is run.
        return new Retrofit.Builder()
                .baseUrl("https://example.com")
                .build()
                .create(LoginService.class);
    }
}
注意:您可以使用@ProvidesDagger模块中的注释来告诉Dagger如何提供您的项目不拥有的类(例如的实例 Retrofit)。 对于接口的实现,最佳实践是using @Binds,如您在Android应用程序codelab中的Using Dagger中所见。
模块是一种语义封装有关如何提供对象的信息的方法。如您所见,您调用了该类NetworkModule以对提供与网络相关的对象的逻辑进行分组。如果应用程序扩展,您还可以添加如何在OkHttpClient此处提供或如何配置Gson或Moshi。
@Provides方法的依赖关系是该方法的参数。对于先前的方法,LoginRetrofitService可以提供不依赖项,因为该方法没有参数。如果您声明了OkHttpClient作为参数,则Dagger将需要OkHttpClient从图中提供一个实例来满足的依赖性LoginRetrofitService。例如:
@Module
public class NetworkModule {

    @Provides
    public LoginRetrofitService provideLoginRetrofitService(OkHttpClient okHttpClient) {
        ...
    }
}
为了使Dagger图了解此模块,必须将其添加到@Component界面中,如下所示:
// The "modules" attribute in the @Component annotation tells Dagger what Modules
// to include when building the graph
@Component(modules = NetworkModule.class)
public interface ApplicationComponent {
    ...
}
向Dagger图添加类型的推荐方法是使用构造函数注入(即@Inject,在类的构造函数上带有注释)。有时,这是不可能的,您必须使用Dagger模块。一个示例是您希望Dagger使用计算结果来确定如何创建对象实例的情况。每当必须提供该类型的实例时,Dagger都会在@Provides方法内部运行代码。
这是示例中的Dagger图现在的样子:
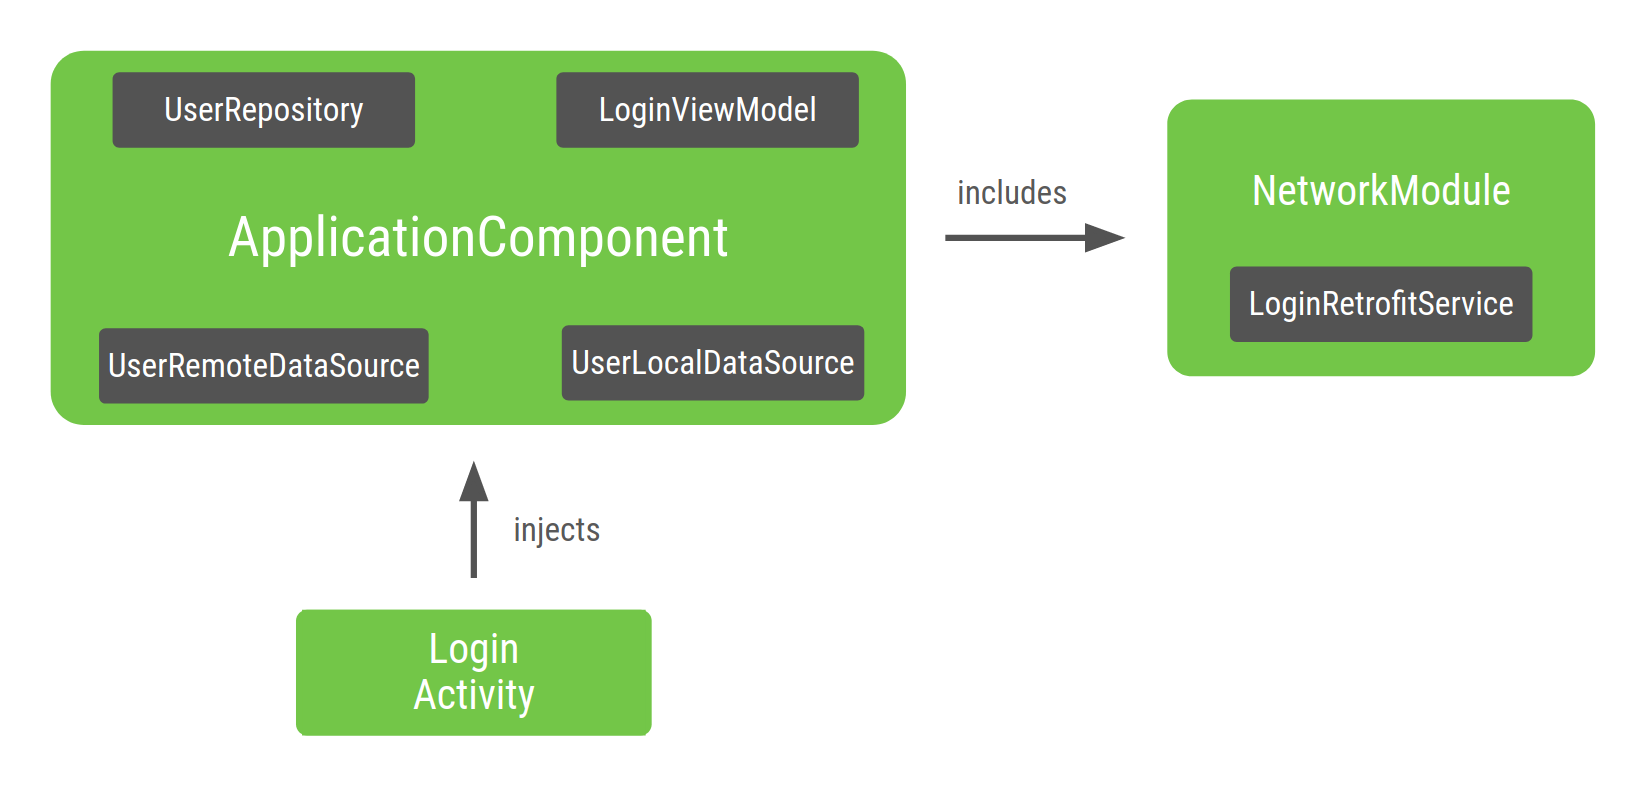
在ApplicationComponentDagger生成的内部,有一个工厂类型的方法来获取它知道如何提供的所有类的实例。在这个例子中,匕首委托给NetworkModule包括在 ApplicationComponent获得的一个实例LoginRetrofitService。
Dagger范围
在Dagger基础页面上提到了范围,这是在组件中具有类型的唯一实例的一种方式。这是 将类型范围限定到组件的生命周期的意思。
因为您可能想UserRepository在应用程序的其他功能中使用,并且可能不想在每次需要它时都创建一个新对象,所以可以将其指定为整个应用程序的唯一实例。这是相同的LoginRetrofitService:创建起来可能会很昂贵,并且您还希望重用该对象的唯一实例。创建一个实例UserRemoteDataSource并不昂贵,因此不必在组件的生命周期内进行限定。
@Singleton是javax.inject软件包随附的唯一作用域注释。您可以使用它来批注ApplicationComponent 以及要在整个应用程序中重用的对象。
注意:可以使用任何作用域注释在组件中具有类型的唯一实例,只要该组件和类型都带有注释。 @SingletonDagger库附带了Dagger库,通常用于对应用程序组件进行注释,但是您可以创建一个具有不同名称的自定义组件(例如@ApplicationScope)。
@Singleton
@Component(modules = NetworkModule.class)
public interface ApplicationComponent {
    void inject(LoginActivity loginActivity);
}

@Singleton
public class UserRepository {

    private final UserLocalDataSource userLocalDataSource;
    private final UserRemoteDataSource userRemoteDataSource;

    @Inject
    public UserRepository(UserLocalDataSource userLocalDataSource, UserRemoteDataSource userRemoteDataSource) {
        this.userLocalDataSource = userLocalDataSource;
        this.userRemoteDataSource = userRemoteDataSource;
    }
}

@Module
public class NetworkModule {

    @Singleton
    @Provides
    public LoginRetrofitService provideLoginRetrofitService() { ... }
}
注意:使用范围注释的模块只能在使用相同范围进行注释的组件中使用。
将范围应用于对象时,请注意不要引入内存泄漏。只要作用域组件位于内存中,那么创建的对象也位于内存中。因为ApplicationComponent是在启动应用程序时(在应用程序类中)创建的,所以在销毁应用程序时会销毁它。因此,UserRepository始终唯一的实例始终保留在内存中,直到应用程序被破坏为止。
注意:使用构造函数注入(带有@Inject)时,在类中添加范围注释,而@Provides使用Dagger模块时,将它们添加到方法中。
Dagger子组件
如果你的登录流程包含多个fragment(这些fragment被LoginActivity管理),应当在多个fragment中复用相同的LoginViewModel实例。不能通过为LoginViewModel添加@Singleton注解来复用实例,因为:
- 登录流程结束
LoginViewModel实例仍然停留在内存中。 - 每一次登录流程你都需要不同的
LoginViewModel实例。例如,用户退出登录,你需要一个不同的LoginViewModel实例,而不是用户首次登录相同的实例。
为了确保LoginViewModel的作用域在
LoginActivity的生命周期中,你需要为登录流程和作用域创建一个新组件(一个新子图)。
让我们创建一个针对登录流程的图
@Component
public interface LoginComponent {
}
现在,LoginActivity应当从LoginComponent中获取注入,因为它一个特定于登录的配置。ApplicationComponent将移除注入LoginActivity的职责。
@Component
public interface LoginComponent {
    void inject(LoginActivity loginActivity);
}
LoginComponent必须能够访问ApplicationComponent中的对象,因为LoginViewModel依赖UserRepository。告诉Dagger您希望新组件使用其他组件的一部分的方法是使用 Dagger子组件。新组件必须是包含共享资源的组件的子组件。
子组件继承和扩展父组件的对象图。因此,父组件提供的所有对象,在子组件中也被提供。子组件中的对象可以依赖被父组件提供的对象。
为了创建一个子组件实例,你需要一个父组件实例。因此,父组件提供给子组件的对象,作用范围仍然在父组件中。
在这个例子中,你必须定义LoginComponent为ApplicationComponent的字组件。要做到这一点,为LoginComponent添加@Subcomponent注解。
// @Subcomponent annotation informs Dagger this interface is a Dagger Subcomponent
@Subcomponent
public interface LoginComponent {

    // This tells Dagger that LoginActivity requests injection from LoginComponent
    // so that this subcomponent graph needs to satisfy all the dependencies of the
    // fields that LoginActivity is injecting
    void inject(LoginActivity loginActivity);
}
你也必须在LoginComponent中定义一个子组件工厂,以便ApplicationComponent知道如何创建LoginComponent实例。
@Subcomponent
public interface LoginComponent {

    // Factory that is used to create instances of this subcomponent
    @Subcomponent.Factory
    interface Factory {
        LoginComponent create();
    }

    void inject(LoginActivity loginActivity);
}
为了告诉Dagger,LoginComponent是ApplicationComponent的一个子组件,你需要以下步骤指明它:
1.创建一个新的Dagger模块(例如SubcomponentsModule),将子组件类传递给注解的subcomponents属性。
// The "subcomponents" attribute in the @Module annotation tells Dagger what
// Subcomponents are children of the Component this module is included in.
@Module(subcomponents = LoginComponent.class)
public class SubcomponentsModule {
}
2.将新的模块添加到ApplicationComponent。
// Including SubcomponentsModule, tell ApplicationComponent that
// LoginComponent is its subcomponent.
@Singleton
@Component(modules = {NetworkModule.class, SubcomponentsModule.class})
public interface ApplicationComponent {
}
注意ApplicationComponent不再需要注入LoginActivity,因为这部分职责属于LoginComponent。所以你可以移除ApplicationComponent的inject()方法。
ApplicationComponent的消费者需要知道如何创建LoginComponent实例。父组件必须在他的接口中添加一个方法让消费者创建子组件实例。
3.暴露工厂,在接口中创建LoginComponent实例
@Singleton
@Component(modules = { NetworkModule.class, SubcomponentsModule.class} )
public interface ApplicationComponent {
// This function exposes the LoginComponent Factory out of the graph so consumers
// can use it to obtain new instances of LoginComponent
LoginComponent.Factory loginComponent();
}
将范围分配给子组件
如果你建立的项目,您可以创建的实例ApplicationComponent 和LoginComponent。ApplicationComponent附加到应用程序的生命周期,因为只要应用程序在内存中,您就想使用相同的图形实例。
什么是生命周期LoginComponent?之所以需要这样做的原因之一 LoginComponent是因为您需要在与LoginViewModelLogin相关的片段之间共享相同的实例 。而且,LoginViewModel每当有新的登录流程时,您都需要不同的实例。LoginActivity 是适用的生命周期LoginComponent:对于每个新活动,您都需要一个的新实例LoginComponent和可以使用该实例的片段 LoginComponent。
由于LoginComponent已附加到LoginActivity生命周期,因此必须在活动中保留对组件的引用,就像applicationComponent在应用程序类中保留对组件的引用一样。这样,片段可以访问它。
注意,该变量loginComponent没有注释,@Inject 因为您不希望Dagger提供该变量。
您可以使用ApplicationComponent来获取对LoginComponent的引用,然后按如下所示注入LoginActivity:
LoginComponent是在活动的onCreate()方法中创建的,并且在活动被销毁时会隐式销毁。
在LoginComponent必须提供相同的实例LoginViewModel 会在每次请求的时间。您可以通过创建一个自定义的注释范围和注释都保证这一点LoginComponent,并LoginViewModel用它。请注意,您不能使用@Singleton注释,因为注释已被父组件使用,并且会使对象成为应用程序单例(整个应用程序的唯一实例)。您需要创建其他注释范围。
注意:作用域的规则如下: 当类型用作用域注释标记时,只能由具有相同作用域注释的组件使用。 当组件用范围注释标记时,它只能提供带有该注释的类型或没有注释的类型。 子组件不能使用其父组件之一使用的范围注释。 在这种情况下,组件还涉及子组件。
在这种情况下,您可以调用此作用域,@LoginScope但这不是一个好习惯。范围注释的名称不应针对其实现的目的而明确。而是应根据其生存期来命名,因为注释可以通过诸如RegistrationComponent 和的同级组件重用SettingsComponent。因此,您应该调用它@ActivityScope而不是@LoginScope。
现在,如果您有两个需要的片段,则LoginViewModel它们都具有相同的实例。例如,如果您有 LoginUsernameFragment和,LoginPasswordFragment则需要通过来注入它们LoginComponent:
组件访问驻留在LoginActivity对象中的组件实例 。的示例代码LoginUserNameFragment出现在以下代码片段中:
和相同的LoginPasswordFragment:
图3显示了带有新子组件的Dagger图。带白点(UserRepository,LoginRetrofitService和LoginViewModel)的类是具有唯一实例的实例,该实例的作用域仅限于其各自的组件。
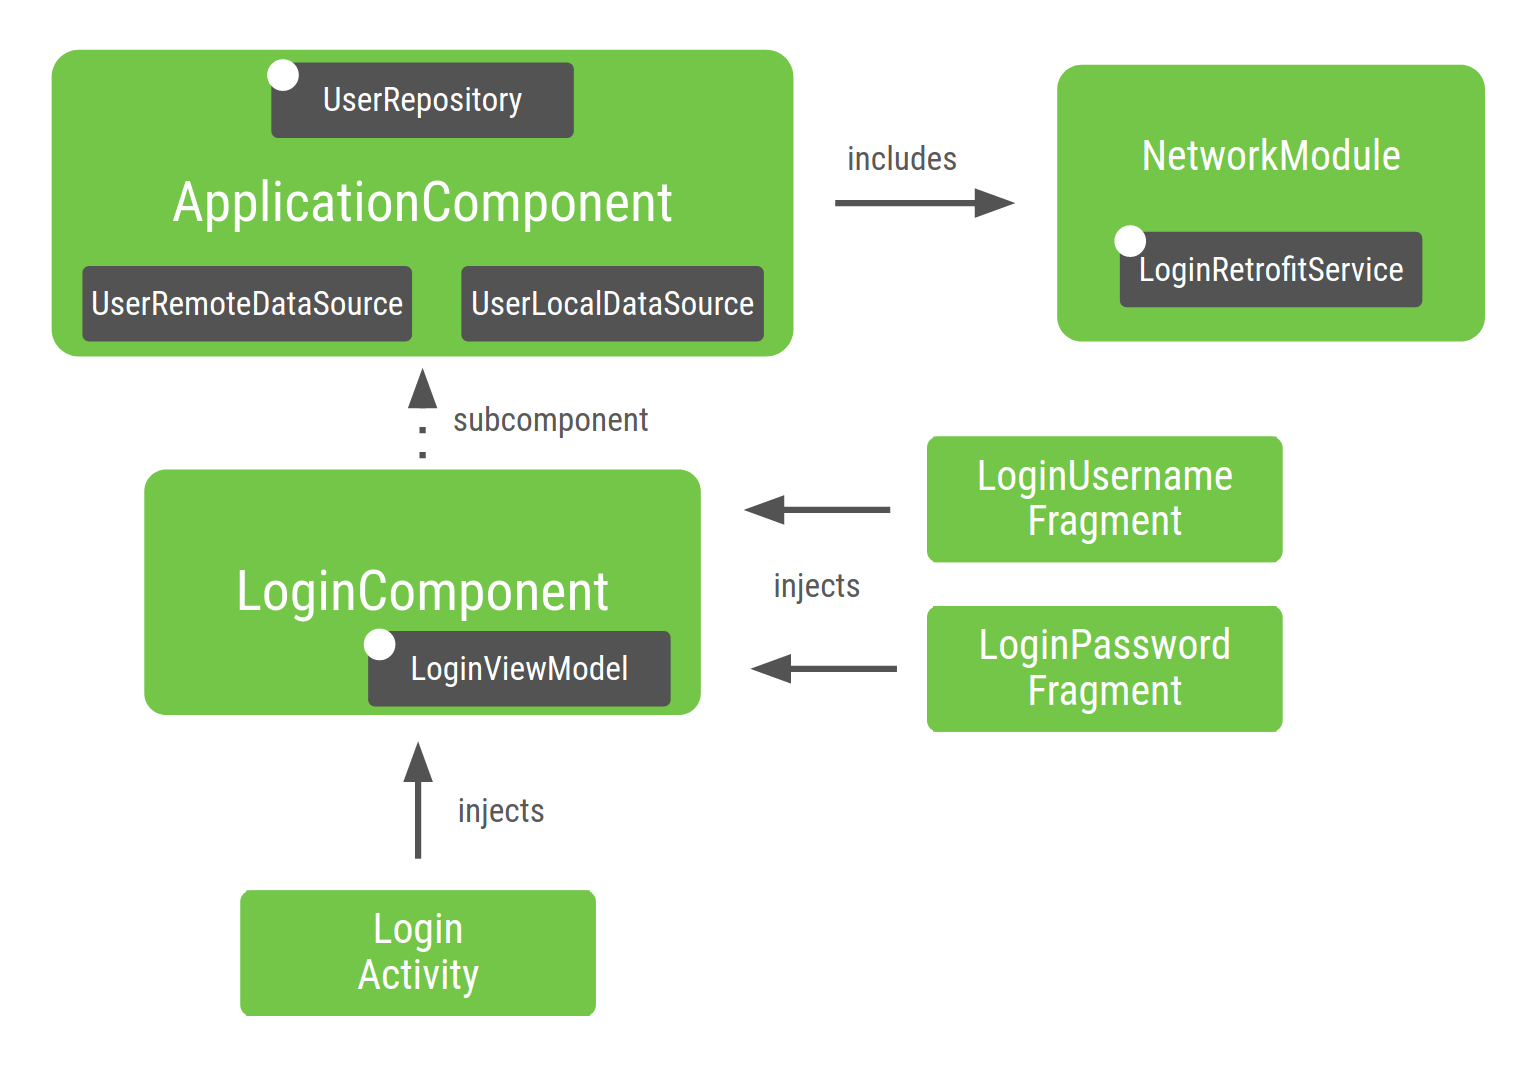
图3.您为Android应用程序示例构建的图形的表示形式
让我们分解图的各部分:
的NetworkModule(因此LoginRetrofitService)被列入ApplicationComponent,因为你在组件中指定它。
UserRepository保留在内,ApplicationComponent因为它的作用域为 ApplicationComponent。如果项目发展,您想在不同功能(例如注册)中共享同一实例。
因为UserRepository是的一部分ApplicationComponent,所以它的依赖项(即UserLocalDataSource和UserRemoteDataSource)也必须在此组件中,以便能够提供的实例UserRepository。
LoginViewModel之所以包含,LoginComponent是因为只有注入的类才需要它LoginComponent。LoginViewModel不包含在内, ApplicationComponent因为对ApplicationComponent需求 没有依赖性LoginViewModel。
同样,如果您没有将作用域限定UserRepository为ApplicationComponent,则Dagger会自动包含UserRepository它,并且它的依赖项也作为一部分,LoginComponent因为Dagger 是当前唯一使用的地方 UserRepository。
除了将对象的作用域限定为不同的生命周期之外,创建子组件是一种将应用程序的不同部分相互封装的良好实践。
根据应用程序的流程来构建应用程序以创建不同的Dagger子图,有助于在内存和启动时间方面实现性能更高且可扩展的应用程序。
注意:如果您需要容器来抵抗配置更改(例如设备旋转),请遵循“ 保存UI状态”指南。您可能希望以与处理终止相同的方式来处理配置更改。否则,您的应用可能会在低端设备上丢失状态。
建立Dagger图时的最佳做法
为您的应用程序构建Dagger图时:
创建组件时,应考虑哪个元素负责该组件的生命周期。在这种情况下,应用程序类是负责ApplicationComponent和LoginActivity负责LoginComponent。
仅在有意义时才使用作用域。过度使用作用域会对应用程序的运行时性能产生负面影响:只要组件在内存中,对象就在内存中,获取作用域对象的代价更高。当Dagger提供对象时,它将使用DoubleCheck锁定而不是工厂类型的提供程序。
测试使用Dagger的项目
使用像Dagger这样的依赖注入框架的好处之一是,它使测试代码更加容易。
单元测试
您不必使用Dagger进行单元测试。测试使用构造函数注入的类时,无需使用Dagger实例化该类。您可以直接调用其构造函数,直接传递假的或模拟的依赖项,就像没有注释时一样。
例如,在测试时LoginViewModel:
端到端测试
对于集成测试,一个好的做法是创建一个 TestApplicationComponent测试工具。 生产和测试使用不同的组件配置。
这需要对应用程序中的模块进行更多的前期设计。测试组件扩展了生产组件并安装了一组不同的模块。
FakeNetworkModule具有原始的伪造实现NetworkModule。在那里,您可以提供要替换的假实例或模拟对象。
在集成测试或端到端测试中,您将使用TestApplication创建TestApplicationComponent而不是的ApplicationComponent。
然后,在自定义TestRunner中使用此测试应用程序,您将使用它运行仪器测试。有关此的更多信息,请在Android应用程序代码实验室中查看“ 使用Dagger”。
使用Dagger模块
Dagger模块是一种封装方式,以语义方式提供对象。您可以在组件中包含模块,但也可以在其他模块中包含模块。它功能强大,但很容易被滥用。
将模块添加到组件或其他模块后,它已经在Dagger图形中;Dagger可以在该组件中提供那些对象。在添加模块之前,通过检查该模块是否已添加到组件中或通过编译项目并查看Dagger是否可以找到该模块所需的依赖关系,来检查该模块是否已成为Dagger图的一部分。
优良作法规定,模块在组件中只能声明一次(特定的高级Dagger用例之外)。
假设您以这种方式配置了图表。ApplicationComponent 包括Module1与Module2和Module1包括ModuleX。
如果现在Module2取决于所提供的类ModuleX。甲不好的做法 是包括ModuleX在Module2因为ModuleX在如见于下面的代码段的曲线图被包括两次:
而是,您应该执行以下任一操作:
重构模块并将公共模块提取到组件中。 使用两个模块共享的对象创建一个新模块,并将其提取到组件中。 不以这种方式进行重构会导致很多模块彼此包含,而没有清晰的组织意识,并使每个依赖关系的来源变得更加困难。
良好做法(选项1):在Dagger图中一次声明ModuleX。
最好的做法(选项2) :从普通的依赖Module1,并Module2 在ModuleX被提取出来命名为一个新的模块ModuleXCommon中包含的组件。然后ModuleXWithModule1Dependencies,ModuleXWithModule2Dependencies创建另外两个名为 和的模块,每个模块都具有特定的依赖关系。所有模块在Dagger图中都声明一次。
结论
如果还没有,请查看“ 最佳做法”部分。要查看如何在Android应用程序中使用Dagger,请参阅在Android应用程序代码实验室中使用Dagger。
