

** 创建一个简单的ReactNative 程序 **
使用下面三个命令可以创建一个简单的ReactNative程序,并在iOS模拟器上运行 (无论是运行在安卓还是iOS模拟器上,都需要在开启模拟器的情况下运行程序)
react-native init AwesomeProject
cd AwesomeProject
react-native run-ios
** 那么如何将ReactNative的界面嵌入到iOS程序中那?**
- 首先将新创建的 AwesomeProject 程序目录下的
package.json和index.ios.js文件拷贝自己的原生程序目录下面 (自己新建目录统一放置也可以) - 在命令行 切换到
package.json所在的目录,并执行sudo npm install输入密码后回车,等待执行成功 - 在Podfile中加入
pod 'Yoga',  :path => './node_modules/react-native/ReactCommon/yoga'
pod 'React', :path => './node_modules/react-native', :subspecs => [
        'Core',
        'BatchedBridge',
        'DevSupport',
        'ART',
        'RCTActionSheet',
        'RCTAnimation',
        'RCTImage',
        'RCTNetwork',
        'RCTText',
        'RCTWebSocket',
        'RCTLinkingIOS',
]
# 这是一份基础的添加库列表,其他如有需要继续添加
- 执行
pod update --verbose等待更新成功
好的,已经将关于RN的准备工作做完了,下面还要对原生程序进行一点小改造:
- a. 设置程序Info.plist文件中的
App Transport Security Settings确保http协议可以正常通信
- b. 在程序中添加:
    // ----------第一种方式----------
    #import <React/RCTRootView.h>
    NSString * strUrl = @"http://localhost:8081/index.ios.bundle?platform=ios";
    NSURL * jsCodeLocation = [NSURL URLWithString:strUrl];

    RCTRootView * rootView = [[RCTRootView alloc] initWithBundleURL:jsCodeLocation
                                                         moduleName:@"AwesomeProject"
                                                  initialProperties:nil
                                                      launchOptions:nil];
    rootView.frame = self.view.bounds;
    [self.view addSubview:rootView];

    // ----------第二种方式----------
    #import <React/RCTRootView.h>
    #import <React/RCTBundleURLProvider.h>
    [[RCTBundleURLProvider sharedSettings] setEnableDev:YES];
    NSURL *jsCodeLocation = [[RCTBundleURLProvider sharedSettings] jsBundleURLForBundleRoot:@"index.ios" fallbackResource:nil];
    RCTRootView *rootView = [[RCTRootView alloc] initWithBundleURL:jsCodeLocation
                                                        moduleName:@"AwesomeProject"
                                                 initialProperties:nil
                                                     launchOptions:nil];
    rootView.frame = self.view.bounds;
    [self.view addSubview:rootView];
- c. 运行Packager:
跳转到包含
node_module目录的文件夹,运行npm startorreact-native start(两个命令都可以) 命令行出现 :**Loading dependency graph, done.** 即表示本地服务已成功开启
- 如果忘记这一步会出现:Could not connect to development server
- 如果出现
Packager can't listen on port 8081Most likely another process is already using this port或端口被占用之类的,多半是其他命令窗口已经Start服务了,检查下,找到后control + C关闭它 - 此提示是基于以下版本,如果版本不同可能会提示不一样
react-native-cli: 2.0.1react-native: 0.42.3
- d. 在Xcode
com+R运行项目
请确保** cocoapods版本在1.2.0以上 ** 否则可能会出现 找不到头文件 的错误 查看cocoapods版本,在命令行执行
pod --version
** iOS打包React Native资源 **
在正式测试打包的时候,就需要将RN的资源进行打包成离线资源,放到项目中,使项目在其他机器上也能正常运行
React Native的 react-native bundle 命令是用来进行打包的命令,
其中我们常使用的一些命令选项:
- --entry-file ,ios或者android入口的js名称,比如
index.ios.js - --platform ,平台名称(ios或者android)
- --dev ,设置为false的时候将会对JavaScript代码进行优化处理。
- --bundle-output, 生成的jsbundle文件的名称,比如
./ios/bundle/index.ios.jsbundle - --assets-dest 图片以及其他资源存放的目录,比如
./react-native/image
** 打包的命令:**
react-native bundle --entry-file index.ios.js --platform ios --dev false --bundle-output ./bundles/index.ios.jsbundle --assets-dest ./bundles
** 正式打包时候的代码:**
    NSURL * jsCodeLocation = [[NSBundle mainBundle] URLForResource:@"index.ios" withExtension:@"jsbundle"];

    RCTRootView * rootView = [[RCTRootView alloc] initWithBundleURL:jsCodeLocation
                                                         moduleName:@"RNInit"
                                                  initialProperties:nil
                                                      launchOptions:nil];
## ** iOS真机运行React Native ** 将刚才打包生成的bundles的文件夹,拖入iOS 工程,放到主工程下面
iOS中导入bundle的路径需要改一下
    // #import <React/RCTRootView.h>
    // #import <React/RCTBundleURLProvider.h>
    NSURL *jsCodeLocation = [[NSBundle mainBundle] URLForResource:@"index.ios" withExtension:@"jsbundle" subdirectory:@"bundles"];
    RCTRootView *rootView = [[RCTRootView alloc] initWithBundleURL:jsCodeLocation
                                                        moduleName:@"AwesomeProject"
                                                 initialProperties:nil
                                                     launchOptions:nil];
    rootView.frame = self.view.bounds;
    [self.view addSubview:rootView];
index.ios.js 中的代码也需要改一下,才能将图片的路径搞对,不然会出现本地图片不显示的问题
import { AppRegistry } from 'react-native';
import App from './js/yourapp';
import { Platform } from 'react-native';
import { setCustomSourceTransformer } from 'react-native/Libraries/Image/resolveAssetSource';

// 更改一下图片的查找方法,以便在真机能正确查找路径
setCustomSourceTransformer(function (resolver) {
    if (Platform.OS === 'ios'
        && !resolver.serverUrl
        && !resolver.bundlePath
        && resolver.asset.type === 'png') {
        resolver.bundlePath = 'bundles/';
    }
    return resolver.defaultAsset();
});

AppRegistry.registerComponent('test', () => App);
## ** iOS真机实时调试React Native ** 在调试的时候,我比较习惯使用真机运行查看,介绍下如何在真机调试React Native: >在项目中加入一个名字为ip.txt的文件,将自己电脑的ip地址写入文件,占用1行,记得加入target中 剩下的和使用模拟器一样的步骤启动,npm start 正常运行项目,即可
** 将ReactNative 嵌入iOS 中时,会碰到一些问题 **
1. 不知道需要Pod里的React的subspecs填哪些?
可以去打开 ./node_modules/react-native/React.podspec 这个文件里面有React的subspecs 的全部声明
2. 更新pod 出现 Yoga 依赖错误
类似于这种 Yoga (= 0.42.3.React) required by React/Core (0.42.3)
详细错误:
[!] Unable to satisfy the following requirements:

- `Yoga (= 0.42.3.React)` required by `React/Core (0.42.3)`

None of your spec sources contain a spec satisfying the dependency: `Yoga (= 0.42.3.React)`.

You have either:
 * out-of-date source repos which you can update with `pod repo update`.
 * mistyped the name or version.
 * not added the source repo that hosts the Podspec to your Podfile.

Note: as of CocoaPods 1.0, `pod repo update` does not happen on `pod install` by default.
解决方法:
在Podfile文件加上
pod 'Yoga', :path => './node_modules/react-native/ReactCommon/yoga'
路径中的./node_modules需要替换为自己项目中的node_modules目录路径
3. 运行程序出现 Native module cannot be null
第一次将RN嵌入到iOS中后,运行程序出现 Native module cannot be null
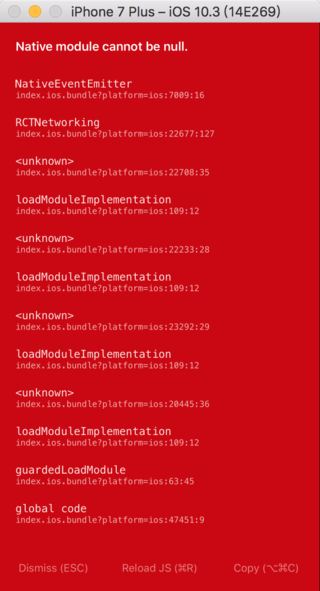
解决方法:
出现上述错误,是因为少引入了一个部件 RCTNetwork ,将 RCTNetwork 加入到 React 的 subspecs 中。
以下是三个基础部件,如果需要其他 subspecs 自己继续往下加就好了
pod 'React', :path => './node_modules/react-native', :subspecs => [
        'Core',
        'BatchedBridge',
        'DevSupport',
        'ART',
        'RCTActionSheet',
        'RCTAnimation',
        'RCTImage',
        'RCTNetwork',
        'RCTText',
        'RCTWebSocket',
        'RCTLinkingIOS',
]
# 这是一份基础的添加库列表
4. 编译出现 jschelpers/JavaScriptCore.h file not found ❗️
第一个可能的问题:cocoapods版本低于1.2.0,去网上查找升级cocoapods的方法解决 第二个可能的问题:0.45 版本以后 React缺少依赖,更新Podfile解决
pod 'Yoga',  :path => '../node_modules/react-native/ReactCommon/yoga'
pod 'React', :path => '../node_modules/react-native', :subspecs => [
         'Core',
         'BatchedBridge', # 0.45 版本以后需要添加
         'RCTText',
         'RCTWebSocket',
         'RCTNetwork',
    ]
(真的坑啊。。。)
5. 出现 error: bundling: UnableToResolveError: Unable to resolve module AccessibilityInfo
详细信息:
error: bundling: UnableToResolveError: Unable to resolve module `AccessibilityInfo` from `/Users/Test/Desktop/cardloan_react/node_modules/react-native/Libraries/react-native/react-native-implementation.js`: Module does not exist in the module map or in these directories:
  /Users/Test/Desktop/cardloan_react/node_modules/react-native/node_modules
,   /Users/Test/Desktop/cardloan_react/node_modules
解决办法:
调用npm start -- --reset-cache 重新开启服务,重新运行解决
6. 出现 Unhandled JS Exception: Cannot read property 'string' of undefined
报错到系统的js文件:
Unhandled JS Exception: Cannot read property 'string' of undefined就是报错到系统的 React.PropTypes.string
遇到这种情况,你需要在js文件夹下执行下 npm list 如果过出现 ERR 就表明是依赖库错误,需要删除 node_modules 重新 install 一下
** 注意 **: 本文描述中出现的 `./node_modules/react-native` 记得替换成自己项目中的 `node_modules` 目录的路径 ** Tips **: `./ 为当前文件所在的文件夹` `../ 为当前文件所在的文件夹的上级文件夹`
其他文章
ReactNative入坑: ReactNative入门(一) ReactNative入坑: iOS原生项目集成ReactNavite(二) ReactNative入坑: react-navigation库(三) ReactNative入坑: codepush热更新(四) ReactNative入坑: 一些常用控件的使用(五)
