


Redux 概述
Redux 是跟随 React 一同孕育的一款非常强大状态管理库,当应用程序变得复杂、组件之间的交互增多的时候,我们可以使用 Redux 管理数据状态、托管及解耦组件之间的关联逻辑,使代码业务流变的更加清晰。 Redux 精简而优秀的代码和设计思想,使得它可以配合多种响应式框架进行使用,如 React, Flutter 等。
在Angular应用中, 我们使用 @ngrx/store 库,并结合 RxJS 强大的操作符, 以一种类似 Redux 的方式管理应用的状态。
在 Angular 项目中引入 @ngrx/store 依赖

# npm
npm install @ngrx/store --save

# Yarn
yarn add @ngrx/store
需求概述
我们通过完成一个 Todo 的 demo 在项目中引入 @ngrx/store,并熟悉 Ngrx 的基本使用。
在项目中集成 @ngrx/store
首先新建 store 文件夹,在 store 文件夹下, 新建 actions、reducers 文件夹分别来存放 todo 业务相关的 action 和 reducer
action 用于描述和承载参数的动作
reducer 是纯函数,用于合并新旧状态,生成新状态。
关于 纯函数 的概念,可以参考 函数式编程之路
依据 todo 的需求,简单设计 todo 的 state,然后合并到 store 中
新建 store/index.ts 作为 store 仓库根目录,index.ts:
/**
 * @description store 管理库
 */
import { default as todoReducer, TodoState } from './reducers/todo.reducer';
import { ActionReducerMap } from '@ngrx/store';

export interface AppState {
    'todoState': TodoState
}

export const STORE_KEY = {
    TODO_STATE: 'todoState'
};

export const reducers: ActionReducerMap<any> = {
    'todoState': todoReducer,
};
- 建立 todo.reducer 文件, 用于处理 todo 相关的动作(action),store/reducers/todo.reducer.ts :
export interface TodoState {
  todos: ITodoItem[]
}

export const initState: TodoState = {
  todos: []
}

export default function reducer(
    state = initState, action: any
): TodoState {
  return state;
}
接下来,我们需要在 app.module.ts 根目录中去引入 StoreModule 来帮我们合并 reducer 中状态:
import { StoreModule } from '@ngrx/store';
import { reducers } from '../store';
...
@NgModule({
  ...
  imports: [
    ...
    StoreModule.forRoot(reducers, {}),
  ],
  providers: [],
  bootstrap: [AppComponent]
})
export class AppModule { }
这样,我们的 store 便引入成功了。
定义数据Model、action
每个 todo 应至少包含如下几个状态: * todo 的序号 index * 当前 todo 是否完成的标识 complete * todo 的 value * 需要用来更新的新的 newValue
根据这几个状态,我们在项目根目录下创建 global.d.ts 声明文件,
- global.d.ts
interface ITodoItem {
    index: number;
    complete: boolean;
    value: string;
    newValue?: string;
}
在 global.d.ts 文件中声明数据 model,方便在全局去使用。
接下来,在 store/actions/todo.action.ts 中定义业务中所需要的 action:
- store/actions/todo.action.ts 代码如下
import { Action } from '@ngrx/store';

export const ADD_TODO = '[TODO MODULES] add todo';
export const DELETE_TODO = '[TODO MODULES] delete todo';
export const UPDATE_TODO = '[TODO MODULES] update todo';
export const TOGGLE_TODO = '[TODO MODULES] toggle todo';

export class AddTodoAction implements Action {
    readonly type = ADD_TODO;
    constructor(public payload: ITodoItem) {}
}

export class DeleteTodoAction implements Action {
    readonly type = DELETE_TODO;
    constructor(public payload: ITodoItem) {}
}

export class UpdateTodoAction implements Action {
    readonly type = UPDATE_TODO;
    constructor(public payload: ITodoItem) {}
}

export class ToggleTodoAction implements Action {
    readonly type = TOGGLE_TODO;
    constructor(public payload: ITodoItem) {}
}

export type todoActions =
    | AddTodoAction
    | DeleteTodoAction
    | UpdateTodoAction
    | ToggleTodoAction;
根据我们 action, 来完成 todo reducer 的状态合并, store/reducers/todo.reducer.ts:
...
export default function reducer(state = initState, action: todoActions): TodoState {
  switch (action.type) {
    case ADD_TODO:
      return {
        todos: [action.payload, ...state.todos]
      };
    case DELETE_TODO:
      return {
        todos: state.todos.filter((item, index) => index !== action.payload.index)
      };
    case UPDATE_TODO:
      return {
        todos: state.todos.map((item, index) => {
          return index === action.payload.index
            ? Object.assign({}, item, { value: action.payload.newValue })
            : item;
        })
      }
    case TOGGLE_TODO:
      return {
        todos: state.todos.map((item, index) => {
          return index === action.payload.index
            ? Object.assign({}, item, { complete: !action.payload.complete })
            : item;
        })
      }
    default:
      return state;
  }
}
编写 todo 组件
当 Ngrx 在项目根目录中引入之后,我们便可以在 UI 组件中,通过依赖注入的方式,注入 Store 实例,并通过 Rxjs 的操作符去获取想要所需要的状态,在 todo 案例中,我们需要获取到 todoState 状态:
// app.component.ts
import { Component } from '@angular/core';
import { Store, select } from '@ngrx/store';
import { Observable } from 'rxjs';
import { map } from 'rxjs/operators';
import { STORE_KEY, AppState } from '../store';
import { TodoState } from '../store/reducers/todo.reducer';

@Component({
  selector: 'app-root',
  templateUrl: './app.component.html',
  styleUrls: [
    './app.component.scss'
  ]
})
export class AppComponent {
  todos$: Observable<ITodoItem[]>;
  editTargetIndex: number;
  todo: string;
  editing: boolean = false;

  constructor(private store: Store<AppState>) {
    this.todos$ = this.store.select('todoState').pipe(
      map((state: TodoState) => state.todos)
    );
  }
我们在 构造函数 中通过 select 函数获取到 todoState 的状态,并通过 map 操作符,将他映射为 todos。在 页面模板中,我们便可以使用 async Pipe 管道来完成 Observable 的订阅操作了。
关于 Async 原理和使用,可以参考Angular 记录 - Async pipe
快速完成 app.component.html:
<h1>
  输入待办事项:
</h1>
<input placeholder="your todo" [(ngModel)]="todo">

<button (click)="addTodo(todo)" [disabled]="!todo" *ngIf="!editing">
  添加待办
</button>

<button (click)="updateTodo(todo)" *ngIf="editing">
  Update
</button>
<button (click)="cancelEdit()" *ngIf="editing">
  Cancel
</button>


<ul class="todo_container">
  <li class="todo_item" *ngFor="let todo of todos$ | async; let index = index;">
    <span class="todo_index">{{ index }}</span>
    <span [class.complete]="todo.complete">{{ todo.value }}</span>
    <button (click)="editTodo(todo, index)"> 编辑 </button>
    <button (click)="toggleTodo(todo, index)"> 舍弃/待办 </button>
    <button (click)="deleteTodo(index)"> 删除 </button>
  </li>
</ul>
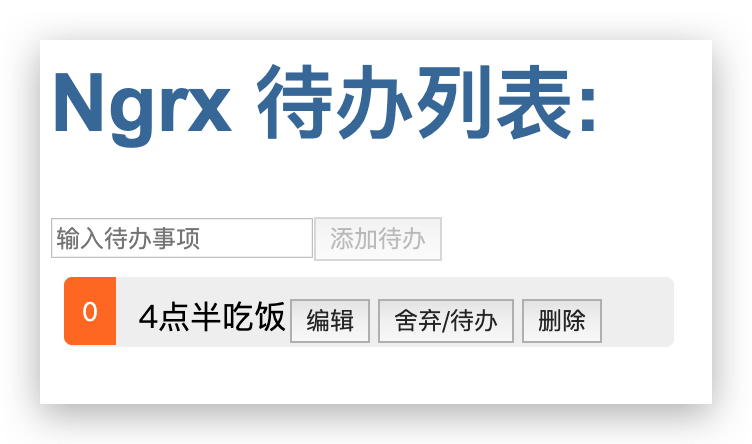
运行效果如下:

点击添加,我们使用 store 中的 dispatch 方法去派发一个 AddTodoAction 动作,并传入我们需要的信息:
public addTodo(value): void {
    this.store.dispatch(new AddTodoAction({ value, complete: false }));
    this.todo = '';
}
此时我们在页面中看到了,看到页面中新增了一条 todo 信息了:
编辑,删除的逻辑也是如此,只是数组的一些操作,这里就不演示了。
使用 createFeatureSelector, createSelector 来定义一些快速获取状态的方法
在一些业务中,我们的 state 可能会很复杂,并掺杂一些副作用在其中,我们可以使用 ngrx 为我们提供的 createFeatureSelector 函数来为任意指定的state创建一个feature selector,一般情况下,我们可以这样使用 createFeatureSelector:
// store/reducers/todo.reducers.ts
...
export const getTodoState = createFeatureSelector<TodoState>('todoState');
拿到 feature selector 之后,我们可以在使用 ngrx 提供的 selector 来根据我们的需要创建各种 selector 函数, 这就像是 vuex 的 getter 属性一样,方便我们在取得 state 的过程中,去更自由的操作我们的 state:
// store/reducers/todo.reducers.ts
export const getTodoLists = createSelector(
  getTodoState,
  (state: TodoState) => state.todos
);
最后,我们可以在 组件 中使用 getTodoLists 这个 selector 函数,直接获取 todos 列表了:
// app.component.ts
constructor(private store: Store<AppState>) {
    this.todos$ = this.store.select(getTodoLists);
}
此时,页面的功作,依然正常。
总结
到这里,使用 @ngrx/store 编写的 todo 案例基本完成了,简单总结一下:
ngrx store 借用redux 对应用的状态管理的理念,结合 Rxjs Observable 所开发的一套状态管理库。
它通过在业务中触发不同的 Action 动作,结合 reducer 纯函数,完成对 store 中状态的各类合并及修改。其利用 Rxjs 多播的功能,结合 angular 框架的脏检测机制,完成对页面数据的更新。
借用这种状态托管的机制,我们可以解决多层级组件之间的通讯问题,解耦我们的业务逻辑,使 UI 组件变得更加简单。
最后, 通过一张图来加深一下对这个业务流程的理解,这个过程就变的很简单了。
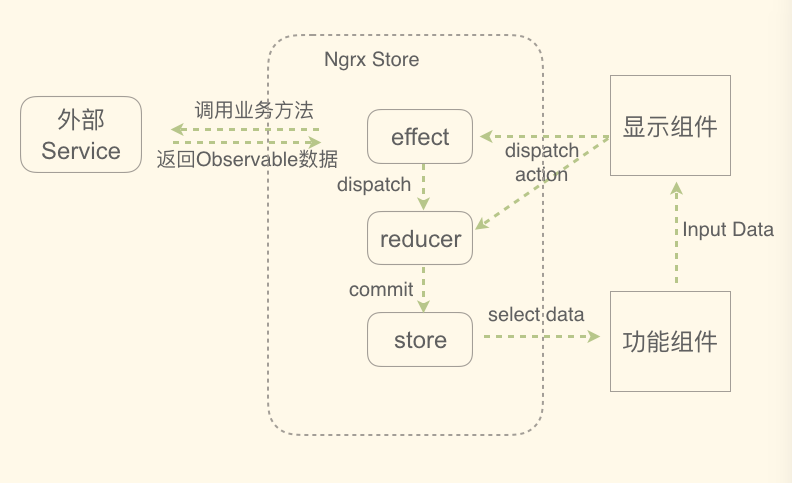
effect 译为副作用,给予 业务 拥有派发不同的动作的一个时机。类似 redux-thunk 的使用。
文章中所使用的代码,已经上传至 github 仓库
感谢您的阅读~

