上两个分享中,从写SQL语句到直接用Sequelize编译帮我们写好执行SQL,现在到了我们前端最有兴趣的这块了,此处实现数据的增删改查已经对常用的代码封装以及编写接口。
mongodb 的基本使用
我们现在最新安装都是4以上的版本,所以不需要自己启动,他都会自动启动了
mongodb 原生驱动
安装mysql: npm i mongodb --save
连接mongodb操作
const MongoClient = require("mongodb").MongoClient;

const url = "mongodb://localhost:27017";

const dbName = "test";

(async function() {
    //创建客户端
    const client  = new MongoClient(url,{useNewUrlParser:true}); //配置项,新的url解释器作用连接的时候会报老的错误信息  https://mongoosejs.com/docs/connections.html
        await client.connect();
        console.log("连接成功");

        const db = client.db(dbName)
        //获取集合
        const fruitsColl = db.collection('fruits');
        //插入文档,返回Promise
        let obj = [
            {name:'芒果1',price: 20},
            {name:'芒果2',price: 20},
            {name:'芒果3',price: 20},
            {name:'芒果4',price: 20},
        ]
        let r = await fruitsColl.insertMany(obj); //插入多条数据,insertOne()插入一条

        console.log("插入成功",r.result);
        // 查询文档
        r= await fruitsColl.findOne();
        console.log('查询结果',r);

        r = await fruitsColl.updateOne({name: '芒果1'},{$set: {name: '苹果2'}});
        console.log("更新成功",r.result)

        r=await fruitsColl.deleteOne({name: '苹果'});
        console.log('删除成功',r.result);
    } catch(error) {
        console.error(error);
    }
    client.close(); //关闭
})();
// 运行: nodemon 文件名称
// 连接成功
// 插入成功 { ok: 1, n: 4 }
// 查询结果 { _id: 5e09ad07a100d551bcf10152, name: '芒果1', price: 20 }
// 更新成功 { n: 1, nModified: 1, ok: 1 }
封装,接口
进入正题编辑数据接口,常用封装。每次连接我们都需要声明数据库连接的配置项,会很费时,则我们可以根据这个进行封装相应的配置文件,即MVC结构的M层配置
Node 是先走同步的代码,再走异步的代码,所以在封装的时候,导入配置项确保是同步代码anscy .. await,或是运用通信机制,事件派发器EventEmiter
模型式连接配置
//配置连接 conf.js
module.exports = {
    url: 'mongodb://localhost:27017',
    dbName: 'test'
}
模型式db调用封装
每次都需要db连接获取集合,则进行封装,此处如有不明白可以看下上一块的原型驱动。此处的实现是对db的和collection调用的封装,以及事件的派发监听。
- 通过构造函数constructor的方法构造出集合,继而连接客户端。
- 其二解决的事collection调用的封装
   //获取集合方法  const fruitsColl = db.collection('fruits');
    col(colName,dbName=this.conf.dbName) { //集合名称;尝试获取不同数据库,如果不传则放入默认数据库
        return this.client.db(dbName).collection(colName);
    }
- 由于node的特性,我们需要引入事件派发器,进行实例化派发器,当在连接数据库成功后emit派发成功通知,其次封装一个监听事件的方法,进行函数的回调
const EventEmitter = require('events').EventEmitter; //导入事件派发器
this.emitter = new EventEmitter(); //实例化
this.emitter.emit('connect');//连接成功后进行派发成功通知
//监听事件的方法(只听一次)
   once(event,cb) {//事件,回调函数
       this.emitter.once(event,cb)
 }
继而我们只需要抛出方法即可,以下是全部封装db的函数
//db封装
const conf = require('./conf')
const MongoClient = require("mongodb").MongoClient;
const EventEmitter = require('events').EventEmitter; //导入事件派发器

class Mongodb{
    constructor(conf) {
        //保存conf
        this.conf=conf //成员变量
        this.emitter = new EventEmitter(); //实例化
        //连接
        this.client = new MongoClient(conf.url,{useNewUrlParser:  true})
        this.client.connect( err => { //有自动重连的机制
            if(err) {
                throw err
            }
            console.log('连接数据库成功');
            this.emitter.emit('connect');//连接成功后进行派发通知
        });
    }
    //监听事件的方法(只听一次)
    once(event,cb) {
        this.emitter.once(event,cb)
    }
    //获取集合方法
    col(colName,dbName=this.conf.dbName) {
        return this.client.db(dbName).collection(colName);
    }
}

module.exports = new Mongodb(conf);
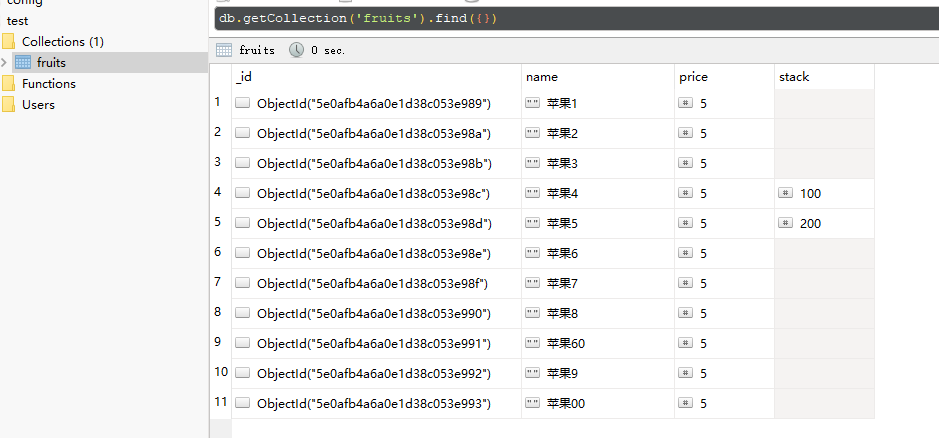
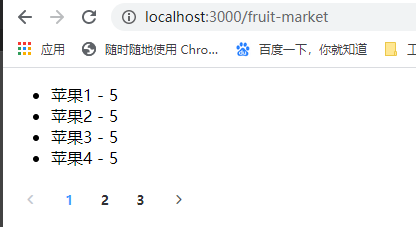
测试数据编写
此处包括如何once监听方法的使用,此处你会发现插入的数据即使是不对称的还是可以随意编入
//testdata.js
const mongodb  = require('./db');

mongodb.once('connect',async ()=> { //进行监听方法
     const col = mongodb.col('fruits');
     try {
         //删除已存在
         await col.deleteMany();

         //插入测试数据
         await col.insertMany([
             {name: '苹果1',price:5},
             {name: '苹果2',price:5},
             {name: '苹果3',price:5},
             {name: '苹果4',price:5,stack: 100},
             {name: '苹果5',price:5,stack: 200},
             {name: '苹果6',price:5},
             {name: '苹果7',price:5},
             {name: '苹果8',price:5},
             {name: '苹果60',price:5},
             {name: '苹果9',price:5},
             {name: '苹果00',price:5},
         ])
         console.log('测试数据插入成功')
     } catch (error) {
         console.log('测试数据插入失败');
         console.log(error);
     }
})
运行数据文件
//fruit-market.js
const mongodb  = require('./db');
const testdata  = require('./testdata');
// nodemon fruit-market.js
// 连接数据库成功
// 测试数据插入成功
接口编写
有了上述的测试数据后,我们再基于//fruit-market.js中编写服务器端口和请求接口的编写
//服务器
const mongo = require('./db');
const testdata = require('./testdata');
const path = require('path')
const express = require('express')
const app = express();
app.get('/fruit-market',(req,res)=> { //检测路由地址匹配
res.sendFile(path.resolve('./fruit-market/fruit-market.html'))
})
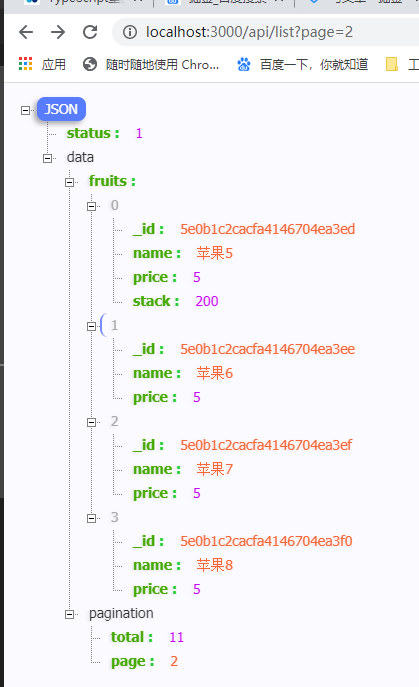
//分页查询
app.get('/api/list',async(req,res)=>{//定义接口
//分页数据
const {page} = req.query; //api/list?page=3
//查询
try {
const col = mongo.col('fruits')
const fruits = await col.find().skip((page-1)*4).limit(4).toArray(); //游标转成数组
//查询总条数 聚合操作
const total = await col.find().count();
res.json({status: 1,data: {fruits,pagination:{total,page}}})//请求到的JSON
} catch (error) {
}
})
app.listen(3000); //端口
前端数据遍历
getData() {
      axios
        .get(`/api/list?page=${this.page}`)
        .then(res => res.data)
        .then(({ data }) => {
          this.fruits = data.fruits;
          this.total = data.pagination.total;
        });
}
类别查询
//分类查询
app.get('/api/category',async(req,res)=>{
    const col = mongo.col("fruits");
    const data =await col.distinct("category");
    res.json({status: 1,data})
})
//结果
{
    "status": 1,
    "data": [
        "其他",
        "家居",
        "水果",
        "蔬菜"
    ]
}
分类查询接口
此处跟分页类似的,只是这块多做一个操作,那么就是将类别的数据进行添加到一个数组当中,让find在数组中找到我们想要的数据结构
app.get('/api/list',async(req,res)=>{//定义接口
    //分页数据
    const {page,category} = req.query; //http://localhost:3000/api/list?page=1&category=蔬菜
    //查询
    try {
        const col = mongo.col('fruits')

        const condition={} //过了条件,构造条件
        if(category) {
            condition.category = category
        }

        const fruits = await col.find(condition).skip((page-1)*4).limit(4).toArray(); //游标转成数组  find--查询条件
        //查询总条数 聚合操作
        const total = await col.find(condition).count();
        res.json({status: 1,data: {fruits,pagination:{total,page}}})//请求到的JSON
    } catch (error) {

    }
})
拓展 操作符
r = await fruitsColl.findOne({
   // $or:[{price:{$gte:20}},{price:{$lte:10}}] //或,大于20或小于10
    price:{$gte:20,$lte:10}
    name: {$regex: /果/} //适用模糊搜索
})
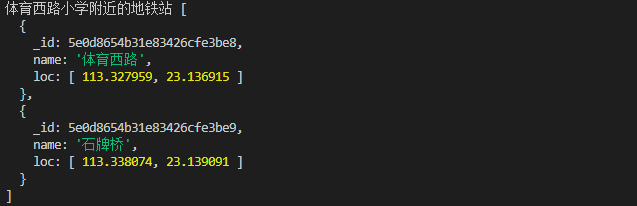
球面式的位置查询
实现的需求地图1公里内的地铁站
//查询1公里内的地铁站
        const stations = db.collection('stations')
        await stations.insertMany([
            {name: '体育西路',loc:[113.327959,23.136915]},
            {name: '石牌桥',loc:[113.338074,23.139091]},
            {name: '林和西',loc:[113.330241,23.1471]},
            {name: '动物园',loc:[113.313784,23.140828]},
        ])
        await stations.createIndex({loc:'2dsphere'}) //设置索引 --概念:球面地理位置索引
        r = await stations.find({ //指定查询字段,千米与弧度为单位,
            loc: {
                $nearSphere: {
                    $geometry: { //地理定位
                        type: 'Point', //类型,点
                        coordinates:[113.332666,23.135195] //指定坐标 体育西路小学
                    },
                    $maxDistance: 1000//接受最远的距离 1公里
                }
            }
        }).toArray();
        console.log('体育西路小学附近的地铁站',r)
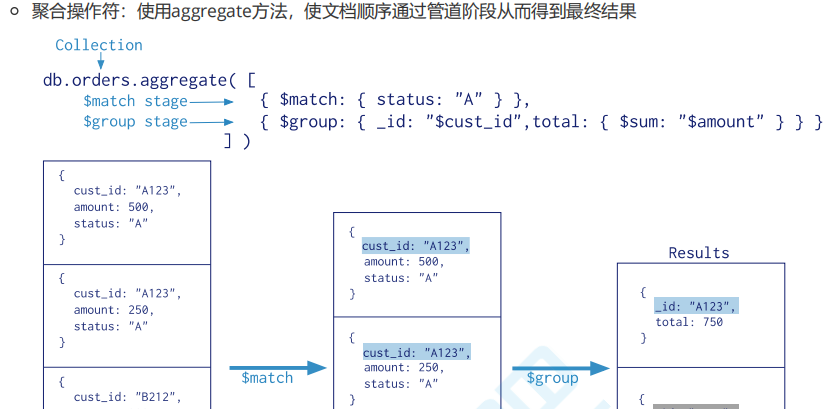
聚合操作符,使文档顺序通过管道阶段而得出
 //获取集合
        const fruitsColl = db.collection('fruits');
        //插入文档,返回Promise
        let obj = [
            {name:'芒果',price: 20},
            {name:'芒果',price: 15},
            {name:'葡萄',price: 20},
            {name:'苹果',price: 20},
        ]
        let r = await fruitsColl.insertMany(obj);
//分组,求和 主要是实现对列表数据重复部分进行合并,比如在实现电商购物车的时候,我们可以根据group对同一个多商品进行合并成一个计算
        //聚合管道操作 $group,$count,$sort,$skip,$limit,$project
        r = await fruitsColl.aggregate([
            {$match:{name: '芒果'}} ,//查询出芒果
            {$group:{_id:'$name',total:{$sum:'$price'}}} //按照名称进行分类
        ]).toArray();
        console.log(r);
        //[ [ { _id: '芒果', total: 35 } ]