


- 使用PureComponent
- 使用React.memo(myComponent, areEqual)
- 使用shouldComponentUpdate生命周期事件
- 使用 React Fragments 避免额外标记
- 避免使用内联函数定义
- 使用唯一键迭代
- 为组件创建错误边界
- 响应式数据的精细化渲染
- 减少渲染的节点/降低渲染计算量(复杂度)
1.使用PureComponent
它与普通组件是一样的,只是对负责 shouldComponentUpdate——它对状态和 props 数据进行浅层比较。如果先前的状态和 props 数据与下一个 props 或状态相同,则组件不会重新渲染。
什么是浅层比较?
在对比先前的 props 和状态与下一个 props和状态时,浅层比较将检查它们的属性是否有相同的值,如简单数据类型的值是否相等或者是复杂数据类型的引用地址是否相等。通过这种方式能跳过组件渲染,提高组件性能。
2. 使用React.memo(myComponent, areEqual)
React.memo是用来创建函数式高阶组件的API,与PureComponent功能类似,默认是对输入的props进行浅层比较,如果相同则跳过组件渲染,提高组件性能。
class RegularChildComponent extends React.Component {
  render() {
    console.log("Regular Component Rendered..");
    return <div>{this.props.name}</div>;
  }
}

class PureChildComponent extends React.PureComponent {
  // Pure Components are the components that do not re-render if the State data or props data is still the same
  render() {
    console.log("Pure Component Rendered..")
    return <div>{this.props.name}</div>;
  }
}

function CustomisedComponent(props) {
  console.log("Memo Component Rendered..")
  return (
    <div>
      <b>User name: {props.name}</b>
    </div>
  )
}

// The component below is the optimised version for the Default Componenent
// The Component will not re-render if same props value for "name" property
const MemoComponent = React.memo(CustomisedComponent);

class ApplicationComponent extends React.Component {

  constructor() {
    super();
    this.state = {
      name: "Mayank"
    }
  }

  updateState = () => {
    setInterval(() => {
      this.setState({
        name: "Mayank"
      })
    }, 1000)
  }

  componentDidMount() {
    this.updateState();
  }

  render() {
    console.log("Render Called Again")
    return (
      <div>
        <CustomisedComponent name={this.state.name} />
        <PureChildComponent name={this.state.name} />
        <MemoComponent name={this.state.name} />
      </div>
    )
  }
}
注意:
与 class 组件中 shouldComponentUpdate() 方法不同的是,如果 props 相等,areEqual 会返回 true;如果 props 不相等,则返回 false。这与 shouldComponentUpdate 方法的返回值相反。
3.使用shouldComponentUpdate生命周期事件
shouldComponentUpdate(nextProps, nextState) {
  if(nextState.age != this.state.age || netState.name === this.state.name) {
    return true;
  }
  return false;
}
这个生命周期钩子将nextState和nextProps 作为输入,并可将其与当前props 和state做对比,以决定是否需要重新渲染,一般是针对某些特定的业务场景进行的优化。
4.使用 React Fragments 避免额外标记
用户创建新组件时,每个组件应具有单个父标签。父级不能有两个标签,所以顶部要有一个公共标签。所以我们经常在组件顶部添加额外标签,例如
  render() {
    return(<div>
      <h1>ComponentA</h1>
      <p>aaaaaa</p>
    </div>)
  }
}
export default ComponentA
除了充当组件的父标签之外,这个额外的 div 没有其他用途。 更好的方式是通过fragement代替div,因为fragement没有标记上面的代码没有额外的标记,因此节省了渲染器渲染额外元素的工作量。
  render() {
    return(<>
      <h1>ComponentA</h1>
      <p>aaaaaa</p>
    </>)
  }
}
export default ComponentA
5. 避免使用内联函数定义
使用内联函数时,则每次调用render函数时都会创建一个新的函数实例,这会导致 组件始终被重新渲染。
但有时候我们会被逼的不得不使用箭头函数来作为事件处理器,如下图场景。
handleClick = () => {
  // 处理点击业务
};
render() {
  return (<>{
    listData.map(item => {
      return (<ListItem key={item.id} onClick={event => this.handleClick(event, item)}/>)
    })
  }</>)
}
这里有更好的实现方式。
handleClick = () => {
  // 处理点击业务
};
render() {
  return (<>{
    listData.map(item => {
      return (<ListItem key={item.id} id={item.id} onClick={this.handleClick}/>)
    })
  }</>)
}
当第三方组件或者 DOM 组件呢? 可以用传递data-*属性。
handleClick = () => {
  // 处理点击业务
};
render() {
  return (<>{
    listData.map(item => {
      return (<ListItem data-key={item.id} data-id={item.id} onClick={this.handleClick}/>)
    })
  }</>)
}
这里顺带提一下关于绑定函数上下文的实践方式分析,目前以下几种方式可以实现:
- 1.在Constructor中进行绑定。
constructor() {
  this.handleClick = this.handleClick.bind(this)
}
- 2.内联函数中进行绑定。
handleClick() {
  // 处理点击业务
}
render() {
  return (<>{
    listData.map(item => {
      return (<ListItem data-key={item.id} data-id={item.id} onClick={this.handleClick.bind(this)}/>)
    })
  }</>)
}
- 3.使用箭头函数。
handleClick = () => {
  // 处理点击业务
}
render() {
  return (<>{
    listData.map(item => {
      return (<ListItem data-key={item.id} data-id={item.id} onClick={this.handleClick}/>)
    })
  }</>)
}
对比1和2,第2种方式在每次render时,都执行一次绑定函数上下文的操作,而1只在构造函数中绑定一次,后面不会再绑定。
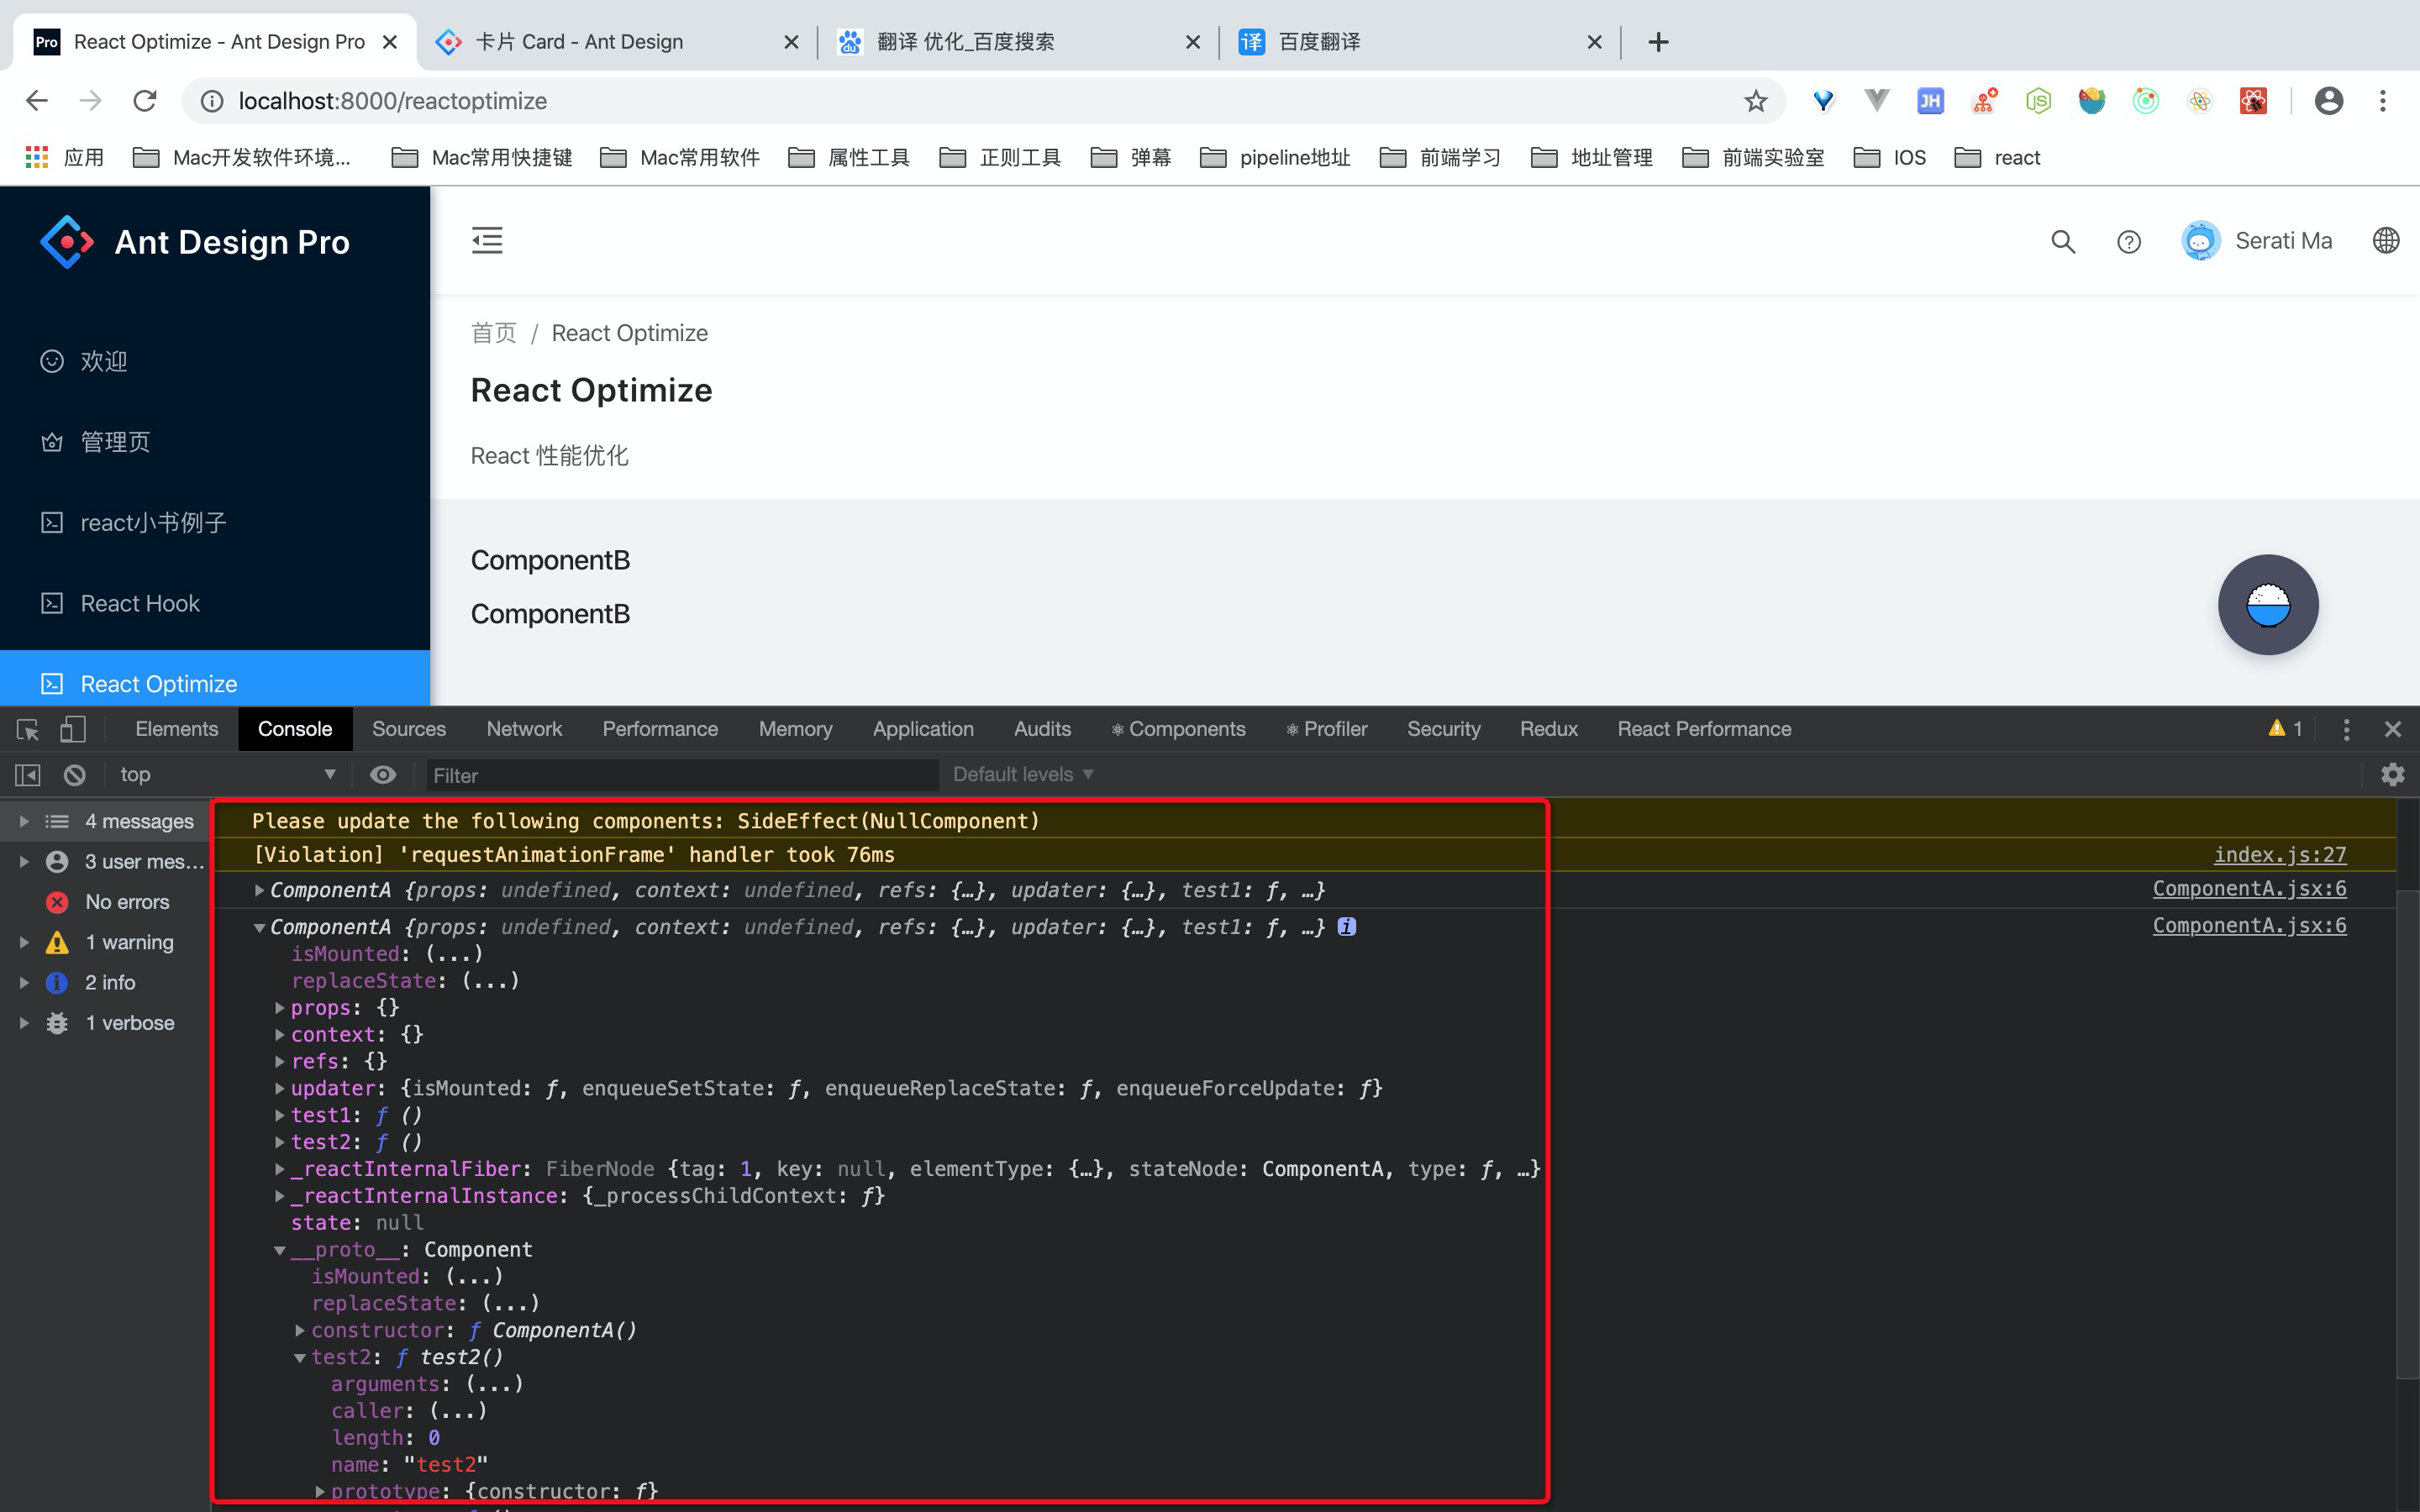
对比1和3,第三种方式避免了绑定上下文的写法,运用箭头函数的方式隐式地绑定了当前环境的上下文,当然这种方式也有缺点,每个组件都会有test1函数的一份实例,影响了可复用性。此外因为它是对象属性但不是原型属性,所以test1函数在继承链中不可用。
class ComponentA extends React.Component {
  constructor() {
    super()
    this.test2 = this.test2.bind(this)
    console.log(this)
  }
  test2() {
    console.log('test1')
  }
  test1 = () => {
    console.log('test1')
  }
  render() {
    return(<div>
      <h1>ComponentA</h1>
      <p>aaaaaa</p>
    </div>)
  }
}
综上所述:如果组件复用性不高,可以考虑箭头函数的形式,如果是高复用率的话,更推荐在Constructor中进行绑定。
6.使用唯一键迭代
我们可以在以下场景中使用 index 作为键:
- 列表项是静态的,项目不随时间变化。
- items 没有唯一 id。
- list 永远不会重新排序或过滤。
- 不会从顶部或中间添加或删除项目。
非上面的情况则可以考虑某种哈希函数生成id。
7.为组件创建错误边界
错误边界涉及一个高阶组件,包含以下方法:static getDerivedStateFromError() 和 componentDidCatch()。
static 函数用于指定回退机制,并从收到的错误中获取组件的新状态。
componentDidCatch 函数用来将错误信息记录到应用中。
class ErrorBoundaries extends React.Component {
  constructor(props) {
      super(props);
        this.state = {
        hasErrors: false
      }
  }

  componentDidCatch(error, info) {
    console.dir("Component Did Catch Error");
  }

  static getDerivedStateFromError(error) {
    console.dir("Get Derived State From Error");
      return {
        hasErrors: true
      }
  }

  render() {
    if(this.state.hasErrors === true) {
        return <div>This is a Error</div>
    }
    return <div><ShowData name="Mayank" /></div>
    }
}
class ShowData extends React.Component {

  constructor() {
    super();
    this.state = {
      name: "Mayank"
    }
  }

  changeData = () => {
    this.setState({
      name: "Anshul"
    })
  }

  render() {
    if(this.state.name === "Anshul") {
        throw new Error("Sample Error")
    }

    return (
      <div>
        <b>This is the Child Component {this.state.name}</b>
        <input type="button" onClick={this.changeData} value="Click To Throw Error" />
      </div>
    )
  }
}
当 name 更新为 Anshul 时,上面的代码会抛出错误。
组件 ShowData 是 ErrorBoundaries 组件内的嵌入。
因此,如果错误是从 ShowData 函数内抛出的,则它会被父组件捕获,我们使用 static getDerivedStateFromError 函数和 componentDidCatch 生命周期事件中的日志数据部署回退 UI。
8.响应式数据的精细化渲染
大部分情况下,响应式数据可以实现视图精细化的渲染,但它还是不能避免写出低效的程序. 本质上还是因为组件违背'单一职责'.
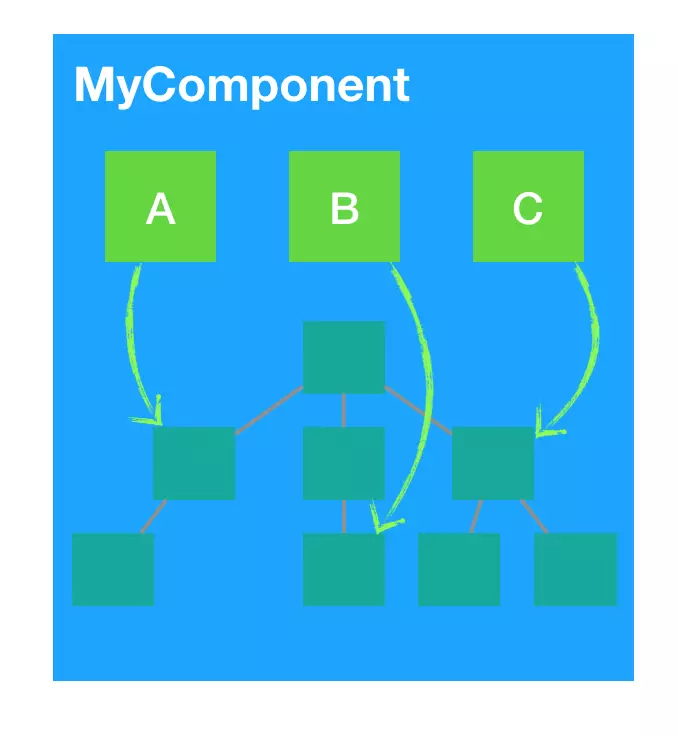
举个例子,现在有一个 MyComponent 组件,依赖于 A、B、C 三个数据源,来构建一个 vdom 树。现在的问题是什么呢?现在只要 A、B、C 任意一个变动,那么 MyComponent 整个就会重新渲染:
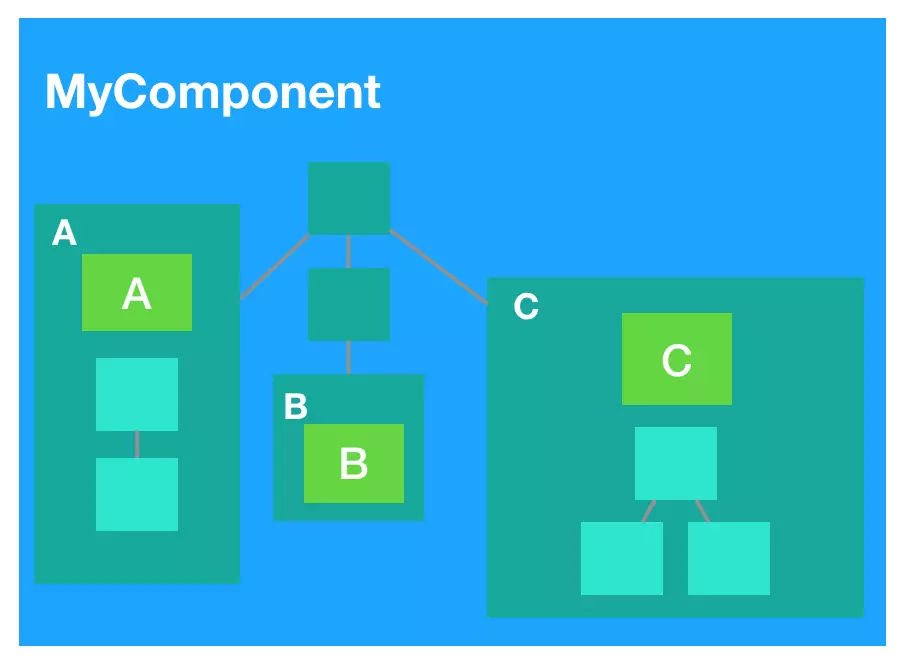
更好的做法是让组件的职责更单一,精细化地依赖响应式数据,或者说对响应式数据进行‘隔离’. 如下图, A、B、C 都抽取各自的组件中了,现在 A 变动只会渲染 A 组件本身,而不会影响父组件和 B、C 组件:
9.减少渲染的节点/降低渲染计算量(复杂度)
- 不要在渲染函数都进行不必要的计算
比如不要在渲染函数(render)中进行数组排序、数据转换等等。
- 不可变数据 不可变数据可以让状态变得可预测,也让 shouldComponentUpdate '浅比较'变得更可靠和高效.
相关的工具有Immutable.js、Immer、immutability-helper 以及 seamless-immutable。
- 虚拟列表
虚拟列表是常见的‘长列表'和'复杂组件树'优化方式,它优化的本质就是减少渲染的节点。

虚拟列表常用于以下组件场景:
无限滚动列表,表格,下拉列表
推荐组件方案 react-virtualized,antd中的List组件也是基于该组件做的滚动加载无限长列表功能
- 懒加载组件
我们可以按需懒惰加载这些拆分组件,增强应用的整体性能。假设有两个组件 ComponentA 或 ComponentB,根据标识判断渲染其中一个。我们可以根据具体的条件延迟组件加载,无需一开始就加载两个组件。
const LazyComponentA = lazy(() => slowImport(import("./components/ComponentA")));
const LazyComponentB = lazy(() => slowImport(import("./components/ComponentB")));
import ComponentA from './components/ComponentA'
import ComponentB from './components/ComponentB'

// 模拟延时加载
function slowImport(value, ms = 1000){
  return new Promise(resolve=>{
    setTimeout(() => resolve(value), ms);
  })
}

export default () => {
  const [isShowA, setIsShowA] = useState(true)
  setTimeout(() => {
    setIsShowA(false)
  }, 10000)
  return (
    <PageHeaderWrapper content="React 性能优化">
      {
        isShowA ? (<>
          <Suspense fallback={<h1>Loading...</h1>}>
            <LazyComponentA />
          </Suspense>
        </>) : (<>
          <Suspense fallback={<h1>Loading...</h1>}>
            <LazyComponentB />
          </Suspense>
        </>)
      }
      {
        isShowA ?  <ComponentA /> : <ComponentB />
      }
    </PageHeaderWrapper>
  );
};
这样做的可以减少主包体积,消耗的网络传输时间更少,而且动态单独加载的包比较小,可以迅速加载完成。我们可以分析应用来决定懒加载哪些组件,从而减少应用的初始加载时间。实际项目中使用场景可以使是tab,树形选择器,模态弹窗,下拉列表,折叠组件等等
