

安装
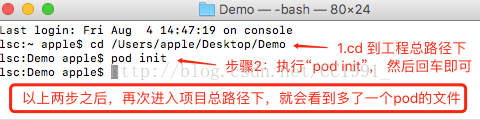
在装有cocoapods的情况下,cd到项目总路径下(Attention:就是包含Demo.xcodeproj的那个文件),然后pod init,创建podfile的配置文件。
打开Podfile文件,需要选择“文本编辑”的打开方式,并且编辑修改Podfile文件如下所示:
source 'https://github.com/CocoaPods/Specs.git'

platform :ios, '10.0'

use_frameworks!

target 'Demo' do  //自己的工程名
    pod 'SnapKit', '~> 3.0'
end
在终端中输入
pod install
项目里面会多了好的文件,生成的重要文件Podfile.lock是用来记录着上一次下载的框架版本,包括后缀为.xcworkspace
Snapkit的布局使用
1.实现一个宽高为100,居于当前视图的中心的视图布局
class ViewController: UIViewController {
    override func viewDidLoad() {
        super.viewDidLoad()

        let testView = UIView()
        testView.backgroundColor = UIColor.cyan
        view.addSubview(testView)
        testView.snp.makeConstraints { (make) in
            make.width.equalTo(100)         // 宽为100
            make.height.equalTo(100)        // 高为100
            make.center.equalTo(view)       // 位于当前视图的中心
        }

    }
}
更简洁的写法
import UIKit
import SnapKit

class ViewController: UIViewController {
    override func viewDidLoad() {
        super.viewDidLoad()

        let testView = UIView()
        testView.backgroundColor = UIColor.cyan
        view.addSubview(testView)
        testView.snp.makeConstraints { (make) in
            make.width.height.equalTo(100)    // 链式语法直接定义宽高
            make.center.equalToSuperview()    // 直接在父视图居中
        }

    }
}
在使用Snapkit时,利用addSubview添加到父视图上,调用 subView.snp.makeConstraints
可以串联起宽、高等属性如:
make.width.height.equalTo(100)
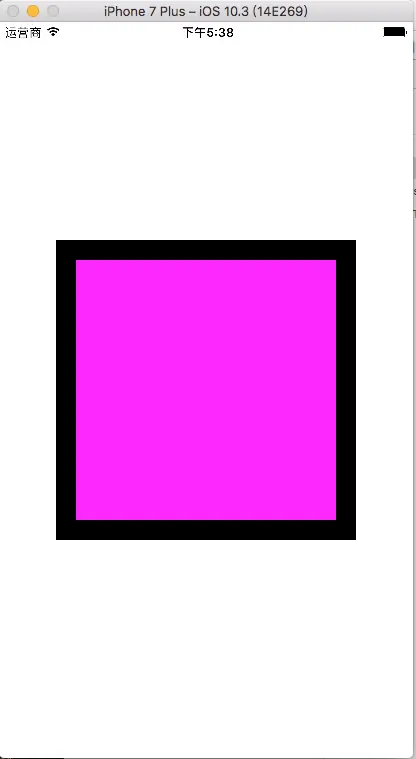
2.view中的两个子控件布置约束
View2位于View1内, view2位于View1的中心, 并且距离View的边距的距离都为20
import UIKit
import SnapKit

class ViewController: UIViewController {
    override func viewDidLoad() {
        super.viewDidLoad()

         // 黑色视图作为父视图
         let view1 = UIView()
         view1.frame = CGRect(x: 0, y: 0, width: 300,
         height: 300)
         view1.center = view.center
         view1.backgroundColor = UIColor.black
         view.addSubview(view1)

         // 测试视图
         let view2 = UIView()
         view2.backgroundColor = UIColor.magenta
         view1.addSubview(view2)
         view2.snp.makeConstraints { (make) in
              make.top.equalToSuperview().offset(20)
              // 当前视图的顶部距离父视图的顶部:20(父视图顶部+20)
              make.left.equalToSuperview().offset(20)
              // 当前视图的左边距离父视图的左边:20(父视图左边+20)
              make.bottom.equalToSuperview().offset(-20)
              // 当前视图的底部距离父视图的底部:-20(父视图底部-20)
              make.right.equalToSuperview().offset(-20)
              // 当前视图的右边距离父视图的右边:-20(父视图右边-20)
         }

    }
}
更简洁的写法 import UIKit import SnapKit
class ViewController: UIViewController { override func viewDidLoad() { super.viewDidLoad()
     // 黑色视图作为父视图
     let view1 = UIView()
     view1.frame = CGRect(x: 0, y: 0, width: 300,
     height: 300)
     view1.center = view.center
     view1.backgroundColor = UIColor.black
     view.addSubview(view1)

     // 测试视图
     let view2 = UIView()
     view2.backgroundColor = UIColor.magenta
     view1.addSubview(view2)
     view2.snp.makeConstraints { (make) in
        make.edges.equalToSuperview().inset
        (UIEdgeInsets(top: 20, left: 20, bottom: 20,
        right: 20))
     }

}
}
其他
edges边缘: 对于边缘的处理offset是往右或往下或往外多少
make.edges.equalTo(view2).inset(UIEdgeInsetsMake(10, 15, 20,
25))
size尺寸 :向外偏移 -50,就是内移
make.size.equalTo(boxOutter).offset(-50)
其中,size就是让 width = 父视图.width - 50, height = 父视图.height - 50
center中心
make.size.equalTo(boxOutter).multipliedBy(0.5)
multipliedBy 乘法 将视图的尺寸设置成父视图几倍大小
利用multipliedBy后,width = superview.width * 0.5, height = superview.height / 2
