

初衷
现在大部分的应用都会使用 Retrofit + OkHttp 的网络请求,仅从使用的角度来讲,这两者最大的特点是 注解 + 拦截器。
在平时开发的过程中,Client 和 Server 的开发工作是并行的,这个时候 Client 就需要一些 mock 数据来进行开发,此外做一些单纯的演示功能或者离线 app 的时候也需要一些本地写死的数据,平常开发的时候我们都是将将数据放到 assets 下然后读取后 gson 序列化一下塞给数据源类,这样的做法显得有些笨拙且麻烦,需要每次修改一堆代码,所以就想着要是能用注解来让网络请求库自动返回 mock 数据就好了,比如像下面这样调用:
@Mock(assets = "github.json")
@GET("search/repositories")
fun searchRepos(@Query("q") query: String): LiveData<ApiResponse<RepoSearchResponse>>
同样如果有一些特殊需求都可以使用自定义的注解来处理,这样可以提高一些灵活性。
实现原理
大体流程如下:
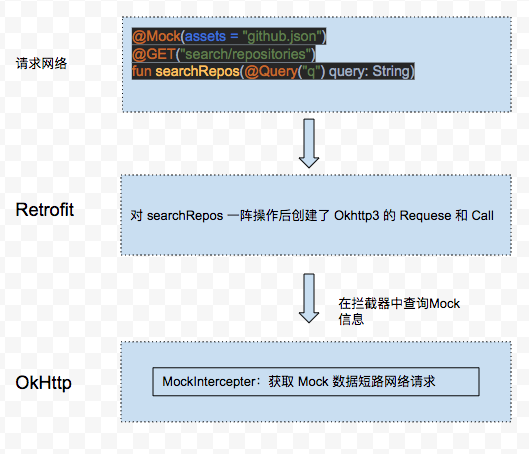
关键问题就是在 OkHttp 的拦截器中如何获取 searchRepos 的注解信息。 要想解决这个问题我们就需要带着下面 3 个问题去看 Retrofit 的源码:
- Retrofit 是如何处理注解
- Retrofit 调用 OkHttp 的时候都传递了什么参数
- OkHttp 如何在拦截器中获取到 Retrofit Method 中注解
Retrofit 调用 OkHttp 的流程
使用 Retrofit 的步骤如下:
- 先定一个服务接口
interface GithubService {
    @Mock(assets = "github.json")
    @GET("search/repositories")
    fun searchRepos(@Query("q") query: String): LiveData<ApiResponse<RepoSearchResponse>>
}
- 创建一个 Retrofit 实例
Retrofit.Builder().client(okHttpClient)
            .baseUrl(baseUrl)
            .addConverterFactory(GsonConverterFactory.create(Gson()))
            .addCallAdapterFactory(LiveDataCallAdapterFactory())
            .build()
            .create(GithubService::class.java
)
当调用 create 方法的时候会为 GithubService 添加动态代理,每次调用 searchRepos 都会调用 HttpServiceMethod 的 invoke 方法:
public <T> T create(final Class<T> service) {
    ...
    return (T) Proxy.newProxyInstance(service.getClassLoader(), new Class<?>[] { service },
        new InvocationHandler() {
          ...
            return loadServiceMethod(method).invoke(args != null ? args : emptyArgs);
          }
        });
  }
ServiceMethod<?> loadServiceMethod(Method method) {
    ServiceMethod<?> result = serviceMethodCache.get(method);
    if (result != null) return result;

    synchronized (serviceMethodCache) {
      result = serviceMethodCache.get(method);
      if (result == null) {
        result = ServiceMethod.parseAnnotations(this, method);
        serviceMethodCache.put(method, result);
      }
    }
    return result;
  }
可以看到 Retrofit 每次调用 metheod 的时候都会把 method 添加到这个缓存中:
public final class Retrofit {
  private final Map<Method, ServiceMethod<?>> serviceMethodCache = new ConcurrentHashMap<>();
  }
key 就是 method,value 是 HttpServiceMethod
再来查看它是何方神圣:
HttpServiceMethod(RequestFactory requestFactory, okhttp3.Call.Factory callFactory,
      Converter<ResponseBody, ResponseT> responseConverter) {
    this.requestFactory = requestFactory;
    this.callFactory = callFactory;
    this.responseConverter = responseConverter;
  }
可以看到它有三个字段:
- requestFactory:保存了所有的请求相关的数据,比如请求方法是 GET 还是 POST,url 以及请求参数等。
- callFactory:创建 OkHttp 的 Call,用于请求网络
- responseConverter: 用于序列化 response
在 requestFactory 中我们找到了第一个问题的答案:
完蛋,没法修改 Retrofit 的源码来额外解析自定义的注解。
那么再从 callFactory 寻找第二个问题的答案,HttpServiceMethod 的 invoke 方法中使用了 callFactory 创建了 OkHttpCall:
 @Override final @Nullable ReturnT invoke(Object[] args) {
    Call<ResponseT> call = new OkHttpCall<>(requestFactory, args, callFactory, responseConverter);
    return adapt(call, args);
  }
OkHttpCall 中创建了 OkHttp 的 Request 和 Call
private okhttp3.Call createRawCall() throws IOException {
    okhttp3.Call call = callFactory.newCall(requestFactory.create(args));
    ...
    return call;
  }
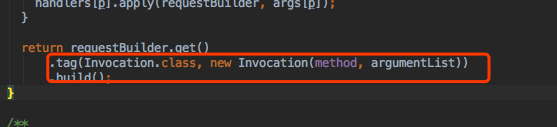
关键的 tag
其中 requestFactory 创建了 okhttp3.Request 也就是在拦截器中可以获取到的 Request:
okhttp3.Request create(Object[] args) throws IOException {
   ...

    return requestBuilder.get()
        .tag(Invocation.class, new Invocation(method, argumentList))
        .build();
  }
在创建 Request 的时候发现 Retrofit 为 Request 添加了一个 tag: evernotecid://147782CD-B655-4EB8-8690-0C53A55A9C43/appyinxiangcom/24089108/ENResource/p86
解决了关键问题之后我们就可以很轻松的扩展注解了。
实现流程
自定义 Mock 注解
@Target(AnnotationTarget.FUNCTION)
@Retention(AnnotationRetention.RUNTIME)
annotation class Mock(val value: String = "", val assets: String = "", val url: String = "")
我们定义了三个参数
- value:json 字符串
- assets:assets 下的文件名
- url:mock url
自定义 Mock 拦截器
/**
 * Description: mock 拦截器
 *
 * @author wangzhen
 * @version 1.0
 */
class MockInterceptor : Interceptor {
    override fun intercept(chain: Interceptor.Chain): Response {
        val request = chain.request()

        // 获取 retrofit 中定义 method
        val retrofitMethod = getRetrofitMethod(request) ?: return chain.proceed(request)

        // 根据 method 获取它的 mock 注解
        val mock = getMock(retrofitMethod) ?: return chain.proceed(request)

        // 获取 mockUrl 进行重定向
        if (mock.url.isNotEmpty()) {
            return chain.proceed(mockRequest(request, mock.url))
        }

        // 根据 mock 注解获取 mockData
        val mockData = getMockData(mock)

        // 如果 mockData 不为空就短路拦截器
        if (!mockData.isNullOrEmpty()) {
            return Response.Builder()
                .protocol(Protocol.HTTP_1_0)
                .code(200)
                .request(request)
                .message("ok")
                .body(mockData.toResponseBody(null))
                .build()
        }
        return chain.proceed(request)
    }

    private fun mockRequest(request: Request, mockUrl: String): Request {
        return request.newBuilder().url(mockUrl).build()
    }
}
MockUtils如下:
package com.wangzhen.baselib.http.mock

import android.util.Log
import com.wangzhen.baselib.application.GlobalApplication
import com.wangzhen.baselib.utils.readAssets
import okhttp3.Request
import retrofit2.Invocation
import java.lang.reflect.Method

/**
 * Description: mock 相关工具工具
 *
 * @author wangzhen
 * @version 1.0
 */

fun getRetrofitMethod(request: Request): Method? {
    return request.tag(Invocation::class.java)?.method() ?: return null
}

fun getMock(method: Method): Mock? {
    val annotations = method.annotations
    for (annotation in annotations) {
        if (annotation is Mock) {
            return annotation
        }
    }
    return null
}

fun getMockData(mock: Mock): String? {
    val value = mock.value
    if (value.isNotEmpty()) {
        return value
    }
    val assetsUrl = mock.assets
    if (assetsUrl.isNotEmpty()) {
        return readAssets(GlobalApplication.getAppContext(), assetsUrl)
    }
    return null
}
可以看到关键的操作就是根据 request 的 tag 获取到当前调用的 method,然后获得 method 的 mock 注解:
val method = request.tag(Invocation::class.java).method()
val annotations = method.annotations
Retrofit 版本
不同的版本源码不同,这里使用的是:
com.squareup.retrofit2:retrofit:2.6.2
其他实现方式
调研过其他的实现方式,与现在的实现方式相比要复杂不少,感兴趣的可以参考下: 使用反射获取到 request 的 url,然后在拦截器中根据 url 匹配对应的注解,这种方式使用了大量的反射
自定义 CallAdapter.Factory 保存 ”url - 注解“ 的关系对然后在拦截器中处理,这种方式需要修改 retrofit 的源码
