

目录结构
        readme              //项目的说明文件
        package.json         //第三方依赖包配置
        package.lock.json    //帮助我们去确定安装的第三方依赖包的具体的版本,保持团队编程的统一
        license             //开源协议的说明
        index.html          //项目默认的首页模版文件
        .postcssrc.js        //对 postcss 的配置项
        .gitignore          //不需要上传到 git 上的文件管理
        .eslintrc.js        //对写的代码检测是否标准做一个检测
        .eslintignore       //配置不需要 eslintrc 检测工具检测的文件
        .editorconfig       //配置编辑器总风格统一的自动化格式的语法
        .babelrc            //项目写的代码是 Vue 的大文件组件的代码的写法,所以需要通过 babel 这种语法解析器做一些语法上的转换,最终转换成浏览器能够编译执行的代码,babel 需要做额外配置时,就放在文件里面
        static                  //static 目录放的是静态资源,要用到的静态图片啊或者后续需要模拟的 json 数据
        node_modules                 //项目中需要用到的第三方 node 包
        src                         //放的是项目的源代码
        src/main.js                  //整个项目的入口文件
        src/app.vue                 //整个项目最原始的根组件
        src/router/index.js          //项目的路由放置位置
        src/components               //项目中要用到的小组件
        src/assets                  //项目中需要用到的图片
        config                      //放置项目配置文件
        config/index.js              //放基础配置
        config/dev.ent.js            //开发环境配置信息
        config/prod.ent.js           //线上环境配置信息
        build                      //放置项目打包的 webpack 配置信息,vue-cli 会自动构建
        build/webpack.base.conf.js   //基础的 webpack 配置信息
        build/webpack.dev.conf.js    //开发环境的 webpack 配置信息
        build/webpack.prod.conf.js   //线上环境的 webpack 配置信息
移动端300ms延迟 移动端浏览器click事件为什么会有300ms的延迟呢?因为在手机上有个双击方案 —— 在手机上快速点击两下,实现页面放大;再次双击,恢复到原始比例。
那它是如何实现的呢?浏览器在捕捉到第一次点击事件后,会等待一段时间,如果在这段时间内,用户没有再次进行点击操作的话,就执行单击事件;如果用户进行了第二次点击操作的话,就会执行双击事件。这段等待的时间大约300ms。
如何解决这个延迟呢?有很多方法,这里推荐两种比较简单的方法:
width=device-width 宽度为设备宽度
initial-scale=1 初始比例为1
maximum-scale=1 最大比例为1
minimum-scale=1 最小比例为1
user-scalable=no 用户不能进行放大缩小
引入第三方库fastclick
npm install fastclick --save
因为所有页面都要引入,所以在入口处统一引入就可以了import FastClick from 'fastclick'
FastClick.attach(document.body)
1px像素问题 红色边框是用border-bottom: 1px solid red;写的,在手机上明显可以看出它不是1px。

怎么解决这个问题呢?
方法有好几种,这里推荐一种:伪类 + transform 看代码:
.border1 height: .5rem position: relative .border1:before position: absolute top:-.5rem left:0 content: '' width:100% height:1px border-top:1px solid rgba(0,0,0,.3) transform: scaleY(0.5) 这种方式的原理很简单,就是把原先元素的border去掉,然后利用:before或者:after重做border ,并transform的scale缩小一半,原先的元素相对定位,新做的border绝对定位。
border.css
    @charset "utf-8";
    .border,
    .border-top,
    .border-right,
    .border-bottom,
    .border-left,
    .border-topbottom,
    .border-rightleft,
    .border-topleft,
    .border-rightbottom,
    .border-topright,
    .border-bottomleft {
        position: relative;
    }
    .border::before,
    .border-top::before,
    .border-right::before,
    .border-bottom::before,
    .border-left::before,
    .border-topbottom::before,
    .border-topbottom::after,
    .border-rightleft::before,
    .border-rightleft::after,
    .border-topleft::before,
    .border-topleft::after,
    .border-rightbottom::before,
    .border-rightbottom::after,
    .border-topright::before,
    .border-topright::after,
    .border-bottomleft::before,
    .border-bottomleft::after {
        content: "\0020";
        overflow: hidden;
        position: absolute;
    }
    /* border
     * 因,边框是由伪元素区域遮盖在父级
     * 故,子级若有交互,需要对子级设置
     * 定位 及 z轴
     */
    .border::before {
        box-sizing: border-box;
        top: 0;
        left: 0;
        height: 100%;
        width: 100%;
        border: 1px solid #eaeaea;
        transform-origin: 0 0;
    }
    .border-top::before,
    .border-bottom::before,
    .border-topbottom::before,
    .border-topbottom::after,
    .border-topleft::before,
    .border-rightbottom::after,
    .border-topright::before,
    .border-bottomleft::before {
        left: 0;
        width: 100%;
        height: 1px;
    }
    .border-right::before,
    .border-left::before,
    .border-rightleft::before,
    .border-rightleft::after,
    .border-topleft::after,
    .border-rightbottom::before,
    .border-topright::after,
    .border-bottomleft::after {
        top: 0;
        width: 1px;
        height: 100%;
    }
    .border-top::before,
    .border-topbottom::before,
    .border-topleft::before,
    .border-topright::before {
        border-top: 1px solid #eaeaea;
        transform-origin: 0 0;
    }
    .border-right::before,
    .border-rightbottom::before,
    .border-rightleft::before,
    .border-topright::after {
        border-right: 1px solid #eaeaea;
        transform-origin: 100% 0;
    }
    .border-bottom::before,
    .border-topbottom::after,
    .border-rightbottom::after,
    .border-bottomleft::before {
        border-bottom: 1px solid #eaeaea;
        transform-origin: 0 100%;
    }
    .border-left::before,
    .border-topleft::after,
    .border-rightleft::after,
    .border-bottomleft::after {
        border-left: 1px solid #eaeaea;
        transform-origin: 0 0;
    }
    .border-top::before,
    .border-topbottom::before,
    .border-topleft::before,
    .border-topright::before {
        top: 0;
    }
    .border-right::before,
    .border-rightleft::after,
    .border-rightbottom::before,
    .border-topright::after {
        right: 0;
    }
    .border-bottom::before,
    .border-topbottom::after,
    .border-rightbottom::after,
    .border-bottomleft::after {
        bottom: 0;
    }
    .border-left::before,
    .border-rightleft::before,
    .border-topleft::after,
    .border-bottomleft::before {
        left: 0;
    }
    @media (max--moz-device-pixel-ratio: 1.49), (-webkit-max-device-pixel-ratio: 1.49), (max-device-pixel-ratio: 1.49), (max-resolution: 143dpi), (max-resolution: 1.49dppx) {
        /* 默认值,无需重置 */
    }
    @media (min--moz-device-pixel-ratio: 1.5) and (max--moz-device-pixel-ratio: 2.49), (-webkit-min-device-pixel-ratio: 1.5) and (-webkit-max-device-pixel-ratio: 2.49), (min-device-pixel-ratio: 1.5) and (max-device-pixel-ratio: 2.49), (min-resolution: 144dpi) and (max-resolution: 239dpi), (min-resolution: 1.5dppx) and (max-resolution: 2.49dppx) {
        .border::before {
            width: 200%;
            height: 200%;
            transform: scale(.5);
        }
        .border-top::before,
        .border-bottom::before,
        .border-topbottom::before,
        .border-topbottom::after,
        .border-topleft::before,
        .border-rightbottom::after,
        .border-topright::before,
        .border-bottomleft::before {
            transform: scaleY(.5);
        }
        .border-right::before,
        .border-left::before,
        .border-rightleft::before,
        .border-rightleft::after,
        .border-topleft::after,
        .border-rightbottom::before,
        .border-topright::after,
        .border-bottomleft::after {
            transform: scaleX(.5);
        }
    }
    @media (min--moz-device-pixel-ratio: 2.5), (-webkit-min-device-pixel-ratio: 2.5), (min-device-pixel-ratio: 2.5), (min-resolution: 240dpi), (min-resolution: 2.5dppx) {
        .border::before {
            width: 300%;
            height: 300%;
            transform: scale(.33333);
        }
        .border-top::before,
        .border-bottom::before,
        .border-topbottom::before,
        .border-topbottom::after,
        .border-topleft::before,
        .border-rightbottom::after,
        .border-topright::before,
        .border-bottomleft::before {
            transform: scaleY(.33333);
        }
        .border-right::before,
        .border-left::before,
        .border-rightleft::before,
        .border-rightleft::after,
        .border-topleft::after,
        .border-rightbottom::before,
        .border-topright::after,
        .border-bottomleft::after {
            transform: scaleX(.33333);
        }
    }
样式重置 网上有很多reset.css找一份引入到项目之中。
轮播

可以用下面的css代码对这些可替换资源先进行占位,页面大体框架在第一次渲染后就能呈现给用户,数据获取到后,替换相应的内容就可,就不会出现抖动了。
.icon-img
    overflow: hidden
    width: 100%
    height: 0
    padding-bottom: 100%
样式穿透 在子组件中实现在这样的布局,需要用到样式穿透,不然是无法滚动下半部分的。
.icons >>> .swiper-container
  height: 0
  padding-bottom:50%
多页 现在上面的轮播,一页上有8个icon,此时如果需求变成了9个,怎么样才能做到在不改动代码的前提下,能实现任意数量的icon
可以用计算属性computed对iconList进行监听:
在Home.vue首先定义了iconList: []通过属性传递给了Icons.vue组件。 在Icons.vue中通过props接收到了iconList数据。 使用computed之所以能对iconList监听,是因为刚开始传递进来的iconList是空数组,当获取到到数据之后,在传递过来iconList是有值的,iconList一旦发生了变化,computed就能捕捉到。 computed中还有一个计算属性showIconList,它的用途是:
刚开始渲染的时候,由于iconList是一个空数组,直接将空数组渲染上去了 当有了数据之后,又会进行第二次渲染,此时就会看到,轮播始终在最后一页 使用v-if=showIconList是为了不让它在空数组时渲染,而是要等到有数据后在渲染 所以swiper在初次创建是应该要用完整的数据来创建,而不要用空数据创建 代码:
    <swiper :options="swiperOption">
      <swiper-slide v-for="(page,index) of pages" :key="index" v-if="showIconList">
        <div class="icon" v-for="item of page" :key="item.id">
          <div class="icon-img">
            <img class="icon-img-content" :src="item.iconUrl" alt="">
          </div>
          <p class="icon-desc">{{item.desc}}</p>
        </div>
      </swiper-slide>
    </swiper>
    computed: {
        pages () {
          const pages = []
          this.iconList.forEach((item, index) => {
            const page = Math.floor(index / 8)          //每页是 8 个,index / 8 能获取到页数
            if (!pages[page]) {     //初始化每一项
              pages[page] = []
            }
            pages[page].push(item)  //变成新数组
          })
          return pages
       },
       showIconList () {
          return this.iconList.length
       }
    }
城市选择 兄弟组件通信 这块内容比较多,重新写了一遍文章,介绍了两种数据传递的方式,城市选择的这边用的是vuex。 Vue 中非父子组件间的传值
节流 手指在城市字母表中滑动时,会触发无数次handleTouchMove这个函数,这就对性能影响很大。
函数节流:通过设定一个时间周期,只要在这个周期内函数就不执行。
实现方法:
    ihandleTouchMove (e) {
      if (this.touchStatus) {
        if (this.timer) {
          clearTimeout(this.timer)
        }
        this.timer = setTimeout(() => {
          const touchY = e.touches[0].clientY - 79
          const index = Math.floor((touchY - this.startY) / 20)
          if (index >= 0 && index < this.letters.length) {
            this.$emit('change', this.letters[index])
          }
        }, 10)
      }
    }
这里设置的周期是10ms,10ms这个代码只会执行一次,大大优化了性能
keep-alive优化请求 只发送一次请求 每次点击城市或者回到首页时,都会重新发送一个ajax请求,因为当路由切换的时候,这个组件就会被重新渲染,组件一被重新渲染,mounted这个钩子函数就会被执行。这样就会对性能造成比较大的影响。
Vue 也考虑到了这一点,为我们提供了一个keep-alive的标签。
    <keep-alive>
       <router-view/>
    </keep-alive>
路由的内容被加载过一次之后,就把路由的内容放到内存之中,下次在进这个路由的时候不需要再重新渲染组件了,只需你从内容里把以前的内容拿出来显示就可以了。
城市改变在发送请求 按照上面这样优化,当我改变城市时,它也不会发送请求,因为这一块用的是内存里的数据,那么这个选择曾是功能就变得有名无实,那该怎么改进呢?
当我们使用了keep-alive标签后,会自动执行钩子函数activated,而mounted钩子函数是不会被执行的。
    activated () {
        if (this.lastCity !== this.city) {
          this.lastCity = this.city
          this.getHomeInfo()
        }
    }
详情页 全局事件 详情页绑定了一个全局事件,当我在详情页面中滚动,这个样写没有问题,但是当我去到其他页面,在滚动时,你就会发现,刚刚你绑定在详情页中的滚动事件,在这个页面也被执行了,这肯定是有问题的。
其实在我们使用了keep-alive标签后,会有两个生命周期函数分别是:activated、deactivated
    activated:页面展示的时候被执行
    deactivated:页面被隐藏或者页面即将被替换成新的页面时被执行

    activated () {
        window.addEventListener('scroll', this.handleScroll)
    },
    deactivated () {
        window.removeEventListener('scroll', this.handleScroll)
    }
    这段代码是页面被展示的执行scroll,页面被隐藏的时候移除scroll事件
递归组件 递归组件就是在我组件的自身去调用组件的自身
假如说现在有这样的数据结构,一级标题,二级标题,三级标题,如何实现呢?
data () {
    return {
        "categoryList": [{
            "title": "成人票",
            "children": [{
                "title": "成人三馆联票",
                "children": [{
                    "title": "成人三馆联票 - 某一销售店"
                }]
            }, {
                "title": "成人五馆联票"
            }]
        }, {
            "title": "儿童票"
        }, {
            "title": "学生票"
        }, {
            "title": "特惠票"
        }]
    }
}
对一层标题用v-for来进行循环,二、三层标题该怎么显示出来呢?在写组件的时候,都会写一个name的属性,它其中一个用途就是——递归组件

keep-alive不缓存 在Detail.vue页面中,当我点击了其他景点后,它也是不会发送请求的,那么Detail页面就不会重新渲染了。
可以使用keep-alive的exclude属性,给它默认设置为Detail,用途是每次进入Detail页面都会发送请求
//使用 exclude 属性,可以设置不需要缓存的页面 组件中name名字的用途 组件中name这个值到底是干什么用的呢:
递归组件可以用到 当你相对某个页面想取消缓存的时候会用到 在 Vue 的开发调试工具中会用到 webpack别名设置 使用alias 项目中有许多地方需要引入一些公用样式,此项目样式是用stylus写了,比如很多地方都需要用到主题色,统一写在一个文件中后期维护很方便。但是引入这个文件很麻烦:
../../../assets/styles/varible.css
如果每个页面都这样引入文件,一方面写的不优雅,另一方面维护也不方便。
    module.exports = {
      ...
      resolve: {
        extensions: ['.js', '.vue', '.json'],
        alias: {
          'vue$': 'vue/dist/vue.esm.js',
          '@': resolve('src'),
          'styles': resolve('src/assets/styles')
        }
      }
    }
在build/webpack.base.config.js文件中找到resolve下alias,它可以对路径进行简化操作,项目中引入这个文件只需要写styles/varible.css即可。
路径分配 在自己开发中,经常需要自己moke数据`
    axios.get('/api/detail.json', {
        params: {
          id: this.$route.params.id
        }
    }).then(this.getDetailInfoSucc)
这样写路径是访问不到自己mock的数据的,那应该怎么写呢?
    axios.get('/static/mock/detail.json', {
        params: {
          id: this.$route.params.id
        }
    }).then(this.getDetailInfoSucc)
把/api改成/static/mock/这样访问到我们本地的数据了,但是这样有风险的,上线前你需要改回/api,很容易出错,造成bug
    module.exports = {
      dev: {
        ...
        proxyTable: {
          '/api':{
            target: 'http://localhost:8080',
            pathRewrite: {
              '^/api':'/static/mock'
            }
          }
        }
     }
在config/index.js文件中找到dev下的proxyTable,它可以代理路径,我们在项目中写/api,通过proxyTable可以自动找到/static/mock这个目录。
移动端可以访问 当手机上用本地的ip地址访问项目时被拒绝了,这是因为前端项目是通过webpack-dev-server启动的,webpack-dev-server默认不支持ip的形式访问页面,这就需要把它默认的配置项做一个修改。
    "scripts": {
        "dev": "webpack-dev-server --host 0.0.0.0 --inline --progress --config build/webpack.dev.conf.js",
        "start": "npm run dev",
        "lint": "eslint --ext .js,.vue src",
        "build": "node build/build.js"
    }
当每次运行npm run start或者npm run dev时,都是在运行scripts下dev指令,只需要在它上面加上--host 0.0.0.0就可以了
总结 技术选型
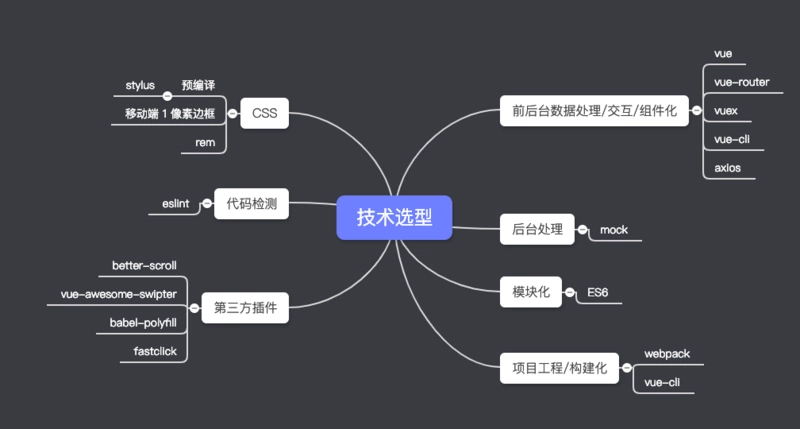

学到了什么 流程化开发
了解了代码规范,编写可维护代码 学会了用git管理代码,用分支开发 学会了组件化、模块化、工程化的开发模式 掌握使用Vue-cli脚手架初始化Vue.js项目 学会es6 + eslint的开发方式 mock 数据,前后端分离 设计思想与模式
函数节流 组件化开发 代码规范 第三方库使用
vue-awesome-swiper轮播组件 fastclick解决点击延迟问题 better-scroll体验更好的页面滚动 babel-polyfill解决proxyTable兼容问题 不足之处 缺乏webpack及前后端交互相关的知识,在部署到github上出现了问题,在打包后无法访问到mock数据,这块知识在后面还得要跟进学习。
