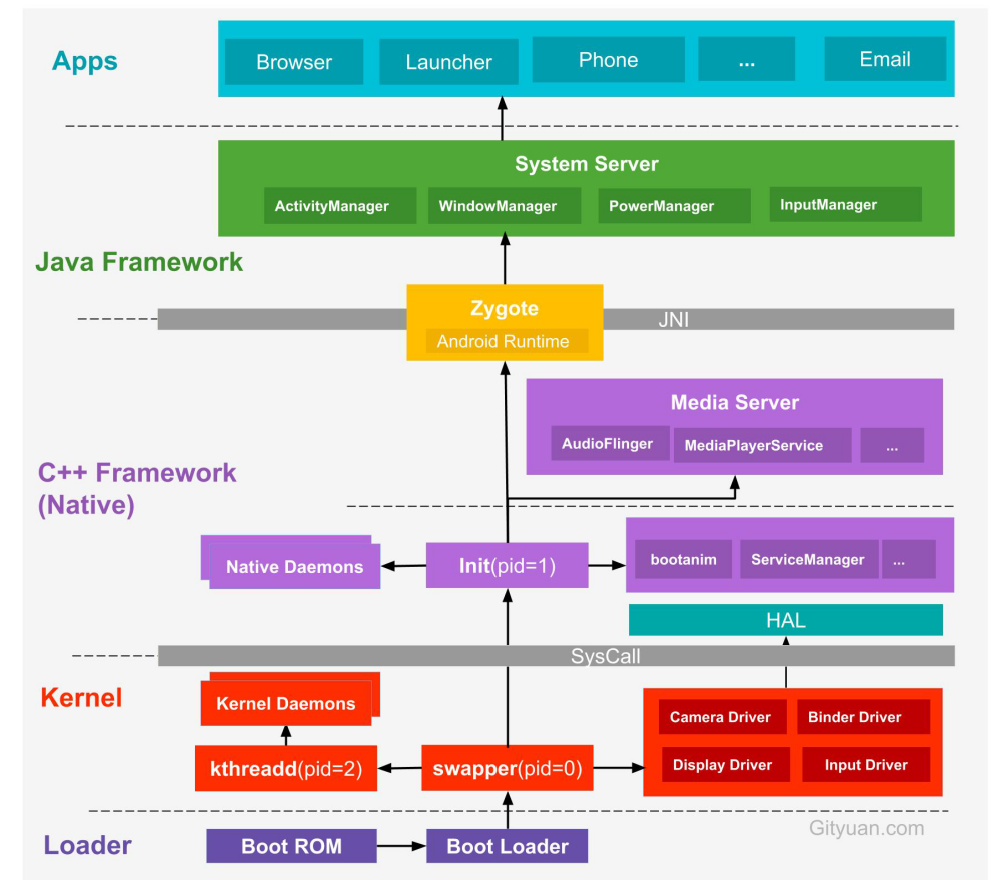
引入 init 进程
-
启动电源以及系统启动
当电源按下时,引导芯片代码从预定义的地方(固化在ROM)开始执行。加载引导程序Boot Loader到RAM中,然后执行。
-
Boot Loader
Boot Loader 是在Android操作系统运行前的一段小程序。目的就是把OS拉起来运行
-
Linux内核启动
当内核启动时,设置缓存、被保护储存器、计划列表、加载驱动。在内核完成系统设置后,首先找到
init.rc文件,并启动init进程。 -
init进程启动
init进程主要用来初始化和启动属性服务,也是用来启动
Zygote进程
init.rc文件,是用于初始化手机,启动init进程的文件,里面存放的叫Android Init Language,Android 通过特定的解析来读取rc文件, Android Init Language
init 进程入口
以main函数为入口(文章代码均为Android 9.0代码)
 int main(int argc, char** argv) {
     ...
     property_init(); // 对属性服务初始化
     ...
     sigchld_handler_init(); // 设置子进程信号处理函数,防止init进程的子进程变为僵尸进程
     ...
     start_property_service(); //启动属性服务
     ...
     LoadBootScripts(am, sm);//解析init.rc文件
     ...
     auto next_process_restart_time = RestartProcesses(); //重启进程
 }
属性服务: 类似于Windows平台的注册表,通过键值对的方式记录一些信息,恢复出厂设置的开关。
僵尸进程: 子进程终止后,并没有被父进程回收。此时系统进程表里面还是保留的子进程的信息。 系统进程表被占满后,无法再创建新进程。
我们进入到LoadBootScripts方法
 static void LoadBootScripts(ActionManager& action_manager, ServiceList& service_list) {

     Parser parser = CreateParser(action_manager, service_list);  //创建解析器
     ...
     parser.ParseConfig("/init.rc"); // 解析init.rc文件
     ...
 }

 Parser CreateParser(ActionManager& action_manager, ServiceList& service_list) {

    Parser parser;

     parser.AddSectionParser("service", std::make_unique<ServiceParser>(&service_list, subcontexts));  //创建ServiceParser对象
     parser.AddSectionParser("on", std::make_unique<ActionParser>(&action_manager, subcontexts));
     parser.AddSectionParser("import", std::make_unique<ImportParser>(&parser));

     return parser;
 }

  bool Parser::ParseConfigFile(const std::string& path, size_t* parse_errors) {
     ...
     ParseData(path, *config_contents, parse_errors);
     ...
}

 void Parser::ParseData(const std::string& filename, const std::string& data, size_t* parse_errors) {
     ...
     if (auto result = section_parser->EndSection(); !result) {  //把service 添加到 serviceList中
     ...
     section_parser->ParseSection(std::move(args), filename, state.line);
     ...
}

 Result<Success> ServiceParser::ParseSection(std::vector<std::string>&& args, const std::string& filename, int line) {
     ...
     service_ = std::make_unique<Service>(name, restart_action_subcontext, str_args);// 创建service对象
     return Success();
 }
从上述代码可以看出,首先创建解析器,以 service 为例,如果读到的是 service 便相应的创建解析器 ServiceParser, 然后开始解析 init.rc,到最后创建出service对象。
//init.rc
 on nonencrypted
     class_start main   // 对应 init.zygoteXX.rc
     class_start late_start


//init.zygote32.rc
service zygote /system/bin/app_process -Xzygote /system/bin --zygote --start-system-server
    class main
    priority -20
    user root
    group root readproc reserved_disk
    socket zygote stream 660 root system
    onrestart write /sys/android_power/request_state wake
    onrestart write /sys/power/state on
    onrestart restart audioserver
    onrestart restart cameraserver
    onrestart restart media
    onrestart restart netd
    onrestart restart wificond
    writepid /dev/cpuset/foreground/tasks
 static Result<Success> do_class_start(const BuiltinArguments& args) {
     for (const auto& service : ServiceList::GetInstance()) {
          if (service->classnames().count(args[1])) {
              if (auto result = service->StartIfNotDisabled(); !result) {
      ...
}

 Result<Success> Service::StartIfNotDisabled() {
    ...
    return Start();  //服务启动
    ...
}

Result<Success> Service::Start() {
    ...
    pid = fork();    //fork进程
    if (pid == 0) {
      if (!ExpandArgsAndExecv(args_)) {  //进程启动
    ...
可以看到在解析 init.rc 文件的时候,会去调用 class_start main,而这个 main 则定义在 init.zygoteXX.rc 中,根据之前的解析,此时便会启动zygote进程
zygote进程
通过 Android.mk 可以知道,/system/bin/app_process 所对应的 cpp 文件就是 app_main.cpp
Android.mk
app_process_src_files :=  app_main.cpp
进入 app_main 的 main 函数
 app_main.CPP
 int main(int argc, char* const argv[]) {
      ...
      if (zygote) {
          runtime.start("com.android.internal.os.ZygoteInit", args, zygote); //使用JNI 建立与java关系,调用 ZygoteInit.main()方法
     ...
}

 AndroidRuntime.CPP
 void AndroidRuntime::start(const char* className, const Vector<String8>& options, bool zygote) {
     ...
     if (startVm(&mJavaVM, &env, zygote) != 0) {     //启动java虚拟机
          return;
      }

      if (startReg(env) < 0) {  //为java虚拟机注册JNI
          return;
       }

       char* slashClassName = toSlashClassName(className != NULL ? className : ""); // 格式化一下类名
       jclass startClass = env->FindClass(slashClassName); //找到 ZygoteInit类

       jmethodID startMeth = env->GetStaticMethodID(startClass, "main","([Ljava/lang/String;)V"); //找到main方法

       env->CallStaticVoidMethod(startClass, startMeth, strArray); //启动方法
      ...
}
可以看到,当zygote进程创建后,首先会启动jvm,然后注册jni方法,调用java层的 ZygoteInit 的main方法,我们现在进入到java层
ZygoteInit.java

public static void main(String argv[]) {
     ZygoteServer zygoteServer = new ZygoteServer();   //创建

     ZygoteServerzygoteServer.registerServerSocketFromEnv(socketName);  // 创建LocalServerSocket  服务端

     preload(bootTimingsTraceLog); //预加载类、资源

     Runnable r = forkSystemServer(abiList, socketName, zygoteServer); //创建SystemService 进程

     caller = zygoteServer.runSelectLoop(abiList); //等待AMS 请求创建新的应用程序进程
      ...
}

void registerServerSocketFromEnv(String socketName) {
     ...
     mServerSocket = new LocalServerSocket(fd);   //创建 LocalServerSocket
     ...
}

private static Runnable forkSystemServer(String abiList, String socketName,
         ZygoteServer zygoteServer) {
         String args[] = {
                          ...
                           "com.android.server.SystemServer",  //保存启动SystemServer的参数
          parsedArgs = new ZygoteConnection.Arguments(args);  //将数组封装成对象 为创建systemServer而使用
          pid = Zygote.forkSystemServer(  parsedArgs.uid , ...)
        };


public static int forkSystemServer(int uid, int gid, int[] gids, int runtimeFlags,
        int pid = nativeForkSystemServer(
                uid, gid, gids, runtimeFlags, rlimits, permittedCapabilities, effectiveCapabilities);
                //fork SystemServer 进程
        ...
}
ZygoteInit java层代码是创建了 LockServiceSocket 和 SystemServer 进程,为framework层提供了初始化操作
ZygoteServer.java

Runnable runSelectLoop(String abiList) {
       fds.add(mServerSocket.getFileDescriptor());

       if ((pollFds[i].revents & POLLIN) == 0) {  //通过判断revents是否改变,来确定当前是否有AMS穿来的信息

       ZygoteConnection newPeer = acceptCommandPeer(abiList); //创建sokcet连接

       final Runnable command = connection.processOneCommand(this); //fork新进程
}
runSelectLoop 是Zygote进程用来接受AMS消息的地方,当收到AMS所发送的请求,就会fork出新的进程
SystemServer 进程
我们继续通过 forkSystemServer 往下走
ZygoteInit.java

private static Runnable forkSystemServer(String abiList, String socketName,ZygoteServer zygoteServer) {
        /* For child process */
        if (pid == 0) {
            if (hasSecondZygote(abiList)) {
                waitForSecondaryZygote(socketName);
            }

            zygoteServer.closeServerSocket();   //关闭zygote 进程创建的socket
            return handleSystemServerProcess(parsedArgs);  //启动SystemServer进程
        }
        ...
}


private static Runnable handleSystemServerProcess(ZygoteConnection.Arguments parsedArgs) {
         cl = createPathClassLoader(systemServerClasspath, parsedArgs.targetSdkVersion); // 创建PathClassLoader
         return ZygoteInit.zygoteInit(parsedArgs.targetSdkVersion, parsedArgs.remainingArgs, cl);
}
因为 frok 实质上是复制进程,而新的进程并不需要ServerSocket,所以会关闭新进程的ServerSocket。
创建 PathClassLoader ,PathClassLoader为Android系统默认的类加载器,只能加载系统中已经安装过的apk /data/dalvik-cache ,而DexClassLoader 为动态加载提供了可能。
ZygoteInit.java

public static final Runnable zygoteInit(int targetSdkVersion, String[] argv, ClassLoader classLoader) {
         ZygoteInit.nativeZygoteInit(); // native 方法 启动Binder线程
         return RuntimeInit.applicationInit(targetSdkVersion, argv, classLoader); // 进入 SystemServer main 方法
}

static void com_android_internal_os_ZygoteInit_nativeZygoteInit(JNIEnv* env, jobject clazz){
        gCurRuntime->onZygoteInit();
}

virtual void onZygoteInit(){
        sp<ProcessState> proc = ProcessState::self();
        ALOGV("App process: starting thread pool.\n");
        proc->startThreadPool();  //启动 Binder线程池
}
zygote 启动了Binder线程池,具体分析会在后续章节中写。
protected static Runnable applicationInit(int targetSdkVersion, String[] argv, ClassLoader classLoader) {
       return findStaticMain(args.startClass, args.startArgs, classLoader);  //反射 main
}


protected static Runnable findStaticMain(String className, String[] argv,ClassLoader classLoader) {
        m = cl.getMethod("main", new Class[] { String[].class });  // 反射 获取SystemServer main方法,最后在ZygoteInit处进行调用
}


SystemServer
public static void main(String[] args) {
        new SystemServer().run();
}


private void run() {
        System.loadLibrary("android_servers");  //加载动态库 libandroid_servers.so
        mSystemServiceManager = new SystemServiceManager(mSystemContext);  //创建SystemServiceManager
        startBootstrapServices();  // 启动引导服务
        startCoreServices();         //启动核心服务
        startOtherServices();       //启动其他服务
}

private void startBootstrapServices() {
    ...
        traceBeginAndSlog("StartActivityManager");
        ActivityTaskManagerService atm = mSystemServiceManager.startService(
                ActivityTaskManagerService.Lifecycle.class).getService();
        mActivityManagerService = ActivityManagerService.Lifecycle.startService(
                mSystemServiceManager, atm);
        mActivityManagerService.setSystemServiceManager(mSystemServiceManager);
        mActivityManagerService.setInstaller(installer);
        mWindowManagerGlobalLock = atm.getGlobalLock();
        traceEnd();
    ...
}
反射调用 SystemServer 的 main 方法,可以看到在 new SystemServer().run() 中启动了很多必须的服务 例如AMS,PMS
public SystemService startService(String className) {
         serviceClass = (Class<SystemService>)Class.forName(className);
         return startService(serviceClass);
}

public <T extends SystemService> T startService(Class<T> serviceClass) {
         service = constructor.newInstance(mContext);  //反射服务对象
         startService(service);
}

public void startService(@NonNull final SystemService service) {
        service.onStart();   //调用服务的onStart方法
}
最后调用的都是各个服务的 onStart 方法
Launcher启动
SystemServer
private void startOtherServices() {
         mActivityManagerService.systemReady(() -> {
         ...
         }
}


ActivityManagerService
public void systemReady(final Runnable goingCallback, TimingsTraceLog traceLog) {
          startHomeActivityLocked(currentUserId, "systemReady");
}

boolean startHomeActivityLocked(int userId, String reason) {
           Intent intent = getHomeIntent();   //获取launcher intent
           mActivityStartController.startHomeActivity(intent, aInfo, myReason);  //启动launcher
}

Intent getHomeIntent() {
        Intent intent = new Intent(mTopAction, mTopData != null ? Uri.parse(mTopData) : null);  //mTopAction = Intent.ACTION_MAIN;
        intent.addCategory(Intent.CATEGORY_HOME);
        return intent;
    }
当AMS启动完毕,会获取HomeIntent,而HomeIntent其实对应的就是我们的Laucher
ActivityStartController
void startHomeActivity(Intent intent, ActivityInfo aInfo, String reason) {
       mSupervisor.moveHomeStackTaskToTop(reason);  //移动到HomeStack
       mLastHomeActivityStartResult = obtainStarter(intent, "startHomeActivity: " + reason)
                .setOutActivity(tmpOutRecord)
                .setCallingUid(0)
                .setActivityInfo(aInfo)
                .execute();
}


ActivityStarter
int execute() {
        try {
           if (mRequest.mayWait) {
                return startActivityMayWait(...);
            } else {
                return startActivity(...);   //到了 startActivity 流程了
            }
        } finally {
            onExecutionComplete();
        }
最后还是通过startActivity启动起了我们的Launcher
总结
init 进程启动总结
- 创建和挂载所需的文件目录
- 初始化和启动属性服务
- 防止僵尸进程的出现
- 解析 init.rc配置文件,并启动Zygote进程
Zygote 进程启动总结
- 创建java虚拟机,并且注册JNI方法
- 通过JNI调用ZygoteInit 的main方法,进入framework层
- 创建LockServiceSocket,通过runSelectLoop方法,等待AMS的请求,来创建新的进程
- 启动SystemServer进程
SystemServer 进程启动总结
- 启动 Binder 线程池 ,提供跨进程通信
- 创建 SystemSericeManager
- 启动各种系统服务 AMS PMS等
Launcher 启动总结
- SystemServer 启动完毕后,通知AMS
- AMS 启动laucher