

1.FlutterUI中的main()函数是怎么调用的??
2.怎么修改FlutterUI中的main()函数的名称也能调用,自定义入口函数
flutterenginerun.png
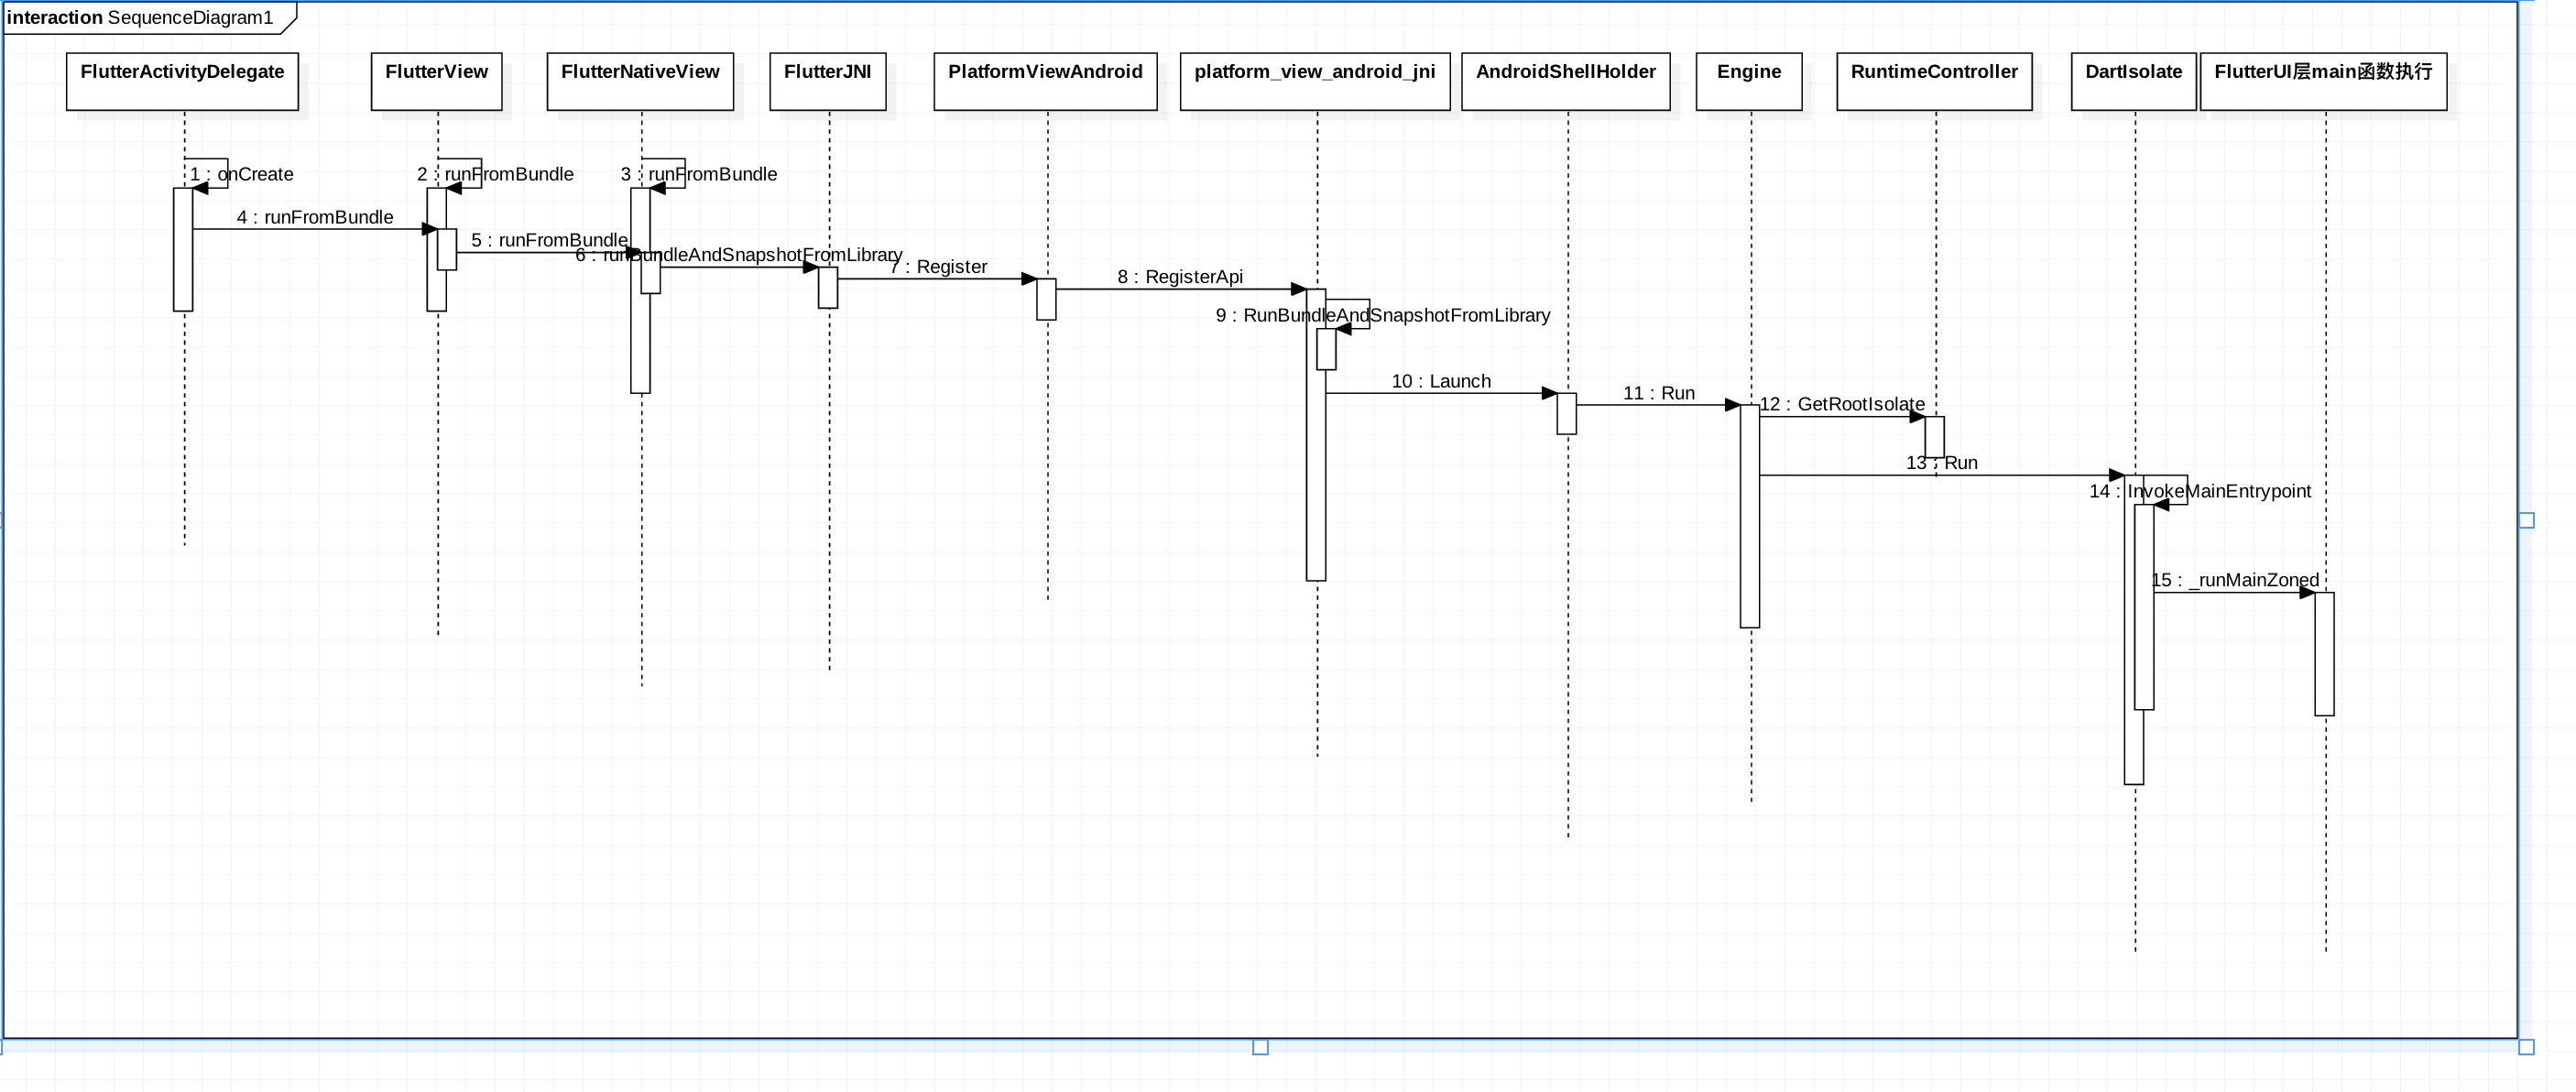
在Android端启动过程中io/flutter/app/FlutterActivityDelegate.class调用onCreate进行初始化,在FlutterEngine初始化的时候已经分析了FlutterEngine初始化的过程,Android的SurferView也已经添加到了Flutter引擎中,但是此时、flutterengine还没有启动,接下继续分析一下Flutter真正加载Dart代码的过程
public void onCreate(Bundle savedInstanceState) {
    if (VERSION.SDK_INT >= 21) {
        Window window = this.activity.getWindow();
        window.addFlags(-2147483648);
        window.setStatusBarColor(1073741824);
        window.getDecorView().setSystemUiVisibility(1280);
    }

    String[] args = getArgsFromIntent(this.activity.getIntent());
    FlutterMain.ensureInitializationComplete(this.activity.getApplicationContext(), args);
    this.flutterView = this.viewFactory.createFlutterView(this.activity);
    if (this.flutterView == null) {
        FlutterNativeView nativeView = this.viewFactory.createFlutterNativeView();
        this.flutterView = new FlutterView(this.activity, (AttributeSet)null, nativeView);
        this.flutterView.setLayoutParams(matchParent);
        this.activity.setContentView(this.flutterView);
        this.launchView = this.createLaunchView();
        if (this.launchView != null) {
            this.addLaunchView();
        }
    }
    ///开始正在加载Dart代码
    if (!this.loadIntent(this.activity.getIntent())) {
        String appBundlePath = FlutterMain.findAppBundlePath();
        if (appBundlePath != null) {
            this.runBundle(appBundlePath);
        }

    }
}

## loadIntent 可以在启动Activity的时候这顶初始化路由

```java
private boolean loadIntent(Intent intent) {
    String action = intent.getAction();
    if ("android.intent.action.RUN".equals(action)) {
        String route = intent.getStringExtra("route");
        String appBundlePath = intent.getDataString();
        if (appBundlePath == null) {
            appBundlePath = FlutterMain.findAppBundlePath();
        }

        if (route != null) {
            this.flutterView.setInitialRoute(route);
        }

        this.runBundle(appBundlePath);
        return true;
    } else {
        return false;
    }
}
Engine: run的相关参数

FlutterIU层中的入口就是在这里设置的,下面这些地方是我们通过配置来改变,flutter参数的地方

1.Apk中抽取的代码保存的位置

2.FlutterUI  main函数的入口,也就是说我们可以随意的改动Flutter代码的入口函数名称,后面在分析Engine侧查找Main函数的逻辑

```java
///Apk中抽取的代码保存的位置
private static String sFlutterAssetsDir = "flutter_assets";

private void runBundle(String appBundlePath) {
    if (!this.flutterView.getFlutterNativeView().isApplicationRunning()) {
        FlutterRunArguments args = new FlutterRunArguments();
        args.bundlePath = appBundlePath;
        ///Flutter  main函数的入口,也就是说我们可以随意的改动Flutter代码的入口函数名称,后面在分析Engine侧查找Main函数的逻辑
        args.entrypoint = "main";
        this.flutterView.runFromBundle(args);
    }
}
nativeRunBundleAndSnapshotFromLibrary
FlutterJNI中调用native方法进行调用FlutterEngine的本地方法
@UiThread
public void runBundleAndSnapshotFromLibrary(@NonNull String bundlePath, @Nullable String entrypointFunctionName, @Nullable String pathToEntrypointFunction, @NonNull AssetManager assetManager) {
    this.ensureRunningOnMainThread();
    this.ensureAttachedToNative();
    this.nativeRunBundleAndSnapshotFromLibrary(this.nativePlatformViewId, bundlePath, entrypointFunctionName, pathToEntrypointFunction, assetManager);
}
PlatformViewAndroid 初始化
Android启动的时候回使用System.library加载Flutter.so库,加载完成会自动调用JNI_OnLoad进行初始化
// This is called by the VM when the shared library is first loaded.
JNIEXPORT jint JNI_OnLoad(JavaVM* vm, void* reserved) {
  // Initialize the Java VM.
  fml::jni::InitJavaVM(vm);

  JNIEnv* env = fml::jni::AttachCurrentThread();
  bool result = false;

  // Register FlutterMain.
  result = shell::FlutterMain::Register(env);
  FML_CHECK(result);

  // Register PlatformView
  result = shell::PlatformViewAndroid::Register(env);
  FML_CHECK(result);

  // Register VSyncWaiter.
  result = shell::VsyncWaiterAndroid::Register(env);
  FML_CHECK(result);

  return JNI_VERSION_1_4;
}
platform_view_android_jni 中注册的本地方法代码engine/src/flutter/shell/platform/android/platform_view_android_jni.cc注册本地代码回调逻辑
  {  ///这个是我们真正关心的FlutterEngine启动过程中调用的逻辑
      .name = "nativeRunBundleAndSnapshotFromLibrary",
      .signature = "(J[Ljava/lang/String;Ljava/lang/String;"
                   "Ljava/lang/String;Landroid/content/res/AssetManager;)V",
      .fnPtr =
          reinterpret_cast<void*>(&shell::RunBundleAndSnapshotFromLibrary),
  },
bool RegisterApi(JNIEnv* env) {
  static const JNINativeMethod flutter_jni_methods[] = {
      // Start of methods from FlutterNativeView
      {
          .name = "nativeAttach",
          .signature = "(Lio/flutter/embedding/engine/FlutterJNI;Z)J",
          .fnPtr = reinterpret_cast<void*>(&shell::AttachJNI),
      },
      {
          .name = "nativeDestroy",
          .signature = "(J)V",
          .fnPtr = reinterpret_cast<void*>(&shell::DestroyJNI),
      },
      {  ///这个是我们真正关心的FlutterEngine启动过程中调用的逻辑
          .name = "nativeRunBundleAndSnapshotFromLibrary",
          .signature = "(J[Ljava/lang/String;Ljava/lang/String;"
                       "Ljava/lang/String;Landroid/content/res/AssetManager;)V",
          .fnPtr =
              reinterpret_cast<void*>(&shell::RunBundleAndSnapshotFromLibrary),
      },
      {
          .name = "nativeGetObservatoryUri",
          .signature = "()Ljava/lang/String;",
          .fnPtr = reinterpret_cast<void*>(&shell::GetObservatoryUri),
      },
      {
          .name = "nativeDispatchEmptyPlatformMessage",
          .signature = "(JLjava/lang/String;I)V",
          .fnPtr =
              reinterpret_cast<void*>(&shell::DispatchEmptyPlatformMessage),
      },
      {
          .name = "nativeDispatchPlatformMessage",
          .signature = "(JLjava/lang/String;Ljava/nio/ByteBuffer;II)V",
          .fnPtr = reinterpret_cast<void*>(&shell::DispatchPlatformMessage),
      },
      {
          .name = "nativeInvokePlatformMessageResponseCallback",
          .signature = "(JILjava/nio/ByteBuffer;I)V",
          .fnPtr = reinterpret_cast<void*>(
              &shell::InvokePlatformMessageResponseCallback),
      },
      {
          .name = "nativeInvokePlatformMessageEmptyResponseCallback",
          .signature = "(JI)V",
          .fnPtr = reinterpret_cast<void*>(
              &shell::InvokePlatformMessageEmptyResponseCallback),
      },

      // Start of methods from FlutterView
      {
          .name = "nativeGetBitmap",
          .signature = "(J)Landroid/graphics/Bitmap;",
          .fnPtr = reinterpret_cast<void*>(&shell::GetBitmap),
      },
      {
          .name = "nativeSurfaceCreated",
          .signature = "(JLandroid/view/Surface;)V",
          .fnPtr = reinterpret_cast<void*>(&shell::SurfaceCreated),
      },
      {
          .name = "nativeSurfaceChanged",
          .signature = "(JII)V",
          .fnPtr = reinterpret_cast<void*>(&shell::SurfaceChanged),
      },
      {
          .name = "nativeSurfaceDestroyed",
          .signature = "(J)V",
          .fnPtr = reinterpret_cast<void*>(&shell::SurfaceDestroyed),
      },
      {
          .name = "nativeSetViewportMetrics",
          .signature = "(JFIIIIIIIIII)V",
          .fnPtr = reinterpret_cast<void*>(&shell::SetViewportMetrics),
      },
      {
          .name = "nativeDispatchPointerDataPacket",
          .signature = "(JLjava/nio/ByteBuffer;I)V",
          .fnPtr = reinterpret_cast<void*>(&shell::DispatchPointerDataPacket),
      },
      {
          .name = "nativeDispatchSemanticsAction",
          .signature = "(JIILjava/nio/ByteBuffer;I)V",
          .fnPtr = reinterpret_cast<void*>(&shell::DispatchSemanticsAction),
      },
      {
          .name = "nativeSetSemanticsEnabled",
          .signature = "(JZ)V",
          .fnPtr = reinterpret_cast<void*>(&shell::SetSemanticsEnabled),
      },
      {
          .name = "nativeSetAccessibilityFeatures",
          .signature = "(JI)V",
          .fnPtr = reinterpret_cast<void*>(&shell::SetAccessibilityFeatures),
      },
      {
          .name = "nativeGetIsSoftwareRenderingEnabled",
          .signature = "()Z",
          .fnPtr = reinterpret_cast<void*>(&shell::GetIsSoftwareRendering),
      },
      {
          .name = "nativeRegisterTexture",
          .signature = "(JJLandroid/graphics/SurfaceTexture;)V",
          .fnPtr = reinterpret_cast<void*>(&shell::RegisterTexture),
      },
      {
          .name = "nativeMarkTextureFrameAvailable",
          .signature = "(JJ)V",
          .fnPtr = reinterpret_cast<void*>(&shell::MarkTextureFrameAvailable),
      },
      {
          .name = "nativeUnregisterTexture",
          .signature = "(JJ)V",
          .fnPtr = reinterpret_cast<void*>(&shell::UnregisterTexture),
      },
  };
RunBundleAndSnapshotFromLibrary
1.加载配置文件
2.启动FlutterEngine
3.在前面介绍的android传入的参数,设置FlutterEngine真正加载Dart代码,执行第一个FlutterUI框架的入口文件
static void RunBundleAndSnapshotFromLibrary(JNIEnv* env,
                                            jobject jcaller,
                                            jlong shell_holder,
                                            jobjectArray jbundlepaths,
                                            jstring jEntrypoint,
                                            jstring jLibraryUrl,
                                            jobject jAssetManager) {
  auto asset_manager = std::make_shared<blink::AssetManager>();
  for (const auto& bundlepath :
       fml::jni::StringArrayToVector(env, jbundlepaths)) {
    if (bundlepath.empty()) {
      continue;
    }

    // If we got a bundle path, attempt to use that as a directory asset
    // bundle or a zip asset bundle.
    const auto file_ext_index = bundlepath.rfind(".");
    if (bundlepath.substr(file_ext_index) == ".zip") {
      asset_manager->PushBack(std::make_unique<blink::ZipAssetStore>(
          bundlepath, "assets/flutter_assets"));

    } else {
      asset_manager->PushBack(
          std::make_unique<blink::DirectoryAssetBundle>(fml::OpenDirectory(
              bundlepath.c_str(), false, fml::FilePermission::kRead)));

      // Use the last path component of the bundle path to determine the
      // directory in the APK assets.
      const auto last_slash_index = bundlepath.rfind("/", bundlepath.size());
      if (last_slash_index != std::string::npos) {
        auto apk_asset_dir = bundlepath.substr(
            last_slash_index + 1, bundlepath.size() - last_slash_index);

        asset_manager->PushBack(std::make_unique<blink::APKAssetProvider>(
            env,                       // jni environment
            jAssetManager,             // asset manager
            std::move(apk_asset_dir))  // apk asset dir
        );
      }
    }
  }

  auto isolate_configuration = CreateIsolateConfiguration(*asset_manager);
  if (!isolate_configuration) {
    FML_DLOG(ERROR)
        << "Isolate configuration could not be determined for engine launch.";
    return;
  }

  RunConfiguration config(std::move(isolate_configuration),
                          std::move(asset_manager));

  {
    auto entrypoint = fml::jni::JavaStringToString(env, jEntrypoint);
    auto libraryUrl = fml::jni::JavaStringToString(env, jLibraryUrl);

    if ((entrypoint.size() > 0) && (libraryUrl.size() > 0)) {
      config.SetEntrypointAndLibrary(std::move(entrypoint),
                                     std::move(libraryUrl));
    } else if (entrypoint.size() > 0) {
      config.SetEntrypoint(std::move(entrypoint));
    }
  }

  ANDROID_SHELL_HOLDER->Launch(std::move(config));
}
AndroidShellHolder 在UI线程启动FlutterEngine
void AndroidShellHolder::Launch(RunConfiguration config) {
  if (!IsValid()) {
    return;
  }

  shell_->GetTaskRunners().GetUITaskRunner()->PostTask(
      fml::MakeCopyable([engine = shell_->GetEngine(),  //
                         config = std::move(config)     //
  ]() mutable {
        FML_LOG(INFO) << "Attempting to launch engine configuration...";
        if (!engine || engine->Run(std::move(config)) ==
                           shell::Engine::RunStatus::Failure) {
          FML_LOG(ERROR) << "Could not launch engine in configuration.";
        } else {
          FML_LOG(INFO) << "Isolate for engine configuration successfully "
                           "started and run.";
        }
      }));
}
Engine::Run
1.PrepareAndLaunchIsolate 预处理一下运行环境
2.获取初始化的GetRootIsolate
3.获取DartState状态
4.添加AddIsolateShutdownCallback回调方法
Engine::RunStatus Engine::Run(RunConfiguration configuration) {
  if (!configuration.IsValid()) {
    FML_LOG(ERROR) << "Engine run configuration was invalid.";
    return RunStatus::Failure;
  }

  auto isolate_launch_status =
      PrepareAndLaunchIsolate(std::move(configuration));
  if (isolate_launch_status == Engine::RunStatus::Failure) {
    FML_LOG(ERROR) << "Engine not prepare and launch isolate.";
    return isolate_launch_status;
  } else if (isolate_launch_status ==
             Engine::RunStatus::FailureAlreadyRunning) {
    return isolate_launch_status;
  }

  std::shared_ptr<blink::DartIsolate> isolate =
      runtime_controller_->GetRootIsolate().lock();

  bool isolate_running =
      isolate && isolate->GetPhase() == blink::DartIsolate::Phase::Running;

  if (isolate_running) {
    tonic::DartState::Scope scope(isolate.get());

    if (settings_.root_isolate_create_callback) {
      settings_.root_isolate_create_callback();
    }

    if (settings_.root_isolate_shutdown_callback) {
      isolate->AddIsolateShutdownCallback(
          settings_.root_isolate_shutdown_callback);
    }
  }

  return isolate_running ? Engine::RunStatus::Success
                         : Engine::RunStatus::Failure;
}
DartIsolate Run方法
1.初始化当前的Scope
2.获取加载的Dart库文件Dart_RootLibrary上一篇中已经介绍了加载库文件
3.解析入口文件
FML_WARN_UNUSED_RESULT
bool DartIsolate::Run(const std::string& entrypoint_name) {
  TRACE_EVENT0("flutter", "DartIsolate::Run");
  if (phase_ != Phase::Ready) {
    return false;
  }

  tonic::DartState::Scope scope(this);

  auto user_entrypoint_function =
      Dart_GetField(Dart_RootLibrary(), tonic::ToDart(entrypoint_name.c_str()));

  if (!InvokeMainEntrypoint(user_entrypoint_function)) {
    return false;
  }

  phase_ = Phase::Running;
  FML_DLOG(INFO) << "New isolate is in the running state.";
  return true;
}
DartIsolate InvokeMainEntrypoint
-
_getStartMainIsolateFunction 查找主Isolate文件句柄
-
查找dart:ui库中的入口文件
_runMainZoned
static bool InvokeMainEntrypoint(Dart_Handle user_entrypoint_function) {
  if (tonic::LogIfError(user_entrypoint_function)) {
    FML_LOG(ERROR) << "Could not resolve main entrypoint function.";
    return false;
  }

  Dart_Handle start_main_isolate_function =
      tonic::DartInvokeField(Dart_LookupLibrary(tonic::ToDart("dart:isolate")),
                             "_getStartMainIsolateFunction", {});

  if (tonic::LogIfError(start_main_isolate_function)) {
    FML_LOG(ERROR) << "Could not resolve main entrypoint trampoline.";
    return false;
  }

  if (tonic::LogIfError(tonic::DartInvokeField(
          Dart_LookupLibrary(tonic::ToDart("dart:ui")), "_runMainZoned",
          {start_main_isolate_function, user_entrypoint_function}))) {
    FML_LOG(ERROR) << "Could not invoke the main entrypoint.";
    return false;
  }

  return true;
}
FlutterUI main()启动
import 'package:flutter/material.dart';

void main() => runApp(MyApp());

class MyApp extends StatelessWidget {
  // This widget is the root of your application.
  @override
  Widget build(BuildContext context) {
    return MaterialApp(
      title: 'Flutter Demo',
      theme: ThemeData(
//          primarySwatch: Colors.blue,
          ),
      home: Scaffold(
        body: ...,
      ),
    );
  }
}
总结
通过两篇文件的分析,我们已经介绍了Flutter引擎的初始化过程和FlutterEngine的运行过程。
1.FlutterEngine初始化四种不同的线程,初始化DartVM,初始化Engine,加载Dart相关的代码,创建运行环境 2.FlutterEngine真正运行起来,加载编译完成的Dart相关的代码,调用FlutterUI中的main()方法,初始化FlutterUI代码
