

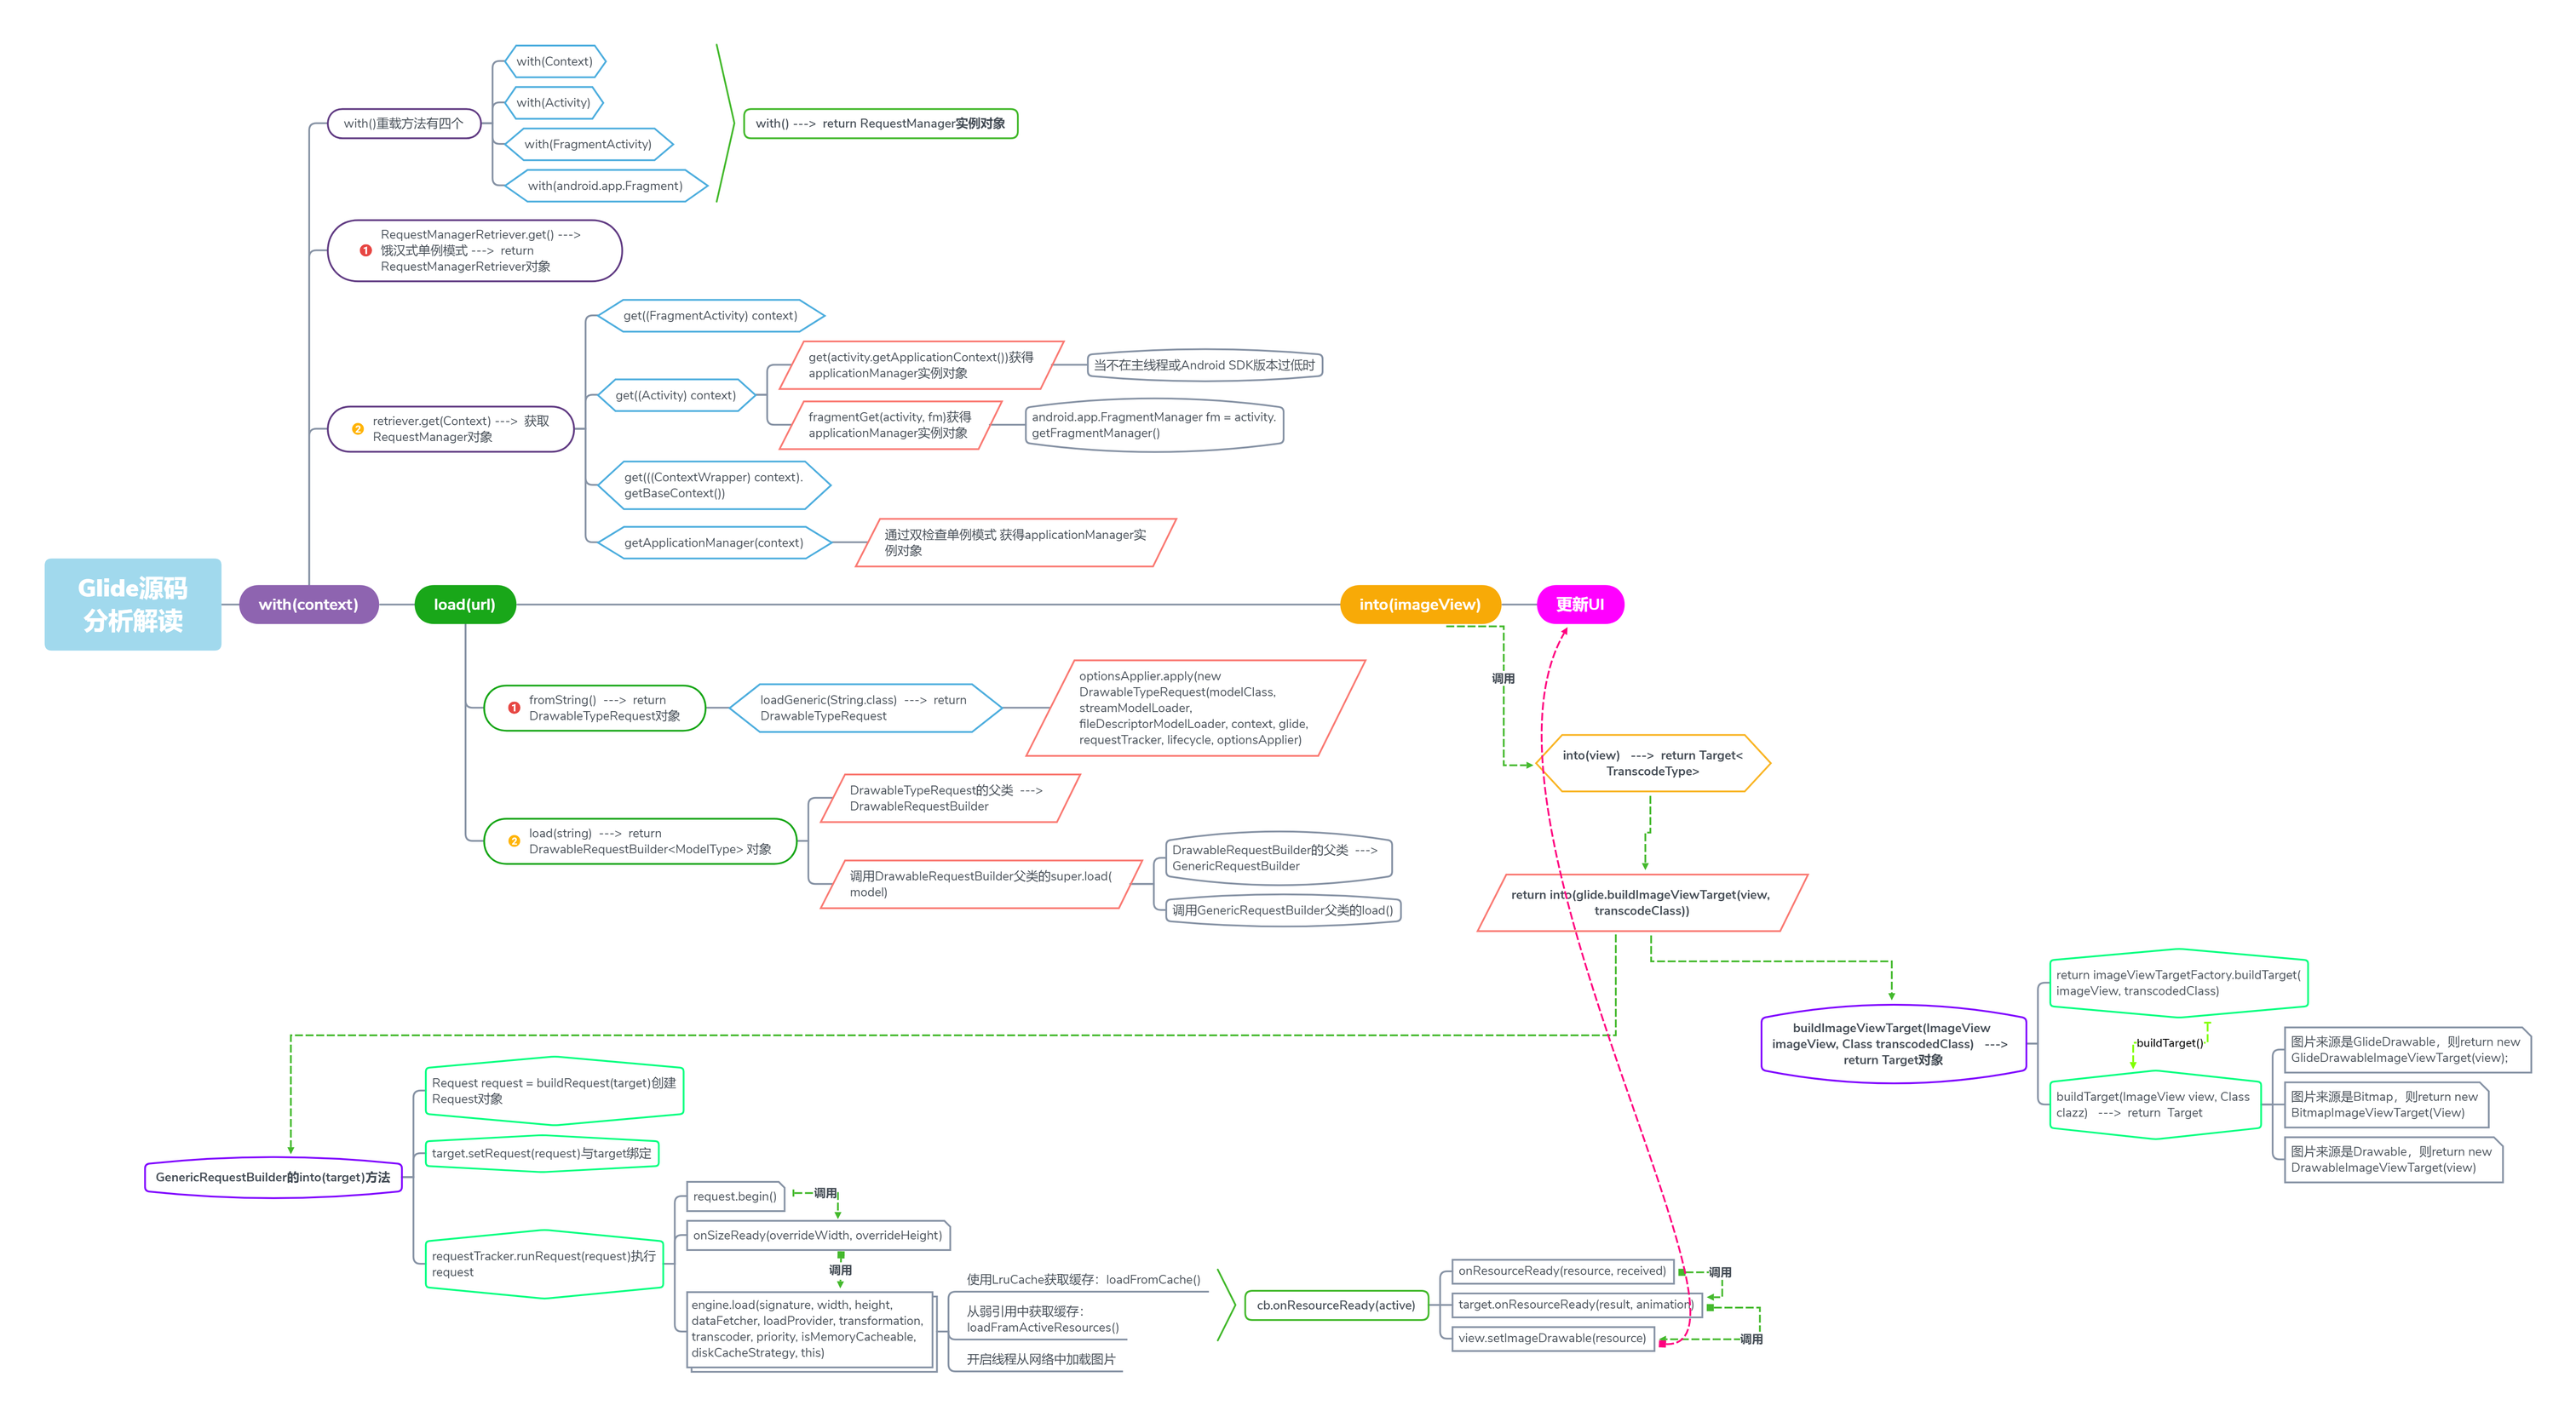
思维导图:Glide源码的流程
(流程图可能有点怪,最后有个水平流程图,不过可能看不清楚)
一、Glide简介
Glide是一款由Bump Technologies开发的图片加载框架,使得我们可以在Android平台上以季度简单的方式加载和展示图片。
其作用:
- GIF动画的解码
- 本地视频剧照的解码
- 缩略图的支持
- Activity生命周期的集成
- 转码的支持
- 动画的支持
- OkHttp和Volley的支持
- 其他功能:如在图片加载过程中,使用Drawables对象作为占位符、图片请求的优化、图片的宽度和高度可重新设定、缩略图和原图的缓存等功能
二、用法
1、添加一个依赖
在app/build.gradle文件中添加依赖
compile 'com.github.bumptech.glide:glide:3.7.0'
2、加载图片的核心代码
从网络请求一张图片,放入控件ImageView中
Glide.with(this)
     .load(url)  //url:网络请求图片的链接地址
     .into(show);//show = (ImageView) findViewById(R.id.image_view);
在上述代码中:
with(context):这个方法时创建一个加载图片的实例,可以接受很多参数,不论是在一个Activity还是在Fragment里面,都可以load(url):指定加载的图片资源,各种方式的into(target):这个是最好理解的,因为它指定要放在哪个ImageView里面,还支持很多用法
3、占位图和加载失败的图片
有时我们发现这个还是不满足我们的需求,因为还需要以下两种情况下的图片:
- 加载时间太长怎么办,不能让别人看到空白
- 加载失败怎么办,也不可能一大堆空白
但是这个框架已经帮我们解决了。
首先先看下占位图
占位图就是指在图片的加载过程中,我们先显示一张临时的图片,等图片加载出来了再替换成要加载的图片。
代码如下:
Glide.with(this)
     .load(url)  //url:网络请求图片的链接地址
     .placeholder(R.drawable.noimage) //加入占位图
     .into(show);//show = (ImageView) findViewById(R.id.image_view);
然后我们再看看加载失败的情况下的处理:
异常占位图:
如果因为某些异常情况导致图片加载失败,比如手机信号不好,这是就显示一张异常占位图。
用法也是一样,如下:
Glide.with(this)
     .load(url)  //url:网络请求图片的链接地址
     .placeholder(R.drawable.noimage) //加入占位图
     .error(R.drawable.errorimage) //异常处理的图片方法
     .into(show);//show = (ImageView) findViewById(R.id.image_view);
三、源码分析
1、with(context)方法
看一下with(context)的源码:
    public static RequestManager with(Context context) {
        RequestManagerRetriever retriever = RequestManagerRetriever.get();
        return retriever.get(context);
    }

    public static RequestManager with(Activity activity) {
        RequestManagerRetriever retriever = RequestManagerRetriever.get();
        return retriever.get(activity);
    }

    public static RequestManager with(FragmentActivity activity) {
        RequestManagerRetriever retriever = RequestManagerRetriever.get();
        return retriever.get(activity);
    }

    public static RequestManager with(android.app.Fragment fragment) {
        RequestManagerRetriever retriever = RequestManagerRetriever.get();
        return retriever.get(fragment);
    }

    public static RequestManager with(Fragment fragment) {
        RequestManagerRetriever retriever = RequestManagerRetriever.get();
        return retriever.get(fragment);
}可以看到,with()方法有很多,但内容基本一致,都是通过RequestManagerRetriever.get()获取RequestManagerRetriever对象retriever,然后通过retriever.get(context)获取一个RequestManager对象并返回。
这些with()方法关键的不同在于传入的参数不同,可以是Context、Activity、Fragment等等。
那么为什么要分这么多种呢?其实我们应该知道:Glide在加载图片的时候要绑定with(context)方法中传入的context的生命周期,如果传入的是Activity,那么在这个Activity销毁的时候Glide会停止图片的加载。这样做的好处在于:避免了消耗多余的资源,也避免了在Activity销毁之后加载图片从而导致空指针问题。
为了更好的分析with(context)中的这两步,我们来看一下RequestManagerRetriever类:
public class RequestManagerRetriever implements Handler.Callback {
    //饿汉式创建单例
    private static final RequestManagerRetriever INSTANCE = new RequestManagerRetriever();

    //返回单例对象
    public static RequestManagerRetriever get() {
        return INSTANCE;
    }

    //根据传入的参数,获取不同的RequestManager
    public RequestManager get(Context context) {
        if (context == null) {
            throw new IllegalArgumentException("You cannot start a load on a null Context");
        } else if (Util.isOnMainThread() && !(context instanceof Application)) {
            if (context instanceof FragmentActivity) {
                return get((FragmentActivity) context);
            } else if (context instanceof Activity) {
                return get((Activity) context);
            } else if (context instanceof ContextWrapper) {
                return get(((ContextWrapper) context).getBaseContext());
            }
        }

        return getApplicationManager(context);
    }

    //省略无关代码......
}很明显,这是个饿汉式单例模式,关键在于retriever.get(context),我们继续看代码:
    //根据传入的参数,获取不同的RequestManager
    public RequestManager get(Context context) {
        //context为null则抛出异常
        if (context == null) {
            throw new IllegalArgumentException("You cannot start a load on a null Context");
        } else if (Util.isOnMainThread() && !(context instanceof Application)) {
            //当前线程是主线程并且此context并不是Application的实例,
            //根据context的类型做不同的处理
            if (context instanceof FragmentActivity) {
                return get((FragmentActivity) context);
            } else if (context instanceof Activity) {
                return get((Activity) context);
            } else if (context instanceof ContextWrapper) {
                return get(((ContextWrapper) context).getBaseContext());
            }
        }

        //如果以上条件都不满足
        return getApplicationManager(context);
}上面这个方法主要是通过传入context的不同类型来做不同的操作。context可以是Application、FragmentActivity、Activity或者是ContextWrapper。
我们先看一下当context是Application时的操作:
private RequestManager getApplicationManager(Context context) {
        // 返回一个单例
        if (applicationManager == null) {
            synchronized (this) {
                if (applicationManager == null) {
                    applicationManager = new RequestManager(context.getApplicationContext(),
                            new ApplicationLifecycle(), new EmptyRequestManagerTreeNode());
                }
            }
        }

        return applicationManager;
    }
getApplicationManager(Context context)通过双检查单例模式创建并返回applicationManager。
我们再来看下如果传入的context是Activity时的操作:
public RequestManager get(Activity activity) {
        //如果不在主线程或者Android SDK的版本低于HONEYCOMB,传入的还是Application类型的context
        if (Util.isOnBackgroundThread() || Build.VERSION.SDK_INT < Build.VERSION_CODES.HONEYCOMB) {
            return get(activity.getApplicationContext());
        } else {
            //判断当前activity是否被销毁
            assertNotDestroyed(activity);
            android.app.FragmentManager fm = activity.getFragmentManager();
           //通过fragmentGet(activity, fm)获取RequestManager
            return fragmentGet(activity, fm);
        }
}该代码逻辑很简单:如果不在主线程或者Android SDK版本过低,走的还是传入Application的方法,这个方法在上面提到过;反之,首先判断当前activity是否被销毁,若没有被销毁,则通过fragmentGet(activity, fm)获取RequestManager。
关键是这个fragmentGet(activity, fm),我们看下源码:
RequestManager fragmentGet(Context context, android.app.FragmentManager fm) {
        //在当前activity中创建一个没有界面的的fragment并add到当前activity中
        RequestManagerFragment current = getRequestManagerFragment(fm);
        RequestManager requestManager = current.getRequestManager();
        if (requestManager == null) {
            //创建一个requestManager
            requestManager = new RequestManager(context, current.getLifecycle(),
                       current.getRequestManagerTreeNode());
            //将requestManager与fragment绑定
            current.setRequestManager(requestManager);
        }
        return requestManager;
    }
fragmentGet()这个方法主要是在当前activity中创建一个没有界面的fragment并add到当前activity中,以此来实现对activity生命周期的监听。到此,with()方法已经基本介绍完毕。
2、with()方法总结
- 通过
RequestManagerRetriever.get()获取RequestManagerRetriever单例对象 - 通过
retriever.get(context)获取RequestManager,在get(context)方法中通过对context类型的判断做不同的处理: - context是
Application,通过getApplicationManager(Context context)创建并返回一个RequestManager对象 - context是
Activity,通过fragmentGet(activity, fm)在当前activity创建并添加一个没有界面的fragment,从而实现图片加载与activity的生命周期相绑定,之后创建并返回一个RequestManager对象。
3、load(url)
with(context)返回一个RequestManager,接下来我们再看看RequestManager中的load(url)方法:
public DrawableTypeRequest<String> load(String string) {
        return (DrawableTypeRequest<String>) fromString().load(string);
}这个方法分两步:fromString()、load(string):
- fromString()
public DrawableTypeRequest<String> fromString() {
        return loadGeneric(String.class);
}z这个方法返回的是loadGeneric(String.class),我们跟进去:
private <T> DrawableTypeRequest<T> loadGeneric(Class<T> modelClass) {
        ModelLoader<T, InputStream> streamModelLoader =
                        Glide.buildStreamModelLoader(modelClass, context);
        ModelLoader<T, ParcelFileDescriptor> fileDescriptorModelLoader =
                Glide.buildFileDescriptorModelLoader(modelClass, context);
        if (modelClass != null && streamModelLoader == null && fileDescriptorModelLoader == null) {
            throw new IllegalArgumentException("Unknown type " + modelClass + ". You must provide a Model of a type for"
                    + " which there is a registered ModelLoader, if you are using a custom model, you must first call"
                    + " Glide#register with a ModelLoaderFactory for your custom model class");
        }

        //这句是核心,本质是创建并返回了一个DrawableTypeRequest
        return optionsApplier.apply(
                new DrawableTypeRequest<T>(modelClass, streamModelLoader,
                        fileDescriptorModelLoader, context,
                        glide, requestTracker, lifecycle, optionsApplier));
}在loadGeneric(Class<T> modelClass)方法中,我们只需要关注核心即可。它的核心是最后一句,方法调用看着很复杂,其实本质是创建并返回一个DrawableTypeRequest,Drawable类型的请求。
- load(string)
@Override
    public DrawableRequestBuilder<ModelType> load(ModelType model) {
        super.load(model);
        return this;
}需要注意的是这个方法存在于DrawableTypeRequst的父类DrawableRequestBuilder中,这个方法首先调用DrawableRequestBuilder的父类GenericRequestBuilder的load()方法,然后返回自身。
再看下DrawableRequestBuilder父类中的load()方法
public GenericRequestBuilder<ModelType, DataType, ResourceType, TranscodeType> load(ModelType model) {
        this.model = model;
        isModelSet = true;
        return this;
}DrawableRequestBuilder的父类是GenericRequestBuilder,从名字中我们也可以看出来,前者是Drawable请求的构建者,后者是通用的请求构建者,他们是子父关系。
这个load()方法其实是把我们传入的String类型的URL存入到内部的model成员变量中,再将数据来源是否已经设置的标志位isModelSet设置为true,意味着我们在调用Glide.with(context).load(url)之后数据来源已经设置成功了。
4、load(url)总结
说到这里,其实Glide中的load(url)基本已经结束了,可能有的会问:我平时使用Glidehi加一些配置,如下:
Glide.with(context)
    .load(url)
    .placeholder(R.drawable.place_image)
    .error(R.drawable.error_image)
.into(imageView);其实大家在写的时候是会有一种感觉,这种写法很想Builder模式。没错,这就是一个Builder模式。
经过上面的分析我们知道,在Glide.with(context).load(url)之后会返回一个DrawableTypeRequest的对象,它的父类是DrawableRequestBuilder,DrawableRequestBuilder的父类是GenericRequestBuilder,我们写的placeHolder()、error()等等相关图片请求配置的方法都定义在GenericRequestBuilder中,下面我们来简单看看:
    public GenericRequestBuilder<ModelType, DataType, ResourceType, TranscodeType> placeholder(
            int resourceId) {
        this.placeholderId = resourceId;

        return this;
    }

    public GenericRequestBuilder<ModelType, DataType, ResourceType, TranscodeType> error(
            int resourceId) {
        this.errorId = resourceId;

        return this;
}是不是一下子就明白了,我们平时对图片请求的配置使用的就是Builder模式。
5、into(imageView)
简单的说,Glide中的前两部是创建了一个Request,这个Request可以理解为对图片加载的配置请求,需要注意的是仅仅是创建了一个请求,而并不是去执行。
在Glide的最后一步into()方法中,这个请求才会真实的执行。
在DrawableTypeRequest中找下into()方法,发现没有扎到,那肯定是在他的父类DrawableRequestBuilder中,我们再看看DrawableRequestBuilder中的into()方法:
public Target<GlideDrawable> into(ImageView view) {
        return super.into(view);
}发现它调用的是父类GenericRequestBuilder的into()方法,那我们继续看GenericRequestBuilder中的into()方法:
public Target<TranscodeType> into(ImageView view) {
        //确保在主线程
        Util.assertMainThread();
        //确保view不为空
        if (view == null) {
            throw new IllegalArgumentException("You must pass in a non null View");
        }
        //对ScaleType进行配置
        if (!isTransformationSet && view.getScaleType() != null) {
            switch (view.getScaleType()) {
                case CENTER_CROP:
                    applyCenterCrop();
                    break;
                case FIT_CENTER:
                case FIT_START:
                case FIT_END:
                    applyFitCenter();
                    break;
                //$CASES-OMITTED$
                default:
                    // Do nothing.
            }
        }

        //核心
        return into(glide.buildImageViewTarget(view, transcodeClass));
}可以看到,上面的方法就是into()的核心代码,它定义在GenericRequestBuilder这个通用的请求构建者中。方法的核心是最后一行:into(glide.buildImageViewTarget(view, transcodeClass)),首先通过glide.buildImageViewTarget(view, transcodeClass)创建出一个Target类型的对象,然后把这个target传入GenericRequestBuilder中的into()方法中。
我们先来看下Glide中的buildImageViewTarget(view, transcodeClass)方法:
    <R> Target<R> buildImageViewTarget(ImageView imageView, Class<R> transcodedClass) {
        return imageViewTargetFactory.buildTarget(imageView, transcodedClass);
}这个方法的目的是把我们传入的ImageView包装成一个Target。内部调用了imageViewTargetFactory.buildTarget(imageView, transcodedClass)
继续跟进看:
public <Z> Target<Z> buildTarget(ImageView view, Class<Z> clazz) {
        //图片来源是GlideDrawable
        if (GlideDrawable.class.isAssignableFrom(clazz)) {
            //创建GlideDrawable对应的target
            return (Target<Z>) new GlideDrawableImageViewTarget(view);
        } else if (Bitmap.class.equals(clazz)) {
            //如果图片来源是Bitmap,创建Bitmap对应的target
            return (Target<Z>) new BitmapImageViewTarget(view);
        } else if (Drawable.class.isAssignableFrom(clazz)) {
            //如果图片来源是Drawable,创建Drawable对应的target
            return (Target<Z>) new DrawableImageViewTarget(view);
        } else {
            throw new IllegalArgumentException("Unhandled class: " + clazz
                    + ", try .as*(Class).transcode(ResourceTranscoder)");
        }
}buildTarget()方法的本质是:通过对图片来源类型进行判断,创建并返回与图片来源对应的imageViewTarget。
获取到相应的target之后,再来看GenericRequestBuilder的into()方法中的return into()方法:
public <Y extends Target<TranscodeType>> Y into(Y target) {
        //确保在主线程
        Util.assertMainThread();
        //确保target不为空
        if (target == null) {
            throw new IllegalArgumentException("You must pass in a non null Target");
        }
        //确保数据来源已经确定,即已经调用了load(url)方法
        if (!isModelSet) {
            throw new IllegalArgumentException("You must first set a model (try #load())");
        }

        //获取当前target已经绑定的Request对象
        Request previous = target.getRequest();

        //如果当前target已经绑定了Request对象,则清空这个Request对象
        if (previous != null) {
            previous.clear();
            //停止绑定到当前target的上一个Request的图片请求处理
            requestTracker.removeRequest(previous);
            previous.recycle();
        }

        //创建Request对象
        Request request = buildRequest(target);
        //与target绑定
        target.setRequest(request);
        lifecycle.addListener(target);
        //执行request
        requestTracker.runRequest(request);

        return target;
}再次梳理下方法中的逻辑:
- 获取当前target中的
Request对象,如果存在,则清空并终止这个Request对象的执行 - 创建新的
Request对象并与当前target绑定 - 执行新创建的图片处理请求
Request
逻辑还是比较清晰的,这个有个问题需要说明下:
为什么要终止并清除target之前绑定的请求呢?
在没有Glide之前,我们处理ListView中的图片加载其实是一件比较麻烦的事情。由于ListView中item的复用机制,会导致网络图片加载的错位或闪烁。那我们解决这个问题的方法也很简单,就是给当前的ImageView设置tag,这个tag可以是图片的URL等等。当从网络中获取到图片时判断这个ImageView中的tag是否是这个图片的URL,如果是则加载图片,否则跳过。
有Glide后,我们处理ListView或者RecyclerView中的图片加载就很无脑,根本不需要做任何多余的操作,直接正常使用就行了。
其实这里面的原理是Glide给我们处理了这些判断,我们来看下Glide内部如何处理的:
    public Request getRequest() {
        //本质还是getTag
        Object tag = getTag();
        Request request = null;
        if (tag != null) {
            if (tag instanceof Request) {
                request = (Request) tag;
            } else {
                throw new IllegalArgumentException(
                              "You must not call setTag() on a view Glide is targeting");
            }
        }
        return request;
    }

    @Override
    public void setRequest(Request request) {
        //本质是setTag
        setTag(request);
}可以看到,target.getRequest()和target.setRequest(Request request)本质上还是通过setTag和getTag来做处理,这也印证了我们上面所说。
继续回到into()方法中,在创建并绑定了Request后,关键的就是requestTracker.runRequest(request)来执行我们创建的请求。
public void runRequest(Request request) {
        //将请求加入请求集合
        requests.add(request);

        if (!isPaused) {
            如果处于非暂停状态,开始执行请求
            request.begin();
        } else {
            //如果处于暂停状态,将请求添加到等待集合
            pendingRequests.add(request);
        }
}这个方法定义在RequestTracker中,这个类主要负责Request的执行,暂停,取消等等关于图片请求的操作。我们着重看request.begin(),这句代码意味着开始执行图片请求的处理。Request是个接口,request.begin()实际调用的是Request的子类GenericRequestBuilder的begin()方法,我们跟进看下:
    @Override
    public void begin() {
        startTime = LogTime.getLogTime();
        if (model == null) {
            onException(null);
            return;
        }

        status = Status.WAITING_FOR_SIZE;
        if (Util.isValidDimensions(overrideWidth, overrideHeight)) {
            //如果长宽尺寸已经确定
            onSizeReady(overrideWidth, overrideHeight);
        } else {
            //获取长宽尺寸,获取完之后会调用onSizeReady(overrideWidth, overrideHeight)
            target.getSize(this);
        }

        if (!isComplete() && !isFailed() && canNotifyStatusChanged()) {
            //开始加载图片,先显示占位图
            target.onLoadStarted(getPlaceholderDrawable());
        }
        if (Log.isLoggable(TAG, Log.VERBOSE)) {
            logV("finished run method in " + LogTime.getElapsedMillis(startTime));
        }
}begin()方法的逻辑大致如下:
- 获取图片的长宽尺寸,如果长宽已经确定,走
onSizeReady(overrideWidth, overrideHeight)流程;如果不确定,先获取长宽getSize(this),再走onSizeReady(overrideWidth, overrideHeight) - 图片开始加载,首先显示占位图
可以看出,主要的逻辑还是在onSizeReady()方法中:
    @Override
    public void onSizeReady(int width, int height) {
        if (Log.isLoggable(TAG, Log.VERBOSE)) {
            logV("Got onSizeReady in " + LogTime.getElapsedMillis(startTime));
        }
        if (status != Status.WAITING_FOR_SIZE) {
            return;
        }
        status = Status.RUNNING;

        width = Math.round(sizeMultiplier * width);
        height = Math.round(sizeMultiplier * height);

        ModelLoader<A, T> modelLoader = loadProvider.getModelLoader();
        final DataFetcher<T> dataFetcher = modelLoader.getResourceFetcher(model, width, height);

        if (dataFetcher == null) {
            onException(new Exception("Failed to load model: \'" + model + "\'"));
            return;
        }
        ResourceTranscoder<Z, R> transcoder = loadProvider.getTranscoder();
        if (Log.isLoggable(TAG, Log.VERBOSE)) {
            logV("finished setup for calling load in " + LogTime.getElapsedMillis(startTime));
        }
        loadedFromMemoryCache = true;

        //核心代码,加载图片
        loadStatus = engine.load(signature, width, height, dataFetcher, loadProvider,
                transformation, transcoder,
                priority, isMemoryCacheable, diskCacheStrategy, this);

        loadedFromMemoryCache = resource != null;
        if (Log.isLoggable(TAG, Log.VERBOSE)) {
            logV("finished onSizeReady in " + LogTime.getElapsedMillis(startTime));
        }
    }
这段代码看起来很复杂,我们只需要关心核心代码:
engine.load(signature, width, height, dataFetcher, loadProvider, transformation, transcoder, priority, isMemoryCacheable, diskCacheStrategy, this)
我们再看看load()方法内部做了哪些处理:
public <T, Z, R> LoadStatus load(Key signature, int width, int height, DataFetcher<T> fetcher,
            DataLoadProvider<T, Z> loadProvider, Transformation<Z> transformation,
            ResourceTranscoder<Z, R> transcoder, Priority priority,
            boolean isMemoryCacheable, DiskCacheStrategy diskCacheStrategy, ResourceCallback cb) {
        Util.assertMainThread();
        long startTime = LogTime.getLogTime();

        final String id = fetcher.getId();
        EngineKey key = keyFactory.buildKey(id, signature, width, height, loadProvider.getCacheDecoder(),
                loadProvider.getSourceDecoder(), transformation, loadProvider.getEncoder(),
                transcoder, loadProvider.getSourceEncoder());

        //使用LruCache获取缓存
        EngineResource<?> cached = loadFromCache(key, isMemoryCacheable);
        if (cached != null) {
            //从缓存中获取资源成功
            cb.onResourceReady(cached);
            if (Log.isLoggable(TAG, Log.VERBOSE)) {
                logWithTimeAndKey("Loaded resource from cache", startTime, key);
            }
            return null;
        }

        //从弱引用中获取缓存
        EngineResource<?> active = loadFromActiveResources(key, isMemoryCacheable);
        if (active != null) {
            //从缓存中获取资源成功
            cb.onResourceReady(active);
            if (Log.isLoggable(TAG, Log.VERBOSE)) {
                logWithTimeAndKey("Loaded resource from active resources", startTime, key);
            }
            return null;
        }

        //开启线程从网络中加载图片......
        EngineJob current = jobs.get(key);
        if (current != null) {
            current.addCallback(cb);
            if (Log.isLoggable(TAG, Log.VERBOSE)) {
                logWithTimeAndKey("Added to existing load", startTime, key);
            }
            return new LoadStatus(cb, current);
        }

        EngineJob engineJob = engineJobFactory.build(key, isMemoryCacheable);
        DecodeJob<T, Z, R> decodeJob = new DecodeJob<T, Z, R>(key, width, height,
                fetcher, loadProvider, transformation,
                transcoder, diskCacheProvider, diskCacheStrategy, priority);
        EngineRunnable runnable = new EngineRunnable(engineJob, decodeJob, priority);
        jobs.put(key, engineJob);
        engineJob.addCallback(cb);
        engineJob.start(runnable);

        if (Log.isLoggable(TAG, Log.VERBOSE)) {
            logWithTimeAndKey("Started new load", startTime, key);
        }
        return new LoadStatus(cb, engineJob);
}load()方法位于Engine类中。load()方法内部会从三个来源获取图片的数据,我们最熟悉的就是LruCache了。如何获取数据过于复杂,这里就不再展开分析,我们这里主要是关注图片数据取得之后的操作。
获取到图片数据之后,通过cb.onResourceReady(cached)来处理,再看看这个回调的具体实现:
@Override
    public void onResourceReady(Resource<?> resource) {
        if (resource == null) {
            onException(new Exception("Expected to receive a Resource<R> with an object of "
                    + transcodeClass
                    + " inside, but instead got null."));
            return;
        }

        Object received = resource.get();
        if (received == null || !transcodeClass.isAssignableFrom(received.getClass())) {
            releaseResource(resource);
            onException(new Exception("Expected to receive an object of " + transcodeClass
                    + " but instead got " + (received != null ? received.getClass() : "")
                    + "{" + received + "}"
                    + " inside Resource{" + resource + "}."
                    + (received != null ? "" : " "
                        + "To indicate failure return a null Resource object, "
                        + "rather than a Resource object containing null data.")
            ));
            return;
        }

        if (!canSetResource()) {
            releaseResource(resource);
            // We can't set the status to complete before asking canSetResource().
            status = Status.COMPLETE;
            return;
        }

        //核心是这一句
        onResourceReady(resource, (R) received);
}接着看下onResourceReady(resource, (R) received)方法:
    private void onResourceReady(Resource<?> resource, R result) {
        // We must call isFirstReadyResource before setting status.
        boolean isFirstResource = isFirstReadyResource();
        status = Status.COMPLETE;
        this.resource = resource;

        if (requestListener == null ||
         !requestListener.onResourceReady(result, model, target, loadedFromMemoryCache, isFirstResource)) {
            GlideAnimation<R> animation = animationFactory.build(loadedFromMemoryCache, isFirstResource);

            //核心,通过调用target的onResourceReady方法加载图片
            target.onResourceReady(result, animation);
        }

        notifyLoadSuccess();

        if (Log.isLoggable(TAG, Log.VERBOSE)) {
            logV("Resource ready in " + LogTime.getElapsedMillis(startTime) + " size: "
                    + (resource.getSize() * TO_MEGABYTE) + " fromCache: " + loadedFromMemoryCache);
        }
}我们可以看到核心代码:target.onResourceReady(result, animation),其实在这句代码的内部最终是通过:
public class DrawableImageViewTarget extends ImageViewTarget<Drawable> {
    public DrawableImageViewTarget(ImageView view) {
        super(view);
    }

    @Override
    protected void setResource(Drawable resource) {
       view.setImageDrawable(resource);
    }
}本质是通过setResource(Drawable resource)来实现的,在这个方法的内部调用了Android内部最常用的加载图片的方法view.setImageDrawable(resource)。
6、into()方法总结
到此为止,into()方法基本已经分析完了,我们忽略了网络图片获取的过程,专注于获取图片后的处理。现在来对into()方法做个总结:
- 将
ImageView包装成imageViewTarget - 清除这个
imageViewTarget之前绑定的请求,绑定新的请求 - 执行新的请求
- 获取图片数据之后,成功则会调用
ImageViewTarget中的onResourceReady()方法,否则则会调用ImageViewTarget中的onLoadFailed()。二者的本质都是通过调用Android中的imageView.setImageDrawable(drawable)来实现对ImageView的图片加载。
流程图
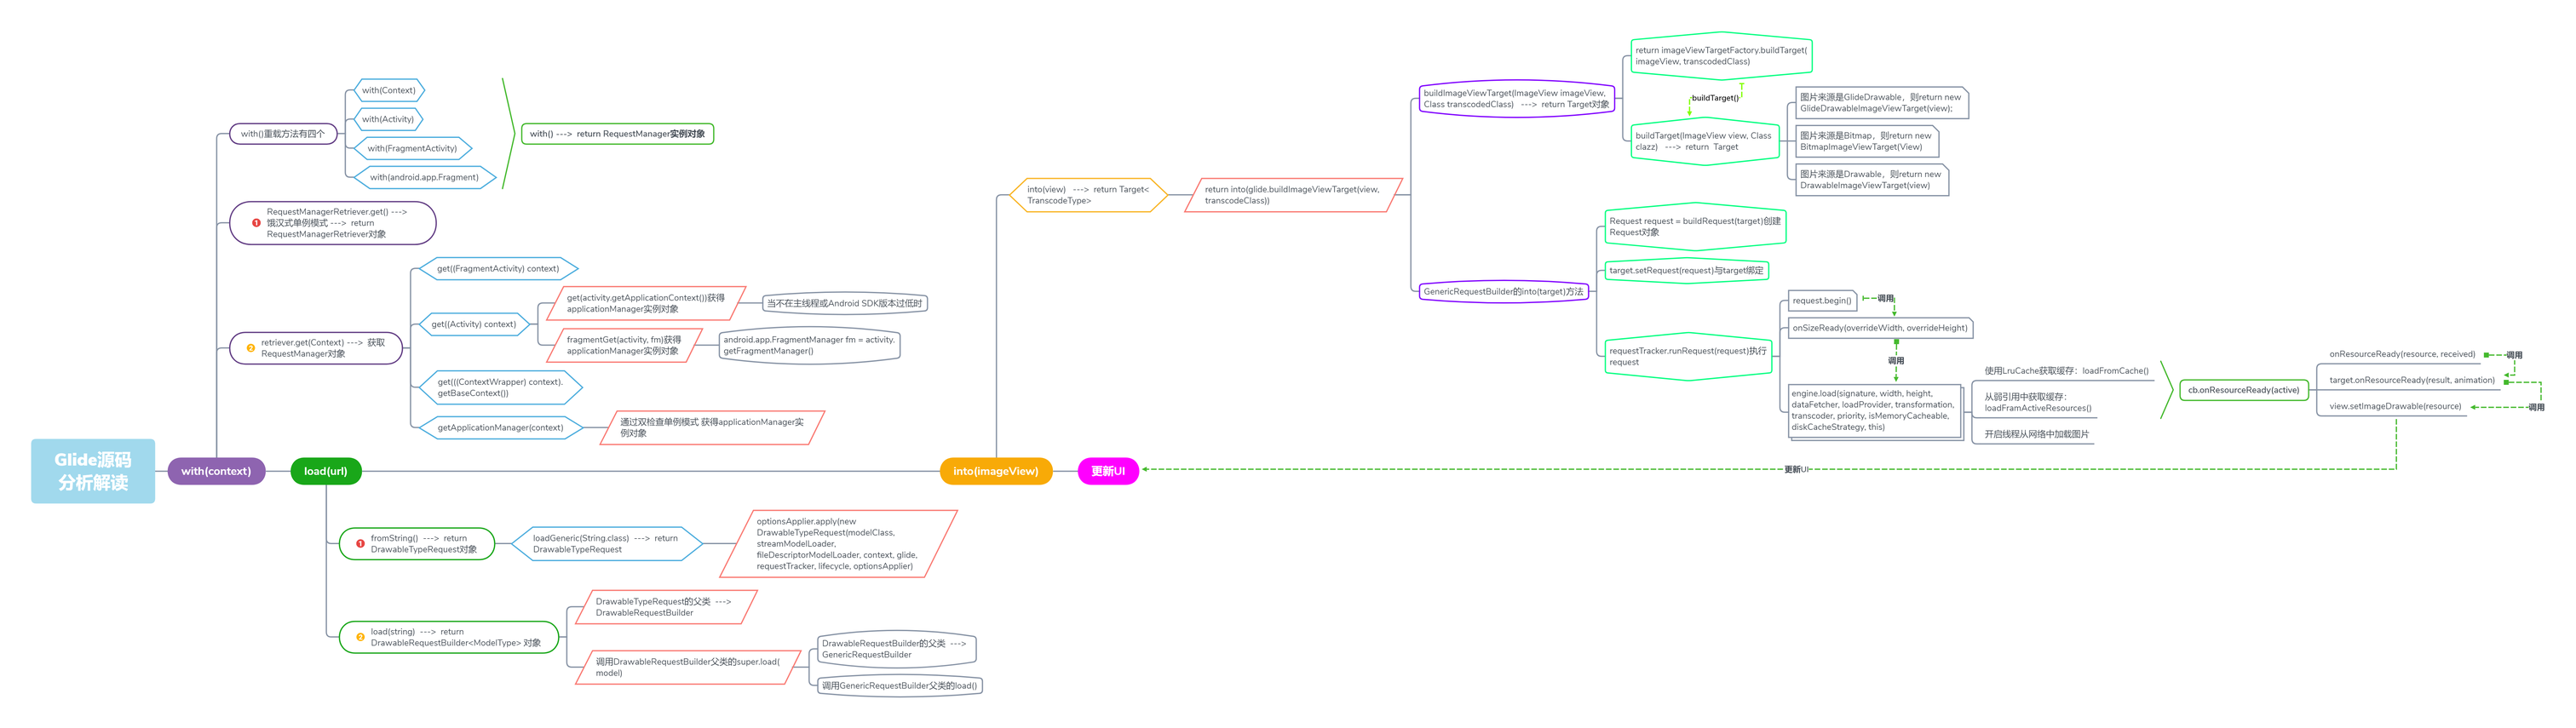
以上全部内容来源于:Glide源码分析
