

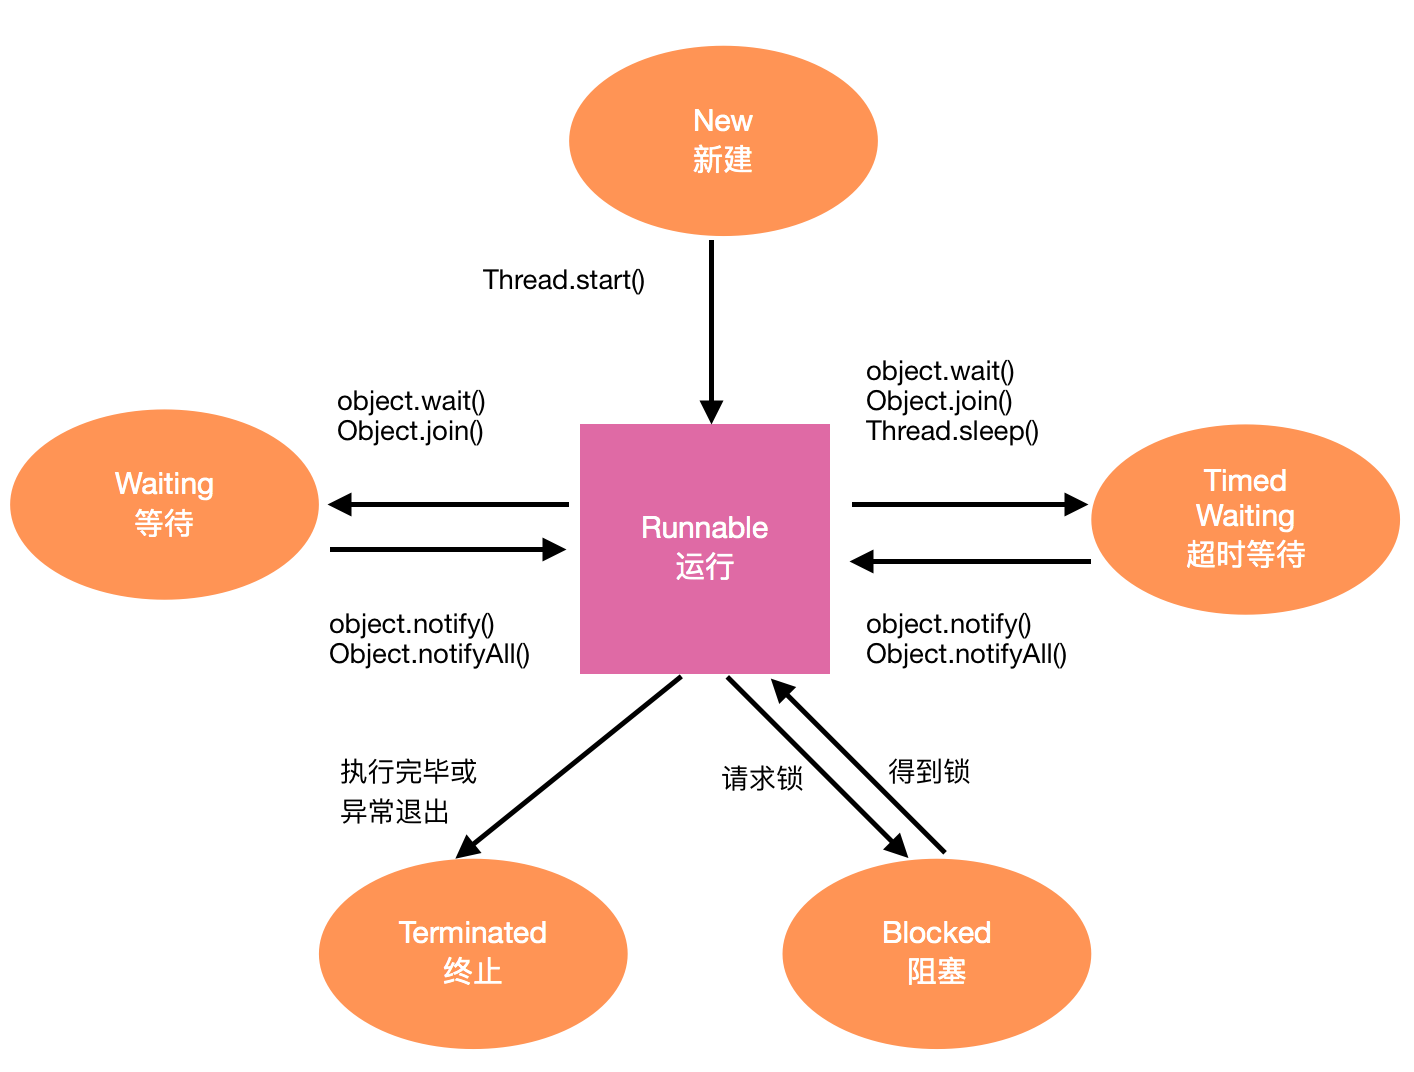
线程的几种状态
主要有6中状态,通过new创建的线程为新建状态,调用start方法后就进入了Runnable(可运行)状态,他可能正在运行也可能没在运行,取决于操作系统给线程提供的时间。当调用object.wait或object.join后会进入Waiting(等待)状态,这时候如果要进入Runnable状态需要其他线程通知,也就是其他线程调用object.notify()或者是object.notifyAll()。超时等待则是相当于在Waiting的基础上加上了时间的限制,如果超过时间还没收到notify或者notifyAll,当前线程也会返回到Runnable状态。当线程调用同步方法时,如果没有得到锁则进入等待状态,当阻塞状态的线程获取到锁时就会回到运行状态,当线程运行完毕或者异常终止时就会进入终止状态
创建线程的方法:
方法1:直接new Thread,在它的run方法中实现需要的任务,最后调用start方法来启动线程。
static void createThreadByNew() {
    Thread thread = new Thread() {
        @Override
        public void run() {
            System.out.println("thread started!");
        }
    };
    thread.start();
}
方法2:通过runnable方式,在Thread中传入runnable,其实与第一种没有本质区别
static void createThreadByRunnable() {
    Runnable runnable = new Runnable() {
        @Override
        public void run() {

            System.out.println("thread with runnable started!");
        }
    };
    Thread thread = new Thread(runnable);
    thread.start();
}
方法3:通过executor:其实就是通过线程池,至于线程池原理我们稍后会说
static void createThreadByExecutor() {
    Runnable runnable = new Runnable() {
        @Override
        public void run() {
            System.out.println("thread with runnable started!");
        }
    };
    Executor executor = Executors.newCachedThreadPool();
    executor.execute(runnable);
    executor.execute(runnable);
    executor.execute(runnable);
}
方法4:实现Callable接口,重写call方法:这种方式需要与executor、future配合一起使用,他是一个有返回值的runnable。而且这里的call方法还可以抛异常,但是需要注意的是通过future.get获取结果的时候当前线程就会阻塞,知道call返回结果
static void createThreadByCallable() {
    Callable<String> callable = new Callable<String>() {
        @Override
        public String call() throws Exception {
            Thread.sleep(1500);
            return "done";
        }
    };

    ExecutorService executorService = Executors.newCachedThreadPool();
    //future与callable成对使用
    Future<String> future = executorService.submit(callable);
    try {
        //这个方法时阻塞的
        String result = future.get();
        System.out.println("result: " + result);
    } catch (InterruptedException e) {
        e.printStackTrace();
    } catch (ExecutionException e) {
        e.printStackTrace();
    }
}
重入锁与条件对象:
ReentrantLock能够支持一个线程对资源的重复加锁。他用lock以及unlock锁住了一段代码块,这段代码在同一时刻只能有一个线程访问,当然如果线程进入了这个区域后发现某种条件不满足,无法继续使用时他就需要条件对象(condition),利用这个对象来释放这个锁,从而使当前线程进入阻塞状态,知道另一个线程调用了同一个条件对象的signalAll方法时为止(调用signalAll时并不是立即激活一个等待线程,而是让其进入runnable状态),比如拿转账的例子,转账操作同一时刻只能被一个线程占有,所以这部分应该在lock代码块中,但如果余额不足则无法转账,此时需要通过condition.await来释放这个锁,让本次操作或者线程进入阻塞状态,但是如果其他线程在同一时刻向该账户转入了钱时,就该通知刚才的线程余额已足可以转账,也就是调用condition的signalAll方法。
public class AliPay {
    private Lock alipayLock;
    private Condition condition;
    private double[] accounts;
    public AliPay(int n, double money){
        accounts = new double[n];
        alipayLock = new ReentrantLock();
        condition = alipayLock.newCondition();
        for (int i = 0; i < n; i++) {
            accounts[i] = money;
        }
    }

    public void transfer(int from,int to,int amount)throws InterruptedException {
        alipayLock.lock();
        //==============同一时刻只能有一个线程访问=============//
        try {
            while (accounts[from] < amount) {
                System.out.println("no enough, await: " + Thread.currentThread().getName());
               //条件不满足时释放锁,使其进入等待状态
                condition.await();
            }

            accounts[from] = accounts[from] - amount;
            accounts[to] = accounts[to] + amount;
            //每次操作成功后通知其他因为这个condition而进入阻塞状态的线程进入runnable状态
            condition.signalAll();
            System.out.println("transfer ok, signal all:" + Thread.currentThread().getName());
       //===============================================//
        }finally {
            alipayLock.unlock();
        }
    }
}
真正调用如下
public static void main(String[] args) {

        final AliPay alipay = new AliPay(3, 20);
        new Thread(new Runnable() {
            @Override
            public void run() {
                System.out.println("transfer 1 to 2, amount 30");
                try {
                    //首次转账时余额不足
                    alipay.transfer(1, 2, 30);
                } catch (InterruptedException e) {
                    e.printStackTrace();
                }
            }
        }).start();

        new Thread(new Runnable() {
            @Override
            public void run() {
                try {
                    Thread.sleep(3000);
                } catch (InterruptedException e) {
                    e.printStackTrace();
                }
                System.out.println("transfer 0 to 1, amount 10");
                try {

                    alipay.transfer(0, 1, 10);
                } catch (InterruptedException e) {
                    e.printStackTrace();
                }
            }
        }).start();
    }
从代码上看,在Thread1进行transfer操作时余额不足,此时应该释放锁进入等待状态,当线程2执行3秒后开始执行transfer操作,此时发现可以使用这个操作而且余额足够,在他操作完成之后,调用的是同一个condition对象的signalAll,所以第一个线程进入runnable状态,此时若执行的话发现满足while条件,所以会执行完毕

Synchronized
它的作用为访问的互斥性与数据同步。互斥则为对同一给定资源在同一个时间只能有一个线程访问,而数据同步则是任何线程在获取到monitor的第一时间会把共享内存中的数据复制到自己的缓存中(一般是CPU的高速缓存),任何线程在释放monitor的第一时间会把缓存中的数据复制到共享内存中,而不加这个的线程在更改同一个变量值的时候就不一定是什么时机了。Java中每个对象都有一个内部锁,如果一个方法用synchronize关键字声明,则对象的锁将保护整个方法。也就是说在同一时刻只能有一个线程来访问整个方法,在方法执行完毕之后才能释放这个锁,但是如果类似于刚才的转账操作,余额不足时一直停留在while中,这个线程一直持有这个锁,导致其他线程无法访问,这时候就需要用到wait方法,它是将这个锁短暂的交出去,直到这个对象中的某个同步方法中调用了notify或者notifyAll方法将锁归还,刚才的线程才能继续执行。而对于wait,notify和notifyAll则必须用在synchronized中,原因在于他们是为了控制同一个资源在同一时刻只能分配给一个线程来使用,因此他们操作的是这个内部锁(monitor),所以他们都是Object中的方法。
public class WaitDemo{
private String sharedString;
private synchronized void initString1() {
sharedString = "testWait";
}
private synchronized void initString2() {
sharedString = "testWait";
//只唤醒一个线程
//notify();
//一般会用这个,就是唤醒所有等待的线程
System.out.println("initString2:notifyAll");
notifyAll();
}
private synchronized void printString1() {
System.out.println("String:" + sharedString);
}
private synchronized void printString2() {
// 等待,但是如果是这种的话那么就会一直打印不出来,原因在于print方法持有monitor,
// 而到了初始化时候,获取不到这个monitor,从而无法初始化
while (sharedString == null) {
}
System.out.println("String:" + sharedString);
}
private synchronized void printString3() {
while (sharedString == null) {
try {
//为了解决monitor持有的问题,引入wait,它是将monitor短暂的交还出去
//wait是object中的方法,因为它操作的是monitor,是资源,同样的notify也是object中的方法
//但是为了获取的时候必须要回来,也就是notify方法(它在初始化完成时候调用)
//wait、notify必须在synchronized中使用
System.out.println("printString3:wait");
wait();
} catch (InterruptedException e) {
e.printStackTrace();
}
}
System.out.println("String:" + sharedString);
}
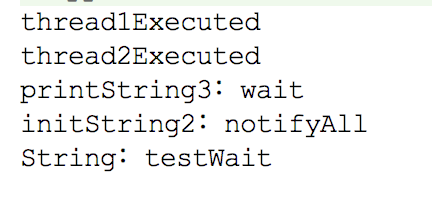
public void runTest() {
//这里是初始化之后再打印
//如果将两个sleep的时间对换,再执行则打印的是null
//为了能继续打印我们需要等待
final Thread thread1 = new Thread() {
@Override
public void run() {
System.out.println("thread1Executed");
try {
//这里的sleep以及接下来的wait和join都会抛出该异常,
// 其原因就在于他们都是处于等待状态,这时候给中断了,
// 那么各自的线程需要做一些收尾工作,所以通过这种方式进行通知
Thread.sleep(1000);
} catch (InterruptedException e) {
e.printStackTrace();
}
//printString1();
//printString2();
printString3();
}
};
thread1.start();
final Thread thread2 = new Thread() {
@Override
public void run() {
System.out.println("thread2Executed");
try {
Thread.sleep(2000);
} catch (InterruptedException e) {
e.printStackTrace();
}
//initString1();
initString2();
}
};
thread2.start();
}
}
Volatile:
当一个变量被volatile修饰时表示,一个线程修改了变量的值时,变量的新值对其他线程时立即可见的,而且不保证操作的原子性。比如线程1对一个共有变量var1做了修改,如果用volatile修饰的话,那么修改完成之后会立即强制将新值写入共享内存,并且会导致其他线程(比如线程2)的工作线程内存中缓存的var1值失效,当其他线程再次读取var1值时会去共享内存中读取。 它的使用条件:真正独立于其他变量值和自己以前的值,比如它可以做状态标志,单例模式的DCL
线程池:
上面我们提到了创建线程的多种方式,其中一种是通过线程池的方式,这里我们重点看一下线程池。在这之前我们先了解一下阻塞队列。
阻塞队列(BlockingQueue):他往往用于生产者-消费者模式中。当队列中没有数据的情况下,所有消费者的线程被自动阻塞(挂起),直到有数据放入队列;当队列中数据已满的情况下,所有生产者的线程被阻塞,直到队列中有空的位置,线程被唤起。支持这两种阻塞场景的队列被称为阻塞队列。
-
常用方法:因为是对队列的存或者取,所以我们重点一下存和取的方法
- offer(object):将object插入到队列中,如果如果能插入的话返回true,否则返回false。而且该方法是不阻塞当前线程的。
- offer(E o,long timeout, TimeUnit unit):设定等待的时间,如果在指定的时间内还不能往队列里插入,则返回失败(false)。否则则的话返回成功(true),该方法会阻塞当前线程。
- put(object):将object插入队列中,如果队列已满,则阻塞当前线程,直到blockingQueue里面有空间继续
- poll(long timeOut,TimeUint unit):在指定的时间内获取队首的对象。一旦有则立即返回该对象,没有的话返回null,该方法会阻塞当前线程。
- take():也是获取队首对象。如果队列为空则进入阻塞状态,直到队列中有新的数据加入
- drainTo():一次性获取所有可用对象。
-
Java中提供的阻塞队列:由于BlockingQueue是一个接口类,所以Java提供了7个默认的实现:ArrayBlockingQueue(由数组构成的有界阻塞队列)。LinkedBlockingQueue(由链表结构构成的有界阻塞队列)、PriorityBlockingQueue(支持优先级排序的无界阻塞队列)、DelayQueue(使用优先级队列实现的无界阻塞队列)、SynchronousQueue(不存储元素的阻塞队列)、LinkedTransferQueue(由链表构成的无界阻塞队列)、LinkedBlockingDeque(由链表构成的双向阻塞队列)
-
常用的LinkedBlockingQueue的源码分析:当然还是从他的创建开始
LinkedBlockingQueue queue= new LinkedBlockingQueue源码为
    public LinkedBlockingQueue() {
        this(Integer.MAX_VALUE);
    }

    /**
     * Creates a {@code LinkedBlockingQueue} with the given (fixed) capacity.
     *创建了一个容量为Integer最大值的queue
     */
    public LinkedBlockingQueue(int capacity) {
        if (capacity <= 0) throw new IllegalArgumentException();
        this.capacity = capacity;
        last = head = new Node<E>(null);
    }
这里的Node就是链表的节点,在初始化时,同时将头结点与尾结点初始化为一样的值。当然利用构造函数创建类的时候,类中的field也完成了初始话,这里主要有以下
/** The capacity bound, or Integer.MAX_VALUE if none */
private final int capacity;

/** Current number of elements */
private final AtomicInteger count = new AtomicInteger();

/**
 * Head of linked list.
 * Invariant: head.item == null
 */
transient Node<E> head;

/**
 * Tail of linked list.
 * Invariant: last.next == null
 */
private transient Node<E> last;

/** Lock held by take, poll, etc */
private final ReentrantLock takeLock = new ReentrantLock();

/** Wait queue for waiting takes */
private final Condition notEmpty = takeLock.newCondition();

/** Lock held by put, offer, etc */
private final ReentrantLock putLock = new ReentrantLock();

/** Wait queue for waiting puts */
private final Condition notFull = putLock.newCondition();
通过注释可以看到其实就是定义了头结点、尾结点、分别用于存数据和取数据的重入锁与条件对象。完成之后对于生产者来说需要向队列中加入元素。我们逐一分析上面提到的加入元素的三个方法
public boolean offer(E e) {
    //加入的元素不能为空,否则直接抛出异常
    if (e == null) throw new NullPointerException();
    //利用原子操作获取当前queue的容量
    final AtomicInteger count = this.count;
    //判断queue是否已满,这里采用的事if,所以不会阻塞当前线程
    if (count.get() == capacity)
        return false;
    int c = -1;
    Node<E> node = new Node<E>(e);
    //可以添加则加锁
    final ReentrantLock putLock = this.putLock;
    putLock.lock();
    try {
        //此时可能由于别的线程对容量进行了增加
        //再次判断
        if (count.get() < capacity) {
            //将数据插入
            enqueue(node);
            //容量自增
            c = count.getAndIncrement();
            if (c + 1 < capacity)
                //通知一个需要插入的线程可以继续插入
                notFull.signal();
        }
    } finally {
        putLock.unlock();
    }
    //如果插入成功的话,通知消费者线程可以来取了
    if (c == 0)
        signalNotEmpty();
    return c >= 0;
}
代码分析已经写在上面了,至于其中的几个方法我们还要具体看一下,首先是将数据插入的enqueque
private void enqueue(Node<E> node) {
    // assert putLock.isHeldByCurrentThread();
    // assert last.next == null;
    last = last.next = node;
}
其实就是指针后移,并且将当前数据写入移动有的指针位置,然后我们再看通知消费者取数据的signalNotEmpty
/**
 * Signals a waiting take. Called only from put/offer (which do not
 * otherwise ordinarily lock takeLock.)
 */
private void signalNotEmpty() {
    final ReentrantLock takeLock = this.takeLock;
    takeLock.lock();
    try {
        notEmpty.signal();
    } finally {
        takeLock.unlock();
    }
}
从方法注释上也可以看出来这是通知消费者线程来取数据的,而且只通知一个。当然这个方法只能在put或者是offer方法中调用,这个不难理解,只有插入了数据才能保证有数据可取,所以插入成功之后调用该方法。我们接着看插入offer的另一种实现
/**
 * 这里首先抛出了一个interrupted异常,是因为这是一个阻塞的方法。原因在于判断是否已满时采用的是while。
 * 而线程在检查中断标志位时,如果发现已阻塞的线程它的中断标志位为true,
 * 则会在阻塞方法调用处抛出InterruptedException
 */

public boolean offer(E e, long timeout, TimeUnit unit) throws InterruptedException {

    if (e == null) throw new NullPointerException();
    long nanos = unit.toNanos(timeout);
    int c = -1;
    final ReentrantLock putLock = this.putLock;
    final AtomicInteger count = this.count;
    //这里采用的是
    putLock.lockInterruptibly();
    try {
        while (count.get() == capacity) {
            if (nanos <= 0L)
                return false;
            nanos = notFull.awaitNanos(nanos);
        }
        enqueue(new Node<E>(e));
        c = count.getAndIncrement();
        if (c + 1 < capacity)
            notFull.signal();
    } finally {
        putLock.unlock();
    }
    if (c == 0)
        signalNotEmpty();
    return true;
}
这个方法基本上与无参的一样,这里重点说一下几个地方,首选这个方法是有返回值的(true/false),其次这里在判断队列是否已满时采用的是while,因此该方法会阻塞当前线程,而在让出锁的时候它调用的是awaitNanos,也就是只是让出这一段时间的锁,时间到了就会获取该锁,并重新执行阻塞的代码,其他的则没什么不同,再看存数据的最后一个方法put
public void put(E e) throws InterruptedException {
    if (e == null) throw new NullPointerException();
    // Note: convention in all put/take/etc is to preset local var
    // holding count negative to indicate failure unless set.
    int c = -1;
    Node<E> node = new Node<E>(e);
    final ReentrantLock putLock = this.putLock;
    final AtomicInteger count = this.count;
    putLock.lockInterruptibly();
    try {
        /*
         * Note that count is used in wait guard even though it is
         * not protected by lock. This works because count can
         * only decrease at this point (all other puts are shut
         * out by lock), and we (or some other waiting put) are
         * signalled if it ever changes from capacity. Similarly
         * for all other uses of count in other wait guards.
         */
        while (count.get() == capacity) {
            notFull.await();
        }
        enqueue(node);
        c = count.getAndIncrement();
        if (c + 1 < capacity)
            notFull.signal();
    } finally {
        putLock.unlock();
    }
    if (c == 0)
        signalNotEmpty();
}
可以看到它与上一个方法基本没什么不同,只不过这里的条件对象调用的是await,是一直让出这个锁,直到收到signal。所以也就跟之前我们说的如果队列满时,阻塞所有生产线程是一致的。数据存储的方法看完了,那么我们就看看取数据的方法。首先看poll
public E poll(long timeout, TimeUnit unit) throws InterruptedException {
    E x = null;
    int c = -1;
    long nanos = unit.toNanos(timeout);
    final AtomicInteger count = this.count;
    final ReentrantLock takeLock = this.takeLock;
    takeLock.lockInterruptibly();
    try {
        while (count.get() == 0) {
            if (nanos <= 0L)
                return null;
            nanos = notEmpty.awaitNanos(nanos);
        }
        //取出object
        x = dequeue();
        //获取新的值
        c = count.getAndDecrement();
        if (c > 1)
            //如果此时queue不为空,通知一个线程继续取
            notEmpty.signal();
    } finally {
        takeLock.unlock();
    }
    if (c == capacity)
        //通知可以存了,
        signalNotFull();
    return x;
}
这里的逻辑很简答,就是判断当前queue是否为空,如果为空则交出锁一段时间, 如果不为空则取出值,如果队列中还有数据的话就通知一个线程继续取,并且让出锁,最后则通知生产者线程可以生产了。其中的dequeque实现为
/**
 * Removes a node from head of queue.
 *
 * @return the node
 */
private E dequeue() {
    // assert takeLock.isHeldByCurrentThread();
    // assert head.item == null;
    Node<E> h = head;
    Node<E> first = h.next;
    h.next = h; // help GC
    head = first;
    E x = first.item;
    first.item = null;
    return x;
}
其实就是从队首取出一个元素,而通知生产者线程的signalNotFull方法如下
/**
 * Signals a waiting put. Called only from take/poll.
 */
private void signalNotFull() {
    final ReentrantLock putLock = this.putLock;
    putLock.lock();
    try {
        notFull.signal();
    } finally {
        putLock.unlock();
    }
}
其实就是通知一个生产者线程开始工作。至于take方法如下
public E take() throws InterruptedException {
    E x;
    int c = -1;
    final AtomicInteger count = this.count;
    final ReentrantLock takeLock = this.takeLock;
    takeLock.lockInterruptibly();
    try {
        while (count.get() == 0) {
            notEmpty.await();
        }
        x = dequeue();
        c = count.getAndDecrement();
        if (c > 1)
            notEmpty.signal();
    } finally {
        takeLock.unlock();
    }
    if (c == capacity)
        signalNotFull();
    return x;
}
可以看到与poll方法不同的是,如果队列为空它是一直让出锁,直到得到signal。还有最后一个
public int drainTo(Collection<? super E> c) {
    return drainTo(c, Integer.MAX_VALUE);
}

/**
 * @throws UnsupportedOperationException {@inheritDoc}
 * @throws ClassCastException            {@inheritDoc}
 * @throws NullPointerException          {@inheritDoc}
 * @throws IllegalArgumentException      {@inheritDoc}
 */
public int drainTo(Collection<? super E> c, int maxElements) {
    if (c == null)
        throw new NullPointerException();
    if (c == this)
        throw new IllegalArgumentException();
    if (maxElements <= 0)
        return 0;
    final ReentrantLock lock = this.lock;
    lock.lock();
    try {
        int n = Math.min(maxElements, count);
        for (int i = 0; i < n; i++) {
            c.add(first.item);   // In this order, in case add() throws.
            unlinkFirst();
        }
        return n;
    } finally {
        lock.unlock();
    }
}
可以看到默认取出所有,也可以取出指定数量,将取出的值放入传入的collection,而且函数的返回值为取出的个数 这里的unlinkFirst其实就是从头部取出一个元素
/**
 * Removes and returns first element, or null if empty.
 */
private E unlinkFirst() {
    // assert lock.isHeldByCurrentThread();
    Node<E> f = first;
    if (f == null)
        return null;
    Node<E> n = f.next;
    E item = f.item;
    f.item = null;
    f.next = f; // help GC
    first = n;
    if (n == null)
        last = null;
    else
        n.prev = null;
    --count;
    notFull.signal();
    return item;
}
阻塞队列介绍完了,我们开始真正的看线程池,它的构造方法如下
public ThreadPoolExecutor(
int corePoolSize,
                          int maximumPoolSize,
                          long keepAliveTime,
                          TimeUnit unit,
                          BlockingQueue<Runnable> workQueue,
                          ThreadFactory threadFactory,
                          RejectedExecutionHandler handler) {
    if (corePoolSize < 0 ||
        maximumPoolSize <= 0 ||
        maximumPoolSize < corePoolSize ||
        keepAliveTime < 0)
        throw new IllegalArgumentException();
    if (workQueue == null || threadFactory == null || handler == null)
        throw new NullPointerException();
    this.corePoolSize = corePoolSize;
    this.maximumPoolSize = maximumPoolSize;
    this.workQueue = workQueue;
    this.keepAliveTime = unit.toNanos(keepAliveTime);
    this.threadFactory = threadFactory;
    this.handler = handler;
}
各个参数的含义为:
- corePoolSize:一直保留在这个线程池中线程的数量,即使线程处于idle状态
- maximumPoolSize:线程池中所允许的最多线程数
- keepAliveTime:当线程数大于核心线程数时,这是多余的空闲线程将在终止之前等待新任务的最长时间。
- workQueue:任务队列。如果当前线程数大于corePoolSize,则将任务添加到此任务队列,这个任务只能是通过execute方法提交的runnable。
- threadFactory:线程工厂,它可以给每个线程设置名字
- RejectedExecutionHandler:饱和策略,这是当任务队列与线程池都满了的情况下所采取的的应对策略。
线程池的工作原理:提交任务后(execute),首先会判断是否达到核心线程数,如果没达到,那么就创建一个核心线程来执行任务;如果达到了那么就尝试将任务添加到任务队列中。他也会判断任务队列(workQueue)是否已满,未满则直接加入,已满则判断是否达到最大线程数(maximumPoolSize),如果没达到的话则会创建一个非核心线程来执行任务,达到的话则会执行饱和策略。比如在项目中我们通常会定义一个线程池管理类,基本上如下
public class ThreadPoolManager {

    private int corePoolSize;
    private int maximumPoolSize;
    private long keepAliveTime = 1;
    private TimeUnit unit = TimeUnit.HOURS;
    private ThreadPoolExecutor executor;


    private volatile static ThreadPoolManager sInstance;

    public static ThreadPoolManager getInstance() {
        if (sInstance == null) {
            synchronized (ThreadPoolManager.class) {
                if (sInstance == null)
                    sInstance = new ThreadPoolManager();
            }
        }
        return sInstance;
    }


    private ThreadPoolManager() {
        corePoolSize = Runtime.getRuntime().availableProcessors() * 2 + 1;
        maximumPoolSize = corePoolSize;
        executor = new ThreadPoolExecutor(corePoolSize, maximumPoolSize, keepAliveTime, unit, new LinkedBlockingDeque<Runnable>(), Executors.defaultThreadFactory(), new ThreadPoolExecutor.AbortPolicy());
    }

    public void execute(Runnable runnable) {
        if (executor == null) {
            executor = new ThreadPoolExecutor(
                    corePoolSize,
                    maximumPoolSize,
                    keepAliveTime,
                    TimeUnit.SECONDS,
                    new LinkedBlockingQueue<Runnable>(),
                    Executors.defaultThreadFactory(),
                    new ThreadPoolExecutor.AbortPolicy());
        }
        if (runnable != null) {
            executor.execute(runnable);
        }
    }

    public void remove(Runnable runnable) {
        if (runnable != null) {
            executor.remove(runnable);
        }
    }
}
在使用时直接调用ThreadPoolManager.getInstance.excute(runnable)即可。
