

前言
上一篇文章中我们简单的总结了ok发起请求并接收响应的整个流程,我们发现关键步骤是getResponseWithInterceptorChain这个方法。那这里面又做了什么事情呢?还是首先来看一下代码:
 @Throws(IOException::class)
  fun getResponseWithInterceptorChain(): Response {
    // Build a full stack of interceptors.
    val interceptors = mutableListOf<Interceptor>()
    interceptors += client.interceptors
    interceptors += RetryAndFollowUpInterceptor(client)
    interceptors += BridgeInterceptor(client.cookieJar)
    interceptors += CacheInterceptor(client.cache)
    interceptors += ConnectInterceptor
    if (!forWebSocket) {
      interceptors += client.networkInterceptors
    }
    interceptors += CallServerInterceptor(forWebSocket)

    val chain = RealInterceptorChain(interceptors, transmitter, null, 0, originalRequest, this,
        client.connectTimeoutMillis, client.readTimeoutMillis, client.writeTimeoutMillis)

    var calledNoMoreExchanges = false
    try {
      val response = chain.proceed(originalRequest)
      if (transmitter.isCanceled) {
        response.closeQuietly()
        throw IOException("Canceled")
      }
      return response
    } catch (e: IOException) {
      calledNoMoreExchanges = true
      throw transmitter.noMoreExchanges(e) as Throwable
    } finally {
      if (!calledNoMoreExchanges) {
        transmitter.noMoreExchanges(null)
      }
    }
  }
可以说这个方法是整个okhttp的核心,通过这么几行代码就实现了整个请求的过程。这里不得不提到ok的拦截器机制。大多数人说到okhttp优秀的地方基本上都会脱口而出通过设置拦截器可以很方便的实现网络请求的打印、添加一些公共参数等等。而拦截器真正的运行其实就是在这个方法中。
- 首先在interceptors中添加用户自定义的拦截器
- 然后按顺序添加各种系统内置的拦截器
- 通过RealInterceptorChain方法获取一个chain对象
- 通过chain.proceed获取response
拦截器
说了这么久的拦截器,肯定会好奇它究竟是个什么妖魔鬼怪:
/**
 * Observes, modifies, and potentially short-circuits requests going out and the corresponding
 * responses coming back in. Typically interceptors add, remove, or transform headers on the request
 * or response.
 */
interface Interceptor {
  @Throws(IOException::class)
  fun intercept(chain: Chain): Response

  companion object {
    inline operator fun invoke(crossinline block: (chain: Chain) -> Response): Interceptor =
        object : Interceptor {
          override fun intercept(chain: Chain) = block(chain)
        }
  }
  interface Chain {
    fun request(): Request

    @Throws(IOException::class)
    fun proceed(request: Request): Response
    fun connection(): Connection?
    fun call(): Call
    fun connectTimeoutMillis(): Int
    fun withConnectTimeout(timeout: Int, unit: TimeUnit): Chain
    fun readTimeoutMillis(): Int
    fun withReadTimeout(timeout: Int, unit: TimeUnit): Chain
    fun writeTimeoutMillis(): Int
    fun withWriteTimeout(timeout: Int, unit: TimeUnit): Chain
  }
}
Interceptor实际上是一个接口,里面定义了一个intercept方法和chain的接口类。
intercept
关于intercept方法是不是很熟悉?我们在自定义拦截器的时候往往都是在这里面做一些瞎操作。
   override fun intercept(chain: Interceptor.Chain): Response {
        val request = chain.request()
        val realInterceptorChain = chain as RealInterceptorChain
        val transmitter = realInterceptorChain.transmitter()
        val response = realInterceptorChain.proceed(request, transmitter, null)
        return response

    }
- 这里首先是通过chain.request获取请求的request对象
- 通过chain.proceed 递归调用下一个拦截器的intercept方法
- 最终返回chain.proceed的response到上一级拦截器
分层
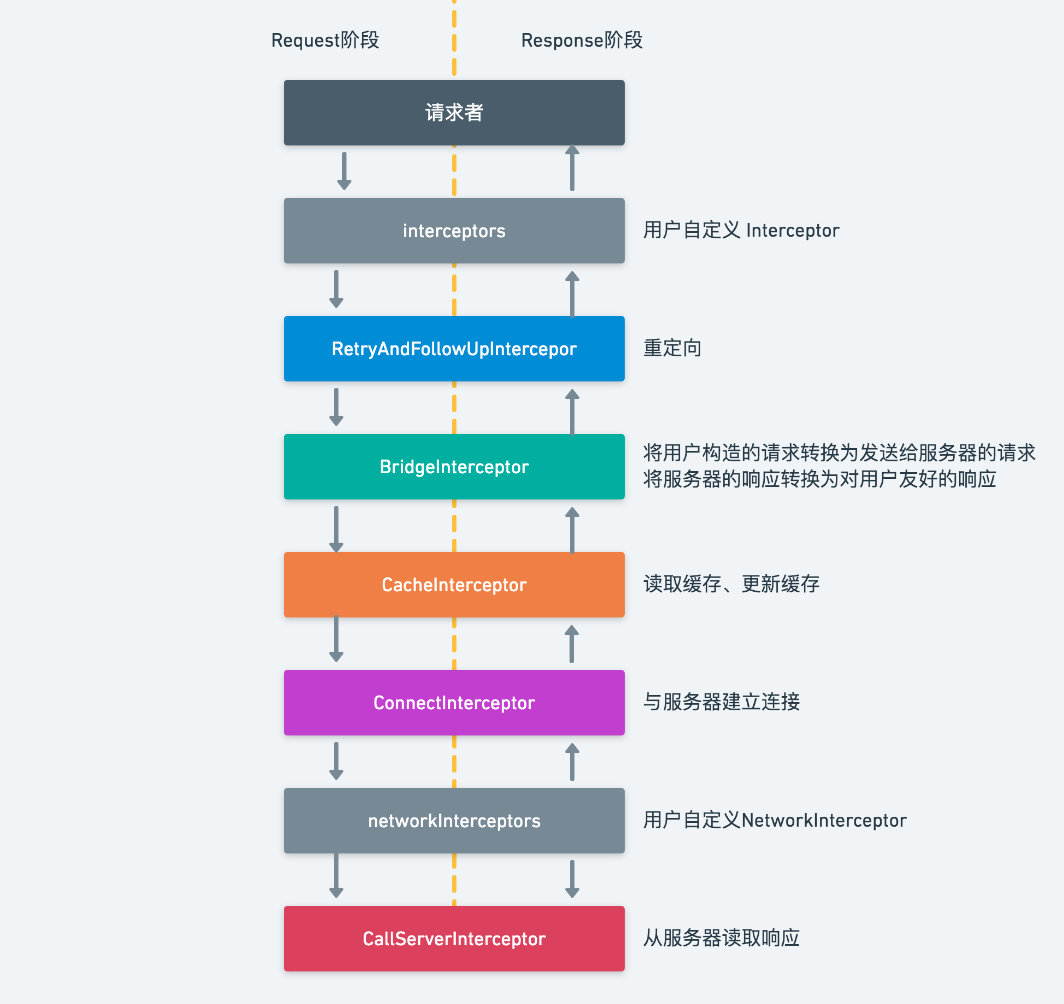
这里其实是将每个拦截器分为了两个阶段:
- Request阶段:执行该拦截器在请求前做的事,例如:bridgeInterceptor添加一些请求参数
- Response阶段:执行拦截器在获取响应之后做的事,例如:打印出请求体的返回
拦截器的设计其实是采用了递归调用的思想,仔细想想其实是非常巧妙的,这样可以保证不论是系统内置还是用户自定义的拦截器都可以得到最终执行。如果在某个拦截器中出现了错误,还可以把错误抛给上一层来处理。
内置拦截器
通过剖析源码我们会发现,ok内部其实是帮我们内置了好几种拦截器,每次请求都会添加进去,我们按照添加顺序整理如下:
| 拦截器 | 说明 |
|---|---|
| RetryAndFollowUpInterceptor | 负责实现重定向功能 |
| BridgeInterceptor | 将用户构造的请求转换为向服务器发送的请求,将服务器返回的响应转换为对用户友好的响应 |
| CacheInterceptor | 读取缓存、更新缓存 |
| ConnectInterceptor | 建立与服务器的连接 |
| CallServerInterceptor | 从服务器读取响应 |
可以看出,整个网络请求的过程是通过各个拦截器相互配合来实现,假如我们在网络请求过程中设置允许缓存,那么在请求网络之前会预先获取缓存,然后再去跟服务器建立连接。通过拦截器的机制,我们可以很方便的控制整个网络请求的过程以及添加我们自己的拓展。
整个网络请求过程中,用户其实是可以添加两种不同类型的拦截器的。
- 通过 addInterceptor()在网络请求前后添加拦截器
- 通过networkInterceptors()在获取响应前后添加拦截器
这一点在getResponseWithInterceptorChain()方法中添加拦截器的顺序是可以分析出来的。
整体流程
RealInterceptorChain
经过上面的分析我们知道okhttp的实际请求和响应过程是通过一个个拦截器的递归调用来实现的。主要方法就是
realInterceptorChain.proceed。我们先来看一下RealInterceptorChain的构造方法
class RealInterceptorChain(
  private val interceptors: List<Interceptor>,
  private val transmitter: Transmitter,
  private val exchange: Exchange?,
  private val index: Int,
  private val request: Request,
  private val call: Call,
  private val connectTimeout: Int,
  private val readTimeout: Int,
  private val writeTimeout: Int
)
这里其实是将上一个拦截器的一些参数传递进来并且赋值的简单实现。包括所有的拦截器、以及我们在第一篇文章提到的transmitter等。整个类中最关键的还是proceed方法
  @Throws(IOException::class)
  fun proceed(request: Request, transmitter: Transmitter, exchange: Exchange?): Response {
    if (index >= interceptors.size) throw AssertionError()
    calls++
    // If we already have a stream, confirm that the incoming request will use it.
    check(this.exchange == null || this.exchange.connection()!!.supportsUrl(request.url)) {
      "network interceptor ${interceptors[index - 1]} must retain the same host and port"
    }
    // If we already have a stream, confirm that this is the only call to chain.proceed().
    check(this.exchange == null || calls <= 1) {
      "network interceptor ${interceptors[index - 1]} must call proceed() exactly once"
    }
    // Call the next interceptor in the chain.
    val next = RealInterceptorChain(interceptors, transmitter, exchange,
        index + 1, request, call, connectTimeout, readTimeout, writeTimeout)
    val interceptor = interceptors[index]
    @Suppress("USELESS_ELVIS")
    val response = interceptor.intercept(next) ?: throw NullPointerException(
        "interceptor $interceptor returned null")
    // Confirm that the next interceptor made its required call to chain.proceed().
    check(exchange == null || index + 1 >= interceptors.size || next.calls == 1) {
      "network interceptor $interceptor must call proceed() exactly once"
    }
    check(response.body != null) { "interceptor $interceptor returned a response with no body" }
    return response
  }
可以看到这个方法中除了大量的判读逻辑,比较关键的就是通过index+1取到下一个RealInterceptorChain对象 。
然后获取当前的拦截器并且调用其intercept方法 ,方法参数中传入了下一个拦截器的对应的chain。就是这样通过递归调用的设计,实现了由上而下,再由下而上实现了递与归的过程。从而非常漂亮的实现了http请求的全链路。
看到这里有没有觉得这种设计模式很熟悉,没错就是责任链模式。这种设计模式在一个流程会有多种操作的业务场景下会非常实用。
总结
本篇文章我们主要是分析了整个网络请求过程中非常重要的getResponseWithInterceptorChain()方法,内部通过责任链的模式递归调用用户自定义拦截器和内置拦截器来完成整个网络请求。通过对整个方法的分析,我们会更清晰的知道ok内部是怎么实现通过设置拦截器来完成我们想要的功能的。同时也是我们学习责任链模式非常好的实践。后续文章将逐个分析ok内置拦截器的具体作用。
