

d3 的过渡是设计是非常好的,基于核心插值器的过渡动画让我们可以通过短短几行代码就可以满足项目所需的动画效果,让数据的展示效果更加优秀。
简单过渡
<!doctype html>
<html lang="en">
<head>
    <meta charset="UTF-8">
    <meta name="viewport"
          content="width=device-width, user-scalable=no, initial-scale=1.0, maximum-scale=1.0, minimum-scale=1.0">
    <meta http-equiv="X-UA-Compatible" content="ie=edge">
    <title>Document</title>
    <style>
        .box {
            width: 200px;
            height: 200px;
            margin: 40px;
            float: left;
            text-align: center;
            border: #969696 solid thin;
            padding: 5px;
        }

    </style>
</head>
<body>
<script src="../d3.js"></script>
<script>
    d3.select('body')
        .append('div')
            .classed('box', true)
            .style('background-color', '#e9967a')
        .transition()
        .duration(5000)
            .style('background-color', '#add8e6')
            .style('margin-left', '600px')
            .style('width', '100px')
            .style('height', '100px')
</script>
</body>
</html>
效果如下:

selection.transition() 定义了一个过渡,然后用 duration() 设置过渡的时长为 5000ms, 然后我们设置了过渡结束后的属性值,d3 会帮我们计算出对应的开始时的属性值,并在过渡期间通过插值器和算法自动填充对应的属性。另外 transition() 是可以多次指定的,下一个 transition 会在上一个结束后开始。
数据绑定 + 过渡
<!doctype html>
<html lang="en">
<head>
    <meta charset="UTF-8">
    <meta name="viewport"
          content="width=device-width, user-scalable=no, initial-scale=1.0, maximum-scale=1.0, minimum-scale=1.0">
    <meta http-equiv="X-UA-Compatible" content="ie=edge">
    <title>Document</title>
    <style>
        * {
            padding: 0;
            margin: 0;
        }
        .baseline {
            height: 1px;
            background-color: black;
        }
        .v-bar {
            min-width: 30px;
            background-color: #4682b4;
            margin-right: 2px;
            font-size: 10px;
            color: #f0f8ff;
            text-align: center;
            display: inline-block;
        }
    </style>
</head>
<body>
<script src="../d3.js"></script>
<script>
    const data = [],
          duration = 500,
          chartHeight = 100,
          chartWidth = 640

    const push = (function () {
        let id = 0
        return function (data) {
            data.push({
              id: ++id,
              value: Math.round(Math.random() * chartHeight)
            })
        }
    })()

    for (let i = 0; i < 20; i++) {
        push(data)
    }

    function render(data) {
        const selection = d3.select('body').selectAll('div.v-bar')
            .data(data, function (d) {
                return d.id
            })

        selection.enter()
            .append('div')
                .classed('v-bar', true)
                .style('height', '0px')
                .style('position', 'fixed')
                .style('left', function (d, i) {
                    return i * 32 + 'px'
                })
                .style('top', chartHeight + 'px')
            .append('span')


        selection
            .transition().duration(duration)
                .style('height', function (d) {
                    return d.value + 'px'
                })
                .style('z-index', 0)
                .style('left', function (d, i) {
                    return i * 32 + 'px'
                })
                .style('top', function (d) {
                    return chartHeight - d.value + 'px'
                })
                .select('span')
                    .text(function (d) {
                        return d.value
                    })

        selection.exit()
            .transition().duration(duration)
                .style('left', function () {
                    return '-32px'
                })
            .remove()
    }

    setInterval(() => {
      data.shift()
      push(data)
      render(data)
    }, 2000)

    render(data)

    d3.select('body')
        .append('div')
            .classed('baseline', true)
            .style('width', chartWidth + 'px')
            .style('position', 'fixed')
            .style('z-index', 1)
            .style('top', chartHeight + 'px')
</script>
</body>
</html>
效果如下:
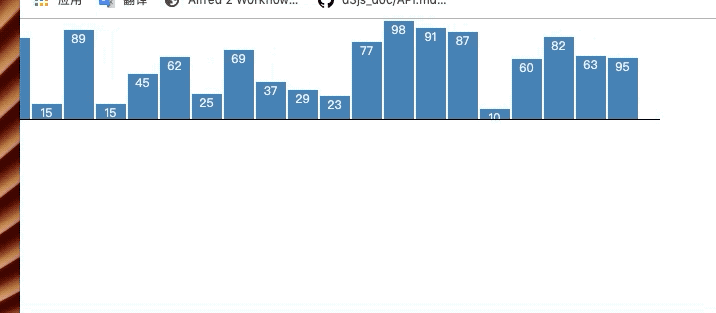
这个例子没什么好解释的,看下就能理解,稍微注意下可以发现我们对于 exit 选择集 也添加了个过渡效果,让它移到显示区域外再移除,这让效果看起来更流畅。
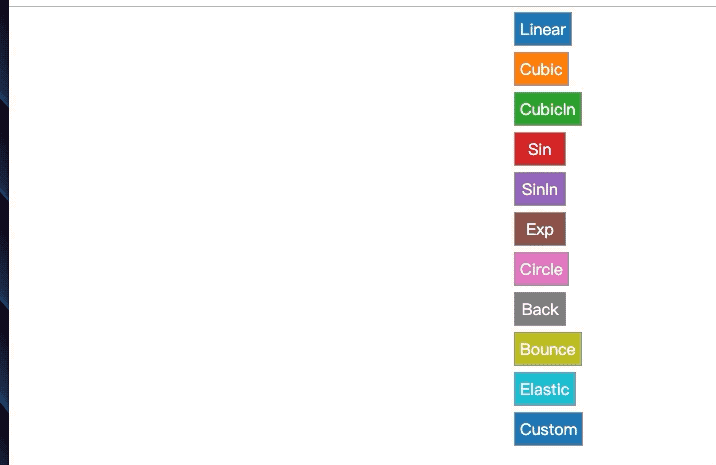
使用ease函数
我们可以使用 ease() 来指定过渡的缓动曲线。delay() 设置过渡开始的延时。
关于d3内置的缓动类型可查看 observablehq.com/@d3/easing-…
我们也可以自定义缓动曲线, 如 ease(t => t * t)
<!doctype html>
<html lang="en">
<head>
    <meta charset="UTF-8">
    <meta name="viewport"
          content="width=device-width, user-scalable=no, initial-scale=1.0, maximum-scale=1.0, minimum-scale=1.0">
    <meta http-equiv="X-UA-Compatible" content="ie=edge">
    <title>Document</title>
    <style>
        .fixed-cell {
            min-width: 40px;
            min-height: 20px;
            margin: 5px;
            position: fixed;
            text-align: center;
            border: #969696 solid thin;
            padding: 5px;
        }
    </style>
</head>
<body>
<script src="../d3.js"></script>
<script>
    const data = [
        {name: 'Linear', fn: d3.easeLinear},
        {name: 'Cubic', fn: d3.easeCubic},
        {name: 'CubicIn', fn: d3.easeCubicIn},
        {name: 'Sin', fn: d3.easeSin},
        {name: 'SinIn', fn: d3.easeSinIn},
        {name: 'Exp', fn: d3.easeExp},
        {name: 'Circle', fn: d3.easeCircle},
        {name: 'Back', fn: d3.easeBack},
        {name: 'Bounce', fn: d3.easeBounce},
        {name: 'Elastic', fn: d3.easeElastic},
        {name: 'Custom', fn: function (t) {
          return t * t
        }}
    ]

    const colors = d3.scaleOrdinal(d3.schemeCategory10)

    d3.select('body').selectAll('div')
        .data(data)
        .enter()
            .append('div')
                .classed('fixed-cell', true)
                .style('top', function (d, i) {
                    return i * 40 + 'px'
                })
                .style('left', '10px')
                .style('background-color', function (d, i) {
                    return colors(i)
                })
                .style('color', 'white')
                .text(function (d) {
                    return d.name
                })

    d3.selectAll('div').each(function (d) {
        d3.select(this)
            .transition().ease(d.fn)
            .duration(1500)
            .delay(3000)
                .style('left', '500px')
    })
</script>
</body>
</html>
效果如下:
使用中间帧
我们可以使用中间帧来指定过渡中的插值情况。
<!doctype html>
<html lang="en">
<head>
    <meta charset="UTF-8">
    <meta name="viewport"
          content="width=device-width, user-scalable=no, initial-scale=1.0, maximum-scale=1.0, minimum-scale=1.0">
    <meta http-equiv="X-UA-Compatible" content="ie=edge">
    <title>Document</title>
</head>
<body>
<script src="../d3.js"></script>
<script>
    d3.select('body')
        .append('div')
        .append('input')
            .classed('countdown', true)
            .attr('type', 'button')
            .attr('value', 0)
        .transition().duration(5000).ease(d3.easeLinear)
            .styleTween('width', widthTween)
            .attrTween('value', valueTween)

    function widthTween() {
        const interpolate = d3.scaleQuantile()
          .domain([0, 1])
          .range([150, 200, 250, 350, 400])

        return function (t) {
          return interpolate(t) + 'px'
        }
    }

    function valueTween() {
      const interpolate = d3.scaleLinear()
        .domain([0, 1])
        .range([0, 1])

      return function (t) {
        return interpolate(t)
      }
    }

</script>
</body>
</html>
效果如下:

指定中间帧时函数必须为返回值为 参数为 t 的函数 的函数。 t 的定义域为[0, 1],代表着过渡的开始和结束。
我们通过 attrTween() , 将 width 的过渡设为离散值的过渡,input 宽度的变化并不是连续的。styleTween() 将 value 的 过渡设为线性过渡。
监听过渡事件
<!doctype html>
<html lang="en">
<head>
    <meta charset="UTF-8">
    <meta name="viewport"
          content="width=device-width, user-scalable=no, initial-scale=1.0, maximum-scale=1.0, minimum-scale=1.0">
    <meta http-equiv="X-UA-Compatible" content="ie=edge">
    <title>Document</title>
    <style>
        .box {
            width: 200px;
            height: 200px;
            margin: 40px;
            float: left;
            text-align: center;
            border: #969696 solid thin;
            padding: 5px;
        }
    </style>
</head>
<body>
<script src="../d3.js"></script>
<script>
    d3.select('body')
        .append('div').classed('box', true)
            .style('background-color', 'steelblue')
            .style('color', 'white')
            .text('waiting')
            .transition().duration(3000).delay(3000)
                .on('start', function () {
                    d3.select(this).text('transitioning')
                })
                .on('end', function () {
                    d3.select(this).text('end')
                })
                .style('margin-left', '600px')
</script>
</body>
</html>
效果如下:
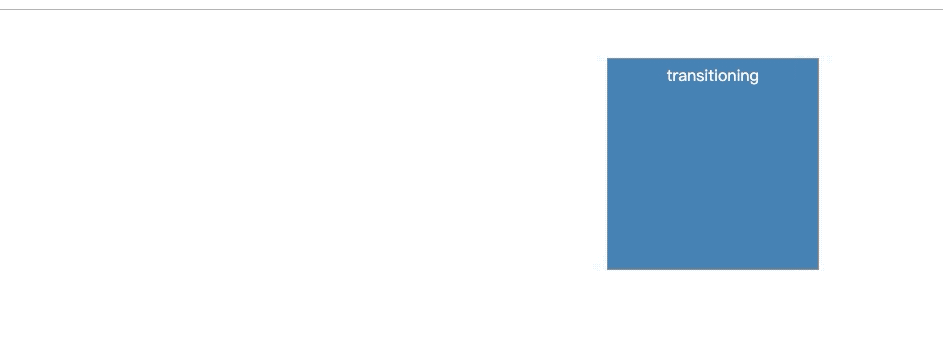
另外 d3 还新添加了 end() 方法,他会在过渡结束后返回一个promise对象方便我们调用。
