

功能介绍
- 微信公众号授权
- 绑定账号
- 自动登录
流程图
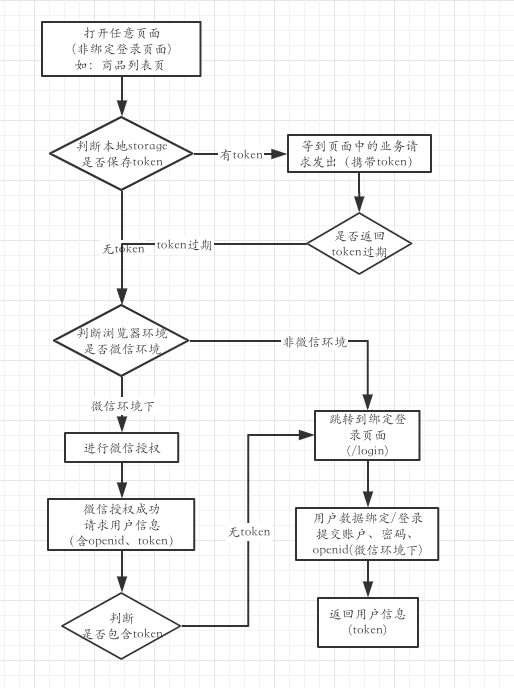
微信公众号授权登录
原理:
当用户打开某页面(如:/goodslist),我们需要获取用户信息或实现用户自动登录,让用户进行微信授权。
使页面跳转到微信给定的授权页面(https://open.weixin.qq.com/connect/oauth2/authorize?{一些传参}#wechat_redirect)
该授权页会提示用户授权,这样用户是否授权,微信能够感知到。
授权成功后,跳回我们在{一些参数}中指定的redirect_uri重定向页面,一般设为跳转之前的页面(/goodslist)
微信会在重定向uri后面添加参数code,如:/goodslist?code=xxxxxx(还有一个参数state)
在跳回的页面拿到code去跟微信换取用户信息(第一步,使用code换取access_token;第二步,拉取用户信息)
使用code换取用户信息由我们自己的服务端去请求,前端就不用管了,因为需要提交一些安全性参数
一些参数:(微信要求,这些参数的顺序不能改变)
- appid - 公众号的唯一标识
- redirect_uri - 授权后重定向的回调链接地址,请使用 urlEncode 对链接进行处理
- response_type - 返回类型,固定值
code - scope - 应用授权作用域,见下方
- state - 重定向后会带上state参数,开发者可以填写a-zA-Z0-9的参数值,最多128字节
scope
应用授权作用域,可选值:snsapi_base, snsapi_userinfo
-
snsapi_base
不弹出授权页面,直接跳转,只能获取用户openid
-
snsapi_userinfo
弹出授权页面,可通过openid拿到昵称、性别、所在地。并且, 即使在未关注的情况下,只要用户授权,也能获取其信息
参考手册
代码实现
判断浏览器环境
// src/utils/env.js
// 使用bowser库
import Bowser from 'bowser'

const parsed = Bowser.getParser(window.navigator.userAgent).parsedResult

// 是否微信环境
export const inWechat = parsed.browser.name === 'WeChat'

export const inIOS = parsed.os.name === 'iOS'

export const inSafari = parsed.browser.name === 'Safari'
微信授权
// src/auth.js

import qs from 'qs'

// store2库 方便操作localStorage 和 sessionStorage
import store from 'store2'

import { inWechat } from '@/utils/env'

import { getUserInfo } from '@/service/login'

// 微信appid
const appid = 'wxxxxxxxxxxxxx'

// 前往授权
const goAuth = () => {
  const uri = 'https://open.winxin.qq.com/connect/oauth2/authorize'

  const params = {
    appid,
    redirect_uri: window.location.href,
    response_type: 'code',
    scope: 'snsapi_userinfo',
    state: 'STATE'
  }

  const hash = 'wechat_redirect'

  const url = `${url}?${qs.stringify(params)}#${hash}`

  // 页面跳转,ios等机型禁止了直接使用location.href跳转
  // window.location.href = url // 不能使用

  const nextPage = document.createElement('a')
  nextPage.setAttribute('href', url)
  nextPage.click()

  // 这里为了获得更友好的效果,可以提示用户需要授权,给出一个前往授权的按钮。用户点击后触发
}

/** 授权返回
 * code - 授权后redirect_uri后面参数中的code
 * callback - 这里一般指定为dom渲染的操作
 */
const authBack = async (code, callback) => {
  // 使用code请求用户信息
  await getUserInfo(code)

  callback()
}

export default async callback => {
  if (
    window.location.pathname === '/login' // 登录绑定页
    || store('token') // 已登录
    || !inWechat // 非微信环境下
  ) {
    // 直接渲染dom
    return callback()
  }

  // 解析querystring
  const params = qs.parse(window.location.search, { ignoreQueryPrefix: true })
  params.code === undefined ? goAuth() : await authBack(params.code, callback)
}
// src/index.js

import React from 'react'
import ReactDOM from 'react-dom'

import auth from './auth'

import { Provider } from 'react-redux'
import store from './store'
import Router from './router'

const renderDom = () => ReactDOM.render(
  <Provider store={store}>
    <Router />
  </Provider>,
  document.getElementById('root')
)

// 授权完成后,才能继续页面渲染,这样可以阻止页面中发出的请求。
// 尤其是这些请求中有的是要求必须登录的,将导致页面跳转到登录页
auth(renderDom)
后记,一些思考
另一种授权流程
redirect_uri 设置为一个后端地址(前端路由不能匹配到的地址,如:/auth);
state 设置为前端回跳地址, 如:window.location.href
用户授权成功后,微信跳转到后端地址并带上code和state参数(/auth?code={code}&state={前端地址})
后端(/auth)获取到code之后,跟微信交换用户信息。如果该微信用户已注册,则进行登录操作,返回token,将页面重定向到{前端地址}?token={token}&openid={openid}&{其他用户信息};该用户未注册,则重定向到{登录页面}?openid={openid}
优点
可以简化前端流程
不足
后端重定向前端页面,会将token等用户信息数据暴露,导致安全风险
