

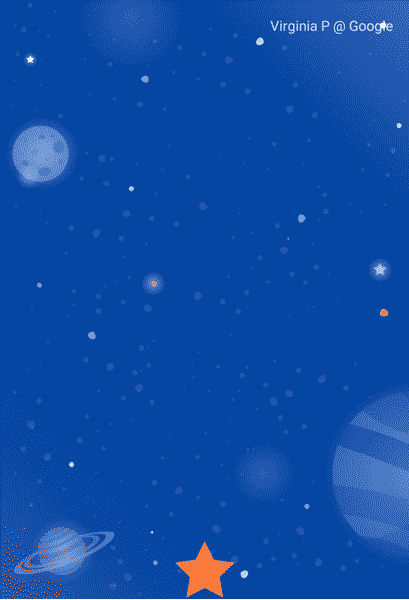
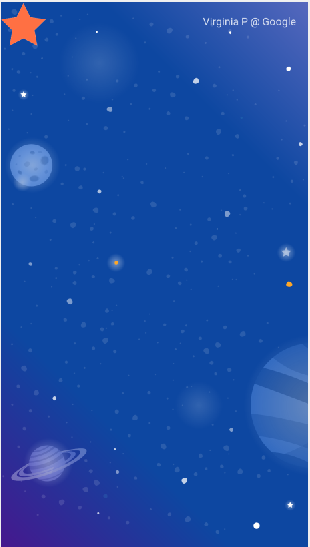
这里我们接着上面的说,主要是未介绍的,这节我们主要实现的效果如下
OnSwipe 元素的属性:
- app:touchAnchorId:【id 值】设置拖动操作要关联到的对象,让触摸操作看起来像是在拖动这个对象的由
- app:touchAnchorSide:属性指定的那个边,设置触摸操作将会拖动对象的哪一边,共有以下 4 个可选值:top、left、right、bottom
- app:dragDirection:设置拖动的方向(注意,只有设置了 app:touchAnchorId 属性后该属性才有效)。共有以下 4 个可选值:
- dragUp:手指从下往上拖动(↑)。
- dragDown:手指从上往下拖动(↓)。
- dragLeft:手指从右往左拖动(←)。
- dragRight:手指从左往右拖动(→)。
- app:maxVelocity:【浮点值】设置动画在拖动时的最大速度(单位:像素每秒 px/s)。
- app:maxAcceleration:【浮点值】设置动画在拖动时的最大加速度(单位:像素每二次方秒 px/s^2)。
可以同时设置 OnClick与 OnSwipe ,或者都不设置,而是使用代码来触发过渡。 还可以在 Transition 元素中设置多个 OnClick,每个 OnClick 都可以关联到一个不同的控件上。虽然 Transition> 元素中也可以设置多个 OnSwipe,但是后面的 OnSwipe 会替换掉前面的 OnSwipe,最终使用的是最后一个 OnSwipe。
OnSwipe拖动操作:由于 OnSwipe拖动操作涉及的交互较为复杂,这里单独对它的以下 3 个属性进行说明:
- app:touchAnchorId
- app:dragDirection
- app:touchAnchorSide
首先是 app:touchAnchorId 属性与 app:dragDirection 属性。app:touchAnchorId 属性用于设置拖动操作要关联到的对象;app:dragDirection 属性用于指定拖动方向。 默认情况下,由上往下 拖动时会运行过渡动画,此时 OnSwipe 元素不需要设置任何属性,只要在 Transition 中加一个 OnSwipe 标签即可。 比如之前的例子都是用的OnClick,我们改成onSwipe如下
<OnSwipe
        app:touchAnchorId="@id/moon"
        app:touchAnchorSide="bottom"
        app:dragDirection="dragRight"
/>
效果为
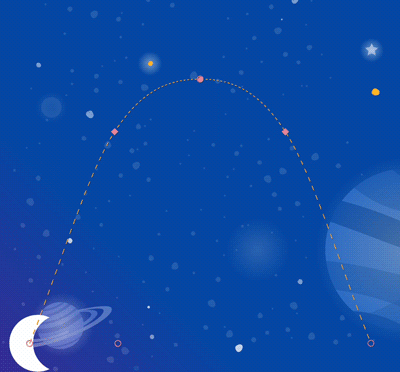
接着说开篇时的效果首先看到是拖拽形成的动画,所以肯定会用到onSwipe,其次初始位置为,三颗星星都在底部中间,其中两个透明,结束位置为到顶部依次排列,并且透明的两颗星星完全展示了。 首先看原始布局
<androidx.constraintlayout.motion.widget.MotionLayout
        xmlns:android="http://schemas.android.com/apk/res/android"
        xmlns:app="http://schemas.android.com/apk/res-auto"
        android:layout_width="match_parent"
        android:layout_height="match_parent"
        app:layoutDescription="@xml/step2" >

    <ImageView
            android:layout_width="0dp"
            android:layout_height="0dp"
            app:layout_constraintTop_toTopOf="parent"
            app:layout_constraintBottom_toBottomOf="parent"
            app:layout_constraintStart_toStartOf="parent"
            app:layout_constraintEnd_toEndOf="parent"
            app:srcCompat="@drawable/background"
            android:scaleType="centerCrop"
    />


    <ImageView
            android:id="@+id/left_star"
            android:layout_width="wrap_content"
            android:layout_height="wrap_content"
            app:srcCompat="@drawable/ic_star_outline"
            android:tint="?colorOnPrimary"
            android:contentDescription="@string/star"
    />

    <ImageView
            android:id="@+id/right_star"
            android:layout_width="wrap_content"
            android:layout_height="wrap_content"
            app:srcCompat="@drawable/ic_star_outline"
            android:tint="?colorOnPrimary"
            android:contentDescription="@string/star"
    />

    <ImageView
            android:id="@+id/red_star"
            android:layout_width="wrap_content"
            android:layout_height="wrap_content"
            app:srcCompat="@drawable/ic_star_outline"
            android:tint="?colorSecondary"
            android:contentDescription="@string/star"
    />

    <TextView
            android:id="@+id/credits"
            android:layout_width="wrap_content"
            android:layout_height="wrap_content"
            android:textColor="?colorOnPrimary"
            android:text="@string/credits"
            android:padding="16dp"
            android:alpha="0.8"
            app:layout_constraintTop_toTopOf="parent"
            app:layout_constraintEnd_toEndOf="parent"/>
</androidx.constraintlayout.motion.widget.MotionLayout>
效果如下:
<ConstraintSet android:id="@+id/start">
    <Constraint
            android:id="@+id/red_star"
            android:layout_width="wrap_content"
            android:layout_height="wrap_content"
            app:layout_constraintStart_toStartOf="parent"
            app:layout_constraintEnd_toEndOf="parent"
            app:layout_constraintBottom_toBottomOf="parent" />

    <Constraint
            android:id="@+id/left_star"
            android:layout_width="wrap_content"
            android:layout_height="wrap_content"
            android:alpha="0.0"
            app:layout_constraintStart_toStartOf="parent"
            app:layout_constraintEnd_toEndOf="parent"
            app:layout_constraintBottom_toBottomOf="parent" />

    <Constraint
            android:id="@+id/right_star"
            android:layout_width="wrap_content"
            android:layout_height="wrap_content"
            android:alpha="0.0"
            app:layout_constraintStart_toStartOf="parent"
            app:layout_constraintEnd_toEndOf="parent"
            app:layout_constraintBottom_toBottomOf="parent" />
</ConstraintSet>
然后是结束位置
<ConstraintSet android:id="@+id/end">

    <Constraint
            android:id="@+id/left_star"
            android:layout_width="wrap_content"
            android:layout_height="wrap_content"
            android:alpha="1.0"
            app:layout_constraintHorizontal_chainStyle="packed"
            app:layout_constraintStart_toStartOf="parent"
            app:layout_constraintEnd_toStartOf="@id/red_star"
            app:layout_constraintTop_toBottomOf="@id/credits" />

    <Constraint
            android:id="@+id/red_star"
            android:layout_width="wrap_content"
            android:layout_height="wrap_content"
            app:layout_constraintStart_toEndOf="@id/left_star"
            app:layout_constraintEnd_toStartOf="@id/right_star"
            app:layout_constraintTop_toBottomOf="@id/credits" />

    <Constraint
            android:id="@+id/right_star"
            android:layout_width="wrap_content"
            android:layout_height="wrap_content"
            android:alpha="1.0"
            app:layout_constraintStart_toEndOf="@id/red_star"
            app:layout_constraintEnd_toEndOf="parent"
            app:layout_constraintTop_toBottomOf="@id/credits" />
</ConstraintSet>
因为是通过拖动的方式触发,所以transition的写法如下
<Transition
        app:constraintSetStart="@+id/start"
        app:constraintSetEnd="@+id/end">
    <!-- MotionLayout will track swipes relative to this view -->
    <OnSwipe app:touchAnchorId="@id/red_star" />
</Transition>
