

前言
数据绑定(data join)作为d3的一大特点,极大方便了对数据及元素的操作
哪里方便呢?这里列举一个简单的例子:
假设需求如下:有数据[5, 15, 25, 35],制作一张柱状图,同时添加交互,鼠标移至对应柱子时变色
如果我们有数据绑定,我们将数据绑定到元素,返回selection之后,有如交互、动画、更新等的操作直接通过selection进行即可
如果没有数据绑定,单纯的使用js与div元素生成柱状图,在交互添加,监听更新方面都得使用for循环来添加等等,不但开发效率低,而且代码难以维护
这还仅仅是柱状图,如果场景更加复杂呢?比如地图的交互,数据更加多维等等
本文将通过实验讲解d3的数据绑定是什么样的,了解数据绑定的三种状态update、exist、enter
小实验也将放在CodePen之中方便大家修改测试
简要
d3通过data join(数据绑定)创造、更新及销毁元素,如何操作元素也能通过selection,我的总结如下:
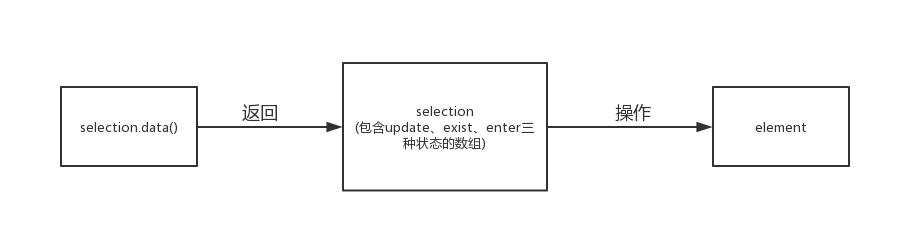
其中,selection的三种状态将data与element结合在一起,对元素进行控制
data、element、与三种状态之间的关系我们来看看data join的概念图,图自d3作者Mike Bostock的文章Thinking with Joins
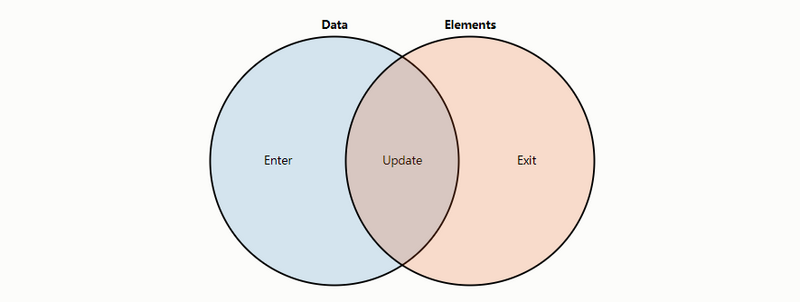
接下来我们用小实验进一步进行说明
实验
我们主要会用到以下API,这里根据官方原文档结合上图解释,更多细节请看官方文档
Binds the specified array of data with the selected elements, returning a new selection that represents the update selection: the elements successfully
selection.data():绑定数据,返回代表
update的selection,此selection表示成功绑定了数据的元素,update状态按上图理解表示又有数据又有元素;同时定义enter selection和exit selection,可以用于添加或删除元素以匹配数量与数据一致
selection.enter():可在selection.data()返回的selection中获取enter selection
selection.exit():可在selection.data()返回的selection中获取exit selection
selection.join():添加、移除、重排元素至元素数量与绑定data的数量一致
以上是个人根据文档的粗略翻译,更官方细致的解释推荐看官方文档 解释错误或不到位还请大佬指出
接下来我们以几个实验来说明这些API在数据绑定上的作用 先列出基本的html结构、css及示例数据
<!-- div元素插入在app之下,修改样式作为柱图 -->
<div id="app">
<!-- 此处根据不同实验确定不同的柱图(div)数量 -->
</div>
#app div{
    font: 10px sans-serif;
    background-color: steelblue;
    text-align: right;
    padding: 3px;
    margin: 1px;
    color: white;
    height:10px;
}
//演示数据
const dataArray = [150, 250, 350];
接下来是几个小实验,对应说明不同API的功能
- #app下无子元素:可通过enter()添加元素至数量与dataArray.length一致
- #app下子元素数量少于dataArray.length:可通过enter()添加元素至数量与dataArray.length一致
- #app下子元素数量等于dataArray.length:selection.data()返回的selection直接操控
- #app下子元素数量多于dataArray.length:可通过exit()操控多余元素
- join简化操作
接下来开始我们的实验✨
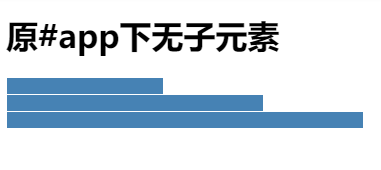
#app下无子元素
<!-- 柱状图元素插入在app之下 -->
<div id="app"></div>
第一个例子我们在控制台下详细看看selection.data()的返回值,在后面的几个例子中也加以比对
先看例子效果如下:

CodePen打开
我也在CodePen中关键的地方console.log()了,但是是第一个例子我们就来逐行解释代码吧:
首先,选择#app元素,返回了selection对象
const app = d3.select("#app");
接着,我们想选择#app下的div元素进行数据绑定,即使这时初始的#app下没有子元素
const allSelection = app.selectAll("div") //欲选择#app下的div元素(即使原本#app下无div元素)
                        .data(dataArray) //进行数据绑定
console.log("————包含update、enter、exit三个状态的selection————");
console.log(allSelection);
我们看看对应的控制台,我用红色的箭头标出三种状态:
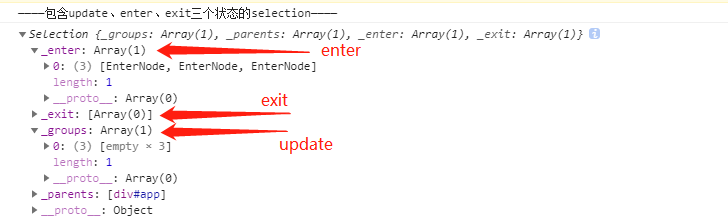
其中_groups是对应selection.data()所返回代表update状态元素,同时定义的enter状态元素对应_enter,exit状态元素对应_exit
selection.enter()、selection.exit()也是将返回的_groups作为各自对应的状态元素。
关于group与selection的关系可查看本人之前的总结或者Mike Bostock本人的文章),简单地说,selection是一个各元素为group的数组,每一个group又是一个DOM数组。
接下来也会有对应的console打印selection.enter()及selection.exit()的代码,可在控制台查看
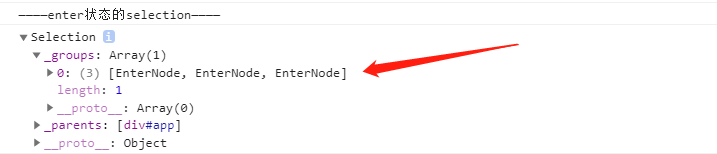
紧些着我们获取enter状态的selection
const enterSelection = allSelection.enter();//获取enter状态的selection
console.log("————enter状态的selection————");
console.log(enterSelection);
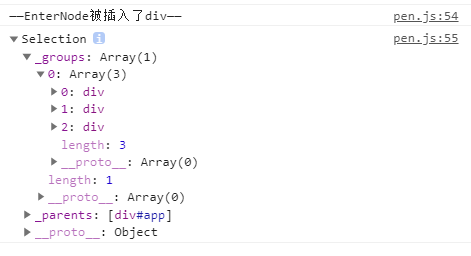
最后我们在EnterNode中插入div,根据绑定的数据设置样式(这里是宽度)
    const divs = enterSelection.append("div")//在selection中插入"div"
    console.log("——EnterNode被插入了div——");
    console.log(divs);

    //对每个div设置宽度
    divs.style("width", function (d) {
       return d + "px";
    });
最终绘制出图形
#app下子元素数量少于dataArray.length
<!-- 柱状图元素插入在app之下 -->
<h1>app下子元素数量少于dataArray.length</h1>
<div id="app">
  <div></div>
</div>
CodePen打开
其实道理等同于#app下无子元素,都是没有足够的元素匹配数据
但是原本存在的div能到数据,即有一个元素是update状态
首先是进行数据绑定
    const dataArray = [150, 250, 350];

    const selection = d3.select('#app')
        .selectAll('div')
        .data(dataArray);
    console.log('——————匹配到数据的元素——————')
    console.log(selection);
    //对匹配到的元素进行样式设置
    selection.style('width', function (d) {
        return d + 'px';
    });
发现selection中匹配了一个div元素
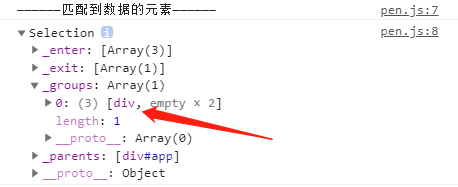
代码中对他进行了样式设置,大家可以去掉那部分代码看看会发生什么
接着获取enterNode,插入div,根据绑定的数据设置样式
    const enterSelection = selection.enter();
    console.log('——————未匹配到数据,取得enter状态selection——————')
    console.log(enterSelection);

    console.log('——————插入div,设置样式——————')
    enterSelection.append('div')
        .style('width', function (d) {
            return d + 'px';
        });
最后效果图与上文一样
#app下子元素数量等于dataArray.length
<!-- 柱状图元素插入在app之下 -->
<div id="app">
  <div></div>
  <div></div>
  <div></div>
</div>
CodePen打开
这次我们的app元素下对应刚刚好对应三个数据,元素数量与数据是匹配的。
const dataArray = [150, 250, 350];
const selection = d3.select('#app')
.selectAll('div')
.data(dataArray);
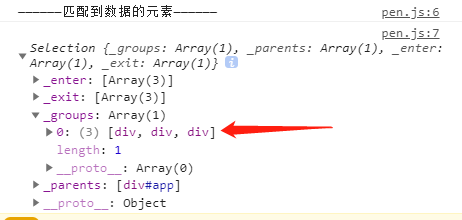
console.log('——————匹配到数据的元素——————')
console.log(selection);
selection.style('width', function (d) {
return d + 'px';
});
我们可以在data()返回的selection看到中匹配了三个div,正是对应update状态
接着对应上面代码进行样式设置即可
#app下子元素数量多于dataArray.length
        <div id="app">
            <div></div>
            <div></div>
            <div></div>
            <div></div>
        </div>
由于设置了高度,width默认为auto,所以初始下会占据整个屏幕

我们先对update状态元素设置样式
const dataArray = [150, 250, 350];
const selection = d3.select('#app')
    .selectAll('div')
    .data(dataArray);
console.log('——————匹配到数据的元素——————')
console.log(selection);
selection.style('width', function (d) {
    return d + 'px';
});
最后一个占满屏幕宽度的元素即是exit状态元素

我们获取exit元素并将他去除:
const exitSelection = selection.exit();
exitSelection.remove();
最后完成如上文的最终图
join简化操作
之前无论是对enter,exit以及update的操作可能都需要通过selection.enter()及selection.exit()等API获取selection,使用selection.join()可以极大地简化操作,同时局部渲染提高了效率。
这里我们举两个简单的例子。
子元素少于数据项或无子元素
<div id="app"></div>
子元素多于数据项
<div id="app">
  <div></div>
  <div></div>
  <div></div>
  <div></div>
</div>
以上两个例子的js代码都是一样的
const dataArray = [150, 250, 350];

const selection = d3.select('#app')
    .selectAll('div')
    .data(dataArray).join('div')
    .style('width', function (d) {
        return d + 'px';
    })
data join思想的意义
1.有利于动态数据的可视化编程
以上仅仅只是静态数据,但我们可以扩展到动态的数据,如data数组元素增加或减少,三种状态使得我们便于操作数据,仅仅只需使用selection.join()或者selection.remove()等等
2.编程更偏向声明式
当数据大小改变,或数据量增多减少时,不需要使用if或者for等语法。update,enter及exit三种状态结合API使得语法简练,大幅度提升编程效率
3.方便添加动画效果
其实意义同第一条很相像,三种状态可以方便我们对进入图表或退出图表的元素创建动画,例子如下
<div id="app"></div>
const data = [150, 250, 350];
const t = d3.transition()//定义动画变换
    .duration(500)
    .ease(d3.easeLinear);

let selection = d3.select('.chart')
    .selectAll('div')
    .data(data).join('div').style('width', 0).
    transition(t) //使用动画变换
    .style('width', d => d + 'px')
总结
很久以前刚开始学d3的时候一直不理解如此大费周章的意义,直到真正接触各类图表后才感慨此设计的妙处所在。
以上若有不足之处,还请指教交流
