

Android View体系
Android View体系是界面编程的核心,他的重要性不亚于Android四大组件,在这个系列中我会陆续讲到View坐标系、View的滑动、View的事件分发等。
View简介:
View是Android所有控件的基类,同时ViewGroup也是继承自View,我们常用的这些控件都是继承于View。
视图坐标
Android坐标系
Android中有两种坐标系,分别为Android坐标系和视图坐标系。
Android坐标系:
将屏幕的左上角的顶点作为Android坐标系的原点,这个原点向右是X轴正方向,原点向下是Y轴正方向。
视图坐标系:
要了解视图坐标系我们只需要看懂一张图就可以了:
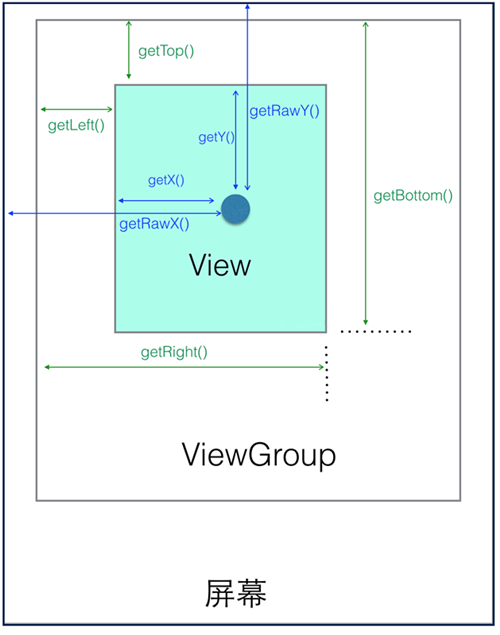
- getHeight:获取View自身高度
- getWidth:获取View自身宽度
View自身坐标
获得View到其父控件(ViewGroup)距离的方法:
- getTop():获取View自身顶边到其父布局顶边的距离
- getLeft():获取View自身左边到其父布局左边的距离
- getRight():获取View自身右边到其父布局左边的距离
- getBottom():获取View自身底边到其父布局顶边的距离
MotionEvent提供的方法
上图中的那个深蓝色点,假设就是我们触摸的点,我们知道无论是View还是ViewGroup,最终的点击事件都会由onTouchEvent(MotionEvent event)方法来处理,MotionEvent也提供了各种获取焦点坐标的方法:
- getX():获取点击事件距离控件左边的距离,即视图坐标
- getY():获取点击事件距离控件顶边的距离,即视图坐标
- getRawX():获取点击事件距离整个屏幕左边距离,即绝对坐标
- getRawY():获取点击事件距离整个屏幕顶边的的距离,即绝对坐标
实现View滑动的六种方法
View的滑动简介:
View的滑动是Android实现自定义控件的基础,同时在开发中我们也难免会遇到View的滑动的处理。其实不管是那种滑动的方式基本思想都是类似的:当触摸事件传到View时,系统记下触摸点的坐标,手指移动时系统记下移动后的触摸的坐标并算出偏移量,并通过偏移量来修改View的坐标。
实现View滑动的六种方法
六种滑动的方法,分别是:layout()、offsetLeftAndRight()与offsetTopAndBottom()、LayoutParams、动画、scollTo与scollBy和Scroller。
layout()
view进行绘制的时候会调用onLayout()方法来设置显示的位置,因此我们同样也可以通过修改View的left、top、right、bottom这四种属性来控制View的坐标。首先我们要自定义一个View,在onTouchEvent()方法中获取触摸点的坐标:
例:
public boolean onTouchEvent(MotionEvent event) {
        //获取到手指处的横坐标和纵坐标
        int x = (int) event.getX();
        int y = (int) event.getY();

        switch (event.getAction()) {
            case MotionEvent.ACTION_DOWN:
                lastX = x;
                lastY = y;
                break;
接下来我们在ACTION_MOVE事件中计算偏移量,再调用layout()方法重新放置这个自定义View的位置就好了:
case MotionEvent.ACTION_MOVE:
    //计算移动的距离
    int offsetX = x - lastX;
    int offsetY = y - lastY;
    //调用layout方法来重新放置它的位置
    layout(getLeft()+offsetX, getTop()+offsetY,
            getRight()+offsetX , getBottom()+offsetY);
    break;
当我们每次移动时都会调用layout()方法来对自己重新布局,从而达到移动View的效果。
自定义View的全部代码:
public class CustomView extends View {
    private int lastX;
    private int lastY;
    public CustomView(Context context, AttributeSet attrs, int defStyleAttr) {
        super(context, attrs, defStyleAttr);
    }
    public CustomView(Context context, AttributeSet attrs) {
        super(context, attrs);
    }
    public CustomView(Context context) {
        super(context);
    }
    public boolean onTouchEvent(MotionEvent event) {
        //获取到手指处的横坐标和纵坐标
        int x = (int) event.getX();
        int y = (int) event.getY();
        switch (event.getAction()) {
            case MotionEvent.ACTION_DOWN:
                lastX = x;
                lastY = y;
                break;
            case MotionEvent.ACTION_MOVE:
                //计算移动的距离
                int offsetX = x - lastX;
                int offsetY = y - lastY;
                //调用layout方法来重新放置它的位置
                layout(getLeft()+offsetX, getTop()+offsetY,
                        getRight()+offsetX , getBottom()+offsetY);
                break;
        }
        return true;
    }
}
布局中引用自定义View:
<?xml version="1.0" encoding="utf-8"?>
<LinearLayout xmlns:android="http://schemas.android.com/apk/res/android"
    xmlns:tools="http://schemas.android.com/tools"
    android:layout_width="match_parent"
    android:layout_height="match_parent"
    android:orientation="vertical">

    <com.example.liuwangshu.moonviewslide.CustomView
        android:id="@+id/customview"
        android:layout_width="80dp"
        android:layout_height="80dp"
        android:layout_margin="50dp"
        android:background="@android:color/holo_red_light" />
</LinearLayout>
offsetLeftAndRight()与offsetTopAndBottom()
这两种方法和layout()方法效果方法差不多,使用也差不多,我们将ACTION_MOVE中的代码替换成如下代码:
case MotionEvent.ACTION_MOVE:
    //计算移动的距离
    int offsetX = x - lastX;
    int offsetY = y - lastY;
    //对left和right进行偏移
    offsetLeftAndRight(offsetX);
    //对top和bottom进行偏移
    offsetTopAndBottom(offsetY);
    break;
LayoutParams(改变布局参数)
LayoutParams主要保存了一个View的布局参数,因此我们可以通过LayoutParams来改变View的布局的参数从而达到了改变View的位置的效果。同样的我们将ACTION_MOVE中的代码替换成如下代码:
LinearLayout.LayoutParams layoutParams= (LinearLayout.LayoutParams) getLayoutParams();
              layoutParams.leftMargin = getLeft() + offsetX;
              layoutParams.topMargin = getTop() + offsetY;
              setLayoutParams(layoutParams);
因为父控件是LinearLayout,所以我们用了LinearLayout.LayoutParams,如果父控件是RelativeLayout则要使用RelativeLayout.LayoutParams。除了使用布局的LayoutParams外,我们还可以用ViewGroup.MarginLayoutParams来实现:
ViewGroup.MarginLayoutParams layoutParams = (ViewGroup.MarginLayoutParams) getLayoutParams();
layoutParams.leftMargin = getLeft() + offsetX;
layoutParams.topMargin = getTop() + offsetY;
setLayoutParams(layoutParams);
动画
可以采用View动画来移动,在res目录新建anim文件夹并创建translate.xml:
<?xml version="1.0" encoding="utf-8"?>
<set xmlns:android="http://schemas.android.com/apk/res/android">
    <translate android:fromXDelta="0" android:toXDelta="300" android:duration="1000"/>
</set>
在Java代码中引用:
mCustomView.setAnimation(AnimationUtils.loadAnimation(this, R.anim.translate));
当然使用属性动画移动那就更简单了,我们让CustomView在1000毫秒内沿着X轴像右平移300像素:
ObjectAnimator.ofFloat(mCustomView,"translationX",0,300).setDuration(1000).start();
scollTo与scollBy
scollTo(x,y)表示移动到一个具体的坐标点,而scollBy(dx,dy)则表示移动的增量为dx、dy。其中scollBy最终也是要调用scollTo的。scollTo、scollBy移动的是View的内容,如果在ViewGroup中使用则是移动他所有的子View。我们将ACTION_MOVE中的代码替换成如下代码:
((View)getParent()).scrollBy(-offsetX,-offsetY);
这里要实现CustomView随着我们手指移动的效果的话,我们就需要将偏移量设置为负值。
Scroller
我们用scollTo/scollBy方法来进行滑动时,这个过程是瞬间完成的,所以用户体验不大好。这里我们可以使用Scroller来实现有过度效果的滑动,这个过程不是瞬间完成的,而是在一定的时间间隔完成的。Scroller本身是不能实现View的滑动的,它需要配合View的computeScroll()方法才能弹性滑动的效果。 在这里我们实现CustomView平滑的向右移动。
首先我们要初始化Scroller:
public CustomView(Context context, AttributeSet attrs) {
      super(context, attrs);
      mScroller = new Scroller(context);
  }
接下来重写computeScroll()方法:
系统会在绘制View的时候在draw()方法中调用该方法,这个方法中我们调用父类的scrollTo()方法并通过Scroller来不断获取当前的滚动值,每滑动一小段距离我们就调用invalidate()方法不断的进行重绘,重绘就会调用computeScroll()方法,这样我们就通过不断的移动一个小的距离并连贯起来就实现了平滑移动的效果。
@Override
public void computeScroll() {
    super.computeScroll();
    if(mScroller.computeScrollOffset()){
        ((View) getParent()).scrollTo(mScroller.getCurrX(),mScroller.getCurrY());
         //通过不断的重绘不断的调用computeScroll方法
         invalidate();
    }
}
调用Scroller.startScroll()方法:
我们在CustomView中写一个smoothScrollTo()方法,调用Scroller.startScroll()方法,在2000毫秒内沿X轴平移delta像素。
public void smoothScrollTo(int destX,int destY){
      int scrollX=getScrollX();
      int delta=destX-scrollX;
      //1000秒内滑向destX
      mScroller.startScroll(scrollX,0,delta,0,2000);
      invalidate();
  }
最后我们在ViewSlideActivity.java中调用CustomView的smoothScrollTo()方法:
//使用Scroll来进行平滑移动
mCustomView.smoothScrollTo(-400,0);
这里我们是设定CustomView沿着X轴向右平移400像素。
属性动画
android视图动画
视图动画我们都了解,它提供了AlphaAnimation,RotateAnimation,TranslateAnimation,ScaleAnimation四种动画方式,并提供了AnimationSet动画集合来混合使用多中动画。随着android3.0属性动画的推出,视图动画就不再风光,相比属性动画视图动画非常大的缺陷是不具有交互性,当某个元素发生视图动画后,其响应事件的位置依然在动画前的地方,所以视图动画只能做普通的动画效果,避免交互的发生。但是它的优点也非常明显:效率比较高使用也方便。
android属性动画
由于android3.0之前已有的动画框架Animation存在一些局限性:动画改变的只是显示,并不能响应事件。因此,在android3.0之后,谷歌就推出了新的动画框架,帮助开发者实现更加丰富的动画效果。 在Animator框架中使用最多的就是AnimatorSet和ObjectAnimator配合,使用ObjectAnimator进行更精细化的控制,控制一个对象和一个属性值,而使用多个ObjectAnimator组合到AnimatorSet形成一个动画。属性动画通过调用属性get,set方法来真实地控制了一个View的属性值,因此强大的属性动画框架,基本可以实现所有的动画效果。
ObjectAnimator
- ObjectAnimator是属性动画最重要的类,创建一个ObjectAnimator只需通过他的静态工厂类直接返还一个ObjectAnimator对象。参数包括一个对象和对象的属性名字,但这个属性必须有get和set函数,内部会通过java反射机制来调用set函数修改对象的属性值。
- 通过ObjectAnimator 的静态工厂方法,创建一个ObjectAnimator 对象,第一个对象是要操作的View,第二个参数则是要操纵的属性,最后一个参数是一个可变的数组参数,需要传进去一个该属性变化的一个取值的过程,这里设置了一个参数,变化到200。与视图动画一样,也可以给属性动画设置显示时长,差值器等属性。在使用ObjectAnimator的时候,有一个非常重要,那就是是要操纵的属性必须要有get,set方法,不然ObjectAnimator 就无法起效。常用的可以直接使用的属性动画的属性值有:translationX和translationY:这两个属性作为增量控制View对象从他的布局容器的左上角开始位置。rotation、rotationX、rotationY:这三个属性控制View对象围绕它的支点进行2D和3D旋转。PrivotX和PrivotY:控制View对象的支点位置,围绕这个支点进行旋转和缩放变换处理。默认该支点位置就是View对象的中心点。alpha:透明度,默认是1(不透明),0代表完全透明。x和y:描述View对象在它容器中的最终位置,它是最初的做上角坐标和translationX,translationY值的累计的和。
- 如果一个属性没有get,set方法,也可以通过自定义一个属性类或则包装类来间接地给这个属性增加get和set方法。来看看如何通过包装类的方法给一个属性增加get和set方法。使用时只需要操纵包类就可以调用get,set方法。
ValueAnimator
ValueAnimator不提供任何动画效果,它更像一个数值发生器,用来产生一定规律数字,从而让调用者来控制动画的实现过程。通常情况下,在ValueAnimator的AnimatorUpdateListener中监听数值的变化,从而完成动画的变换。
动画的监听
完整的动画具有start,Repeat,End,Cancel四个过程。大部分时候我们只关心onAnimationEnd事件,android也提供了AnimatorListenterAdaper来让我门选择必要的事件进行监听。
组合动画-AnimatorSet
这个类提供了一个play()方法,如果我们向这个方法中传入一个Animator对象(ValueAnimator或ObjectAnimator)将会返回一个AnimatorSet.Builder的实例,AnimatorSet.Builder中包括以下四个方法:
- after(Animator anim) 将现有动画插入到传入的动画之后执行
- after(long delay) 将现有动画延迟指定毫秒后执行
- before(Animator anim) 将现有动画插入到传入的动画之前执行
- with(Animator anim) 将现有动画和传入的动画同时执行
首先我们创建三个ObjectAnimator,分别是animator1、animator2和animator3。然后创建AnimatorSet,在这里我们先执行animator3,然后同时执行animator1和animator2的动画,当然也可以调用set.playTogether(animator1,animator2);来使这两种动画同时执行。
组合动画-PropertyValuesHolder
除了上面AnimatorSet类还可以使用PropertyValuesHolder类来实现组合动画,不过这个组合动画就没有上面的丰富了,使用PropertyValuesHolder类只能多个动画一起执行。当然我们得结合 ObjectAnimator.ofPropertyValuesHolder(Object target, PropertyValuesHolder… values);方法来使用。第一个参数是动画的目标对象,之后的参数是PropertyValuesHolder类的实例,可以有多个这样的实例。
xml中使用属性动画
和视图动画一样,属性动画也可以直接写在xml中: 在res文件中新建animator文件,在里面新建一个scale.xml。程序中引用xml定义的属性动画。
从源码解析Scroller
Scroller的构造函数
要想使用Scroller,必须先调用new Scroller()。Scroller有三个构造函数,通常情况我们都用第一种,第二种需要传进去一个差值器Interpolator ,如果不传则采用默认的差值器(viscous)。
Scroller的startScroll方法
- 在startScroll()方法中并没有调用类似开启滑动的方法,而是保存了传进来的各种参数:startX和startY表示滑动开始的起点,dx和dy表示滑动的距离,duration则表示滑动持续的时间。所以startScroll()方法只是用来做前期准备的并不能使View进行滑动。关键是我们在startScroll()方法后调用了 invalidate()方法,这个方法会导致View的重绘,而View的重绘会调用View的draw()方法,draw()方法又会调用View的computeScroll()方法,我们重写computeScroll()方法。
- 我们在computeScroll()方法中通过Scroller来获取当前的ScrollX和ScrollY然后调用scrollTo()方法来进行View的滑动,接着调用invalidate方法来让View进行重绘,重绘就会调用computeScroll()方法来实现View的滑动。这样我们就通过不断的移动一个小的距离并连贯起来就实现了平滑移动的效果。但是在Scroller中我们如何能获取当前的位置的ScrollX和ScrollY呢?我们忘了一点就是在调用scrollTo()方法前会调用Scroller的computeScrollOffset()方法,接下来我们就来看看computeScrollOffset()方法。
Scroller的computeScrollOffset方法
首先会计算动画持续的时间timePassed,如果动画持续时间小于我们设置的滑动持续时间mDuration,则执行Swich语句,因为在startScroll()方法中mMode为SCROLL_MODE所以执行分支语句SCROLL_MODE,然后根据插值器Interpolator来计算出在该时间段里面移动的距离,赋值给mCurrX和mCurrY,这样我们就能通过Scroller来获取当前的ScrollX和ScrollY了。另外,computeScrollOffset()的返回值如果为true则表示滑动未结束,false则表示滑动结束,所以如果滑动未结束我们就得持续的调用scrollTo()方法和invalidate()方法来进行View的滑动。
从源码解析View的事件分发机制
处理点击事件的方法
View的层级
我们知道View的结构是树形的结构,View可以放在ViewGroup中,这个ViewGroup也可以放到另一个ViewGroup中,这样层层的嵌套就组成了View的层级。
什么是点击事件分发
当我们点击屏幕,就产生了触摸事件,这个事件被封装成了一个类:MotionEvent。而当这个MotionEvent产生后,那么系统就会将这个MotionEvent传递给View的层级,MotionEvent在View的层级传递的过程就是点击事件分发。
点击事件分发的重要方法
点击事件有三个重要的方法它们分别是:
- dispatchTouchEvent(MotionEvent ev):用来进行事件的分发
- onInterceptTouchEvent(MotionEvent ev):用来进行事件的拦截,在dispatchTouchEvent()中调用,需要注意的是View没有提供该方法
- onTouchEvent(MotionEvent ev):用来处理点击事件,在dispatchTouchEvent()方法中进行调用
点击事件分发的传递规则
看到这里我们就可以知道点击事件分发的这三个重要方法的关系,用伪代码来简单表示就是:
public boolean dispatchTouchEvent(MotionEvent ev) {
boolean result=false;
if(onInterceptTouchEvent(ev)){
      result=onTouchEvent(ev);

 }else{
      result=child.dispatchTouchEvent(ev);
}
return result;
点击事件由上而下的传递规则
当点击事件产生后会由Activity来处理在传递给Window再传递给顶层的ViewGroup,一般在事件传递中只考虑ViewGroup的onInterceptTouchEvent()方法,因为一般情况我们不会去重写dispatchTouchEvent()方法。 对于根ViewGroup,点击事件首先传递给它的dispatchTouchEvent()方法,如果该ViewGroup的onInterceptTouchEvent()方法返回true,则表示它要拦截这个事件,这个事件就会交给它的onTouchEvent()方法处理,如果onInterceptTouchEvent()方法返回false,则表示它不拦截这个事件,则交给它的子元素的dispatchTouchEvent()来处理,如此的反复下去。如果传递给最底层的View,View是没有子View的,就会调用View的dispatchTouchEvent()方法,一般情况下最终会调用View的onTouchEvent()方法。
点击事件由下而上的传递规则
点击事件传给最底层的View,如果他的onTouchEvent()方法返回true,则事件由最底层的View消耗并处理了,如果返回false则表示该View不做处理,则传递给父View的onTouchEvent()处理,如果父View的onTouchEvent()仍旧返回返回false,则继续传递给改父View的父View处理,如此的反复下去。
点击事件传递时的其他问题
- 如果我们设置了OnTouchListener并且onTouch()方法返回true,则onTouchEvent()方法不会被调用,否则则会调用onTouchEvent()方法,可见OnTouchListener的优先级要比onTouchEvent()要高。在OnTouchEvent()方法中,如果当前设置了OnClickListener则会执行它的onClick()方法。
- View的OnTouchEvent()方法默认都会返回true,除非它是不可点击的也就是CLICKABLE和LONG_CLICKABLE都为false。
从源码解析Activity的构成
- 当我们写Activity时会调用setContentView()方法,来加载布。
- 调用getWindow().setContentView(layoutResID),getWindow()指的是什么呢?getWindow()返回mWindow。
- 在Activity的attach()方法中的mWindow。
- mWindow指的就是PhoneWindow,PhoneWindow是继承抽象类Window的,这样就知道getWindow()得到的是一个PhoneWindow。
- 创建一个DecorView,这个DecorView就是Activity中的根View。DecorView是PhoneWindow类的内部类,并且继承FrameLayout。
- 加载layoutResource的布局,其中的一种布局R.layout.screen_title,这个文件在frameworks\base\core\res\res\layout目录中(screen_title.xml)。
- 上面的ViewStub是用来显示ActionBar的,下面的两个FrameLayout,一个是title用来显示标题,一个是content用来显示内容。
图解Activity的构成
大家知道一个Activity包含一个window对象,这个对象是由PhoneWindow来实现的,PhoneWindow将DecorView做为整个应用窗口的根View,而这个DecorView又将屏幕划分为两个区域一个是TitleView一个是ContentView,而我们平常做应用所写的布局正是展示在ContentView中的。
从源码解析View的measure流程
View的measure流程
先来看看onMeasure()方法(View.java):
protected void onMeasure(int widthMeasureSpec, int heightMeasureSpec) {
     setMeasuredDimension(getDefaultSize(getSuggestedMinimumWidth(), widthMeasureSpec),
             getDefaultSize(getSuggestedMinimumHeight(), heightMeasureSpec));
 }
看看setMeasuredDimension()方法:
protected final void setMeasuredDimension(int measuredWidth, int measuredHeight) {
       boolean optical = isLayoutModeOptical(this);
       if (optical != isLayoutModeOptical(mParent)) {
           Insets insets = getOpticalInsets();
           int opticalWidth  = insets.left + insets.right;
           int opticalHeight = insets.top  + insets.bottom;

           measuredWidth  += optical ? opticalWidth  : -opticalWidth;
           measuredHeight += optical ? opticalHeight : -opticalHeight;
       }
       setMeasuredDimensionRaw(measuredWidth, measuredHeight);
   }
很显然是用来设置View的宽高的,先来看看getDefaultSize()方法处理了什么:
public static int getDefaultSize(int size, int measureSpec) {
  int result = size;
  int specMode = MeasureSpec.getMode(measureSpec);
  int specSize = MeasureSpec.getSize(measureSpec);

  switch (specMode) {
  case MeasureSpec.UNSPECIFIED:
      result = size;
      break;
  case MeasureSpec.AT_MOST:
  case MeasureSpec.EXACTLY:
      result = specSize;
      break;
  }
  return result;
}
specMode是View的测量模式,而specSize是View的测量大小,看到这里我们有必要先看看MeasureSpec类。MeasureSpec类帮助我们来测量View,它是一个32位的int值,高两位为specMode (测量的模式),低30位为specSize (测量的大小),测量模式分为三种:
- UNSPECIFIED:未指定模式,View想多大就多大,父容器不做限制,一般用于系统内部的测量。
- AT_MOST:最大模式,对应于wrap_comtent属性,只要尺寸不超过父控件允许的最大尺寸就行。
- EXACTLY:精确模式,对应于match_parent属性和具体的数值,父容器测量出View所需要的大小,也就是specSize的值。
回头看看getDefaultSize()方法,很显然在AT_MOST和EXACTLY模式下,都返回specSize这个值,也就是View测量后的大小,而在UNSPECIFIED模式返回的是getDefaultSize()方法的第一次个参数的值,这第一个参数从onMeasure()方法来看是getSuggestedMinimumWidth()方法和getSuggestedMinimumHeight()得到的,那我们来看看getSuggestedMinimumWidth()方法做了什么,我们只需要弄懂getSuggestedMinimumWidth()方法,因为这两个方法原理是一样的:
protected int getSuggestedMinimumWidth() {
      return (mBackground == null) ? mMinWidth : max(mMinWidth, mBackground.getMinimumWidth());
  }
如果View没有设置背景则取值为mMinWidth,mMinWidth是可以设置的,它对应于android:minWidth这个属性设置的值或者View的setMinimumWidth的值,如果不指定的话则默认为0:
public void setMinimumWidth(int minWidth) {
    mMinWidth = minWidth;
    requestLayout();
}
如果View设置了背景在取值为max(mMinWidth, mBackground.getMinimumWidth()),取值mMinWidth和mBackground.getMinimumWidth()的最大值,上面我们说过了mMinWidth,那来看看mBackground.getMinimumWidth(),这个mBackground是Drawable类型的,看一下Drawable类的getMinimumWidth()方法(Drawable.java):
public int getMinimumWidth() {
       final int intrinsicWidth = getIntrinsicWidth();
       return intrinsicWidth > 0 ? intrinsicWidth : 0;
   }
intrinsicWidth得到的是这个Drawable的固有的宽度,如果固有宽度大于0则返回固有宽度,否则返回0。 总结一下getSuggestedMinimumWidth()方法就是:如果View没有设置背景则返回mMinWidth ,如果设置了背景就返回mMinWidth 和Drawable最小宽度两个值的最大值。
ViewGroup的measure流程
ViewGroup的measure原理
ViewGroup的measure流程,对于ViewGroup,它不只要measure自己本身,还要遍历的调用子元素的measure()方法,ViewGroup中没有定义onMeasure()方法,但他定义了measureChildren()方法(ViewGroup.java):
protected void measureChildren(int widthMeasureSpec, int heightMeasureSpec) {
       final int size = mChildrenCount;
       final View[] children = mChildren;
       for (int i = 0; i < size; ++i) {
           final View child = children[i];
           if ((child.mViewFlags & VISIBILITY_MASK) != GONE) {
               measureChild(child, widthMeasureSpec, heightMeasureSpec);
           }
       }
   }
就是遍历子元素并调用measureChild()方法:
protected void measureChild(View child, int parentWidthMeasureSpec,
          int parentHeightMeasureSpec) {
      final LayoutParams lp = child.getLayoutParams();
      final int childWidthMeasureSpec = getChildMeasureSpec(parentWidthMeasureSpec,
              mPaddingLeft + mPaddingRight, lp.width);
      final int childHeightMeasureSpec = getChildMeasureSpec(parentHeightMeasureSpec,
              mPaddingTop + mPaddingBottom, lp.height);
      child.measure(childWidthMeasureSpec, childHeightMeasureSpec);
  }
调用child.getLayoutParams()方法来获得子元素的LayoutParams属性,并获取到子元素的MeasureSpec并调用子元素的measure()方法进行测量。很显然这是根据父容器的MeasureSpec的模式再结合子元素的LayoutParams属性来得出子元素的MeasureSpec属性,有一点需要注意的是如果父容器的MeasureSpec属性为AT_MOST,子元素的LayoutParams属性为WRAP_CONTENT,那根据代码我们会发现子元素的MeasureSpec属性也为AT_MOST,它的specSize值为父容器的specSize减去padding的值,也就是说跟这个子元素设置LayoutParams属性为MATCH_PARENT效果是一样的,为了解决这个问题需要在LayoutParams属性为WRAP_CONTENT时指定一下默认的宽和高。
LinearLayout的measure流程
ViewGroup并没有提供onMeasure()方法,而是让其子类来各自实现测量的方法,究其原因就是ViewGroup有不同的布局的需要很难统一,接下来我们来简单分析一下ViewGroup的子类LinearLayout的measure流程,先来看看它的onMeasure()方法(LinearLayout.java):
@Override
   protected void onMeasure(int widthMeasureSpec, int heightMeasureSpec) {
       if (mOrientation == VERTICAL) {
           measureVertical(widthMeasureSpec, heightMeasureSpec);
       } else {
           measureHorizontal(widthMeasureSpec, heightMeasureSpec);
       }
   }
定义了mTotalLength用来存储LinearLayout在垂直方向的高度,然后遍历子元素,根据子元素的MeasureSpec模式分别计算每个子元素的高度,如果是wrap_content则将每个子元素的高度和margin垂直高度等值相加并赋值给mTotalLength得出整个LinearLayout的高度。如果布局高度设置为match_parent者具体数值则和View的测量方法一样。
从源码解析View的layout和draw流程
View的layout流程
View的layout()方法:
public void layout(int l, int t, int r, int b) {
       if ((mPrivateFlags3 & PFLAG3_MEASURE_NEEDED_BEFORE_LAYOUT) != 0) {
           onMeasure(mOldWidthMeasureSpec, mOldHeightMeasureSpec);
           mPrivateFlags3 &= ~PFLAG3_MEASURE_NEEDED_BEFORE_LAYOUT;
       }
       int oldL = mLeft;
       int oldT = mTop;
       int oldB = mBottom;
       int oldR = mRight;
       boolean changed = isLayoutModeOptical(mParent) ?
               setOpticalFrame(l, t, r, b) : setFrame(l, t, r, b);
       if (changed || (mPrivateFlags & PFLAG_LAYOUT_REQUIRED) == PFLAG_LAYOUT_REQUIRED) {
           onLayout(changed, l, t, r, b);
           mPrivateFlags &= ~PFLAG_LAYOUT_REQUIRED;
           ListenerInfo li = mListenerInfo;
           if (li != null && li.mOnLayoutChangeListeners != null) { ArrayList<OnLayoutChangeListener> listenersCopy = (ArrayList<OnLayoutChangeListener>)li.mOnLayoutChangeListeners.clone();
               int numListeners = listenersCopy.size();
               for (int i = 0; i < numListeners; ++i) { listenersCopy.get(i).onLayoutChange(this, l, t, r, b, oldL, oldT, oldR, oldB);
               }
           }
       }
       mPrivateFlags &= ~PFLAG_FORCE_LAYOUT;
       mPrivateFlags3 |= PFLAG3_IS_LAID_OUT;
   }
传进来里面的四个参数分别是View的四个点的坐标,它的坐标不是相对屏幕的原点,而且相对于它的父布局来说的。 l 和 t 是子控件左边缘和上边缘相对于父类控件左边缘和上边缘的距离; r 和 b是子控件右边缘和下边缘相对于父类控件左边缘和上边缘的距离。来看看setFrame()方法里写了什么:
protected boolean setFrame(int left, int top, int right, int bottom) {
    boolean changed = false;
    if (DBG) {
        Log.d("View", this + " View.setFrame(" + left + "," + top + ","
                + right + "," + bottom + ")");
    }
    if (mLeft != left || mRight != right || mTop != top || mBottom != bottom) {
        changed = true;
        // Remember our drawn bit
        int drawn = mPrivateFlags & PFLAG_DRAWN;
        int oldWidth = mRight - mLeft;
        int oldHeight = mBottom - mTop;
        int newWidth = right - left;
        int newHeight = bottom - top;
        boolean sizeChanged = (newWidth != oldWidth) || (newHeight != oldHeight);
        // Invalidate our old position
        invalidate(sizeChanged);
        mLeft = left;
        mTop = top;
        mRight = right;
        mBottom = bottom;
        mRenderNode.setLeftTopRightBottom(mLeft, mTop, mRight, mBottom);
    ...省略
    }
    return changed;
}
在setFrame()方法里主要是用来设置View的四个顶点的值,也就是mLeft 、mTop、mRight和 mBottom的值。在调用setFrame()方法后,调用onLayout()方法:
protected void onLayout(boolean changed, int left, int top, int right, int bottom) {
  }
onLayout()方法没有去做什么,这个和onMeasure()方法类似,确定位置时根据不同的控件有不同的实现,所以在View和ViewGroup中均没有实现onLayout()方法。既然这样,我们就来看看LinearLayout的onLayout()方法:
@Override
  protected void onLayout(boolean changed, int l, int t, int r, int b) {
      if (mOrientation == VERTICAL) {
          layoutVertical(l, t, r, b);
      } else {
          layoutHorizontal(l, t, r, b);
      }
  }
遍历子元素并调用setChildFrame()方法:
private void setChildFrame(View child, int left, int top, int width, int height) {
      child.layout(left, top, left + width, top + height);
  }
在setChildFrame()方法中调用子元素的layout()方法来确定自己的位置。我们看到childTop这个值是逐渐增大的,这是为了在垂直方向,子元素是一个接一个排列的而不是重叠的。
View的draw流程
draw流程有六个步骤:
- 如果有设置背景,则绘制背景
- 保存canvas层
- 绘制自身内容
- 如果有子元素则绘制子元素
- 绘制效果
- 绘制装饰品(scrollbars)
自定义View
自定义View简介
自定义View按照笔者的划分,分为两大类,一种是自定义View,一种是自定义ViewGroup;其中自定义View又分为继承View和继承系统控件两种。这篇文章首先先了解下两大类的其中一种:自定义View。
继承系统控件的自定义View
这种自定义View在系统控件的基础上进行拓展,一般是添加新的功能或者修改显示的效果,一般情况下我们在onDraw()方法中进行处理。这里举一个简单的例子:
public class InvalidTextView extends TextView {
    private Paint mPaint = new Paint(Paint.ANTI_ALIAS_FLAG);
    public InvalidTextView(Context context) {
        super(context);
        initDraw();
    }
    public InvalidTextView(Context context, AttributeSet attrs) {
        super(context, attrs);
        initDraw();
    }
    public InvalidTextView(Context context, AttributeSet attrs, int defStyleAttr) {
        super(context, attrs, defStyleAttr);
        initDraw();
    }
    private void initDraw() {
        mPaint.setColor(Color.RED);
        mPaint.setStrokeWidth((float) 1.5);
    }
    @Override
    protected void onDraw(Canvas canvas) {
        super.onDraw(canvas);
        int width = getWidth();
        int height = getHeight();
        canvas.drawLine(0, height / 2, width, height / 2, mPaint);
    }
}
这个自定义View继承TextView,并且在onDraw()方法中画了一条红色的横线,接下来在布局中引用这个InvalidTextView:
<com.example.liuwangshu.mooncustomview.InvalidTextView
    android:id="@+id/iv_text"
    android:layout_width="200dp"
    android:layout_height="100dp"
    android:background="@android:color/holo_blue_light"
    android:gravity="center"
    android:textSize="16sp"
    android:layout_centerHorizontal="true"
    />
继承View的自定义View
与上面的继承系统控件的自定义View不同,继承View的自定义View实现起来要稍微复杂一些,不只是要实现onDraw()方法,而且在实现过程中还要考虑到wrap_content属性以及padding属性的设置;为了方便配置自己的自定义View还会对外提供自定义的属性,另外如果要改变触控的逻辑,还要重写onTouchEvent()等触控事件的方法。
简单实现继承View的自定义View
按照上面的例子我们再写一个RectView类继承View来画一个正方形:
public class RectView extends View {
    private Paint mPaint = new Paint(Paint.ANTI_ALIAS_FLAG);
    private int mColor=Color.RED;
    public RectView(Context context) {
        super(context);
        initDraw();
    }
    public RectView(Context context, AttributeSet attrs) {
        super(context, attrs);
        initDraw();
    }
    public RectView(Context context, AttributeSet attrs, int defStyleAttr) {
        super(context, attrs, defStyleAttr);
        initDraw();
    }
    private void initDraw() {
        mPaint.setColor(mColor);
        mPaint.setStrokeWidth((float) 1.5);
    }
    @Override
    protected void onDraw(Canvas canvas) {
        super.onDraw(canvas);
        int width = getWidth();
        int height = getHeight();
        canvas.drawRect(0, 0, width, height, mPaint);
    }
}
在布局中引用RectView:
<com.example.liuwangshu.mooncustomview.RectView
      android:id="@+id/rv_rect"
      android:layout_width="200dp"
      android:layout_height="200dp"
      android:layout_below="@id/iv_text"
      android:layout_marginTop="50dp"
      android:layout_centerHorizontal="true"/>
对padding属性进行处理
如果我在布局文件中设置pading属性,发现没有任何的作用,看来还得对padding属性进行处理,只需要在onDraw()方法中稍加修改就可以了,在绘制正方形的时候考虑到padding属性就可以了:
@Override
   protected void onDraw(Canvas canvas) {
       super.onDraw(canvas);
       int paddingLeft=getPaddingLeft();
       int paddingRight=getPaddingRight();
       int paddingTop=getPaddingTop();
       int paddingBottom=getPaddingBottom();
       int width = getWidth()-paddingLeft-paddingRight;
       int height = getHeight()-paddingTop-paddingBottom;
       canvas.drawRect(0+paddingLeft, 0+paddingTop, width+paddingRight, height+paddingBottom, mPaint);
   }
修改布局文件加入padding属性:
<com.example.liuwangshu.mooncustomview.RectView
   android:id="@+id/rv_rect"
   android:layout_width="200dp"
   android:layout_height="200dp"
   android:layout_below="@id/iv_text"
   android:layout_marginTop="50dp"
   android:layout_centerHorizontal="true"
   android:padding="10dp"/>
对wrap_content属性进行处理
修改布局文件,让RectView的宽度分别为wrap_content和match_parent效果都是一样的。对于这种情况需要我们在onMeasure()方法中指定一个默认的宽和高,在设置wrap_content属性时设置此默认的宽和高就可以了。
@Override
  protected void onMeasure(int widthMeasureSpec, int heightMeasureSpec) {
      super.onMeasure(widthMeasureSpec, heightMeasureSpec);
      int widthSpecMode = MeasureSpec.getMode(widthMeasureSpec);
      int heightSpecMode = MeasureSpec.getMode(heightMeasureSpec);
      int widthSpecSize=MeasureSpec.getSize(widthMeasureSpec);
      int heightSpecSize=MeasureSpec.getSize(heightMeasureSpec);
      if(widthSpecMode==MeasureSpec.AT_MOST&&heightSpecMode==MeasureSpec.AT_MOST){
          setMeasuredDimension(400,400);
      }else if(widthSpecMode==MeasureSpec.AT_MOST){
          setMeasuredDimension(400,heightSpecSize);
      }else if(heightSpecMode==MeasureSpec.AT_MOST){
          setMeasuredDimension(widthSpecSize,400);
      }
  }
需要注意的是setMeasuredDimension()方法接收的参数的单位是px。
自定义属性
android系统的控件以android开头的比如android:layout_width,这些都是系统自带的属性,为了方便配置RectView的属性,我们也可以自定义属性,首先在values目录下创建 attrs.xml:
<?xml version="1.0" encoding="utf-8"?>
<resources>
    <declare-styleable name="RectView">
        <attr name="rect_color" format="color" />
    </declare-styleable>
</resources>
这个配置文件定义了名为RectView的自定义属性组合,我们定义了rect_color属性,它的格式为color,接下来在RectView的构造函数中解析自定义属性的值:
public RectView(Context context, AttributeSet attrs) {
       super(context, attrs);
       TypedArray mTypedArray=context.obtainStyledAttributes(attrs,R.styleable.RectView);
       //提取RectView属性集合的rect_color属性,如果没设置默认值为Color.RED
       mColor=mTypedArray.getColor(R.styleable.RectView_rect_color,Color.RED);
       //获取资源后要及时回收
       mTypedArray.recycle();
       initDraw();
   }
最后修改布局文件:
<com.example.liuwangshu.mooncustomview.RectView
     xmlns:app="http://schemas.android.com/apk/res-auto"
     android:id="@+id/rv_rect"
     android:layout_width="wrap_content"
     android:layout_height="200dp"
     android:layout_below="@id/iv_text"
     android:layout_marginTop="50dp"
     android:layout_centerHorizontal="true"
     android:padding="10dp"
     app:rect_color="@android:color/holo_blue_light"
     />
使用自定义属性需要添加schemas: xmlns:app=”schemas.android.com/apk/res-aut…",其中app是 我们自定义的名字,最后我们配置新定义的app:rect_color属性为android:color/holo_blue_light。最后贴出RectView的完整代码:
public class RectView extends View {
    private Paint mPaint = new Paint(Paint.ANTI_ALIAS_FLAG);
    private int mColor=Color.RED;
    public RectView(Context context) {
        super(context);
        initDraw();
    }
    public RectView(Context context, AttributeSet attrs) {
        super(context, attrs);
        TypedArray mTypedArray=context.obtainStyledAttributes(attrs,R.styleable.RectView);
        //提取RectView属性集合的rect_color属性,如果没设置默认值为Color.RED
        mColor=mTypedArray.getColor(R.styleable.RectView_rect_color,Color.RED);
        //获取资源后要及时回收
        mTypedArray.recycle();
        initDraw();
    }
    public RectView(Context context, AttributeSet attrs, int defStyleAttr) {
        super(context, attrs, defStyleAttr);
        initDraw();
    }
    private void initDraw() {
        mPaint.setColor(mColor);
        mPaint.setStrokeWidth((float) 1.5);
    }
    @Override
    protected void onMeasure(int widthMeasureSpec, int heightMeasureSpec) {
        super.onMeasure(widthMeasureSpec, heightMeasureSpec);
        int widthSpecMode = MeasureSpec.getMode(widthMeasureSpec);
        int heightSpecMode = MeasureSpec.getMode(heightMeasureSpec);
        int widthSpecSize=MeasureSpec.getSize(widthMeasureSpec);
        int heightSpecSize=MeasureSpec.getSize(heightMeasureSpec);
        if(widthSpecMode==MeasureSpec.AT_MOST&&heightSpecMode==MeasureSpec.AT_MOST){
        setMeasuredDimension(400,400);
        }else if(widthSpecMode==MeasureSpec.AT_MOST){
          setMeasuredDimension(400,heightSpecSize);
        }else if(heightSpecMode==MeasureSpec.AT_MOST){
        setMeasuredDimension(widthSpecSize,400);
        }
    }
    @Override
    protected void onDraw(Canvas canvas) {
        super.onDraw(canvas);
        int paddingLeft = getPaddingLeft();
        int paddingRight = getPaddingRight();
        int paddingTop = getPaddingTop();
        int paddingBottom = getPaddingBottom();
        int width = getWidth() - paddingLeft - paddingRight;
        int height = getHeight() - paddingTop - paddingBottom;
        canvas.drawRect(0 + paddingLeft, 0 + paddingTop, width + paddingRight, height + paddingBottom, mPaint);
    }
}
自定义组合控件
组合控件的xml布局
我们现在就自定义一个顶部的标题栏,当然实现标题栏有很多的方法,我们来看看自定义组合控件如何去实现。首先我们先定义我们组合控件的布局(view_customtitle.xml):
<?xml version="1.0" encoding="utf-8"?>
<RelativeLayout xmlns:android="http://schemas.android.com/apk/res/android"
    android:id="@+id/layout_titlebar_rootlayout"
    android:layout_width="fill_parent"
    android:layout_height="45dp"
    >

    <ImageView
        android:id="@+id/iv_titlebar_left"
        android:layout_width="wrap_content"
        android:layout_height="fill_parent"
        android:layout_alignParentLeft="true"
        android:layout_centerInParent="true"
        android:paddingLeft="15dp"
        android:paddingRight="15dp"
        android:src="@drawable/ico_return"
       />
    <TextView
        android:id="@+id/tv_titlebar_title"
        android:layout_width="wrap_content"
        android:layout_height="wrap_content"
        android:layout_centerInParent="true"
        android:maxEms="11"
        android:singleLine="true"
        android:ellipsize="end"
        android:textStyle="bold"/>
    <ImageView
        android:id="@+id/iv_titlebar_right"
        android:layout_width="wrap_content"
        android:layout_height="fill_parent"
        android:layout_alignParentRight="true"
        android:layout_centerInParent="true"
        android:src="@drawable/title_right"
        android:gravity="center"
        android:padding="15dp"
        />
    </RelativeLayout>
组合控件的Java代码
接下来我们写java代码,因为我们的组合控件整体布局是RelativeLayout,所以我们的组合控件要继承RelativeLayout:
public class TitleBar extends RelativeLayout {
    private ImageView iv_titlebar_left;
    private ImageView iv_titlebar_right;
    private TextView tv_titlebar_title;
    private RelativeLayout layout_titlebar_rootlayout;
    private int mColor= Color.BLUE;
    private int mTextColor= Color.WHITE;
    public TitleBar(Context context) {
        super(context);
        initView(context);
    }
    public TitleBar(Context context, AttributeSet attrs) {
        super(context, attrs);
        initView(context);
    }
    public TitleBar(Context context, AttributeSet attrs, int defStyleAttr) {
        super(context, attrs, defStyleAttr);
        initView(context);
    }
    public void initView(Context context){
        LayoutInflater.from(context).inflate(R.layout.view_customtitle, this, true);
        iv_titlebar_left= (ImageView) findViewById(R.id.iv_titlebar_left);
        iv_titlebar_right= (ImageView) findViewById(R.id.iv_titlebar_right);
        tv_titlebar_title= (TextView) findViewById(R.id.tv_titlebar_title);
        layout_titlebar_rootlayout= (RelativeLayout) findViewById(R.id.layout_titlebar_rootlayout);
        //设置背景颜色
        layout_titlebar_rootlayout.setBackgroundColor(mColor);
        //设置标题文字颜色
        tv_titlebar_title.setTextColor(mTextColor);
    }
    public void setTitle(String titlename){
        if(!TextUtils.isEmpty(titlename)) {
        tv_titlebar_title.setText(titlename);
        }
    }
    public void setLeftListener(OnClickListener onClickListener){
        iv_titlebar_left.setOnClickListener(onClickListener);
    }
    public void setRightListener(OnClickListener onClickListener){
        iv_titlebar_right.setOnClickListener(onClickListener);
    }
}
重写了三个构造方法并在构造方法中加载布局文件,对外提供了三个方法,分别用来设置标题的名字,和左右按钮的点击事件。
自定义属性
我们在values目录下创建 attrs.xml:
<?xml version="1.0" encoding="utf-8"?>
<resources>
    <declare-styleable name="TitleBar">
        <attr name="title_text_color" format="color" />
        <attr name="title_bg" format="color" />
        <attr name="title_text" format="string" />
    </declare-styleable>
</resources>
我们定义了三个属性,分别用来设置顶部标题栏的背景颜色、标题文字颜色和标题文字。为了引入自定义属性我们需要在TitleBar的构造函数中解析自定义属性的值:
public TitleBar(Context context, AttributeSet attrs) {
       super(context, attrs);
       TypedArray mTypedArray=context.obtainStyledAttributes(attrs,R.styleable.TitleBar);
       mColor=mTypedArray.getColor(R.styleable.TitleBar_title_bg,Color.BLUE);
       mTextColor=mTypedArray.getColor(R.styleable.TitleBar_title_text_color, Color.WHITE);
       titlename=mTypedArray.getString(R.styleable.TitleBar_title_text);
       //获取资源后要及时回收
       mTypedArray.recycle();
       initView(context);
   }
贴上修改后TitleBar的完整的代码:
public class TitleBar extends RelativeLayout {
    private ImageView iv_titlebar_left;
    private ImageView iv_titlebar_right;
    private TextView tv_titlebar_title;
    private RelativeLayout layout_titlebar_rootlayout;
    private int mColor = Color.BLUE;
    private int mTextColor = Color.WHITE;
    private String titlename;
    public TitleBar(Context context) {
        super(context);
        initView(context);
    }
    public TitleBar(Context context, AttributeSet attrs) {
        super(context, attrs);
        initTypedArray(context, attrs);
        initView(context);
    }
    public TitleBar(Context context, AttributeSet attrs, int defStyleAttr) {
        super(context, attrs, defStyleAttr);
        initTypedArray(context, attrs);
        initView(context);
    }
    private void initTypedArray(Context context, AttributeSet attrs) {
        TypedArray mTypedArray = context.obtainStyledAttributes(attrs, R.styleable.TitleBar);
        mColor = mTypedArray.getColor(R.styleable.TitleBar_title_bg, Color.BLUE);
        mTextColor = mTypedArray.getColor(R.styleable.TitleBar_title_text_color, Color.WHITE);
        titlename = mTypedArray.getString(R.styleable.TitleBar_title_text);
        //获取资源后要及时回收
        mTypedArray.recycle();
    }
    private void initView(Context context) {
        LayoutInflater.from(context).inflate(R.layout.view_customtitle, this, true);
        iv_titlebar_left = (ImageView) findViewById(R.id.iv_titlebar_left);
        iv_titlebar_right = (ImageView) findViewById(R.id.iv_titlebar_right);
        tv_titlebar_title = (TextView) findViewById(R.id.tv_titlebar_title);
        layout_titlebar_rootlayout = (RelativeLayout) findViewById(R.id.layout_titlebar_rootlayout);
        //设置背景颜色
        layout_titlebar_rootlayout.setBackgroundColor(mColor);
        //设置标题文字颜色
        tv_titlebar_title.setTextColor(mTextColor);
        setTitle(titlename);
    }
    public void setTitle(String titlename) {
        if (!TextUtils.isEmpty(titlename)) {
          tv_titlebar_title.setText(titlename);
        }
    }
    public void setLeftListener(OnClickListener onClickListener) {
        iv_titlebar_left.setOnClickListener(onClickListener);
    }
    public void setRightListener(OnClickListener onClickListener) {
        iv_titlebar_right.setOnClickListener(onClickListener);
    }
}
xml中引用组合控件
接下来在我们引用组合控件的布局,使用自定义属性需要添加schemas: xmlns:app=”schemas.android.com/apk/res-aut… 自定义的名字,当然也可以取其他的名字:
<?xml version="1.0" encoding="utf-8"?>
<LinearLayout xmlns:android="http://schemas.android.com/apk/res/android"
android:layout_width="match_parent"
android:layout_height="match_parent"
android:orientation="vertical">

<com.example.liuwangshu.mooncustomgroup.TitleBar
    xmlns:app="http://schemas.android.com/apk/res-auto"
    android:id="@+id/title"
    android:layout_width="match_parent"
    android:layout_height="45dp"
    app:title_text="自定义组合控件"
    app:title_bg="@android:color/holo_orange_dark"
    app:title_text_color="@android:color/holo_blue_dark">
</com.example.liuwangshu.mooncustomgroup.TitleBar>
</LinearLayout>
调用组合控件
在主界面调用我们自定义的TitleBar,并设置了左右两遍按钮的点击事件:
public class MainActivity extends Activity {
    private TitleBar mTitleBar;
    @Override
    protected void onCreate(Bundle savedInstanceState) {
        super.onCreate(savedInstanceState);
        setContentView(R.layout.activity_main);
        mTitleBar= (TitleBar) this.findViewById(R.id.title);
//      mTitleBar.setTitle("自定义组合控件");
        mTitleBar.setLeftListener(new View.OnClickListener() {
            @Override
            public void onClick(View v) {
                Toast.makeText(MainActivity.this, "点击左键", Toast.LENGTH_SHORT).show();
            }
        });
        mTitleBar.setRightListener(new View.OnClickListener() {
            @Override
            public void onClick(View v) {
             Toast.makeText(MainActivity.this, "点击右键", Toast.LENGTH_SHORT).show();
            }
        });
    }
}
自定义ViewGroup
继承ViewGroup
要实现自定义的ViewGroup,首先要继承ViewGroup并调用父类构造方法,实现抽象方法等。
public class HorizontalView extends ViewGroup{
    public HorizontalView(Context context) {
        super(context);
    }
    public HorizontalView(Context context, AttributeSet attrs) {
        super(context, attrs);
    }
    public HorizontalView(Context context, AttributeSet attrs, int defStyleAttr) {
        super(context, attrs, defStyleAttr);
    }
    @Override
    protected void onLayout(boolean changed, int l, int t, int r, int b) {
    }
}
这里我们定义了名字叫HorizontalView的类并继承 ViewGroup,onLayout这个抽象方法是必须要实现的,我们暂且什么都不做。
对wrap_content属性进行处理
public class HorizontalView extends ViewGroup {
    //...省略此前的构造代码
    @Override
    protected void onMeasure(int widthMeasureSpec, int heightMeasureSpec) {
        super.onMeasure(widthMeasureSpec, heightMeasureSpec);
        int widthMode = MeasureSpec.getMode(widthMeasureSpec);
        int widthSize = MeasureSpec.getSize(widthMeasureSpec);
        int heightMode = MeasureSpec.getMode(heightMeasureSpec);
        int heightSize = MeasureSpec.getSize(heightMeasureSpec);
        measureChildren(widthMeasureSpec, heightMeasureSpec);
        //如果没有子元素,就设置宽高都为0(简化处理)
        if (getChildCount() == 0) {
            setMeasuredDimension(0, 0);
        }
        //宽和高都是AT_MOST,则设置宽度所有子元素的宽度的和;高度设置为第一个元素的高度;
        else if (widthMode == MeasureSpec.AT_MOST && heightMode == MeasureSpec.AT_MOST) {
            View childOne = getChildAt(0);
            int childWidth = childOne.getMeasuredWidth();
            int childHeight = childOne.getMeasuredHeight(); setMeasuredDimension(childWidth * getChildCount(), childHeight);
        }
        //如果宽度是wrap_content,则宽度为所有子元素的宽度的和
        else if (widthMode == MeasureSpec.AT_MOST) {
            int childWidth = getChildAt(0).getMeasuredWidth(); setMeasuredDimension(childWidth * getChildCount(), heightSize);
        }
        //如果高度是wrap_content,则高度为第一个子元素的高度
        else if (heightMode == MeasureSpec.AT_MOST) {
            int childHeight = getChildAt(0).getMeasuredHeight(); setMeasuredDimension(widthSize, childHeight);
        }
    }
    @Override
    protected void onLayout(boolean changed, int l, int t, int r, int b) {
    }
}
这里如果没有子元素时采用了简化的写法直接将宽和高直接设置为0,正常的话我们应该根据LayoutParams中的宽和高来做相应的处理,另外我们在测量时没有考虑它的padding和子元素的margin。
实现onLayout
接下来我们实现onLayout,来布局子元素,因为每一种布局方式子View的布局都是不同的,所以这个是ViewGroup唯一一个抽象方法,需要我们自己去实现:
public class HorizontalView extends ViewGroup {
    //... 省略构造方法代码和onMeasure的代码

    @Override
       protected void onLayout(boolean changed, int l, int t, int r, int b) {
        int childCount = getChildCount();
        int left = 0;
        View child;
        for (int i = 0; i < childCount; i++) {
            child = getChildAt(i);
            if (child.getVisibility() != View.GONE) {
                int width = child.getMeasuredWidth();
                childWidth = width;
                child.layout(left, 0, left + width, child.getMeasuredHeight());
                left += width;
            }
        }
    }
遍历所有的子元素,如果子元素不是GONE,则调用子元素的layout方法将其放置到合适的位置上,相当于默认第一个子元素占满了屏幕,后面的子元素就是在第一个屏幕后面紧挨着和屏幕一样大小的后续元素,所以left是一直累加的,top保持0,bottom保持第一个元素的高度,right就是left+元素的宽度,同样这里没有处理自身的pading以及子元素的margin。
处理滑动冲突
这个自定义ViewGroup是水平滑动,如果里面是ListView,则ListView是垂直滑动,如果我们检测到的滑动方向是水平的话,就让父View拦截用来进行View的滑动切换 :
public class HorizontalView extends ViewGroup {
    private int lastInterceptX;
    private int lastInterceptY;
    private int lastX;
    private int lastY;
    //... 省略了构造函数的代码
    @Override
    public boolean onInterceptTouchEvent(MotionEvent event) {
        boolean intercept = false;
        int x = (int) event.getX();
        int y = (int) event.getY();
        switch (event.getAction()) {
            case MotionEvent.ACTION_DOWN:
                break;
            case MotionEvent.ACTION_MOVE:
                int deltaX = x - lastInterceptX;
                int deltaY = y - lastInterceptY;  //用户想水平滑动的,所以拦截
                if (Math.abs(deltaX) - Math.abs(deltaY) > 0) {
                    intercept = true;
                }
                break;
            case MotionEvent.ACTION_UP:
                break;
        }
        lastX = x;
        lastY = y;
        lastInterceptX = x;
        lastInterceptY = y;
        return intercept;
    }
    @Override
    public boolean onTouchEvent(MotionEvent event) {
        return super.onTouchEvent(event);
    }
    //... 省略了onMeasure和onLayout的代码
}
弹性滑动到其他页面
这里就会进入onTouchEvent事件,然后我们需要进行滑动切换页面,这里需要用到Scroller。
public class HorizontalView extends ViewGroup {
    //... 省略构造函数,init方法,onInterceptTouchEvent
    int lastInterceptX;
    int lastInterceptY;
    int lastX;
    int lastY;
    int currentIndex = 0; //当前子元素
    int childWidth = 0;
    private Scroller scroller;
    @Override
    public boolean onTouchEvent(MotionEvent event) {
        int x = (int) event.getX();
        int y = (int) event.getY();
        switch (event.getAction()) {
            case MotionEvent.ACTION_DOWN:
                break;
            case MotionEvent.ACTION_MOVE:
                int deltaX = x - lastX; //跟随手指滑动
                scrollBy(-deltaX, 0);
                break;
            case MotionEvent.ACTION_UP: //相对于当前View滑动的距离,正为向左,负为向右
                int distance = getScrollX() - currentIndex * childWidth; //滑动的距离要大于1/2个宽度,否则不会切换到其他页面
                if (Math.abs(distance) > childWidth / 2) {
                    if (distance > 0) {
                        currentIndex++;
                    } else {
                        currentIndex--;
                    }
                } smoothScrollTo(currentIndex * childWidth, 0);
                break;
        }
        lastX = x;
        lastY = y;
        return super.onTouchEvent(event);
    }
    //...省略onMeasure方法
     @Override
    public void computeScroll() {
        super.computeScroll();
        if (scroller.computeScrollOffset()) { scrollTo(scroller.getCurrX(), scroller.getCurrY());
            postInvalidate();
        }
    }
    //弹性滑动到指定位置
    public void smoothScrollTo(int destX, int destY) {
        scroller.startScroll(getScrollX(), getScrollY(), destX - getScrollX(),
        destY - getScrollY(), 1000);
        invalidate();
    }
    @Override
    protected void onLayout(boolean changed, int l, int t, int r, int b) {
        int childCount = getChildCount();
        int left = 0;
        View child;
        //遍历布局子元素
        for (int i = 0; i < childCount; i++) {
            child = getChildAt(i);
            int width = child.getMeasuredWidth();
            //赋值为子元素的宽度
            childWidth = width;
            child.layout(left, 0, left + width, child.getMeasuredHeight());
            left += width;
        }
    }
}
快速滑动到其他页面
我们不只滑动超过一半才切换到上/下一个页面,如果滑动速度很快的话,我们也可以判定为用户想要滑动到其他页面,这样的体验也是好的。 这部分也是在onTouchEvent中的ACTION_UP部分: 这里又需要用到VelocityTracker,它用来测试滑动速度的。使用方法也很简单,首先在构造函数中进行初始化,也就是前面的init方法中增加一条语句:
private VelocityTracker tracker;
 ...
 public void init() {
       scroller = new Scroller(getContext());
       tracker=VelocityTracker.obtain();
   }
接着改写onTouchEvent部分:
@Override
    public boolean onTouchEvent(MotionEvent event) {
...
  case MotionEvent.ACTION_UP: //相对于当前View滑动的距离,正为向左,负为向右
                int distance = getScrollX() - currentIndex * childWidth; //必须滑动的距离要大于1/2个宽度,否则不会切换到其他页面
                if (Math.abs(distance) > childWidth / 2) {
                    if (distance > 0) {
                        currentIndex++;
                    } else {
                        currentIndex--;
                    }
                }
                else { //调用该方法计算1000ms内滑动的平均速度 tracker.computeCurrentVelocity(1000);
                    float xV = tracker.getXVelocity(); //获取到水平方向上的速度 //如果速度的绝对值大于50的话,就认为是快速滑动,就执行切换页面
                    if (Math.abs(xV) > 50) {  //大于0切换上一个页面
                        if (xV > 0) {  currentIndex--; //小于0切换到下一个页面
                        } else {  currentIndex++;
                        }
                    }
                }
                currentIndex = currentIndex < 0 ? 0 : currentIndex > getChildCount() - 1 ?
                getChildCount() - 1 : currentIndex; smoothScrollTo(currentIndex * childWidth, 0);
                //重置速度计算器
                tracker.clear();
                break;
             }
再次触摸屏幕阻止页面继续滑动
当我们快速向左滑动切换到下一个页面的情况,在手指释放以后,页面会弹性滑动到下一个页面,可能需要一秒才完成滑动,这个时间内,我们再次触摸屏幕,希望能拦截这次滑动,然后再次去操作页面。 要实现在弹性滑动过程中再次触摸拦截,肯定要在onInterceptTouchEvent中的ACTION_DOWN中去判断,如果在ACTION_DOWN的时候,scroller还没有完成,说明上一次的滑动还正在进行中,则直接中断scroller:
@Override
    public boolean onInterceptTouchEvent(MotionEvent event) {
        boolean intercept = false;
        int x = (int) event.getX();
        int y = (int) event.getY();
        switch (event.getAction()) {
            case MotionEvent.ACTION_DOWN:
                intercept = false; //如果动画还没有执行完成,则打断
                if (!scroller.isFinished()) { scroller.abortAnimation();
                }
                break;
            case MotionEvent.ACTION_MOVE:
                int deltaX = x - lastInterceptX;
                int deltaY = y - lastInterceptY;
                if (Math.abs(deltaX) - Math.abs(deltaY) > 0) {
                    intercept = true;
                } else {
                    intercept = false;
                }
                break;
            case MotionEvent.ACTION_UP:
                intercept = false;
                break;
        }
        //因为DOWN返回false,所以onTouchEvent中无法获取DOWN事件,所以这里要负责设置lastX,lastY
        lastX = x;
        lastY = y;
        lastInterceptX = x;
        lastInterceptY = y;
        return intercept;
    }
应用HorizontalView
首先我们在主布局中引用HorizontalView,它作为父容器,里面有两个ListView:
<?xml version="1.0" encoding="utf-8"?>
<RelativeLayout xmlns:android="http://schemas.android.com/apk/res/android"
    xmlns:tools="http://schemas.android.com/tools"
    android:layout_width="match_parent"
    android:layout_height="match_parent"
    tools:context="com.example.liuwangshu.mooncustomviewgroup.MainActivity">
    <com.example.liuwangshu.mooncustomviewgroup.HorizontalView
        android:layout_width="match_parent"
        android:layout_height="match_parent">
       <ListView
        android:id="@+id/lv_one"
        android:layout_width="match_parent"
        android:layout_height="match_parent"></ListView>
        <ListView
            android:id="@+id/lv_two"
            android:layout_width="match_parent"
            android:layout_height="match_parent"></ListView>
    </com.example.liuwangshu.mooncustomviewgroup.HorizontalView>
</RelativeLayout>
接着在代码中为ListView填加数据:
public class MainActivity extends AppCompatActivity {
    private ListView lv_one;
    private ListView lv_two;
    @Override
    protected void onCreate(Bundle savedInstanceState) {
        super.onCreate(savedInstanceState);
        setContentView(R.layout.activity_main);
        lv_one=(ListView)this.findViewById(R.id.lv_one);
        lv_two=(ListView)this.findViewById(R.id.lv_two);
        String[] strs1 = {"1","2","3","4","5","6","7","8","9","10","11","12","13","14","15"};
        ArrayAdapter<String> adapter1 = new ArrayAdapter<String>
        (this,android.R.layout.simple_expandable_list_item_1,strs1);
        lv_one.setAdapter(adapter1);
        String[] strs2 = {"A","B","C","D","E","F","G","H","I","J","K","L","M","N","O"};
        ArrayAdapter<String> adapter2 = new ArrayAdapter<String>(this,
        android.R.layout.simple_expandable_list_item_1,strs2);
        lv_two.setAdapter(adapter2);
    }
}
最后贴上HorizontalView的源码:
public class HorizontalView extends ViewGroup {
    private int lastX;
    private int lastY;
    private int currentIndex = 0; //当前子元素
    private int childWidth = 0;
    private Scroller scroller;
    private VelocityTracker tracker;    //增加速度检测,如果速度比较快的话,就算没有滑动超过一半的屏幕也可以
    private int lastInterceptX=0;
    private int lastInterceptY=0;
    public HorizontalView(Context context) {
        super(context);
        init();
    }
    public HorizontalView(Context context, AttributeSet attrs) {
        super(context, attrs);
        init();
    }
    public HorizontalView(Context context, AttributeSet attrs, int defStyleAttr) {
        super(context, attrs, defStyleAttr);
        init();
    }
    public void init() {
        scroller = new Scroller(getContext());
        tracker = VelocityTracker.obtain();
    }
    //todo intercept的拦截逻辑
    @Override
    public boolean onInterceptTouchEvent(MotionEvent event) {
        boolean intercept = false;
        int x = (int) event.getX();
        int y = (int) event.getY();
        switch (event.getAction()) {
            case MotionEvent.ACTION_DOWN:
                intercept = false; //如果动画还没有执行完成,则打断
                if (!scroller.isFinished()) { scroller.abortAnimation();
                }
                break;
            case MotionEvent.ACTION_MOVE:
                int deltaX = x - lastInterceptX;
                int deltaY = y - lastInterceptY;
                //水平方向距离长  MOVE中返回true一次,后续的MOVE和UP都不会收到此请求
                if (Math.abs(deltaX) - Math.abs(deltaY) > 0) {
                    intercept = true; Log.i("wangshu","intercept = true");
                } else {
                    intercept = false; Log.i("wangshu","intercept = false");
                }
                break;
            case MotionEvent.ACTION_UP:
                intercept = false;
                break;
        }
        //因为DOWN返回false,所以onTouchEvent中无法获取DOWN事件,这里要负责设置lastX,lastY
        lastX = x;
        lastY = y;
        lastInterceptX = x;
        lastInterceptY = y;
        return intercept;
    }
    @Override
    public boolean onTouchEvent(MotionEvent event) {
        tracker.addMovement(event);
        int x = (int) event.getX();
        int y = (int) event.getY();
        switch (event.getAction()) {
            case MotionEvent.ACTION_DOWN:
                if (!scroller.isFinished()) { scroller.abortAnimation();
                }
                break;
            case MotionEvent.ACTION_MOVE:
                //跟随手指滑动
                int deltaX = x - lastX;
                scrollBy(-deltaX, 0);
                break; //释放手指以后开始自动滑动到目标位置
            case MotionEvent.ACTION_UP: //相对于当前View滑动的距离,正为向左,负为向右
                int distance = getScrollX() - currentIndex * childWidth; //必须滑动的距离要大于1/2个宽度,否则不会切换到其他页面
                if (Math.abs(distance) > childWidth / 2) {
                    if (distance > 0) {
                        currentIndex++;
                    } else {
                        currentIndex--;
                    }
                } else { tracker.computeCurrentVelocity(1000);
                    float xV = tracker.getXVelocity();
                    if (Math.abs(xV) > 50) {
                        if (xV > 0) { currentIndex--;
                        } else { currentIndex++;
                        }
                    }
                }
                currentIndex = currentIndex < 0 ? 0 : currentIndex > getChildCount() - 1 ?
                getChildCount() - 1 : currentIndex; smoothScrollTo(currentIndex * childWidth, 0);
                tracker.clear();
                break;
            default:
                break;
        }
        lastX = x;
        lastY = y;
        return true;
    }
    @Override
    protected void onMeasure(int widthMeasureSpec, int heightMeasureSpec) {
        super.onMeasure(widthMeasureSpec, heightMeasureSpec);
        int widthMode = MeasureSpec.getMode(widthMeasureSpec);
        int widthSize = MeasureSpec.getSize(widthMeasureSpec);
        int heightMode = MeasureSpec.getMode(heightMeasureSpec);
        int heightSize = MeasureSpec.getSize(heightMeasureSpec);
        //测量所有子元素
        measureChildren(widthMeasureSpec, heightMeasureSpec);
        //处理wrap_content的情况
        if (getChildCount() == 0) {
            setMeasuredDimension(0, 0);
        } else if (widthMode == MeasureSpec.AT_MOST && heightMode == MeasureSpec.AT_MOST) {
            View childOne = getChildAt(0);
            int childWidth = childOne.getMeasuredWidth();
            int childHeight = childOne.getMeasuredHeight(); setMeasuredDimension(childWidth * getChildCount(), childHeight);
        } else if (widthMode == MeasureSpec.AT_MOST) {
            View childOne = getChildAt(0);
            int childWidth = childOne.getMeasuredWidth(); setMeasuredDimension(childWidth * getChildCount(), heightSize);
        } else if (heightMode == MeasureSpec.AT_MOST) {
            int childHeight = getChildAt(0).getMeasuredHeight();
            setMeasuredDimension(widthSize, childHeight);
        }
    }
    @Override
    public void computeScroll() {
        super.computeScroll();
        if (scroller.computeScrollOffset()) {
            scrollTo(scroller.getCurrX(), scroller.getCurrY());
            postInvalidate();
        }
    }
    public void smoothScrollTo(int destX, int destY) {
        scroller.startScroll(getScrollX(), getScrollY(), destX - getScrollX(),
        destY - getScrollY(), 1000);
        invalidate();
    }
    @Override
    protected void onLayout(boolean changed, int l, int t, int r, int b) {
        int childCount = getChildCount();
        int left = 0; //左边的距离
        View child;
        //遍历布局子元素
        for (int i = 0; i < childCount; i++) {
            child = getChildAt(i);
            if (child.getVisibility() != View.GONE) {
                int width = child.getMeasuredWidth();
                childWidth = width; //赋值给子元素宽度变量
                child.layout(left, 0, left + width, child.getMeasuredHeight());
                left += width;
            }
        }
    }
}
