

- MVVM是Model-View-ViewModel的缩写,是基于前端开发的架构模式。其核心是VM,即ViewModel,他是链接View和Model的桥梁,VM的状态改变可以自动的传递给Model和View,实现数据和视图的一致性,即实现双向数据绑定。
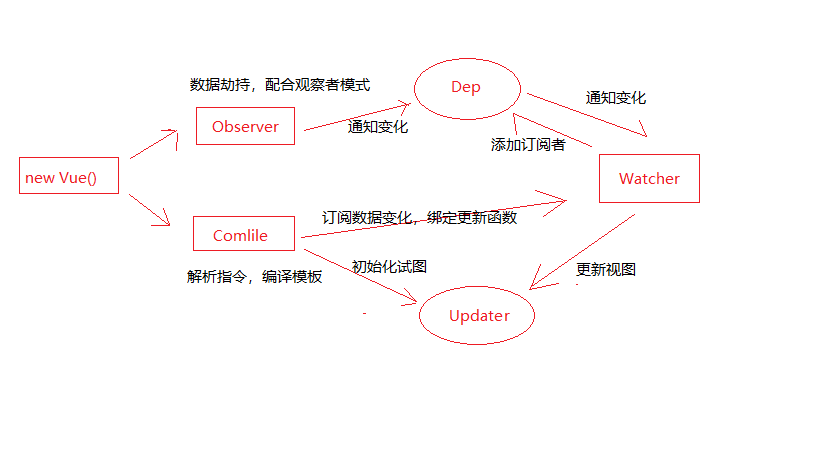
1、Vue:作为数据绑定的入口,整合Observer、Compile和Watcher三者,通过Observer来监听自己的model数据变化,通过Compile来解析编译模板指令,最终利用Watcher搭起Observer和Compile之间的通信桥梁,达到数据变化 -> 视图更新;视图交互变化(input) -> 数据model变更的双向绑定效果。
2、Observer: 数据监听器,能够对数据对象的所有属性进行监听,如有变动可拿到最新的值并通知订阅者,内部采用的Obiect.defineProperty的get和set来实现。
3、complie:指令解析器,它的作用对每个元素节点的指令进行扫描和解析,根据指令模板替换数据,以及绑定Observer和Complie的桥梁,能够订阅并收到每个属性变动的通知,执行指令绑定的相应的回调函数。
4、Watcher:订阅者,作为连接Observer和Complie的桥梁,能够订阅并收到每个属性变动的通知,执行指令绑定的相应回调函数。
5、Dep消息订阅器,内部维护了一个数组,用来收集订阅者(watcher),数据变动触发notify函数,再调用订阅者的update方法。
当执行 new Vue()时,Vue会遍历data的属性,并使用Object.defineProperty中的get()和set()方法,实现对数据的监听,即数据劫持,将数据转变成响应式数据。Vue中的Complie指令解析器会对所有节点进行扫描解析,将元素节点和文本节点纳入内存fragment中、并对有指令的元素节点和使用插值表达式节点进行数据替换并绑定相应的更新函数,完成后再将所有节点返还给网页,完成视图的初始化。并在此过程中,订阅Watcher来更新视图,此时,Watcher将自己添加到消息订阅器(Dep)中,完成初始化。
当数据发生变化时,Observer中的set()方法被触发,set()方法会调用Dep.notify(),Dep遍历所有订阅者,并调用订阅者的update()方法,订阅者收到通知后对视图、数据进行更新。
下面是一个简单的MVVM原理模拟过程。
创建vueMVVM.js
// 存储观察者的类Dep
class Dep {
    constructor() {
        this.subs = []; // subs中存放所有的watcher
    }
    // 添加watcher  订阅
    addSub(watcher) {
        this.subs.push(watcher)
    }
    // 通知 发布  通知subs容器中所有的观察者
    notify() {
        this.subs.forEach(watcher => watcher.update())
    }
}

// 观察者
class Watcher {
    constructor(vm, expr, cb) {
        this.vm = vm;
        this.expr = expr;
        this.cb = cb; // cb表示当状态改变了,要干的事
        // 刚开始需要保存一个老的状态
        this.oldValue = this.get();
    }
    // 获取状态的方法
    get() {
        Dep.target = this;
        let value = CompilerUtil.getVal(this.vm, this.expr);
        Dep.target = null;
        return value;
    }
    // 当状态发生改变后,会调用观察者的update方法
    update() {
        let newVal = CompilerUtil.getVal(this.vm, this.expr);
        if (newVal !== this.oldValue) {
            this.cb(newVal);
        }
    }
}

//数据劫持 实现数据的响应式  new
class Observer {
    constructor(data) {
        this.observer(data)
    }
    observer(data) {
        if (data && typeof data == 'object') {
            for (let key in data) {
                this.defindReactive(data, key, data[key])
            }
        }
    }
    defindReactive(obj, key, value) {
        this.observer(value); // 如果一个数据是一个对象,也需要把这个对象中的数据变成响应式
        let dep = new Dep(); // 不同的watcher放到不同的dep中
        Object.defineProperty(obj, key, {
            // 当你获取school时,会调用get
            get() {
                Dep.target && dep.subs.push(Dep.target)
                // console.log("get....")
                return value
            },
            // 当你设置school时,会调用set
            set: (newVal) => {
                // 当赋的值和老值一样,就不重新赋值
                if (newVal != value) {
                    this.observer(newVal)
                    value = newVal
                    dep.notify();
                }
            }
        })
    }
}

// 编译模板   找到带指令的元素节点  和  插值表达式(v-text)的文本节点
class Compiler {
    constructor(el, vm) {
        this.el = this.isElementNode(el) ? el : document.querySelector(el)
        this.vm = vm;
        // 此时,所有的节点就位于文档碎片
        let fragment = this.node2fragment(this.el);
        // 在内存中编译一堆的节点
        this.compile(fragment);
        // 把编译好的节点重新扔到网页上
        this.el.appendChild(fragment)
    }
    // 判断是否是一个指令
    isDirective(attrName) {
        return attrName.startsWith("v-")
    }
    // 编译元素节点
    compileElement(node) {
        let attributes = node.attributes;
        // console.log(node);  // 打印出所有的元素节点
        [...attributes].forEach(attr => {
            let {
                name,
                value: expr
            } = attr;
            // console.log(value) // school.name
            if (this.isDirective(name)) {
                // console.log(name)  // v-model
                let [, directive] = name.split("-");
                // console.log(directive)
                // console.log(node) // 现在就可以找到模板中带有指令的元素节点了
                CompilerUtil[directive](node, expr, this.vm);
            }
        })
    }
    // 编译文本节点
    compileText(node) {
        // console.dir(node) // 得到所有的文本节点
        let content = node.textContent;
        // console.log(content) 得到所有的文本节点中的内容
        let reg = /\{\{(.+?)\}\}/; // {}在正则中有特殊的含意,需要转义
        reg.test(content) // 如果content满足我们写的正则,返回ture,否则返回false
        if (reg.test(content)) {
            // console.log(content) // {{school.name}}  {{school.age}}
            // console.log(node)  // "{{school.name}}"  node是文本节点
            // console.log(content)  // {{school.name}} content是文本节点中的内容
            CompilerUtil['text'](node, content, this.vm)
        }

    }
    // 编译的方法
    compile(node) {
        let childNodes = node.childNodes;
        [...childNodes].forEach(child => {
            // child就表示每一个节点
            // 如果child元素节点,调用 compileElement
            if (this.isElementNode(child)) {
                this.compileElement(child);
                // 可以一个元素节点中嵌套其它的元素点,还可能嵌套文本节点
                // 如果child内部还有其它节点,需要利用递归重新编译
                this.compile(child)
            } else {
                // 否则调用compileText
                this.compileText(child)
            }
        })
    }
    // 把网页上的节点扔到内存中
    node2fragment(node) {
        let fragment = document.createDocumentFragment();
        let firstChild;
        while (firstChild = node.firstChild) {
            fragment.appendChild(firstChild)
        }
        return fragment;
    }
    isElementNode(node) {
        return node.nodeType === 1;
    }
}
// 写一个对象,{},包含了不同的指令对应的不同的处理办法
CompilerUtil = {
    // 获取数据
    getVal(vm, expr) {
        return expr.split(".").reduce((data, current) => {
            return data[current]
        }, vm.$data);
    },
    // 设置数据
    setVal(vm, expr, value) {
        // console.log(vm)  // vue实例
        // console.log(expr)  // school.name
        // console.log(value)  // beida1
        // console.log(expr.split("."))  // ["school", "name"]
        expr.split(".").reduce((data, current, index, arr) => {
            // 第1次:data是 school对象  current是"school"  index是0   arr是数组["school", "name"]
            // 第2次:data是undefined   cureent是"name"  index是1     arr是数组["school", "name"]
            // console.log(data,current,index,arr)
            if (index == arr.length - 1) {
                // console.log(current)  // name
                // console.log(data)
                return data[current] = value
                //     console.log(data[current])
            }
            // console.log("....")
            return data[current]
        }, vm.$data)
    },
    model(node, expr, vm) {
        let fn = this.updater["modelUpdater"]
        // 给输入框添加一个观察者,如果后面数据改变了,
        new Watcher(vm, expr, (newVal) => {
            fn(node, newVal)
        })
        node.addEventListener("input", (e) => {
            // console.log(e.target.value)
            let value = e.target.value
            this.setVal(vm, expr, value);
        })
        let value = this.getVal(vm, expr)
        fn(node, value);
    },
    html() {
        // 在这里要做v-html要做的事
    },
    // 得到新的内容
    getContentValue(vm, expr) {
        return expr.replace(/\{\{(.+?)\}\}/g, (...args) => {
            return this.getVal(vm, args[1])
        })
    },
    text(node, expr, vm) {
        let fn = this.updater["textUpdater"]
        let content = expr.replace(/\{\{(.+?)\}\}/g, (...args) => {
            new Watcher(vm, args[1], () => {
                fn(node, this.getContentValue(vm, expr));
            })
            return this.getVal(vm, args[1])
        })
        fn(node, content);
    },
    // 更新数据
    updater: {
        modelUpdater(node, value) {
            node.value = value
        },
        htmlUpdater() {

        },
        // 处理文本节点
        textUpdater(node, value) {
            // textContent得到文本节点中内容
            node.textContent = value
        }
    }
}
// VUE类  负责整体的高度
class Vue {
    constructor(options) {
        this.$el = options.el;
        this.$data = options.data;
        if (this.$el) {
            // 把数据变成响应式   当new Observer,后school就变成了响应式数据
            new Observer(this.$data)
            // console.log(this.$data)
            // school: {name: "beida", age: 100}
            // 使用vm来代理vm.$data
            this.proxyVm(this.$data)
            new Compiler(this.$el, this) // 编译模板
        }
    }
    proxyVm(data) {
        for (let key in data) { // {school:{name:beida,age:100}}
            // school---[object Object]-----[object Object]
            // console.log(key+"---"+data[key]+"-----"+data)
            Object.defineProperty(this, key, {
                // vm.school
                get() {
                    return data[key]
                }
            })
        }
    }
}
在html页面中引入vueMVVM.js,验证数据的双向绑定。
<!DOCTYPE html>
<html lang="en">

<head>
    <meta charset="UTF-8">
    <meta name="viewport" content="width=device-width, initial-scale=1.0">
    <meta http-equiv="X-UA-Compatible" content="ie=edge">
    <title>Document</title>
</head>

<body>
    <div id="app">
        <input type="text" v-model="school.name">
        <input type="number" v-model="school.age">
        <div>{{school.name}}</div>
        <div>{{school.age}}</div>
        <ul>
            <li>1</li>
            <li>2</li>
        </ul>
    </div>
    <!-- <script src="https://cdn.bootcss.com/vue/2.6.10/vue.common.dev.js"></script> -->
    <script src="./vueMVVM.js"></script>
    <script>
        let vm = new Vue({
            el: "#app",
            data: {
                school: {
                    name: "beida",
                    age: 100
                }
            },
            methods: {

            },
            computed: {

            }
        })
    </script>
</body>

</html>
至此,我所理解的MVVM阐述完毕,以后有新的理解再加入。
