前面学习了用unittest做接口自动化测试,但是俺们领导让我尝试用pytest来做,学pytest,摊手
pytest命令和main方法
-
pytetst命令运行
(待添加)
-
main方法,程序的入口
# run.py

import pytest

pytest.main(["pytest_demo","-v"]) #运行pytest_demo文件夹下的测试文件
pytest.main(["pytest_demo/test_demo.py","-v"]) #运行指定的测试文件
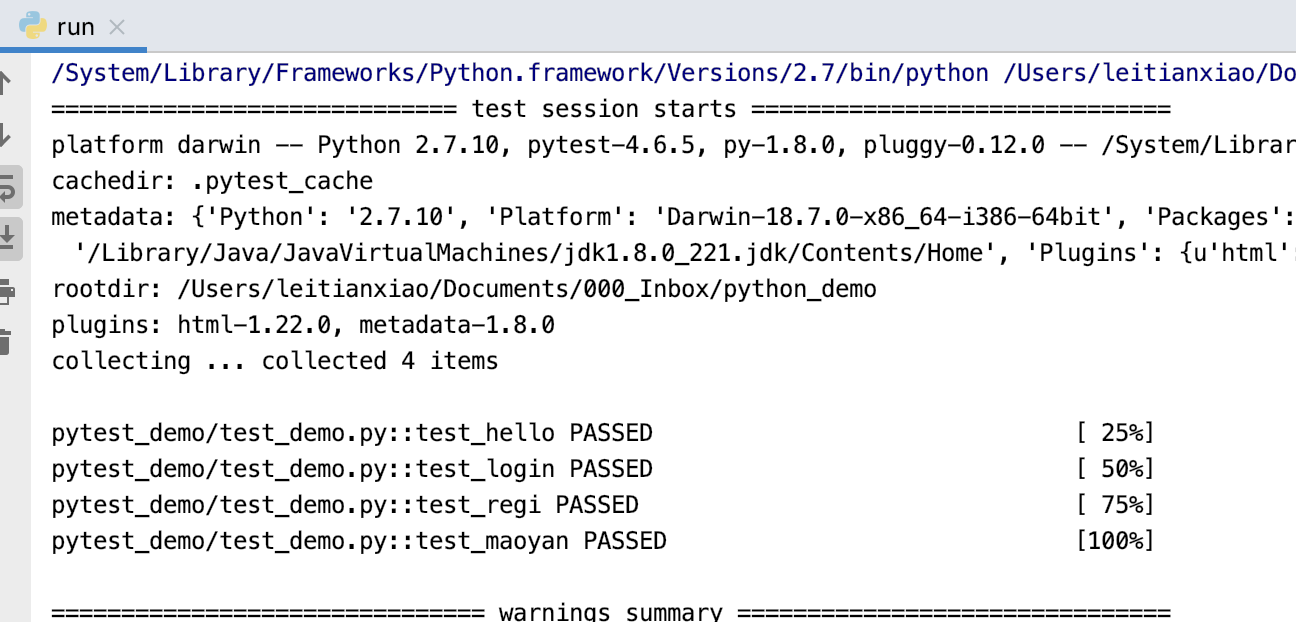
pytest执行标记用例
#test_demo.py

# encoding:utf-8
import pytest

@pytest.mark.general
@pytest.mark.maoyan
def test_hello():
    print "hello"

@pytest.mark.general
def test_login():
    print "回归测试1"

@pytest.mark.general
def test_regi():
    print "回归测试2"

@pytest.mark.general
@pytest.mark.maoyan
def test_maoyan():
    print "冒烟测试1"
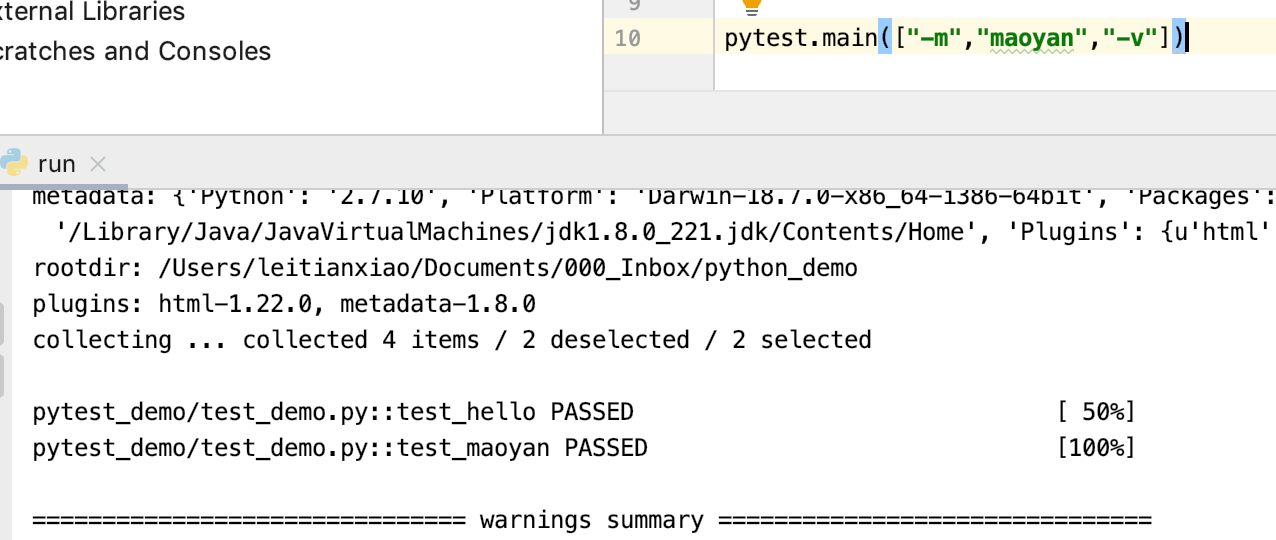
# run.py

pytest.main(["-m","general","-v"])
执行了标记为general的方法:
相应的,可以执行标记为maoyan的方法
- 通过
@pytest.mark.xxx给用例进行标记,可以分类运行,比如某些case是回归测试用,有的case是冒烟测试,或者按模块划分,一个方法可以有多个标记
python正则表达式执行用例
-
命令行执行
我想执行用例中包含
hello的用例:pytest -k hello -v-k模糊匹配 ,-v查看执行了哪些用例所以,命名需要规范一些,比如
test_模块名_接口名,这样,就可以通过pytest -k 某个模块名 -v来跑某个模块的用例。可以与
@pytest.mark搭配使用,如执行某个模块带某个标记的用例:pytest -k 某个模块名 -m 标记 -vpytest -k login -m general -vpytest -k login -m "not general" -v非general标记的,包含login的测试用例 -
main方法执行
pytest.main(["-k","hello","-v"])
pytest.main(["-k","hello","-m","not general","-v"])
fixture流程控制
fixture函自定义测试用例的前置和后置步骤
-
定义fixture函数
@pytest.fixturefixture命名不要以test开头,跟用例区分开。
@pytest.fixture() def waigua(): print "我是外挂,最先执行"-
scope参数,是fixture函数的生效范围
- session 每次运行脚本前只执行一次,整个用例运行期间,只执行一次
- package 可以把一个.py文件看作一个module,只要执行.py文件内的测试用例,就会先执行一次
- module 只要执行到一个类里边的测试用例,会先执行一次
- class 每个测试用例执行之前,都会执行一次
- function 每个测试用例执行之前,都会执行一次
-
autouse参数,控制是否自动调用fixture函数
- False
- 默认是Fasle,没开启的,需要传参调用
- True
- 开启自动调用fixture功能,这样用例就不用每次都去传参了
- False
-
-
使用fixture函数(三种调用方式)
-
把
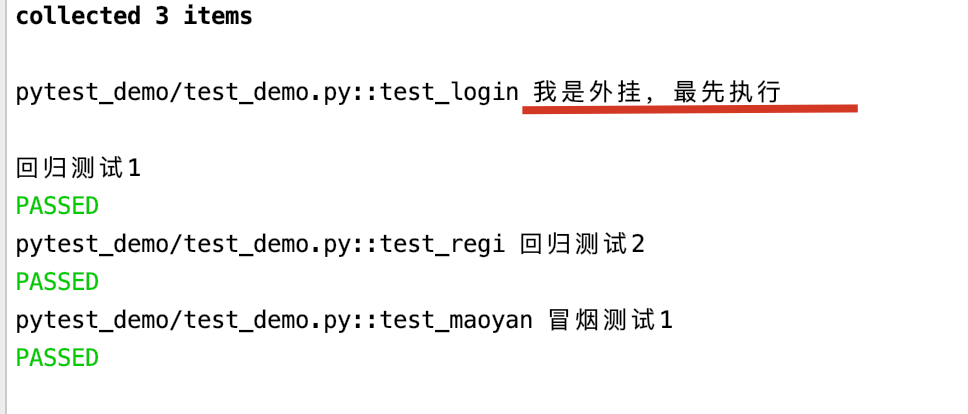
waigua填入需要调用的函数中,把waigua当作参数进行调用import pytest @pytest.mark.general def test_login(waigua): print "回归测试1" @pytest.mark.general def test_regi(waigua): print "回归测试2" @pytest.mark.general @pytest.mark.maoyan def test_maoyan(): print "冒烟测试1" @pytest.fixture() def waigua(): print "我是外挂,最先执行"执行的结果:谁调用,谁就用,不调用,不能用
-
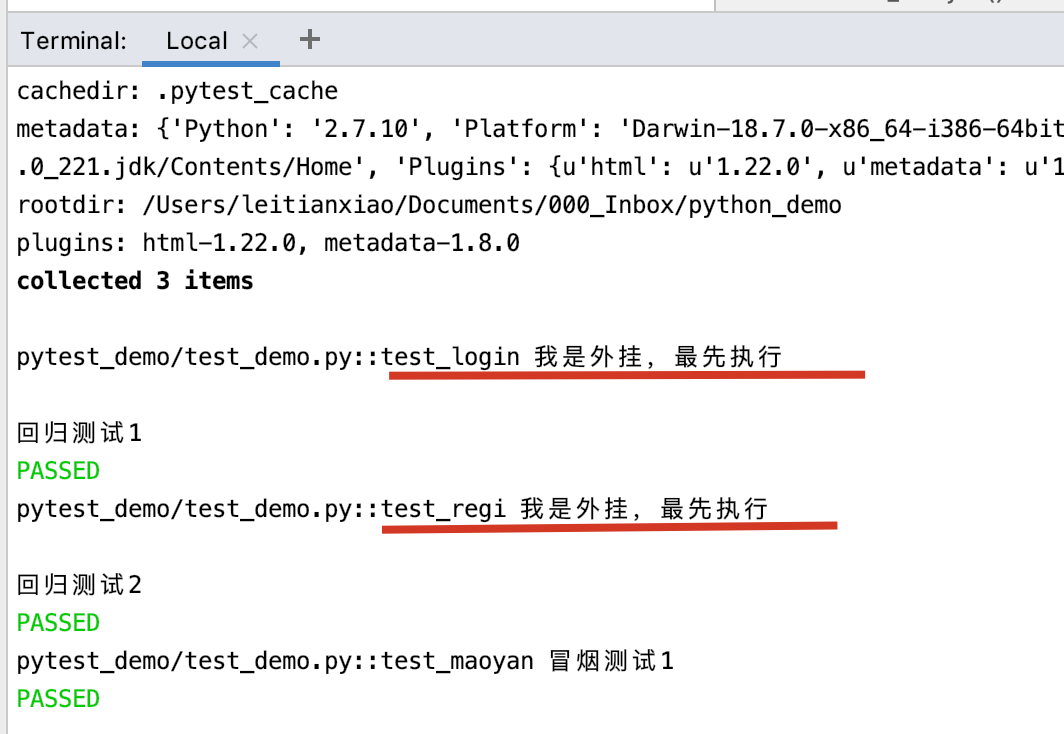
autouse参数调用fixture函数
import pytest

@pytest.mark.general
def test_login():
    print "回归测试1"

@pytest.mark.general
def test_regi():
    print "回归测试2"

@pytest.mark.general
@pytest.mark.maoyan
def test_maoyan():
    print "冒烟测试1"

#在模块运行前执行一次
@pytest.fixture(scope="module",autouse=True)
def waigua():
    print "我是外挂,最先执行\n"
执行结果是:
-
使用
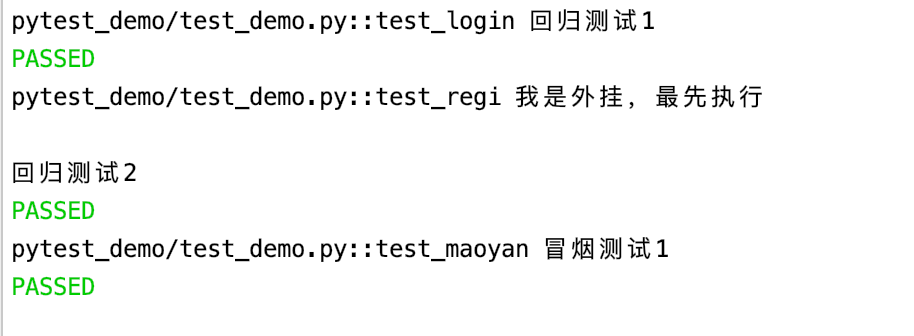
@pytest.mark.usefixtures("fixture函数名")调用import pytest @pytest.mark.general def test_login(): print "回归测试1" @pytest.mark.usefixtures("waigua") @pytest.mark.general def test_regi(): print "回归测试2" @pytest.mark.general @pytest.mark.maoyan def test_maoyan(): print "冒烟测试1" @pytest.fixture() def waigua(): print "我是外挂,最先执行\n"如果一个方法或者一个class用例想要同时调用多个fixture,可以使用@pytest.mark.usefixture()进行叠加。注意叠加顺序,先执行的放底层,后执行的放上层。
执行结果是:
-
-
后置步骤
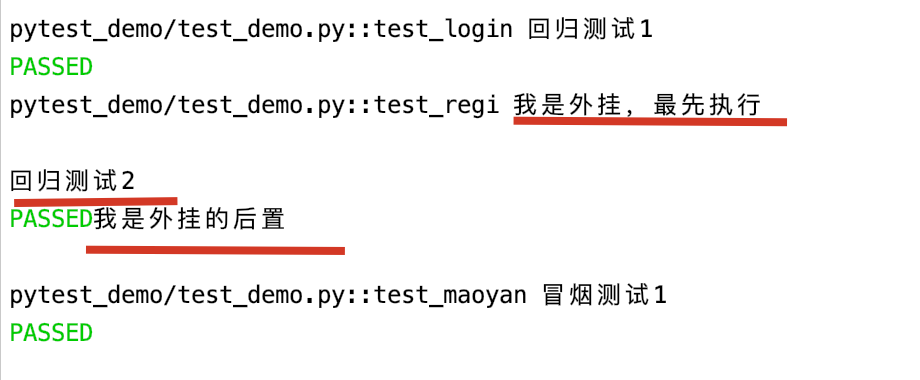
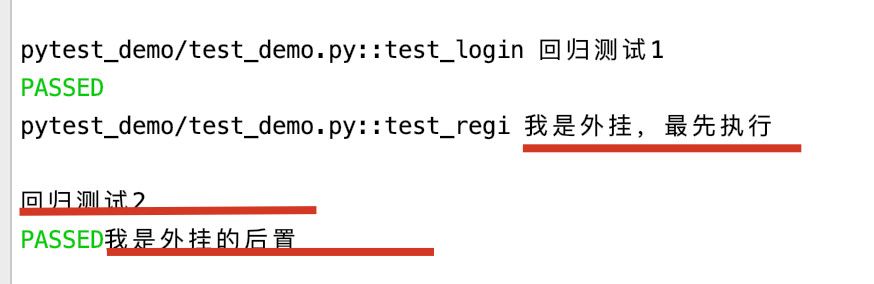
yieldimport pytest @pytest.mark.general def test_login(): print "回归测试1" @pytest.mark.usefixtures("waigua") @pytest.mark.general def test_regi(): print "回归测试2" @pytest.fixture() def waigua(): print "我是外挂,最先执行\n" yield print "我是外挂的后置"yield之前代码是前置,之后的代码就是后置执行结果:
-
fixture函数返回值
fixture是有返回值的,没有返回值默认为None。
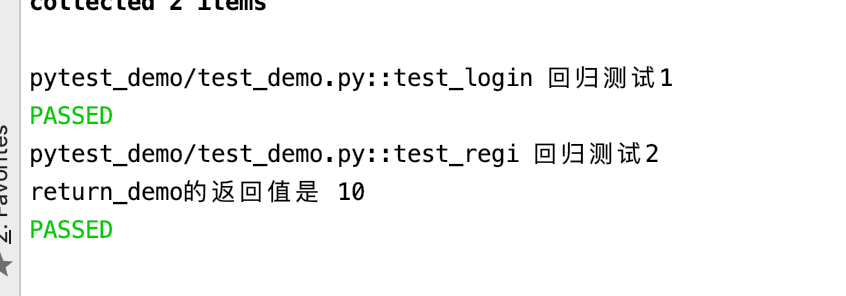
#conftest.py

@pytest.fixture(scope="function",autouse=True)
def return_demo():
    a=10
    return a
要调用有返回值的fixture函数,只能使用这种调用方式,将fixture函数名作为参数传入。
#test_demo.py

import pytest

@pytest.mark.general
def test_login():
    print "回归测试1"

@pytest.mark.general
def test_regi(return_demo):
    print "回归测试2"
    print "return_demo的返回值是",return_demo
执行结果是:
跨模块调用fixture函数
通过
conftest.py(固定名字,不能改)文件,共享fixture函数,不需要在测试中导入,他会自动被pytest发现,作用范围:conftest.py文件所在包及其子包,所以如果需要conftest.py作用于项目全局,放在项目顶级目录下。
# test_demo.py

import pytest

@pytest.mark.general
def test_login():
    print "回归测试1"


@pytest.mark.general
def test_regi(waigua):
    print "回归测试2"
# conftest.py

import pytest

@pytest.fixture()
def waigua():
    print "我是外挂,最先执行\n"

    yield
    print "我是外挂的后置"
执行结果:
- fixture函数,如果某个文件、某个包有多个conftest.py文件,如果存在多个同名的,遵循就近原则。
parametrize参数化
@pytest.mark.parametrize("参数列表",列表数据)装饰器可以实现测试用例参数化。类似于unittest的ddt
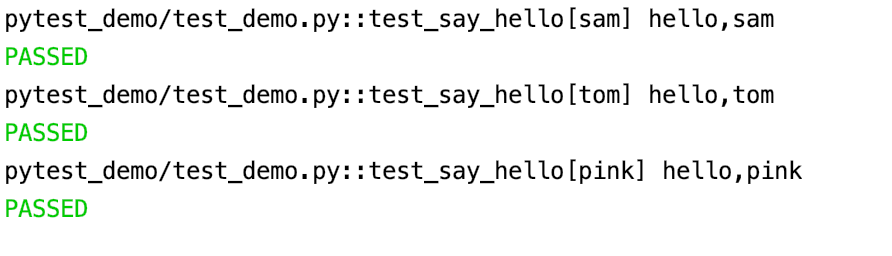
data=["sam","tom","pink"]

@pytest.mark.parametrize("name",data)
def test_say_hello(name):
    print "hello,{0}".format(name)
-
parametrize会自己去循环读取其中的参数,不需要再通过代码去进行循环。
执行结果:
data=[["sam","yang"],["tom","hhhh"],["pink","na"]]
@pytest.mark.parametrize("name,name2",data)
def test_say_hello(name,name2):
    print "hello,{0},我是{1}".format(name,name2)
-
多个参数,用列表嵌套列表传递
执行结果:

assert断言
# add.py

class Add():
    def __init__(self,a,b):
        self.a=a
        self.b=b

    def add(self):
        return self.a+self.b
对这个add方法进行测试:
# test_add.py

from pytest_demo.add import Add
import pytest

class TestAdd:
    #测试数据
    data=[[0,0,0],[1,1,2],[-1,-1,-2]]
    @pytest.mark.parametrize("a,b,expected",data)
    def test_add(self,a,b,expected):
        res=Add(a,b).add()
        print res
        try:
            #assert 对值进行验证,判断实际结果(a+b)是否等于给的期望结果expected
            assert a+b==expected
        except AssertionError as e:
            print "测试用例失败:{0}".format(e)
            raise e
        finally:
            print "a是{0},b{1},expected{2}".format(a,b,expected)
- 断言不通过就会报错,所以需要一个
try...catch...finally捕获异常 - aseert支持条件运算、逻辑运算、成员运算
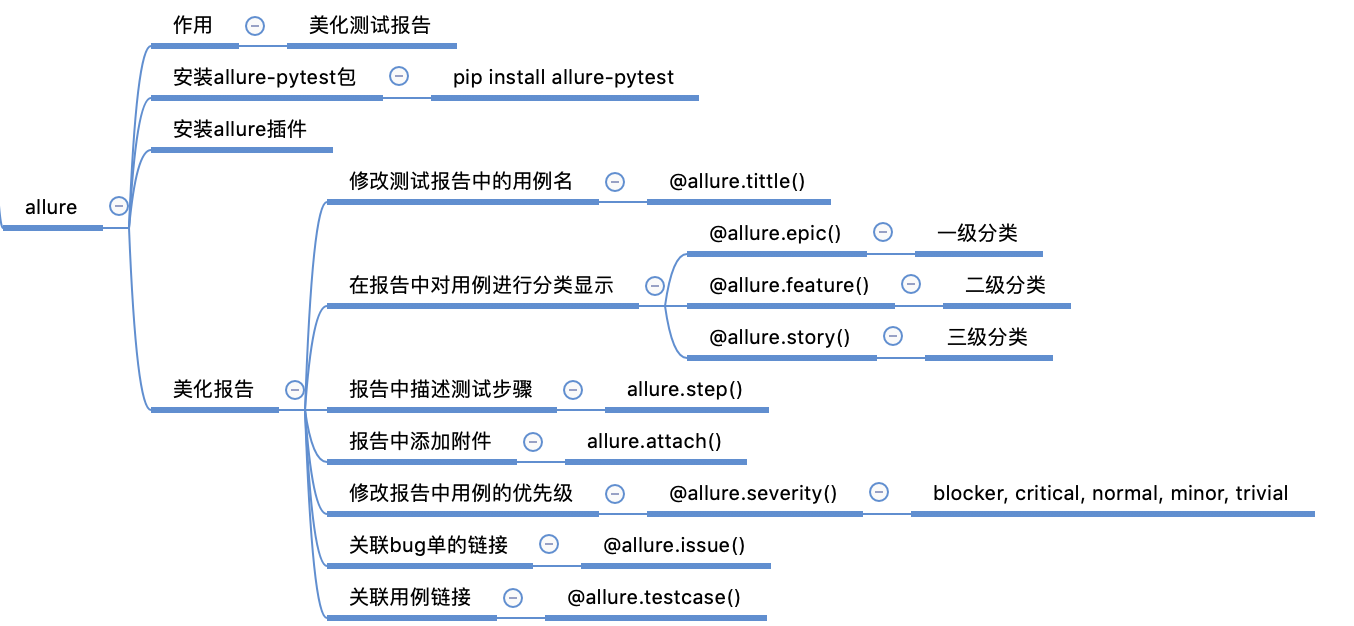
allure测试报告框架-美化测试报告
-
安装allure
pip2 install --user allure-pytest -
安装allure插件-生成html格式的测试报告
- 插件下载地址:github.com/allure-fram…
- 解压,allure是用java写的,运行需要安装jdk
- 将bin目录添加到环境变量
# 配置allure环境变量 export ALLURE_HOME=/Users/xxx/Documents/100_Work/software/allure-2.7.0 export PATH=$PATH:${ALLURE_HOME}/bin - 终端输入
allure确认已经添加到环境变量 - 重启pycharm
-
使用allure
#run.py pytest.main(["pytest_demo/test_add.py","-v","--alluredir","test_result/xml"])-
--alluredir生成allure的测试报告在指定的文件夹,后面跟文件夹的路径,但是这样生成的是一个xml格式的测试报告 -
终端中执行命令:
allure generate xml文件路径 -o 存放html文件路径 --cleanallure generate test_result/xml -o test_result/html --clean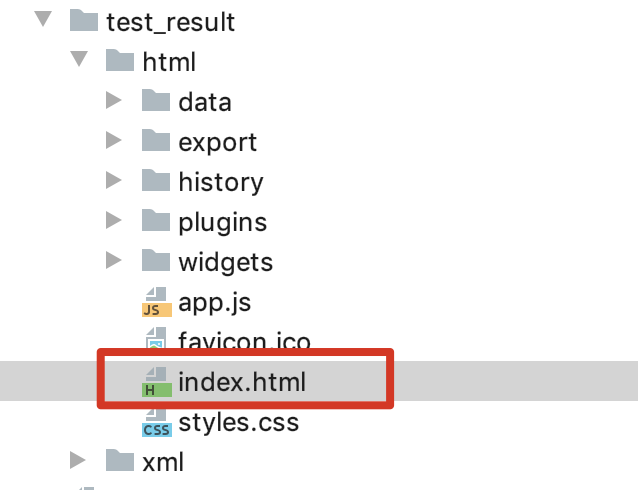
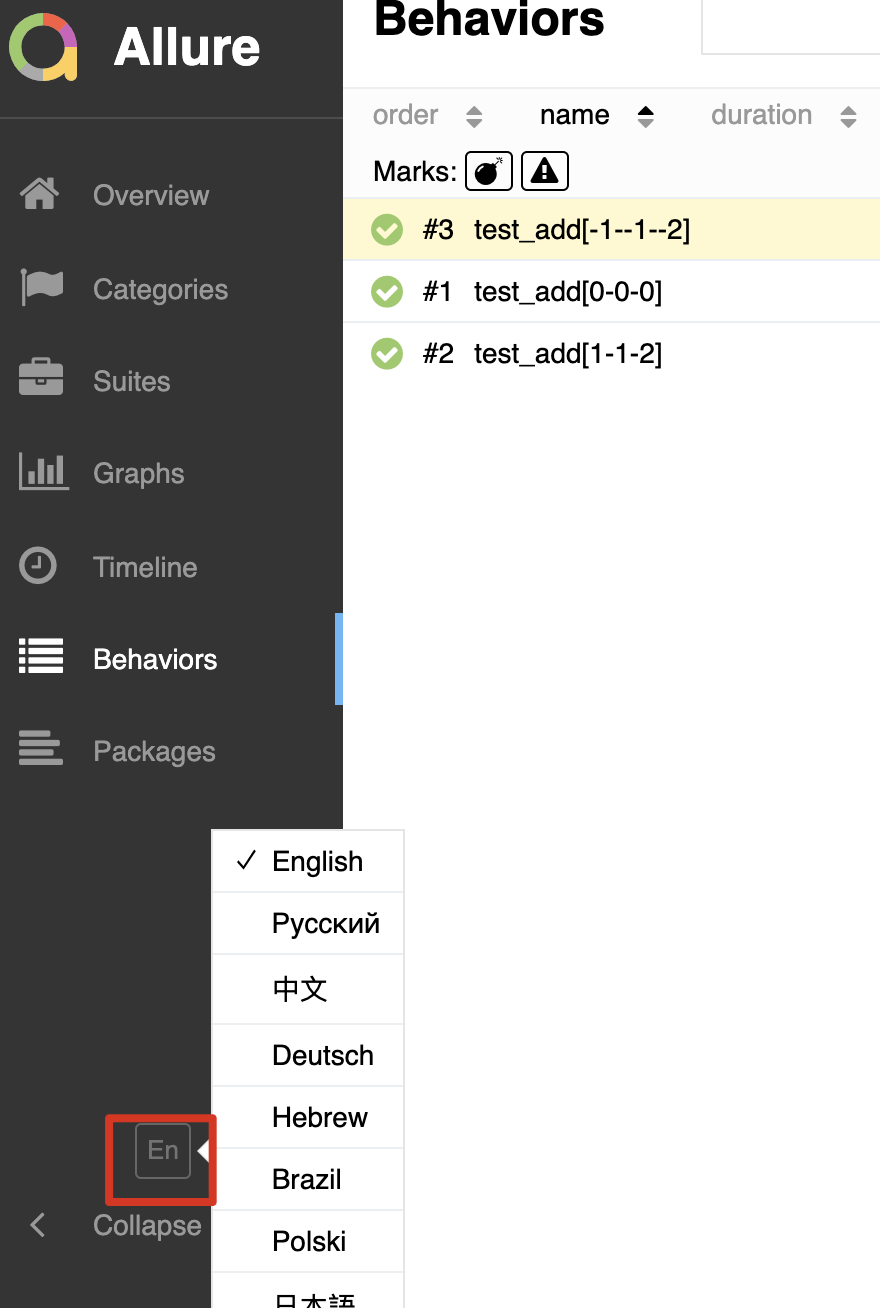
在浏览器中打开,就可以看到html格式的allure测试报告
可进行语言切换
-
allure进行用例分类
-
修改测试报告中的用例名
有时候使用方法名展示,不利于我们查看,修改展示在allure中的用例名是我们测试中常用的一个需求,使用装饰器
allure.title("要展示的用例名")修改用例名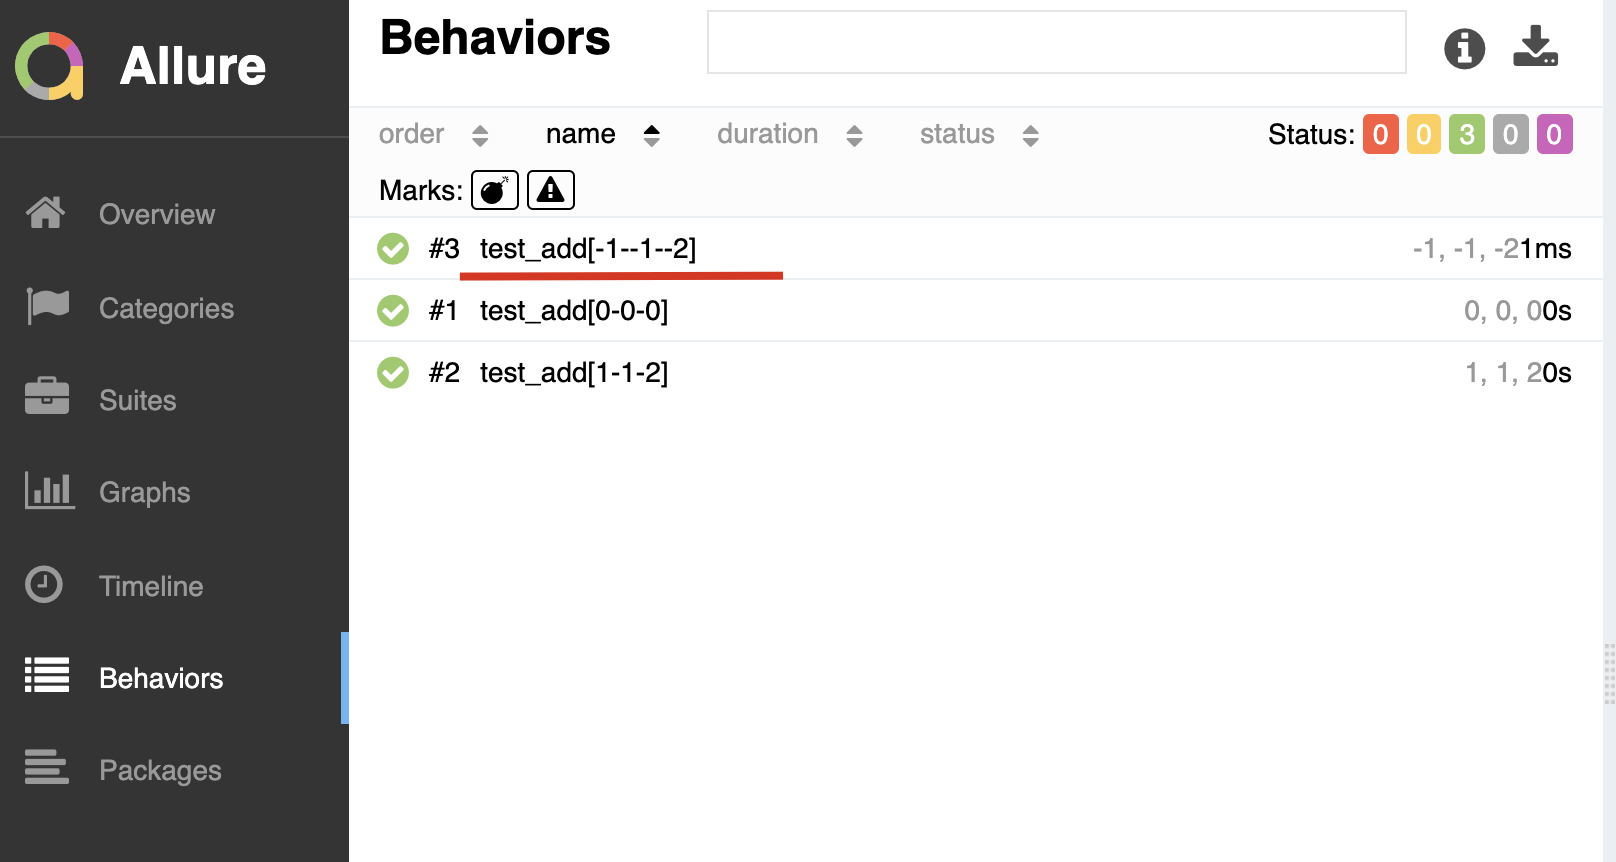
import allure

from pytest_demo.add import Add
import pytest

class TestAdd:

    data=[[0,0,0],[1,1,2],[-1,-1,-2]]

    @allure.title("测试add()函数")
    @pytest.mark.parametrize("a,b,expected",data)
    def test_add(self,a,b,expected):
        res=Add(a,b).add()
        print res
        try:
            assert a+b==expected
        except AssertionError as e:
            print "测试用例失败:{0}".format(e)
            raise e
        finally:
            print "a是{0},b{1},expected{2}".format(a,b,expected)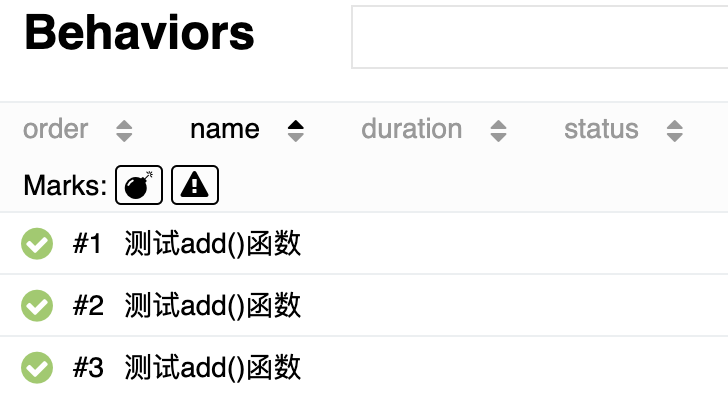
-
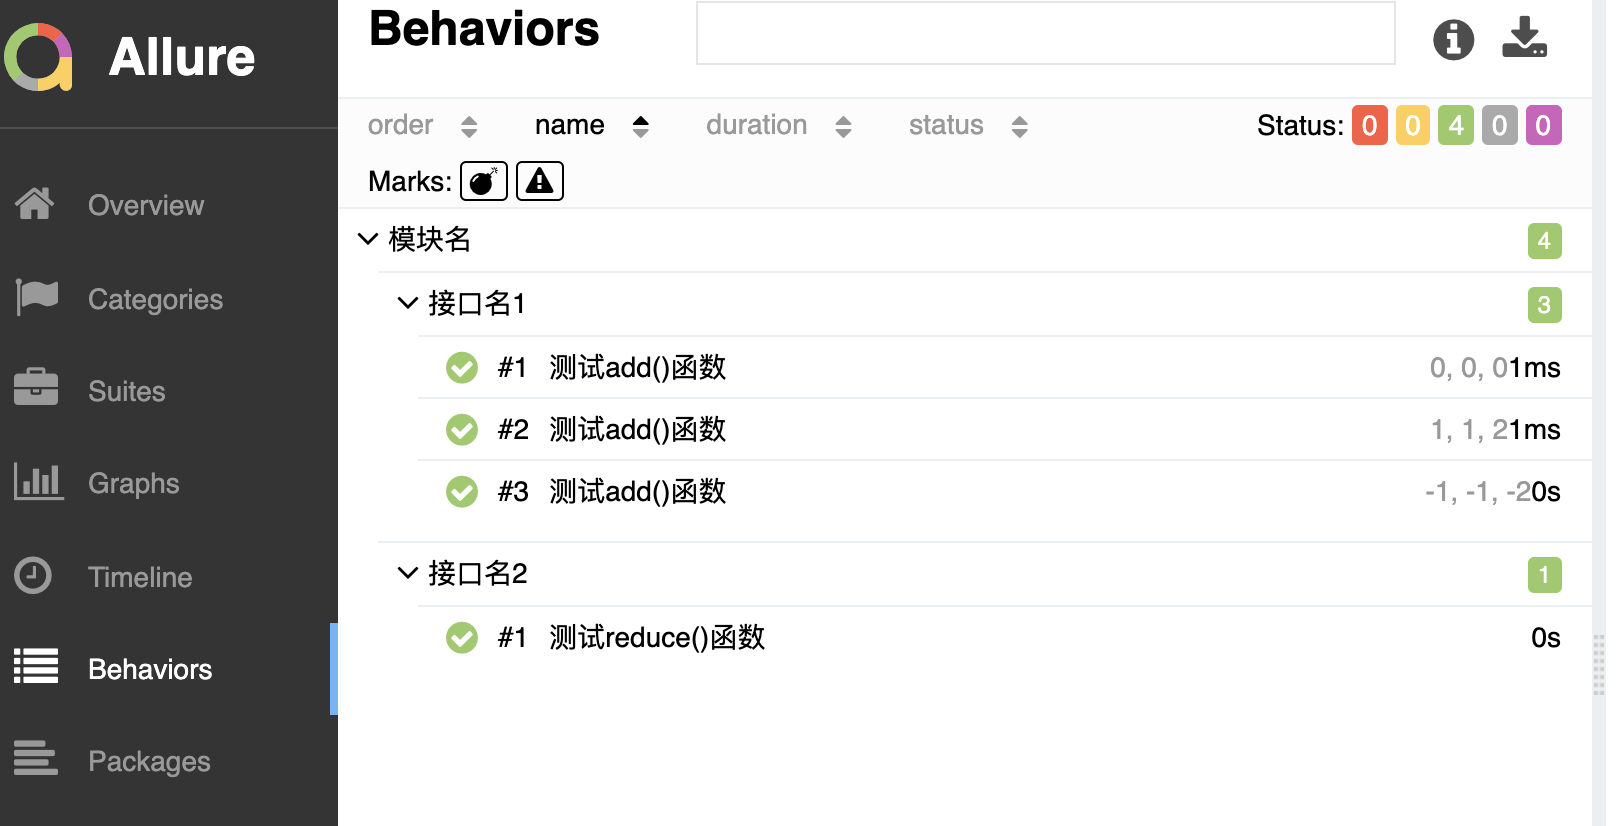
对用例进行分类显示
-
分级
@allure.epic()一级分类@allure.feature()二级分类@allure.story()三级分类
-
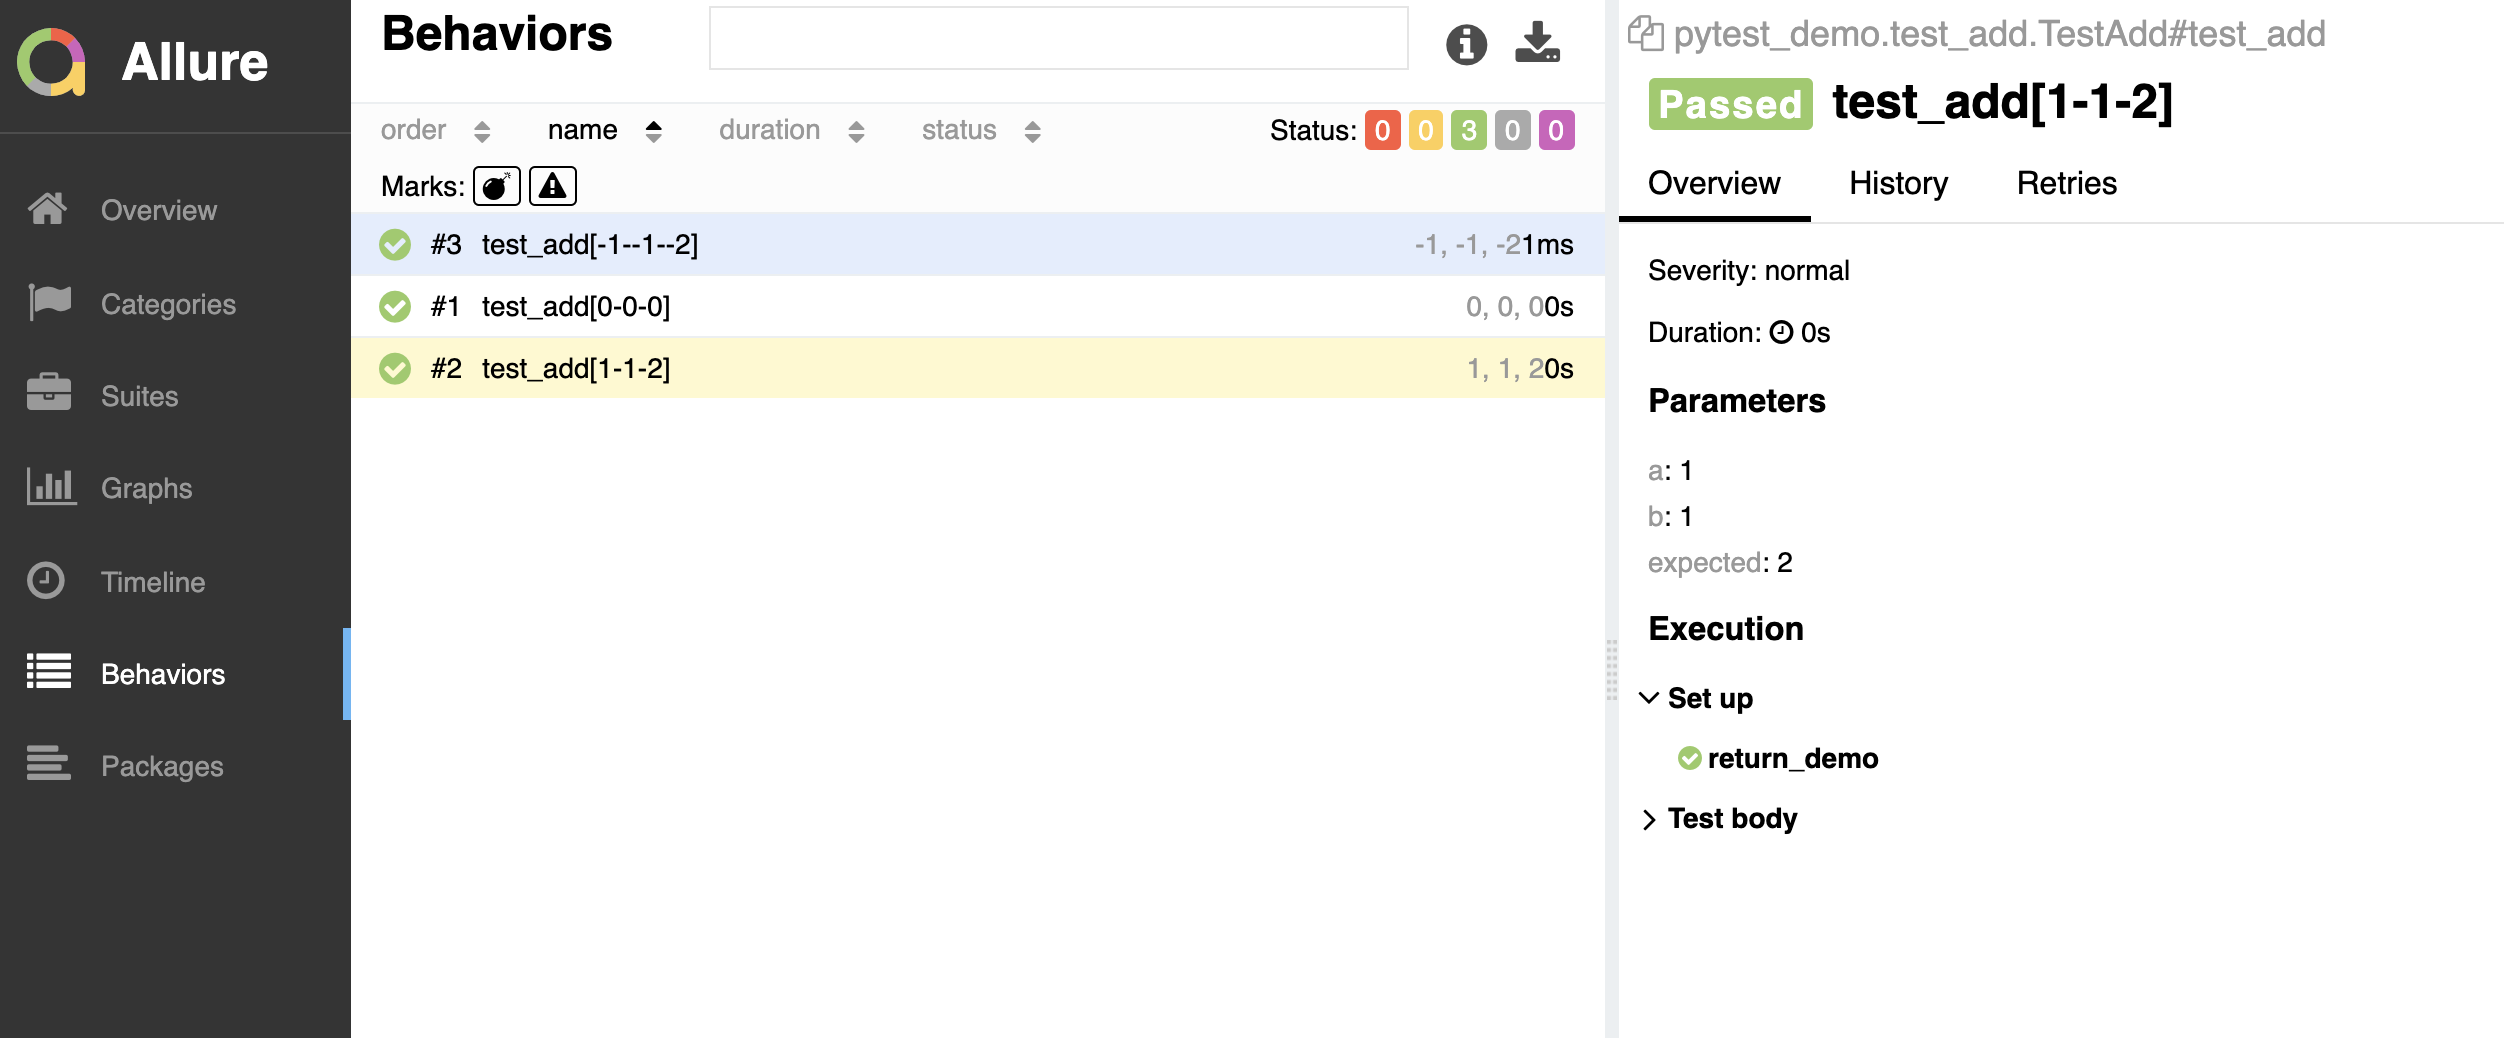
Demo
import allure
from pytest_demo.add import Add
import pytest

class TestAdd:

    data=[[0,0,0],[1,1,2],[-1,-1,-2]]

    @allure.feature("模块名")
    @allure.story("接口名1")
    @allure.title("测试add()函数")
    @pytest.mark.parametrize("a,b,expected",data)
    def test_add(self,a,b,expected):
        res=Add(a,b).add()
        print res
        try:
            assert a+b==expected
        except AssertionError as e:
            print "测试用例失败:{0}".format(e)
            raise e
        finally:
            print "a是{0},b{1},expected{2}".format(a,b,expected)

    @allure.feature("模块名")
    @allure.story("接口名2")
    @allure.title("测试reduce()函数")
    def test_reduce(self):
        print "测试减法接口"
执行结果:
-
allure添加测试步骤、附件
添加测试步骤使用allure.step(),比如说我们要看到断言结果,可以搭配添加附件使用allure.attach
附件可以是多种格式的:mp4、text、bmp、csv....
def test_add(self,a,b,expected):
    res=Add(a,b).add()
    print res

    try:
        #使用allure添加测试步骤
        allure.step("断言")
        assert a+b==expected
        #添加附件的方式
        allure.attach("预期结果是{1},实际结果是{0}".format(a+b,expected),"断言",allure.attachment_type.TEXT)
    except AssertionError as e:
        print "测试用例失败:{0}".format(e)
        raise e
    finally:
        print "a是{0},b{1},expected{2}".format(a,b,expected)
执行结果:
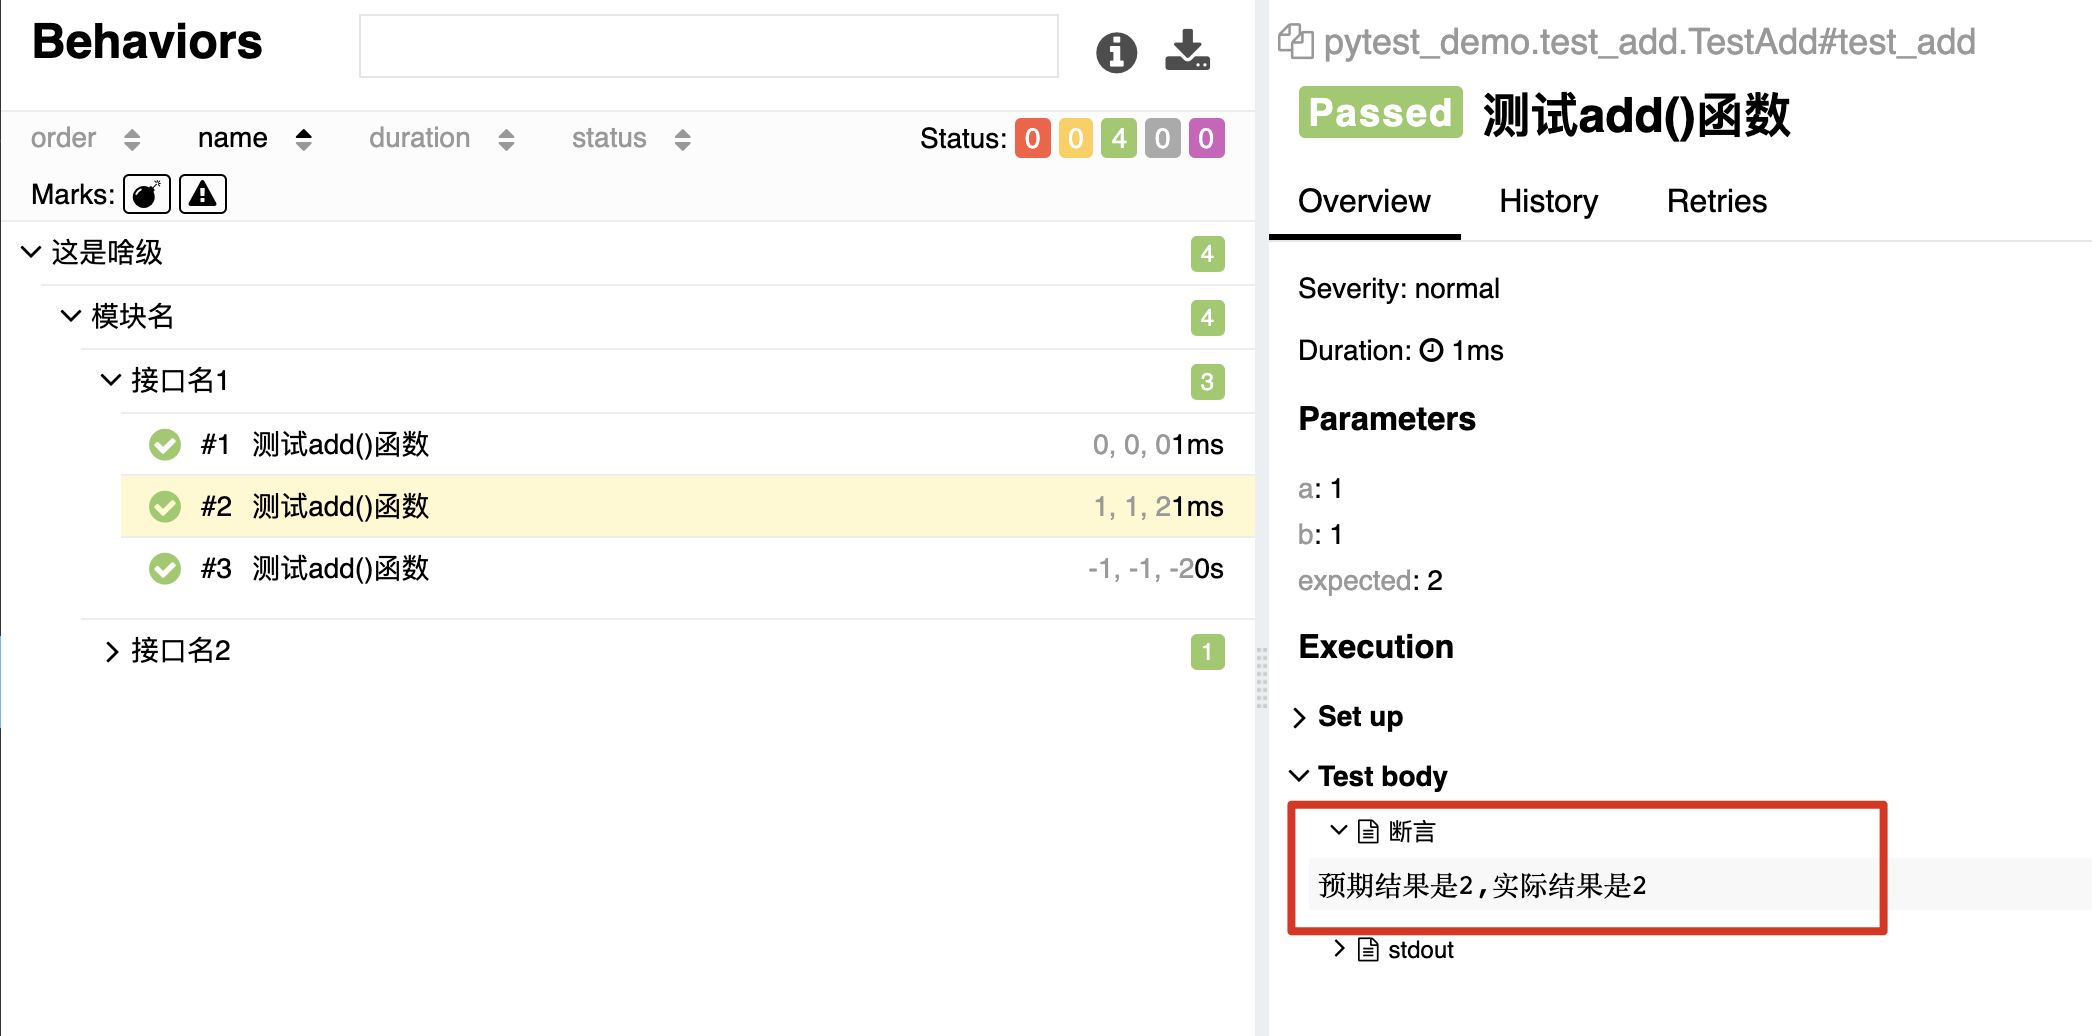
(有点类似日志的感觉??)
给用例设置优先级
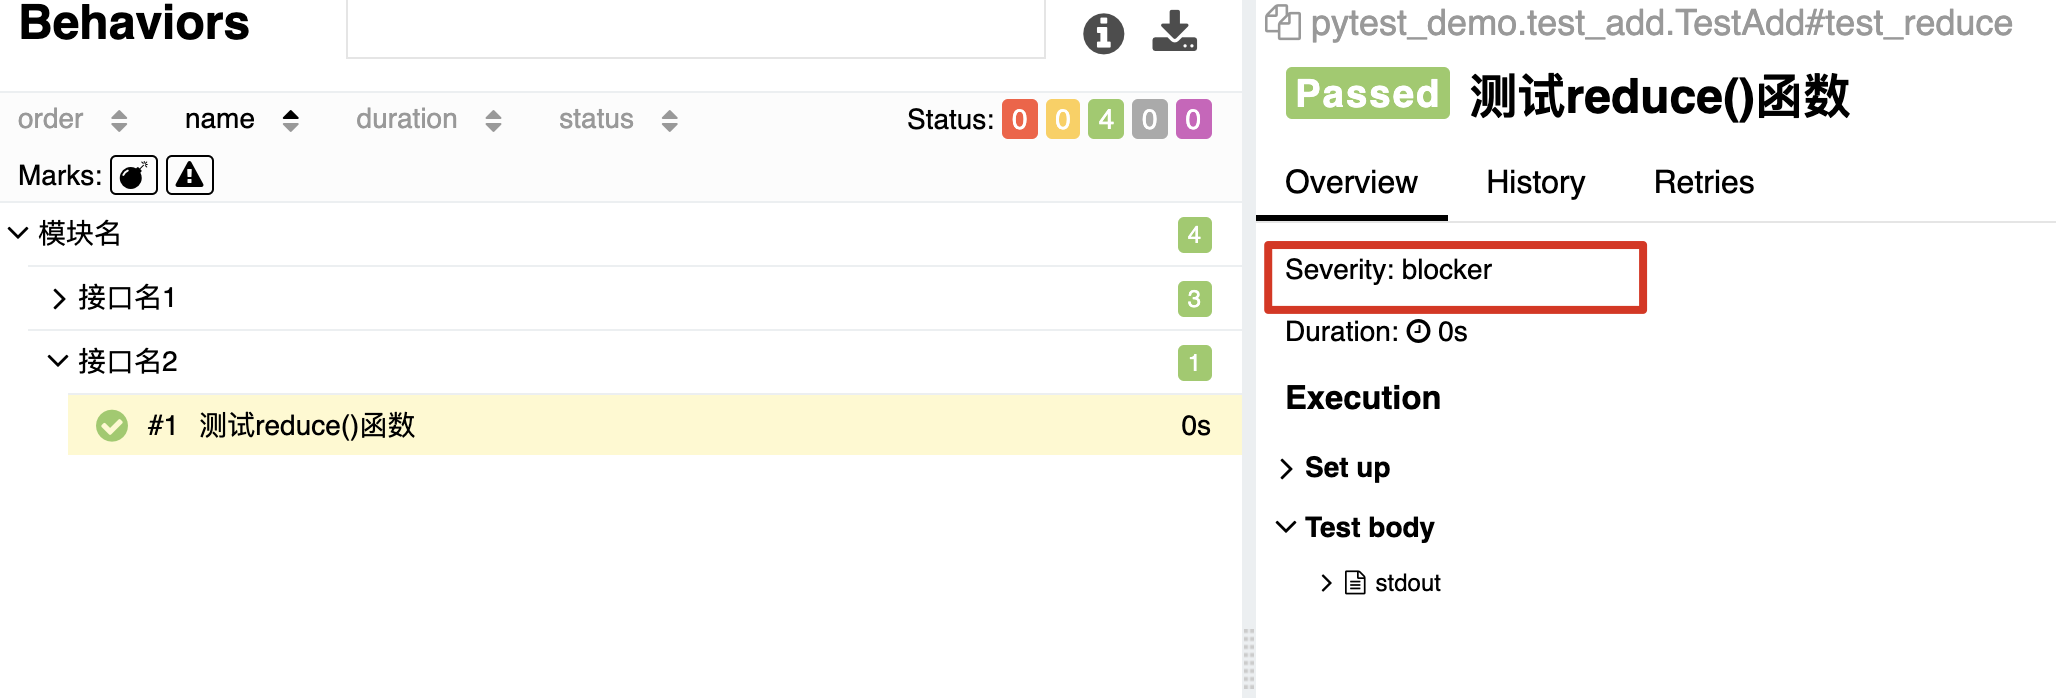
使用装饰器@allure.severity设置优先级
-
优先级
- blocker
- critical
- normal (默认的优先级)
- minor
- trivial
-
Demo
@allure.severity("blocker")
@allure.feature("模块名")
@allure.story("接口名2")
@allure.title("测试reduce()函数")
def test_reduce(self):
    print "测试减法接口"
执行结果:
- 一般不怎么使用,看公司的管理要求
给用例设置关联内容
-
关联bug 比如一个用例测试出了bug,可以把这个bug的链接,关联到用例。
使用
@allure.issue(url,name)@allure.issue("http://www.baidu.com","bug链接") @allure.severity("blocker") @allure.feature("模块名") @allure.story("接口名2") @allure.title("测试reduce()函数") def test_reduce(self): print "测试减法接口"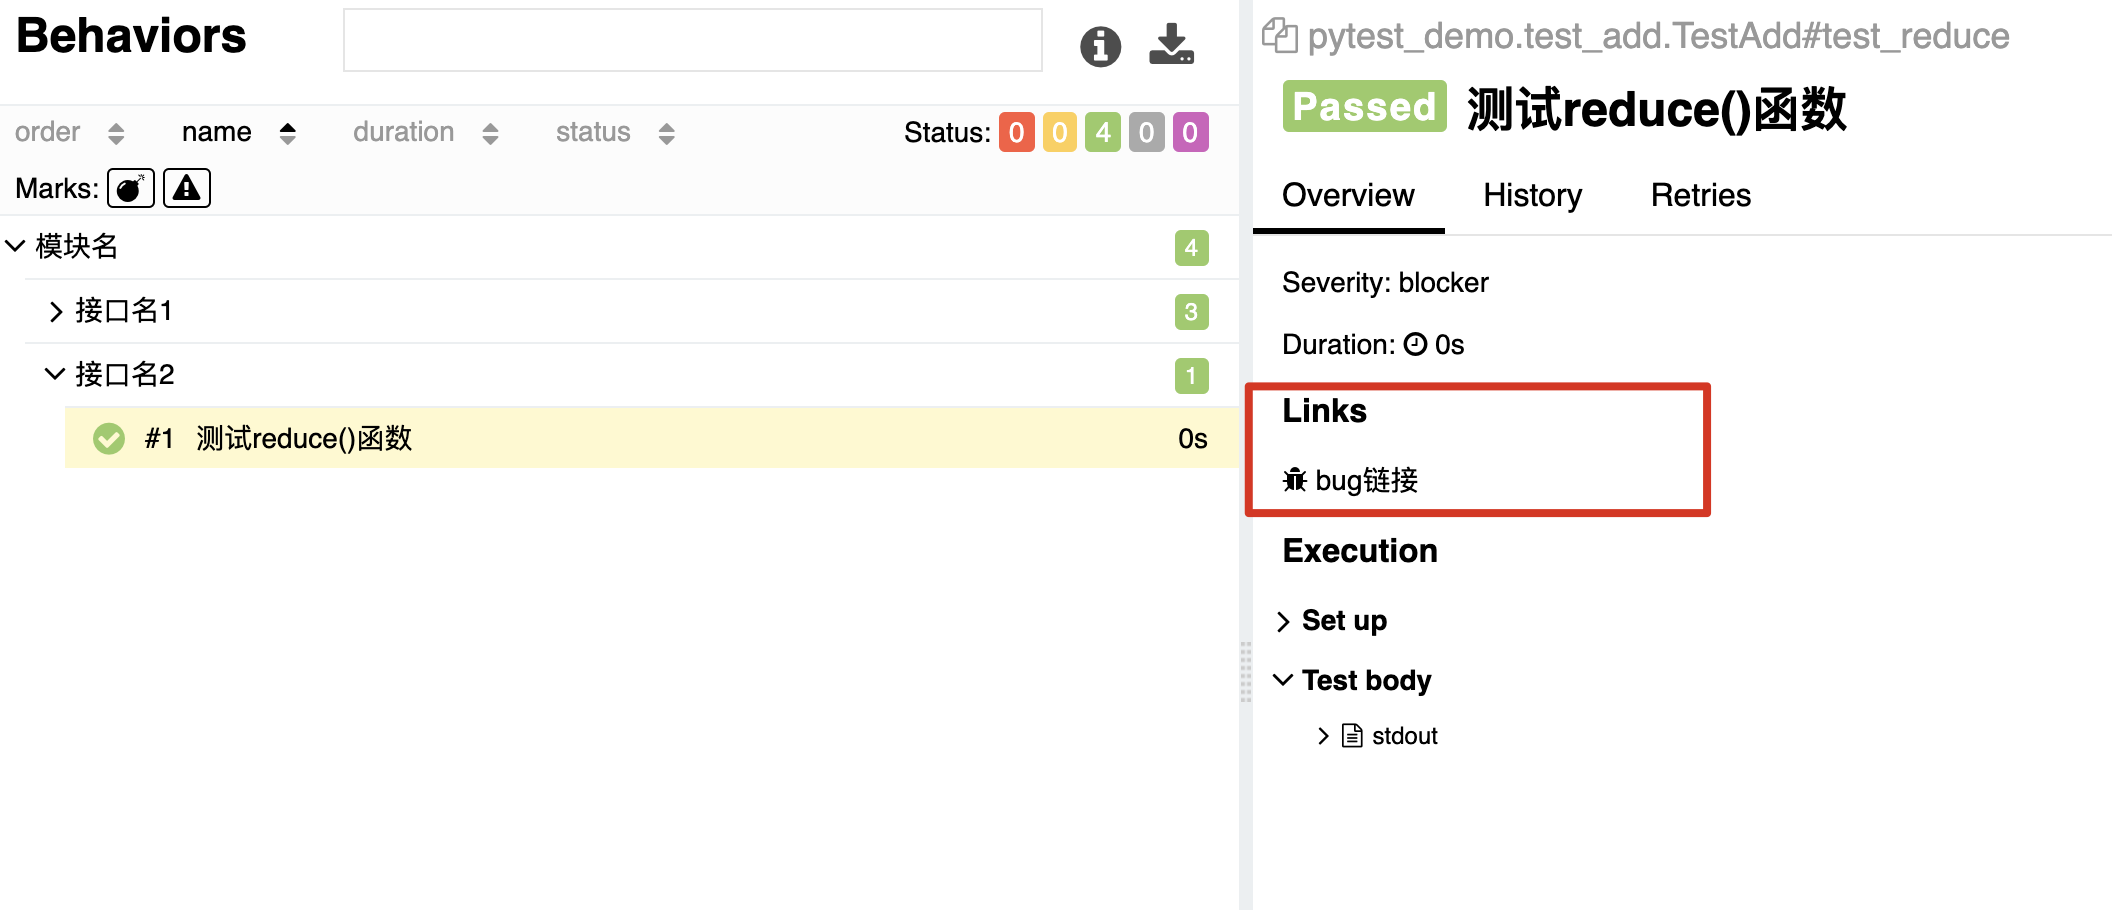
-
关联测试用例
使用@allure.testcase(url,name)
allure总结