

前言
可能现在网上关于UI绘制流程及其原理的文章数不胜数,我粗略的进行了观看,无非是讲解onMeasure()、onLayout()、onDraw()这三个方法的具体实现和原理,并无进行从无都有的详细阐述,小生不才,愿以自身理解以及观摩各路大神的文章,将其总结如下:
预览
我们都知道Android是由java书写的,所以Android也有一个main()函数在ActivityThread类中,在main()函数中做了Looper的初始化和运行,而Looper又和Handler息息相关,其实我们Android中的四大组件的生命周期都是由一个Handler来掌管的,所以我们不难找到入口
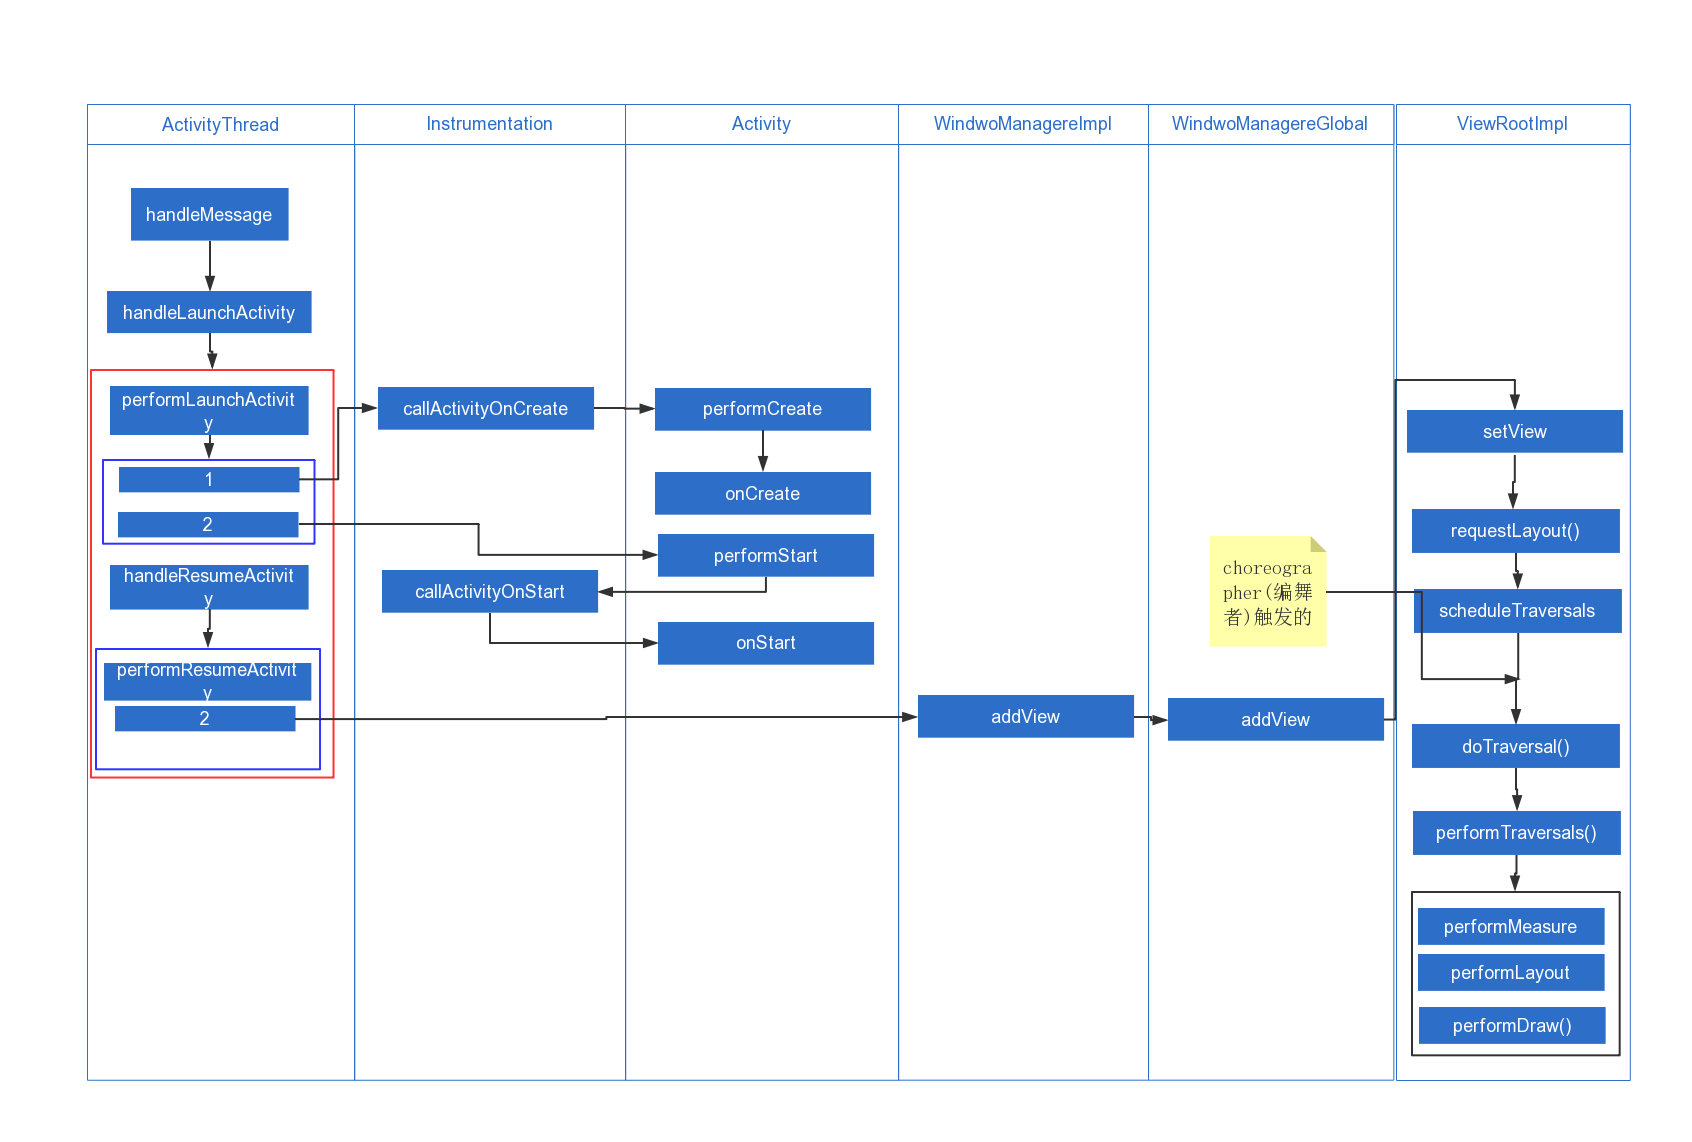
handleMessage
我们都知道在前面经过一系列的运行后系统会发送一个sendMessage(H.LAUNCH_ACTIVITY, r)进行activity的启动,在handleMessage中调用handleLaunchActivity,源代码如下:
  public void handleMessage(Message msg) {
            if (DEBUG_MESSAGES) Slog.v(TAG, ">>> handling: " + codeToString(msg.what));
            switch (msg.what) {
                case LAUNCH_ACTIVITY: {
                    Trace.traceBegin(Trace.TRACE_TAG_ACTIVITY_MANAGER, "activityStart");
                    final ActivityClientRecord r = (ActivityClientRecord) msg.obj;
                    //(和插件加载有关)LoadedApk对象是APK文件在内存中的表示。 Apk文件的相关信息,诸如Apk文件的代码和资源,甚至代码里面的Activity,Service等组件的信息我们都可以通过此对象获取
                    r.packageInfo = getPackageInfoNoCheck(
                            r.activityInfo.applicationInfo, r.compatInfo);
                    handleLaunchActivity(r, null);
                    Trace.traceEnd(Trace.TRACE_TAG_ACTIVITY_MANAGER);
                }
                break;
              ...
            }
        }
handleLaunchActivity
在handleLaunchActivity中主要做了 1、初始化
WindowManagerGlobal()2、调用performLaunchActivity()3、调用handleResumeActivity()
  private void handleLaunchActivity(ActivityClientRecord r, Intent customIntent) {
        // If we are getting ready to gc after going to the background, well
        // we are back active so skip it.
        unscheduleGcIdler();
        mSomeActivitiesChanged = true;

        if (r.profilerInfo != null) {
            mProfiler.setProfiler(r.profilerInfo);
            mProfiler.startProfiling();
        }

        // Make sure we are running with the most recent config.
        handleConfigurationChanged(null, null);

        if (localLOGV) Slog.v(
            TAG, "Handling launch of " + r);

        // Initialize before creating the activity
        WindowManagerGlobal.initialize();
        Activity a = performLaunchActivity(r, customIntent);
           if (a != null) {
            r.createdConfig = new Configuration(mConfiguration);
            Bundle oldState = r.state;
            handleResumeActivity(r.token, false, r.isForward,
                    !r.activity.mFinished && !r.startsNotResumed);

            if (!r.activity.mFinished && r.startsNotResumed) {

                try {
                    r.activity.mCalled = false;
                    mInstrumentation.callActivityOnPause(r.activity);

                    if (r.isPreHoneycomb()) {
                        r.state = oldState;
                    }
                    if (!r.activity.mCalled) {
                        throw new SuperNotCalledException(
                            "Activity " + r.intent.getComponent().toShortString() +
                            " did not call through to super.onPause()");
                    }

                } catch (SuperNotCalledException e) {
                    throw e;

                } catch (Exception e) {
                    if (!mInstrumentation.onException(r.activity, e)) {
                        throw new RuntimeException(
                                "Unable to pause activity "
                                + r.intent.getComponent().toShortString()
                                + ": " + e.toString(), e);
                    }
                }
                r.paused = true;
            }
        } else {
            // If there was an error, for any reason, tell the activity
            // manager to stop us.
            try {
                ActivityManagerNative.getDefault()
                    .finishActivity(r.token, Activity.RESULT_CANCELED, null, false);
            } catch (RemoteException ex) {
                // Ignore
            }
        }
    }
//TODO 未完待续
