

组件注册(component|extend)
- 全局注册
- 将通过 Vue.extend 生成的扩展实例构造器注册(命名)为一个全局组件,参数可以是Vue.extend()扩展的实例,也可以是一个对象(会自动调用extend方法)
- 两个参数,一个组件名,一个extend构造器或者对象
    //全局注册的行为必须在根 Vue 实例 (通过 new Vue) 创建之前发生
    Vue.component('todo-item',{
        template: '<li>hello world</li>',
        data: function(){   //data必须是一个函数
            return{
                name: 'xxx'
            }
        }
    })
    //extend 结合
    let obj = {
        props:[],
        template: ''
        ...
    }
    let Profile = Vue.extend(obj) ;
    Vue.component('component-one', Profile)
- 局部注册, 在子组件不可使用。
  //定义一个普通的js对象
  let ComponentA = {
      template: '',
      ...
  }
  new Vue({
      components:{
          'component-a': ComponentA,
          ...
      }
  })
- extend
  Vue.extend({
      mixins:[myMixin]
  })
组件之间的数据传递
props 自定义属性
- 父组件流向子组件
- 自定义属性,props接受数据
- 注意:prop的大小写,camelCase (驼峰命名法) 的 prop 名需要使用其等价的 kebab-case (短横线分隔命名) 命名: 如果你使用字符串模板,那么这个限制就不存在了。
- 单项数据流 父级prop的更新流向 子组件,反过来不行。
- 子组件试图改变 prop
- 保存到本地数据
props: ['initialCounter'], data: function () { return { counter: this.initialCounter } }- 使用计算属性 computed
props: ['size'], computed: { normalizedSize: function () { return this.size.trim().toLowerCase() } } - 自定义属性,props接受数据
- 其他
   <blog-post
     v-for="post in posts"
     v-bind:key="post.id"
     v-bind:post-title="post"  //命名规范
   ></blog-post>

   Vue.component('blog-post', {
     props: ['postTitle'],
     --
        props: {  //字符串模板
            title: String ,
            num: Number
        }
        props:{
            item1:{
                type: String,
                required: false,
                default: 100   //默认值
            }
        }
        props:{
            item1:{
                type: Array/Object,
                required: false,
                default: ()=> []   //默认值,必须使用工厂函数。如果规定为 Array / Object
            }
        }
     --
     template: `
       <div class="blog-post">
         <h3>{{ post.title }}</h3>
         <div v-html="post.content"></div>
       </div>
     `
   })
- 子组件控制父组件 (观察者模式) $emit
   子组件
   <button v-on:click="$emit('enlarge-text', param1 )">
     Enlarge text
   </button>
   父组件
   <blog-post
     ...
     v-on:enlarge-text="postFontSize += $event"   //$event 参数
   ></blog-post>
- prop双向绑定sync
   子组件
   < button @click='$emit(update:title, newTitle)' > </button>
   父组件
   <todo-item @update:title= 'value = $event'>

   简写sync
   <text-document @title.sync="doc.title"></text-document>
Vuex
provide 和 inject
插槽slot (具名、作用域、默认)
- 一般按照这种模式去写,省的太多,记得太乱。
- slot 必须有name
- 引入必须使用 template v-slot:header
- 作用域写在哪里 属于哪里。
- 父组件想使用 子组件的变量,使用自定义属性传递 插槽props
   <todo-item>
      <template v-slot:header="props">
        {{ props.title }}   //插槽props
         <div> 插入的内容 {{ name }} </div>   //name为父组件的属性
      </template>
   </todo-item>

    Vue.component('todo-item',{
        template: `<div>
            //name 对应具名插槽,一般都写
            <slot name="header" :title="xxx"> 默认值 </slot>  //自定义属性传递数据
        </div>`
    })
可复用性&组合
- 混入,灵活,插入到组件当中
   let myMixin = {
       created: function(){},
       methods: {}
   }
   let Component = Vue.extend({
       mixins: [myMixin]
   })
   new Component()
生命周期钩子
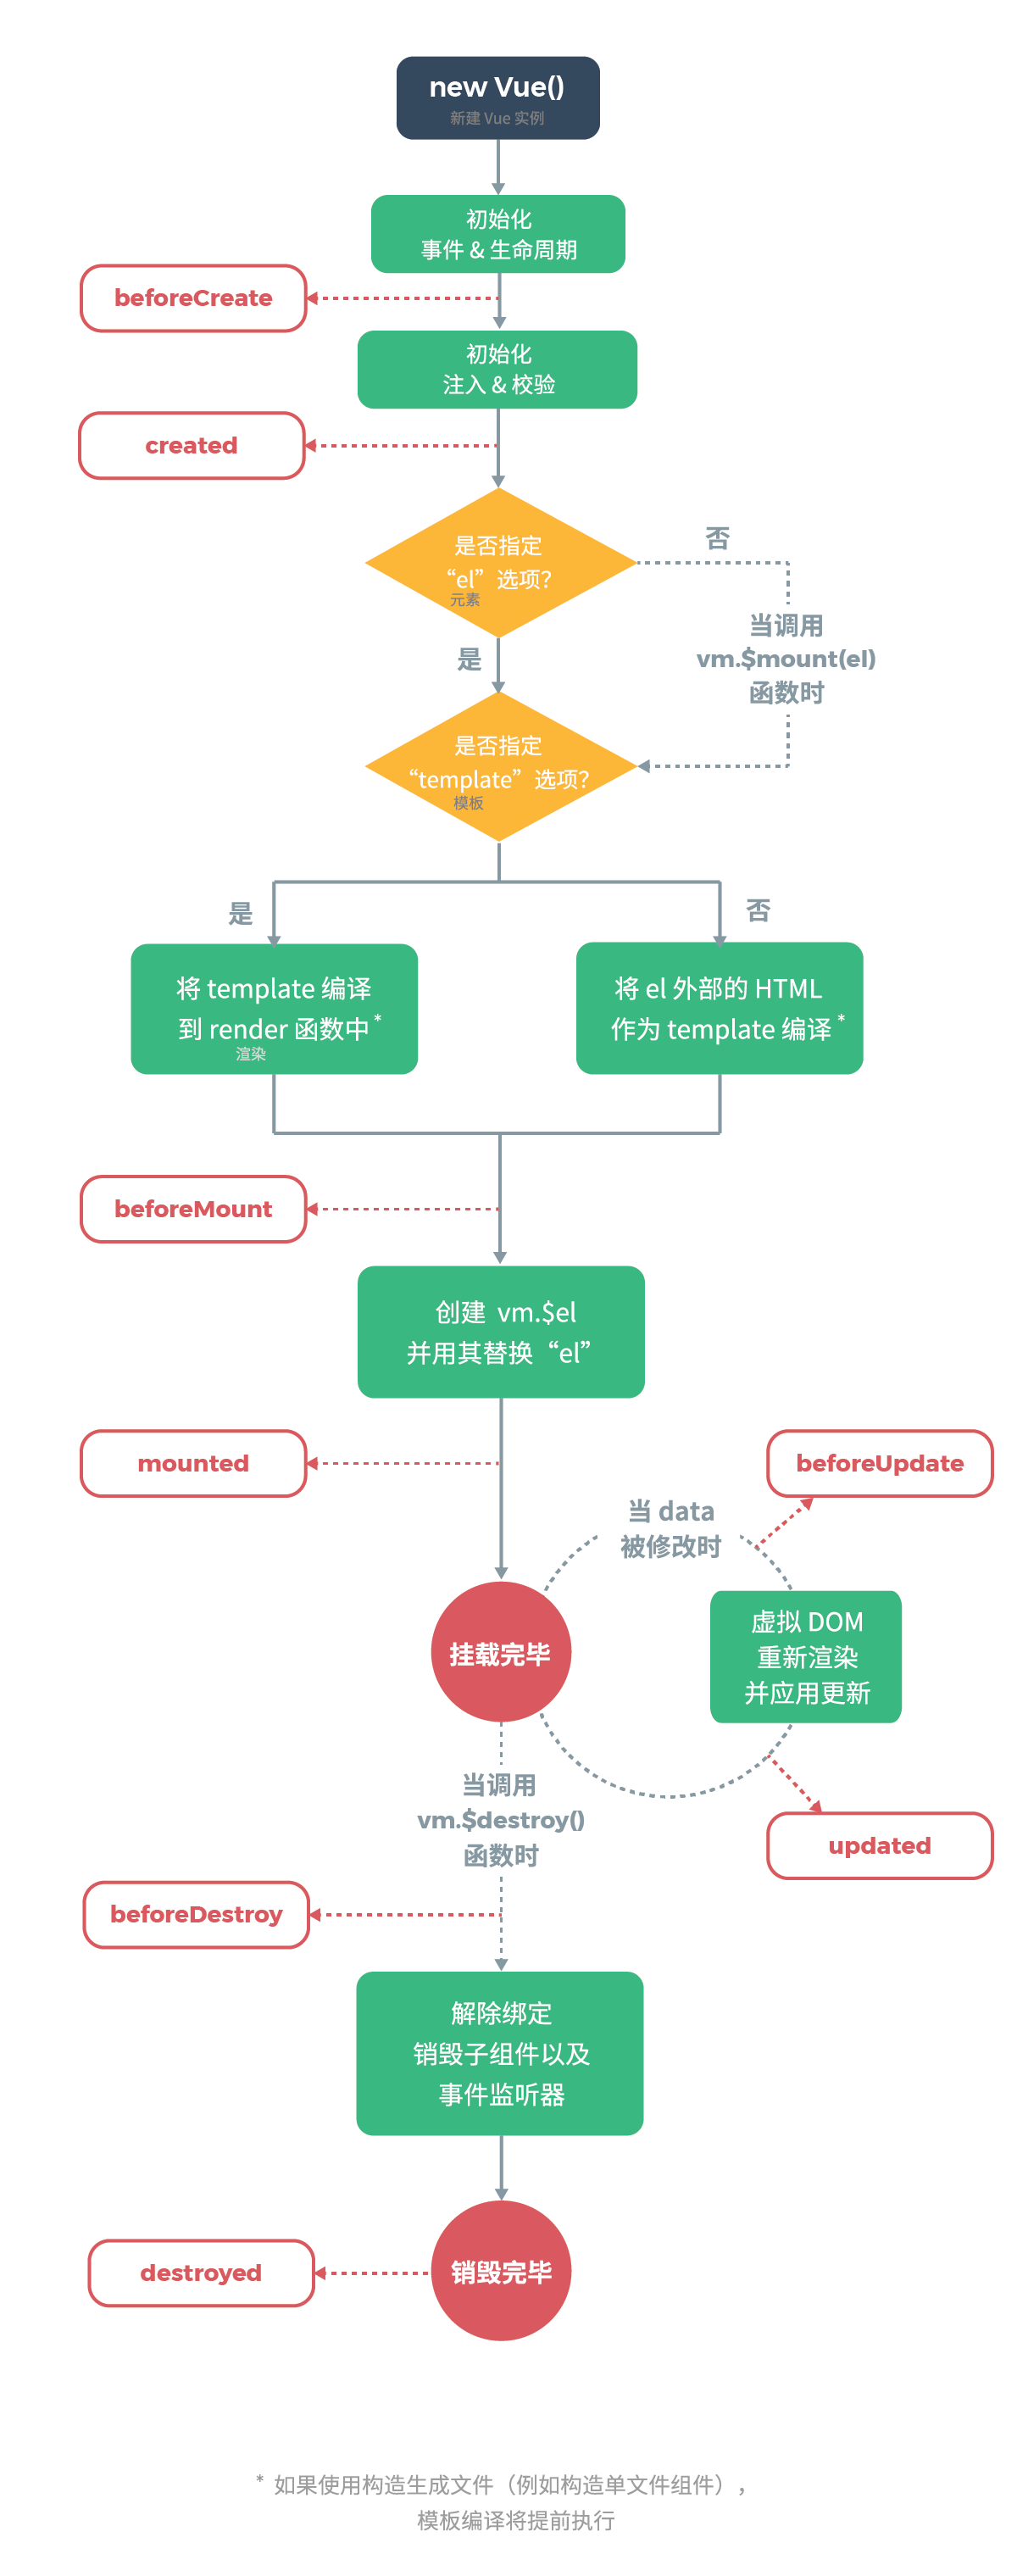
 new Vue({
     data: {
         name:'Hello'
     },
     created: function(){ //禁止使用箭头函数(this消失)

     }

 })
计算属性和侦听器
计算属性
- 对于任何复杂逻辑,都应当使用计算属性,相当于新定义一个变量
- 计算属性是基于它们的响应式依赖进行缓存的
 new Vue({
     ...
     data:{
         message: 'hello'
     }
     computed:{
         reversedMessage: function(){
             return this.message.split("")
         }
     },
     methods:{
         reversedMessage: function(){
             return this.message...
         }
     }

 })
- 计算属性缓存VS方法。(计算属性good)
侦听器
- 监听已定义的变量
    new Vue({
        watch:{
            name: function(val){  //val 新值
                return this.name + val
            }
        }
    })
v-if 和 v-show
v-if 是“真正”的条件渲染,因为它会确保在切换过程中条件块内的事件监听器和子组件适当地被销毁和重建。
v-if 也是惰性的:如果在初始渲染时条件为假,则什么也不做——直到条件第一次变为真时,才会开始渲染条件块。
相比之下,v-show 就简单得多——不管初始条件是什么,元素总是会被渲染,并且只是简单地基于 CSS 进行切换。
一般来说,v-if 有更高的切换开销,而 v-show 有更高的初始渲染开销。因此,如果需要非常频繁地切换,则使用 v-show 较好;如果在运行时条件很少改变,则使用 v-if 较好。
处理边界情况
- 访问根实例 this.$root
- 访问父组件实例 this.$parent
- 访问子组件实例或子元素 this.
children
  <component ref="xxx"></component>
  this.$refs.xxx ;
依赖注入(provide/inject)
- 多层嵌套组件使用,勿用
- provide:一个对象或返回一个对象的函数,该对象包含可注入起的子孙属性
- inject:一个字符串数组或一个对象
