

一.我理解的 Flux
1.学习的因由
首先为什么我学习flux,因为我直接去学习redux总是感觉学不深入,有些知识不是很理解,偶然看到redux是基于flux的思想设计的,由此打算学一学Flux,通过这样触类旁通,帮自己打通瓶颈破关成功。
2.Flux是什么
Flux是一个提供状态管理的前端架构,它为了解决日益复杂的前端数据管理问题。
它最强调的就是单向数据流。
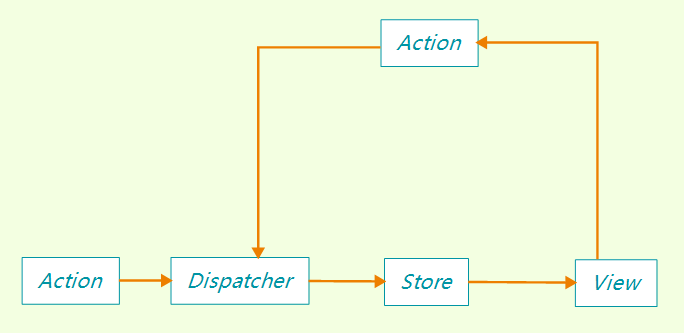
如上图所示。
Action 是某种操作,通过Dispatcher进行分发 ,所谓的分发就依次调用每一个store挂载在Dispatcher上的回调函数,并将Action 作为参数传入。
如果匹配到相应的操作,则会按照事先指定好的方式对store进行处理。
一般每个store在处理块结束的位置,要通知订阅的View视图部分更新数据。
同时View层可以通过如点击事件之类,再次触发Action,重复上述过程。
二.Flux的使用
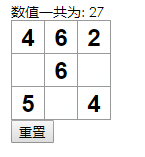
一个简单的demo,如上图所示,每点击一次格子,对应数字+1,然后计算数字总和,并提供重置按钮。
目录结构大致如下:
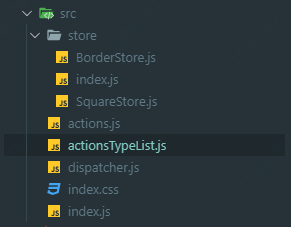
src目录下的index.js 是我们的react文件,index.css是样式文件(可以忽略)
1.Dispatcher
Dispatcher是分发者,它有两个主要的职责。
- 记录store挂载在其上的Action处理函数
- 在每次Action指令下达的时候,执行所有store挂载在其上的函数。
第一个职责主要通过Dispatcher的register()方法实现
第二个职责主要通过Dispatcher的dispatch()方法实现
上述两个方法的源码,接下来结合具体使用来进行解析,请阅览下文
2.Action
(1)Action的实现
首先来说清楚Action是什么,要完成什么样的职责。
Action主要有两个职责:
- 标识出Action操作的类型。
- Action向外(View层)暴露dispatcher分发操作接口
所以首先第一步,就是声明Action
let SquareTypeList = {
    SQUARE_INCREASE: 'SQUARE_INCREASE',
    SQUARE_RESET: 'SQUARE_RESET'
}

export default { ...SquareTypeList }
我们创建了actionsTypeList.js文件,在里面声明Action,并导出相应的标识
import actionsType from './actionsTypeList'
import dispatcher from './dispatcher'

export default {
    squareValueIncrease(index) {
        dispatcher.dispatch({
            type: actionsType.SQUARE_INCREASE,
            index
        })
    },
    reset() {
        dispatcher.dispatch({
            type: actionsType.SQUARE_RESET
        })
    }
}
然后我们创建action.js文件,引入dispatcher,和我们刚才声明的actionsTypeList。
文件对外暴露出来两个action操作API,它们两个API都通过调用dispatcher对象的dispatch方法实现行为触发。
3.Store
store是数据仓库,唯一存储数据,它主要有四个职责:
- 维护数据
- 在自身数据变动是通知视图更新
- 提供给外部(view层)监听自身数据变动和移除监听的API
- 声明对特殊Action的处理回调函数,并挂载进Dispatcher对象中
我们拿SquareStore举例,SquareStore.js里面就是square方格组件的数据仓库。
(1)第一个职责
它的第一个职责很简单
let square_Value = []对就是这样,创建一个变量,并给初始值即可,具体数据结构请跟根据业务需求自行设计。
(2)第二第三个职责
第二第三个职责放在一起说
const square_Store = Object.assign({}, EventEmitter.prototype, {
    getValue (index) {
        if (index !== 'all') {
            return square_Value[index]
        } else {
            return square_Value
        }
    },
    notice () {
        this.emit('square_change')
    },
    squareAddListener (callback) {
        this.on('square_change', callback)
    },
    squareRemoveLister (callback) {
        this.removeLister('square_change', callback)
    }
})
上面就是square_Store 的声明。
我们让square_Store 拓展了EventEmitter.prototype。
等于让square_Store 成为EventEmitter对象,这样我们就可以使用EventEmitter对象的一些方法。
square_Store.notice()方式使用EventEmitter的emit方法,通知所有订阅'square_change'事件的家伙执行回调。
square_Store.squareAddListener() 方法使用使用EventEmitter的on方法,对外提供订阅‘square_change’事件的接口,第二个参数callback可以提供回调执行函数。
square_Store.squareRemoveLister()方法使用EventEmitter的removeLister方法,对外提供取消订阅‘square_change’事件的接口
(3)第四个职责
square_Store.token = dispatcher.register((action) => {
    console.log('我是SquareStore的分发回调函数')
    console.log(square_Value)
    if (action.type === actionsList.SQUARE_INCREASE) {
        if (square_Value[action.index]) {
            square_Value[action.index] ++
        } else {
            square_Value[action.index] = 1
        }
    } else if ( action.type === actionsList.SQUARE_RESET) {
        square_Value = []
    }
    square_Store.notice()
})

export default square_Store
第四个职责使用Dispatcher对象的register()方法来实现。
register方法接受一个函数作为参数,并把当前的Action对象作为参数传入,就是我们在action.js中定义的那些。
Dispatcher会把这个参数函数挂载到自己身上,并在每一个Action操作中调用。
register方法的返回值就是挂载id,通过这个id可以来区分先后执行顺序。
是的没错,如果你有100个store,每个store都挂载了回调方法并且都被view引用,那么任何一次action分发都会依次调用这100个回调函数。
所以在这个函数中要通过if 来判断传入的Action.type是否是自己要处理的行为,如果是的话则执行操作数据更新逻辑,并在最后调用square_Store.notice()通知View层数据更新了。
BorderStore.js是border棋盘组件的store文件,内容和SquareStore.js类似
import dispatcher from '../dispatcher'
import { EventEmitter } from 'events';
import actionsList from '../actionsTypeList'
import squareStore  from './SquareStore'

const borderValue = {
    sum: 0
}
function _getSquareSum() {
    let sum = 0
    squareStore.getValue('all').forEach(e => {
        if (e) {
            sum += e
        }
    })
    borderValue.sum = sum
}
const borderStore = Object.assign({}, EventEmitter.prototype, {
    getValue(caption) {
        return borderValue[caption]
    },
    notice() {
        this.emit('border_change')
    },
    borderAddListener (callback) {
        this.on('border_change', callback)
    },
    borderRemoveListener(callback) {
        this.removeListen('border_change', callback)
    }
})
borderStore.token = dispatcher.register((action) => {
    console.log('我是borderStore的分发回调函数')
    console.log(borderValue)
    if (action.type === actionsList.SQUARE_INCREASE) {
        dispatcher.waitFor([squareStore.token])
        _getSquareSum()
    } else if (action.type === actionsList.SQUARE_RESET) {
        borderValue.sum = 0
    }
    borderStore.notice()
})

export default borderStore
不同的是使用了dispatcher.waitFor()函数
这个函数接受一个数组,数组内的每个元素都是一个dispatcher.register()函数的返回结果。
dispatcher会保证BorderStore对SQUARE_INCREASE操作的处理一定会在squareStore对SQUARE_INCREASE操作之后。
(4)导出
为了工程化,我再store文件夹下的index.js中将BorderStore和squareStore统一导出
import square from './SquareStore'
import border from './BorderStore'

export const squareStore = square

export const borderStore = border
4.View层
src下的index.js代码如下:
  import React from 'react'
  import ReactDOM from 'react-dom'
  import actions from './actions'
  import { squareStore , borderStore} from './store/index.js'
  import './index.css'
  class Square extends React.Component {
    constructor(props) {
      super(props)
      this.onChange = this.onChange.bind(this)
      this.state = {
        count: squareStore.getValue(this.props.index)
      }
    }
    componentDidMount () {
      squareStore.squareAddListener(this.onChange)
    }
    componentWillUnmount () {
      squareStore.squareRemoveLister()
    }
    onChange () {
      this.setState({
        count: squareStore.getValue(this.props.index)
      })
    }
    render () {
      return (
        <button
        className= "square"
        onClick = {() => {
          actions.squareValueIncrease(this.props.index)
        }}
        >
          {this.state.count}
        </button>
      );
  }
  }

  class Board extends React.Component {
    constructor (props) {
      super(props)
      this.onChange = this.onChange.bind(this)
      this.state = {
        sum: borderStore.getValue('sum')
      }
    }
    componentDidMount () {
      borderStore.borderAddListener(this.onChange)
    }
    componentWillUnmount () {
      borderStore.borderRemoveLister()
    }
    onChange () {
      this.setState({
        sum: borderStore.getValue('sum')
      })
    }
    renderSquare(i) {
      return <Square
              index={i}
              />;
    }
    render() {
      return (
        <div>
          <div>数值一共为: {this.state.sum}</div>
          <div className="board-row">
            {this.renderSquare(0)}
            {this.renderSquare(1)}
            {this.renderSquare(2)}
          </div>
          <div className="board-row">
            {this.renderSquare(3)}
            {this.renderSquare(4)}
            {this.renderSquare(5)}
          </div>
          <div className="board-row">
            {this.renderSquare(6)}
            {this.renderSquare(7)}
            {this.renderSquare(8)}
          </div>
          <button onClick={() => {
            actions.reset()
          }}>重置</button>
        </div>
      );
    }
  }


  // ========================================

  ReactDOM.render(
    <Board />,
    document.getElementById('root')
  );
如上所示,我们使用了react,demo主要由square方格组件和border棋盘组件两部分构成。
方格组件通过Flux维护自己的数值,border组件也通过Flux统计所有方格的数值。
(1) square组件
square组件首先在初始化的时候使用squareStore.getValue()获取store中的值
然后在组件挂载完成后订阅通过squareStore.squareAddListener订阅变更,并在数据变动后更新state
在组件销毁前取消订阅,回收对象,释放内存。
当然最关键的是在onclik事件中进行SQUARE_INCREASE动作的触发。
(2) border组件
border棋盘组件和square大致相似,不在赘述
三.dispatcher源码解析
我们来深入Flux源码,深入的扒一扒dispatcher核心方法的实现
主要是dispatch()、register()、waitFor()这两个家伙
小伙伴们npm install Flux后 可以在flux包文件内找到相关源码,具体路径如下:

  function Dispatcher() {
    _classCallCheck(this, Dispatcher);

    this._callbacks = {};
    this._isDispatching = false;
    this._isHandled = {};
    this._isPending = {};
    this._lastID = 1;
  }
var _prefix = 'ID_';
上面是Dispatcher对象的构造函数,先进行检测,然后初始化了一些内部属性。
1.dispatcher.register(callback)
  Dispatcher.prototype.register = function register(callback) {
    var id = _prefix + this._lastID++;
    this._callbacks[id] = callback;
    return id;
};从上图可见,register函数在挂载每一个store的回调处理函数时,就是将这些函数放进自己的_callbacks属性中。
这个属性是一个对象,对象的键值则为返回给store的token,我们可以见得大致都是‘ID_X’的形势,X值从1开始递增。
从这里我们推论dispatch(ActionObj)方法的实现原理,大致就是将传入ActionObj作为参数,依次调用这些函数。
1.dispatcher.dispatch(ActionObj)
  Dispatcher.prototype.dispatch = function dispatch(payload) {
    !!this._isDispatching ? process.env.NODE_ENV !== 'production' ? invariant(false, 'Dispatch.dispatch(...): Cannot dispatch in the middle of a dispatch.') : invariant(false) : undefined;
    this._startDispatching(payload);
    try {
      for (var id in this._callbacks) {
        console.log(this._callbacks)
        if (this._isPending[id]) {
          continue;
        }
        this._invokeCallback(id);
      }
    } finally {
      this._stopDispatching();
    }
  };

  Dispatcher.prototype._invokeCallback = function _invokeCallback(id) {
    this._isPending[id] = true;
    this._callbacks[id](this._pendingPayload);
    this._isHandled[id] = true;
  };

  Dispatcher.prototype._startDispatching = function _startDispatching(payload) {
    for (var id in this._callbacks) {
      this._isPending[id] = false;
      this._isHandled[id] = false;
    }
    this._pendingPayload = payload;
    this._isDispatching = true;
  };
dispatcher.dispatch()首先通过_startDispatching()初始化分发状态
让后和我们想的一样将ActionObj作为参数依次执行所有挂载函数。
这里要说明的是,Dispatcher_isPending属性是一个和Dispatche._callback键值一致的对象,每个键值的对象为一个布尔数据,true代表Dispatche._callback中对应键值的挂载函数已经执行完毕,false则为未执行。
