废话部分
文章是csdn之前写过的。打算重新写一下,蹭蹭热度。因为之前批量迁移的时候这篇文档热度不行,排版也有问题。还有就是因为批量迁移博客,导致一些好文章没有出来。
我认为我主页里面的富文本开发部分还是挺有深度的,不过这块写的人也少,我就不多去推广了。
还有就是再回顾一下,很久没写了。只是公司项目单纯的业务流程的东西,很难让我有什么进步了,现在很多东西都靠自己去写别的来提升自己。
1、了解vue指令开发
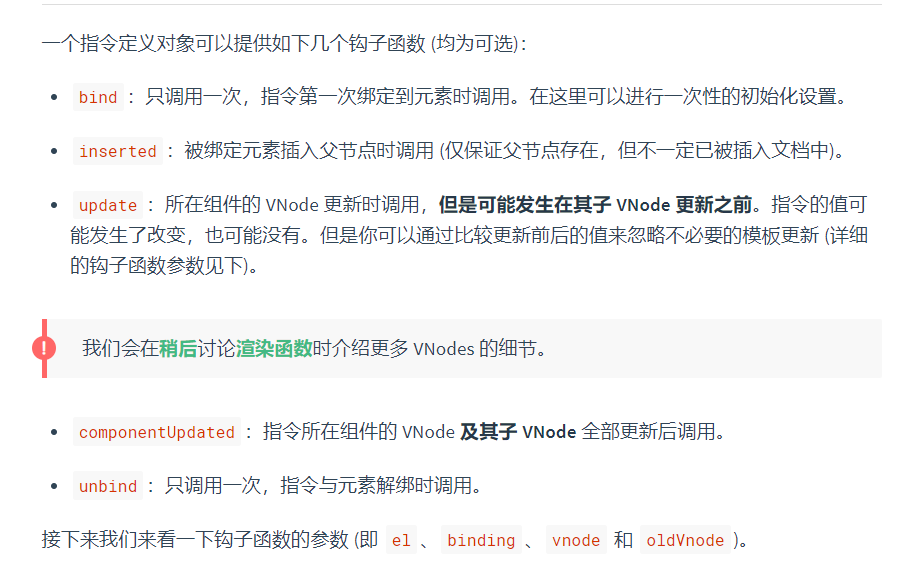
这块我不多说,大家自己去看vue官网,还是比较详细的,主要是看这个图
让大家了解一下,指令在开发的过程中需要注意的发生的函数行为。
2、html代码部分以及参数
这块没太多可以讲的,无非就是写一个固定的蒙版而已。其实这里面很多参数性的东西意义主要在于美化和自定义
<template>
  <div
    :class="fullscreen ? 'dhtMask-FullScreen' : 'dhtMask'"
    :style="{
      zIndex: this.$dhtUI.zIndex,
      background: 'rgba(' + background + ')',
      fontSize: fontSize + 'px',
      color: color
    }"
  >
    <img
      class="dht-loading-icon"
      :src="iconSrc"
      alt="loading"
      :style="{ width: iconWidth + 'px', height: iconHeight + 'px' }"
    />
    <span>{{ text }}</span>
  </div>
</template>

<script>
export default {
  name: "dhtMask",
  data() {
    return {
      fullscreen: false,
      background: "0, 0, 0, 0.5",
      text: "加载中…",
      iconSrc: null,
      iconWidth: null,
      iconHeight: null,
      color: null,
      fontSize: null
    };
  },
  beforeCreate() {},
  created() {},
  beforeMount() {},
  mounted() {
    if (this.fullscreen) {
      document.body.style.overflow = "hidden";
    }
  },
  beforeUpdate() {},
  updated() {},
  activated() {},
  deactivated() {},
  beforeDestroy() {},
  destroyed() {
    document.body.style.overflowX = "hidden";
  },
  errorCaptured() {},
  methods: {}
};
</script>

<style lang="scss">
.dhtMask {
  position: absolute;
  z-index: 2000;
  background: rgba(0, 0, 0, 0.5);
  width: 100%;
  height: 100%;
  color: #ffffff;
  display: flex;
  justify-content: center;
  align-items: center;
  font-size: 12px;
  flex-flow: column;
}
.dhtMask-FullScreen {
  @extend .dhtMask;
  width: 100vw;
  height: 100vh;
  top: 0;
  background: (0, 0, 0, 0.5);
}
.dht-loading-icon {
  width: 25px;
  height: 25px;
  object-fit: cover;
  margin-bottom: 5px;
  animation: dht-rotate 2s linear infinite;
  @keyframes dht-rotate {
    0% {
      transform: rotate(0deg);
    }
    100% {
      transform: rotate(360deg);
    }
  }
}
</style>
2、指定的函数编写(重点)
1、头部引入文件
这里有一个vue.extend,这个是关键,因为在实例化你的html代码之前,需要靠这个来把你的vue文件进行处理。这个标准格式,没太多可以说的。
import vue from "vue";
import maskLoading from "./mask.vue";

const Mask = vue.extend(maskLoading);
2、先把你的指定基本格式写好,这就是基本的格式了
//主函数
const directive = () => {
  vue.directive("dhtLoading", {
    //只调用一次,指令第一次绑定到元素时调用。在这里可以进行一次性的初始化设置。
    bind(el, binding) {

    },
    // 当被绑定的元素插入到 DOM 中时……
    //被绑定元素插入父节点时调用 (仅保证父节点存在,但不一定已被插入文档中)。
    inserted: function(el, binding, vnode, oldVnode) {
      //console.log("元素插入的时候");
    },
    //所在组件的 VNode 更新时调用
    update(el, binding) {

    },
    //指令所在组件的 VNode 及其子 VNode 全部更新后调用
    componentUpdated() {
      //console.log("渲染完成了");
    },
    //只调用一次,指令与元素解绑时调用
    unbind(el) {

    }
  });
};

export default directive;
3、bind函数部分
这是指定函数的开始,所有初始化都在这里完成。我去掉修饰性的代码只留下核心部分
const mask = new Mask({
  el: document.createElement("div"),
  data: {
  }
});
el.instance = mask; //将mask存入
el.mask = mask.$el; //dom存入,方便获取
toggleLoading(el, binding);
这里其实是将vue文件进行实例化,初始化操作。也就是形成虚拟dom,这时候还没有插入页面。
因为我是参考elementUI的源码进行编写。讲解一下关键点。避免大家不理解
el.instance = mask; //将mask存入这段是把实例化的vue文件暂存,后面需要额外使用
el.mask = mask.$el; //dom存入,方便获取这里是把dom处理下
toggleLoading(el, binding);这里el和binding,其实是指令在绑定页面的时候会传入当前绑定dom元素,还有指令参数。方式和elementUI不一样,elementUI是用的的html自定义元素。
核心在于这个函数了。很关键
4、将元素移除和插入页面toggleLoading
//蒙版操作更新
const toggleLoading = function(el, binding) {
  //console.log(binding);
  if (binding.value) {
    vue.nextTick(() => {
      if (binding.modifiers.fullscreen) {
        //全屏情况下
        //el.instance.fullscreen = true;
        //document.body.style.overflow = "hidden";
        document.body.appendChild(el.mask);
      } else {
        //el.instance.fullscreen = false;
        //非全屏情况下
        let height = el.clientHeight; //当前元素高度
        let width = el.clientWidth; //当前元素宽度
        let offsetTop = el.offsetTop; //当前元素距离顶部距离
        //给蒙版赋值
        el.mask.style.top = offsetTop + "px";
        el.mask.style.height = height + "px";
        el.mask.style.width = width + "px";
        //console.log(offsetTop);
        el.appendChild(el.mask);
      }
    });
  } else {
    //移除节点
    el.mask && el.mask.parentNode && el.mask.parentNode.removeChild(el.mask);
    el.instance && el.instance.$destroy();
}关键点分析:vue.nextTick
需要注意,如果不加会导致页面直接在插入的时候插入位置错误。因为是需要等待页面渲染完成的。这里其实我做的不太好,因为elementUI不会发生刷新页面导致元素定位错误的问题。不过我不多研究了,大致原因是知道的。主要是知道核心的原理。
这段代码其实很简单,一个是更新元素的宽高,可以覆盖当前的元素。还有就是定位到当前元素上面,剩下的就是直接把元素插入到页面里面。
重复调用的时候进行处理,支持删除和插入。
5、要知道指令发生变化了
//所在组件的 VNode 更新时调用
update(el, binding) {
  //console.log("更新了", binding);
  if (binding.oldValue !== binding.value) {
    toggleLoading(el, binding);
  }
},
这里很简单,就是判断一下数据是否一致,还有就是再调用一次函数,把元素移除。判断是为了防止同一个地方插入两次元素。
6、解绑指令。
//只调用一次,指令与元素解绑时调用
unbind(el) {
  //console.log("解绑了");
  //不知道指令如何解绑,先写着
  el.mask && el.mask.parentNode && el.mask.parentNode.removeChild(el.mask);
  el.instance && el.instance.$destroy();
}
这里不是很清楚。因为不知道解绑指令在什么时候。
7、整个指令的js文件
先讲注册使用。这个很简单。
就是,引入如你的js文件
import directive from "./mask/directive";vue.use(directive);整个js文件部分
import vue from "vue";
import maskLoading from "./mask.vue";

const Mask = vue.extend(maskLoading);

//主函数
const directive = () => {
  //蒙版操作更新
  const toggleLoading = function(el, binding) {
    //console.log(binding);
    if (binding.value) {
      vue.nextTick(() => {
        if (binding.modifiers.fullscreen) {
          //全屏情况下
          //el.instance.fullscreen = true;
          //document.body.style.overflow = "hidden";
          document.body.appendChild(el.mask);
        } else {
          //el.instance.fullscreen = false;
          //非全屏情况下
          let height = el.clientHeight; //当前元素高度
          let width = el.clientWidth; //当前元素宽度
          let offsetTop = el.offsetTop; //当前元素距离顶部距离
          //给蒙版赋值
          el.mask.style.top = offsetTop + "px";
          el.mask.style.height = height + "px";
          el.mask.style.width = width + "px";
          //console.log(offsetTop);
          el.appendChild(el.mask);
        }
      });
    } else {
      //移除节点
      el.mask && el.mask.parentNode && el.mask.parentNode.removeChild(el.mask);
      el.instance && el.instance.$destroy();
    }
  };
  //let timer = "";
  vue.directive("dhtLoading", {
    //只调用一次,指令第一次绑定到元素时调用。在这里可以进行一次性的初始化设置。
    bind(el, binding) {
      //console.log(el, binding, vnode);
      let background = binding.value.background,
        text = binding.value.text,
        iconSrc = binding.value.iconSrc,
        iconWidth = binding.value.iconWidth,
        iconHeight = binding.value.iconHeight,
        color = binding.value.color,
        fontSize = binding.value.fontSize;
      const mask = new Mask({
        el: document.createElement("div"),
        data: {
          fullscreen: !!binding.modifiers.fullscreen,
          background: background ? background : "0, 0, 0, 0.5",
          text: text ? text : "加载中…",
          iconSrc: iconSrc ? iconSrc : require("../../style/img/loading.png"),
          iconWidth: iconWidth ? iconWidth : null,
          iconHeight: iconHeight ? iconHeight : null,
          color: color ? color : null,
          fontSize: fontSize ? fontSize : null
        }
      });
      el.instance = mask; //将mask存入
      el.mask = mask.$el; //dom存入,方便获取
      toggleLoading(el, binding);
    },
    // 当被绑定的元素插入到 DOM 中时……
    //被绑定元素插入父节点时调用 (仅保证父节点存在,但不一定已被插入文档中)。
    // eslint-disable-next-line no-unused-vars
    inserted: function(el, binding, vnode, oldVnode) {
      //console.log("元素插入的时候");
    },
    //所在组件的 VNode 更新时调用
    update(el, binding) {
      //console.log("更新了", binding);
      if (binding.oldValue !== binding.value) {
        toggleLoading(el, binding);
      }
    },
    //指令所在组件的 VNode 及其子 VNode 全部更新后调用
    componentUpdated() {
      //console.log("渲染完成了");
    },
    //只调用一次,指令与元素解绑时调用
    unbind(el) {
      //console.log("解绑了");
      //不知道指令如何解绑,先写着
      el.mask && el.mask.parentNode && el.mask.parentNode.removeChild(el.mask);
      el.instance && el.instance.$destroy();
    }
  });
};

export default directive;
8、文档
| 指令模式(蒙版) | fullscreen | Boolean | v-dht-loading.fullscreen | 在非全屏模式下,dom没有渲染完成下会导致元素顶部对齐 | |
| background | String | 0, 0, 0, 0.5 | |||
| text | String | 加载中... | |||
| iconSrc | String | 默认加载图 | 修改加载提示图片 | ||
| iconWidth | String | 图片宽度 | |||
| iconHeight | String | 图片高度 | |||
| color | String | 字体颜色 | |||
| fontSize | String | 字体大小 |
3、整体思路和致谢
思路:
指定模式并没有很特别,更多是是一种组件的更优雅的使用方式。
像这个整体就是先绑定到当前元素,然后获取当前元素的宽高,设置蒙版宽高一致,并且定位到当前元素位置,最后插入。必要的时候就是检测数据变化,然后移除元素。本身并没有很神奇,但是大家没写之前真的会觉得,这真是太棒了。
对了说一下我的git:避免大家懵逼。看到execl文件没有,可以直接去看。
https://github.com/ht-sauce/dream