

概述
-
该库通过扩展原生控件实现圆角矩形背景,扩展的控件包括:
- FrameLayout
- LinearLayout
- RelativeLayout
- TextView
-
实现效果如下:
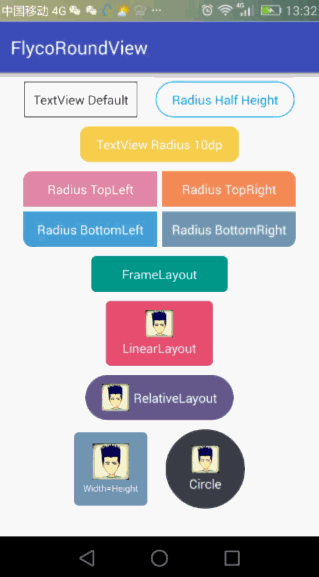
-
使用方式
参考官方地址
源码解析
RoundTextView(其它实现类似)
public class RoundTextView extends TextView {
    private RoundViewDelegate delegate;

    public RoundTextView(Context context) {
        this(context, null);
    }

    public RoundTextView(Context context, AttributeSet attrs) {
        this(context, attrs, 0);
    }

    public RoundTextView(Context context, AttributeSet attrs, int defStyleAttr) {
        super(context, attrs, defStyleAttr);
        delegate = new RoundViewDelegate(this, context, attrs);
    }

    /** use delegate to set attr */
    public RoundViewDelegate getDelegate() {
        return delegate;
    }

    @Override
    protected void onMeasure(int widthMeasureSpec, int heightMeasureSpec) {
        if (delegate.isWidthHeightEqual() && getWidth() > 0 && getHeight() > 0) {
            int max = Math.max(getWidth(), getHeight());
            int measureSpec = MeasureSpec.makeMeasureSpec(max, MeasureSpec.EXACTLY);
            super.onMeasure(measureSpec, measureSpec);
            return;
        }

        super.onMeasure(widthMeasureSpec, heightMeasureSpec);
    }

    @Override
    protected void onLayout(boolean changed, int left, int top, int right, int bottom) {
        super.onLayout(changed, left, top, right, bottom);
        if (delegate.isRadiusHalfHeight()) {
            delegate.setCornerRadius(getHeight() / 2);
        } else {
            delegate.setBgSelector();
        }
    }
}
可以看到具体是通过RoundViewDelegate实现。
在onMeasure中,当配置了属性isWidthHeightEqual时,会指定测量规格,以宽高大的一边测量为正文形;
在onLayout中,当配置了属性isRadiusHalfHeight时,圆角即为高度的一半;
在RoundViewDelegate中的setter方法,都会调用setBgSelector来进行真正的背景绘制;
RoundViewDelegate
- 在
RoundViewDelegate中,有两个成员变量表示默认背景及按下背景;
private GradientDrawable gd_background = new GradientDrawable();
private GradientDrawable gd_background_press = new GradientDrawable();
注意:在xml使用shape时,编译对应的就是GradientDrawable,而不是ShapeDrawable。
-
接下来我们看一下
setBgSelector方法-
首先构建一个
StateListDrawable用于表示背景DrawableStateListDrawable bg = new StateListDrawable(); -
判断api是否大于5.0,并且是否使用水波纹
 if (Build.VERSION.SDK_INT >= Build.VERSION_CODES.LOLLIPOP && isRippleEnable) {
            setDrawable(gd_background, backgroundColor, strokeColor);
            RippleDrawable rippleDrawable = new RippleDrawable(
                    getPressedColorSelector(backgroundColor, backgroundPressColor), gd_background, null);
            view.setBackground(rippleDrawable);
        }
进入该条件,首先会把成员变量
gd_background传入setDrawable方法对其进行赋值private void setDrawable(GradientDrawable gd, int color, int strokeColor) { gd.setColor(color); if (cornerRadius_TL > 0 || cornerRadius_TR > 0 || cornerRadius_BR > 0 || cornerRadius_BL > 0) { /**The corners are ordered top-left, top-right, bottom-right, bottom-left*/ radiusArr[0] = cornerRadius_TL; radiusArr[1] = cornerRadius_TL; radiusArr[2] = cornerRadius_TR; radiusArr[3] = cornerRadius_TR; radiusArr[4] = cornerRadius_BR; radiusArr[5] = cornerRadius_BR; radiusArr[6] = cornerRadius_BL; radiusArr[7] = cornerRadius_BL; gd.setCornerRadii(radiusArr); } else { gd.setCornerRadius(cornerRadius); } gd.setStroke(strokeWidth, strokeColor); }主要设置它的背景色、圆角以及边框;
之后会生成一个带水波纹的Drawable(
RippleDrawable),会调用getPressedColorSelector生成颜色状态;@TargetApi(Build.VERSION_CODES.HONEYCOMB) private ColorStateList getPressedColorSelector(int normalColor, int pressedColor) { return new ColorStateList( new int[][]{ new int[]{android.R.attr.state_pressed}, new int[]{android.R.attr.state_focused}, new int[]{android.R.attr.state_activated}, new int[]{} }, new int[]{ pressedColor, pressedColor, pressedColor, normalColor } ); } }最终把RippleDrawable的实例设置为View的background。
-
如果不使用水波纹
setDrawable(gd_background, backgroundColor, strokeColor);
bg.addState(new int[]{-android.R.attr.state_pressed}, gd_background);
if (backgroundPressColor != Integer.MAX_VALUE || strokePressColor != Integer.MAX_VALUE) {
                setDrawable(gd_background_press, backgroundPressColor == Integer.MAX_VALUE ? backgroundColor : backgroundPressColor,
                        strokePressColor == Integer.MAX_VALUE ? strokeColor : strokePressColor);
                bg.addState(new int[]{android.R.attr.state_pressed}, gd_background_press);
            }

if (Build.VERSION.SDK_INT >= Build.VERSION_CODES.JELLY_BEAN) {//16
    view.setBackground(bg);
} else {
		view.setBackgroundDrawable(bg);
   }
}
通过
StateListDrawable分别设置不同状态的Drawable,再设置给background;bg.addState(new int[]{-android.R.attr.state_pressed}, gd_background);这行代码中出现负号**-**,表示state_pressed为false的情况。 -
最后TextView作特殊处理
        if (view instanceof TextView) {
            if (textPressColor != Integer.MAX_VALUE) {
                ColorStateList textColors = ((TextView) view).getTextColors();
                ColorStateList colorStateList = new ColorStateList(
                        new int[][]{new int[]{-android.R.attr.state_pressed}, new int[]{android.R.attr.state_pressed}},
                        new int[]{textColors.getDefaultColor(), textPressColor});
                ((TextView) view).setTextColor(colorStateList);
            }
        }
通过
ColorStateList设置文字颜色。注意:
GradientDrawable、StateListDrawable、ColorStateList的使用场景。
-
