

ImageIO
创建并使用Image Sources
image source 对数据访问任务进行了抽象并且消除了通过原始内存缓冲区去管理数据的需要. 一个image source 可以包含多个图片, 缩略图, 每个图片的属性和图片文件. 当你正在处理图片数据并且你的应用运行在OS X V10.4及以上的系统上时, image sources 是在你的应用中移动图片数据最好的方式. 在创建了一个CGImageSource 对象后, 你可以使用描述在CGImageSource Reference 中的函数去获取到图片, 缩略图, 图片属性和其他图片信息.
通过Image Source创建Image
在使用Image I/O framework时最常用的是创建一个image通过image source, 如Listing 2-1所示. 这个例子展示了怎样通过图片地址来创建一个image source 并提取image的方法. 当创建一个image source object时, 你可以提供有关图片文件格式的提示.
当通过image source创建image时, 你必须指定一个索引, 你可以提供一个属性字典来指定是否创建缩略图或允许缓存. CGImageSource Reference和CGImageProperties列出了keys和每个key对应值的期望数据类型.
你需要提供一个索引值, 因为一些图片文件格式允许多个image存在于同一个源文件中. 对于仅仅只包含一个image的图片源文件, 索引值为0. 你可以通过调用CGImageSourceGetCount函数来获取在一个图片源文件中包含image的数量.
Listing 2-1 Creating an image from an image source
CGImageRef MyCreateCGImageFromFile(NSString *path)
{
  // Get the URL for the pathname passed to the function.
  NSURL *url = [NSURL fileURLWithPath:path];
  CGImageRef myImage = NULL;
  CGImageSourceRef myImageSource;
  CFDictionaryRef myOptions = NULL;
  CFStringRef myKeys[2];
  CFTypeRef myValues[2];

  // set up options if you want them. The options here are for
  // caching the image in a decoded form and for using floating-point
  // value if the image format supports them.
  myKeys[0] = kCGImageSourceShouldCache;
  myValues[0] = (CFTypeRef)kCFBooleanTrue;
  myKeys[1] = kCGImageSourceShouldAllowFloat;
  myValues[1] = (CFTypeRef)kCFBooleanTrue;
  // Create the dictionary
  myOptions = CFDictionaryCreate(NULL, (const void **)myKeys, (const void **)myValues, 2, &kCFTypeDictionaryKeyCallBacks, &kCFTypeDictionaryValueCallBacks);
  myImageSource = CGImageSourceCreateWithURL((CFURLRef)url, myOptions);
  CFRelease(myOptions);
  // Make sure the image source exists before continuing
  if (myImageSource == NULL) {
    fprintf(stderr, "Image source is NULL.");
    return NULL;
  }
  // Create an image from the first item in the image source
  myImage = CGImageSourceCreateImageAtIndex(myImageSource, 0, NULL);
  CFRelease(myImageSource);
  // Make sure the image exists before continuing
  if (myImage == NULL) {
    fprintf(stderr, "Image not create from image source.");
    return NULL;
  }
  return myImage;
}
通过Image Source创建Thumbnail Image
一些图片源文件包含可以检索的缩略图, 如果缩略图还不存在, Image I/O 给你创建它们的选项. 你也可以指定最大缩略图的尺寸以及是否对缩略图进行形变.
Listing 2-2 展示了怎样通过data创建image source, 设置与缩略图相关的选项字典, 并且创建缩略图. 你可以使用kCGImageSourceCreateThumbnailWithTransform key指定是否缩略图应该旋转, 缩放去匹配整个image的方向及像素长宽比.
Listing 2-2 Create a thumbnail image
CGImageRef MyCreateThumbnailImageFromData(NSData *data, int imageSize)
{
  CGImageRef myThumbnailImage = NULL;
  CGImageSourceRef myImageSource;
  CFDictionaryRef myOptions = NULL;
  CFStringRef myKeys[3];
  CFTypeRef myValues[3];
  CFNumberRef thumbnailSize;

  // Create an image source from NSData; no options.
  myImageSource = CGImageSourceCreateWithData((CFDataRef)data, NULL);
  // Make sure the image source exists before continuing.
  if (myImageSource == NULL) {
    fprintf(stderr, "Image source is NULL");
    return NULL;
  }

  // Package the integer as a CFNumber object. Using CFTypes allows you
  // to more easily create the options dictionary later.
  thumbnailSize = CFNumberCreate(NULL, kCFNumberIntType, &imageSize);

  // Set up the thumbnail options
  myKeys[0] = kCGImageSourceCreateThumbnailWithTransform;
  myValues[0] = (CFTypeRef)kCFBooleanTrue;
  myKeys[1] = kCGImageSourceCreateThumbnailFromImageIfAbsent;
  myValues[1] = (CFTypeRef)kCFBooleanTrue;
  myKeys[2] = kCGImageSourceThumbnailMaxPixelSize;
  myValues[2] = (CFTypeRef)thumbnailSize;

  myOptions = CFDictionaryCreate(NULL, (const void **)myKeys, (const void **)myValues, 2, &kCFTypeDictionaryKeyCallBacks, &kCFTypeDictionaryValueCallBacks);

  // Create the thumbnail image using the specified options
  myThumbnailImage = CGImageSourceCreateThumbnailAtIndex(myImageSource, 0, myOptions);
  // Release the options dictionary and the image source
  // when you no longer need them.
  CFRelease(thumbnailSize);
  CFRelease(myOptions);
  CFRelease(myImageSource);

  // Make sure the thumbnail image exists before continuing.
  if (myThumbnailImage == NULL) {
    fprintf(stderr, "Thumbnail image not created from image source.");
    return NULL;
  }

  return myThumbnailImage;
}
递增的加载图片
如果你有一张非常大的图片或者正在从网络上加载图片数据, 你可能想创建一个递增的image source以便于你递增的绘制图片数据. 你需要执行以下任务来从CFData对象递增的加载图片:
- 创建CFData对象来累加图片数据.
- 创建incremental image source 通过CGImageSourceCreateIncremental函数.
- 添加图片数据到CFData对象.
- 调用CGImageSourceUpdateData函数, 传递CFData对象和一个Boolean值来指定data参数是否包含整个图片还是部分的图片数据. 任何情况下, data参数必须包含累加到该点的所有图片文件数据.
- 如果你已经累加了足够的图片数据, 通过调用CGImageSourceCreateImageAtIndex函数创建图片, 或绘制部分图片, 或释放它.
- 调用CGImageSourceGetStatusAtIndex函数来检查累加的图片数据是否可以创建图片. 如果图片数据是完整的, 这个函数返回kCGImageStatusComplete. 如果图片没有完成, 则重复第3,4步.
- 释放incremental image source.
展示图片属性
数码照片富有丰富的图像信息--图像尺寸, 分辨率, 方向, 颜色轮廓, 孔径, 测量模式, 焦距, 创建时间, 关键字, 标题等. 这些信息对于处理和编辑图片是非常有用的, 但只有在数据在用户界面中公开时. 尽管CGImageSourceCopyPropertiesAtIndex函数可以提取所有该图片相关的属性, 但你需要编写代码来遍历字典来提取并显示这些信息.
这部分, 你将仔细查看OS X ImageApp示例代码, ImageApp是一个显示图片的应用, 你可以下载并用它做实验. 它的一个特性是用于展示缩略图和图片属性的图片信息窗口, 如Figure 2-1
Figure 2-1 An Info window that displays image properties
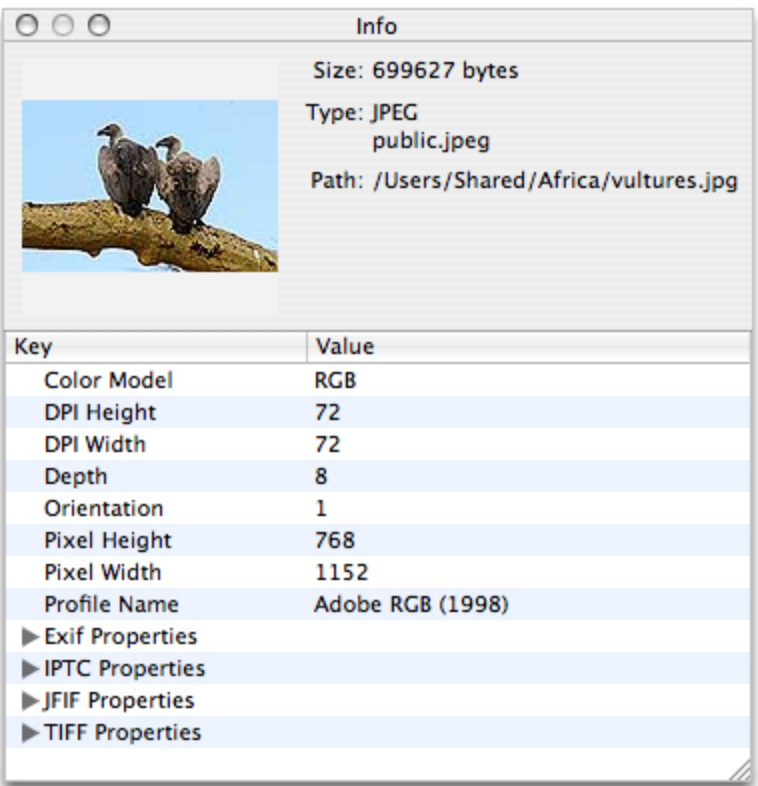
你可以通过查看ImageInfoPanel.h和ImageInfoPanel.m文件来了解这个panel的详细实现; 你也需要查看nib文件了解如何设置窗口和绑定. 要了解如何用CGImageSource函数来支持图片编辑应用, 查看Listing 2-3.
Listing 2-3 A routine that creates an image source and retrieves properties
- (void)setURL:(NSURL *)url {
  if ([url isEqual:mUrl]) {
    return;
  }
  mUrl = url;
  CGImageSourceRef source = CGImageSourceCreateWithURL((CFURLRef)url, NULL);
  if (source) {
    NSDictionary *props = (NSDictionary *)CGImageSourceCopyPropertiesAtIndex(source, 0, NULL);
    [mTree setContent:[self propTree:props]];
    NSDictionary *thumbOpts = [NSDictionary dictionaryWithObjectsAndKeys:(id)kCFBooleanTrue, (id)kCGImageSourceCreateThumbnailWithTransfrom, (id)kCFBooleanTrue, (id)kCGImageSourceCreateThumbnailFromImageIfAbsent, [NSNumber numberWithInt:128], (id)kCGImageSourceThumbnailMaxPixelSize, nil];
    CGImageRef image = CGImageSourceCreateThumbnailAtIndex(source, 0, (CFDictionaryRef)thumbOpts);
    [mThumbView setImage:image];
    CGImageRelease(image);
    [mFilePath setStringValue:[mUrl path]];

    NSString *uri = (NSString *)CGImageSourceGetType(source);
    [mFileType setStringValue:[NSString stringWithFormat:@"%@\n%@", ImageIOLocalizedString(uti), uti]];

    CFDictionaryRef fileProps = CGImageSourceCopyProperties(source, nil);
    [mFileSize setStringValue:[NSString stringWithFormat:@"%@ bytes", (id)CFDictionaryGetValue(fileProps, kCGImagePropertyFileSize)]];
  } else {
    [mTree setContent:nil];
    [mThumbView setImage:nil];
    [mFilePath setStringValue:@""];
    [mFileType setStringValue:@""];
    [mFileSize setStringValue:@""];
  }
}
使用Image Destnations
Image Destination 抽象了写数据任务并且消除了通过原始缓存管理数据的需要. 一个Image Destination可以代表单个image 或者 多个images. 它可以包含多张缩略图以及每个缩略图的属性. 通过URL, CFData, Quartz data来创建CGImageDestination对象后, 你可以添加图片数据和设置图片属性. 当你添加数据完成后, 调用CGImageDestnationFinalize函数.
设置Image Destination的属性
CGImageDestinationSetProperties函数向image destination中的images添加属性字典. 虽然设置属性是可选的, 但是在一下场景下, 你会去设置它. 比如, 你的应用允许用户添加关键字到图片中或者改变饱和度, 曝光或其他值, 你将需要保存这些信息到选项字典中.
Image I/O定义了一组keys,用于指定诸如压缩质量、背景合成颜色、Exif字典key、颜色模型、GIFkey、尼康和佳能相机键等等. CGImageProperties Reference
当设置字典时, 你有两个选择. 你可以创建一个CFDictionary对象或者创建NSDictionary对象, 然后转换为CFDictionaryRef, 当你要将其作为参数传递给CGImageDestinationSetProperties函数时. Listing 3-1 展示了相关的代码片段
当你为一个属性设置key-value时, 你需要查询文档(CGimageDestination Reference 和 CGImageProperties Reference). 如Listing 3-1所示, 数值类型值需要包装成CFNumber对象. 当用Core Foundation类型作为字典的值时, 你可以提供回调在创建字典时 -- kCFTypeDictionaryKeyCallBacks 和 kCFTypeDictionaryValueCallBacks.
Listing 3-1
float compression = 1.0;
int orientation = 4;
CFStringRef mykeys[3];
CFTypeRef myValues[3];
CFDictionaryRef myOptions = NULL;
myKeys[0] = kCGImagePropertyOrientation;
myValues[0] = CFNumberCreate(NULL, kCFNumberIntType, &orientation);
myKeys[1] = kCGImagePropertyHasAlpha;
myValues[1] = kCFBooleanTrue;
myKeys[2] = kCGImageDestinationLossCompressionQuality;
myValues[2] = CFNumberCreate(NULL, kCFNumberFloatType, &compression);
myOptions = CFDictionaryCreate(NULL, (const void **)myKeys, (const void **)myValues, 3, &kCFTypeDictionaryKeyCallBacks, &kCFTypeDictionaryValueCallBacks);
写图片到Image Destination
写图片到Image Destination前, 你需要通过CGImageDestinationCreateWithUrl, CGImageDestinationCreateWithData, CGImageDestinationCreateWithDataConsumer函数创建一个Image Destination对象. 你需要未图片文件提供统一类型标识符UTI.
在创建Image Destination后, 你可以调用CGImageDestinationAddImage或CGImageDestinationAddImageFromSource函数来添加图片. 如果Image Destination文件的格式支持多张图片, 你可以重复添加图片. 调用CGImageDestinationFinalize函数标识完成图片的添加. 一旦完成, 你不能再向Image Destination中添加数据.
Listing 3-2 展示怎样写一个图片文件
- (void)writeCGImage:(CGImageRef)image toURL:(NSURL *)url withType:(CFStringRef)imageType andOptions:(CFDictionaryRef)options {
  CGImageDestinationRef myImageDest = CGImageDestinatonCreateWithURL((CFURLRef)url, imageType, 1, nil);
  CGImageDestinationAddImage(myImageDest, image, options);
  CGImageDestinationFinalize(myImageDest);
  CFRelease(myImageDest);
}
创建动画图片
Image I/O能够创建动画图片. 当创建动画图片时, 你可以调用CGImageDestinationAddImage函数为你创建的每一帧添加图片. 你还必须制定其他属性来控制动画的执行.
Listing 3-3 展示了怎样创建一个PNG动画图片. 首先创建一个字典来保存动画属性. 第一个字典指定PNG动画图片重复它的动画的次数. 第二个字典指定每一帧间的延时. 在创建一个动画图片后, 设置了Image Destination的属性并且添加了帧. 最后调用CGImageDestinationFinalize函数完成PNG动画图片的调用.
Listing 3-3
let loopCount = 1
let frameCount = 60

var fileProperties = NSMutableDictionary()
fileProperties.setObject(kCGImagePropertyPNGDictionary, forKey: NSDictionary(dictionary: [kCGImagePropertyAPNGLoopCount: frameCount]))

var frameProperties = NSMutableDictionary()
frameProperties.setObject(kCGImagePropertyPNGDictionary, forKey: NSDictionary(dictionary: [kCGImagePropertyAPNGDelayTime: 1.0 / Double(frameCount)]))

guard let destination = CGImageDestinationCreateWithURL(fileURL, kUTTypePNG, frameCount, nil) else {
    // Provide error handling here.
}

CGImageDestinationSetProperties(destination, fileProperties.copy() as? NSDictionary)

for i in 0..<frameCount {
    autoreleasepool {
        let radians = M_PI * 2.0 * Double(i) / Double(frameCount)
        guard let image = imageForFrame(size: CGSize(width: 300, height: 300)) else {
            return
        }

        CGImageDestinationAddImage(destination, image, frameProperties)
    }
}

if !CGImageDestinationFinalize(destination) {
    // Provide error handling here.
}
