

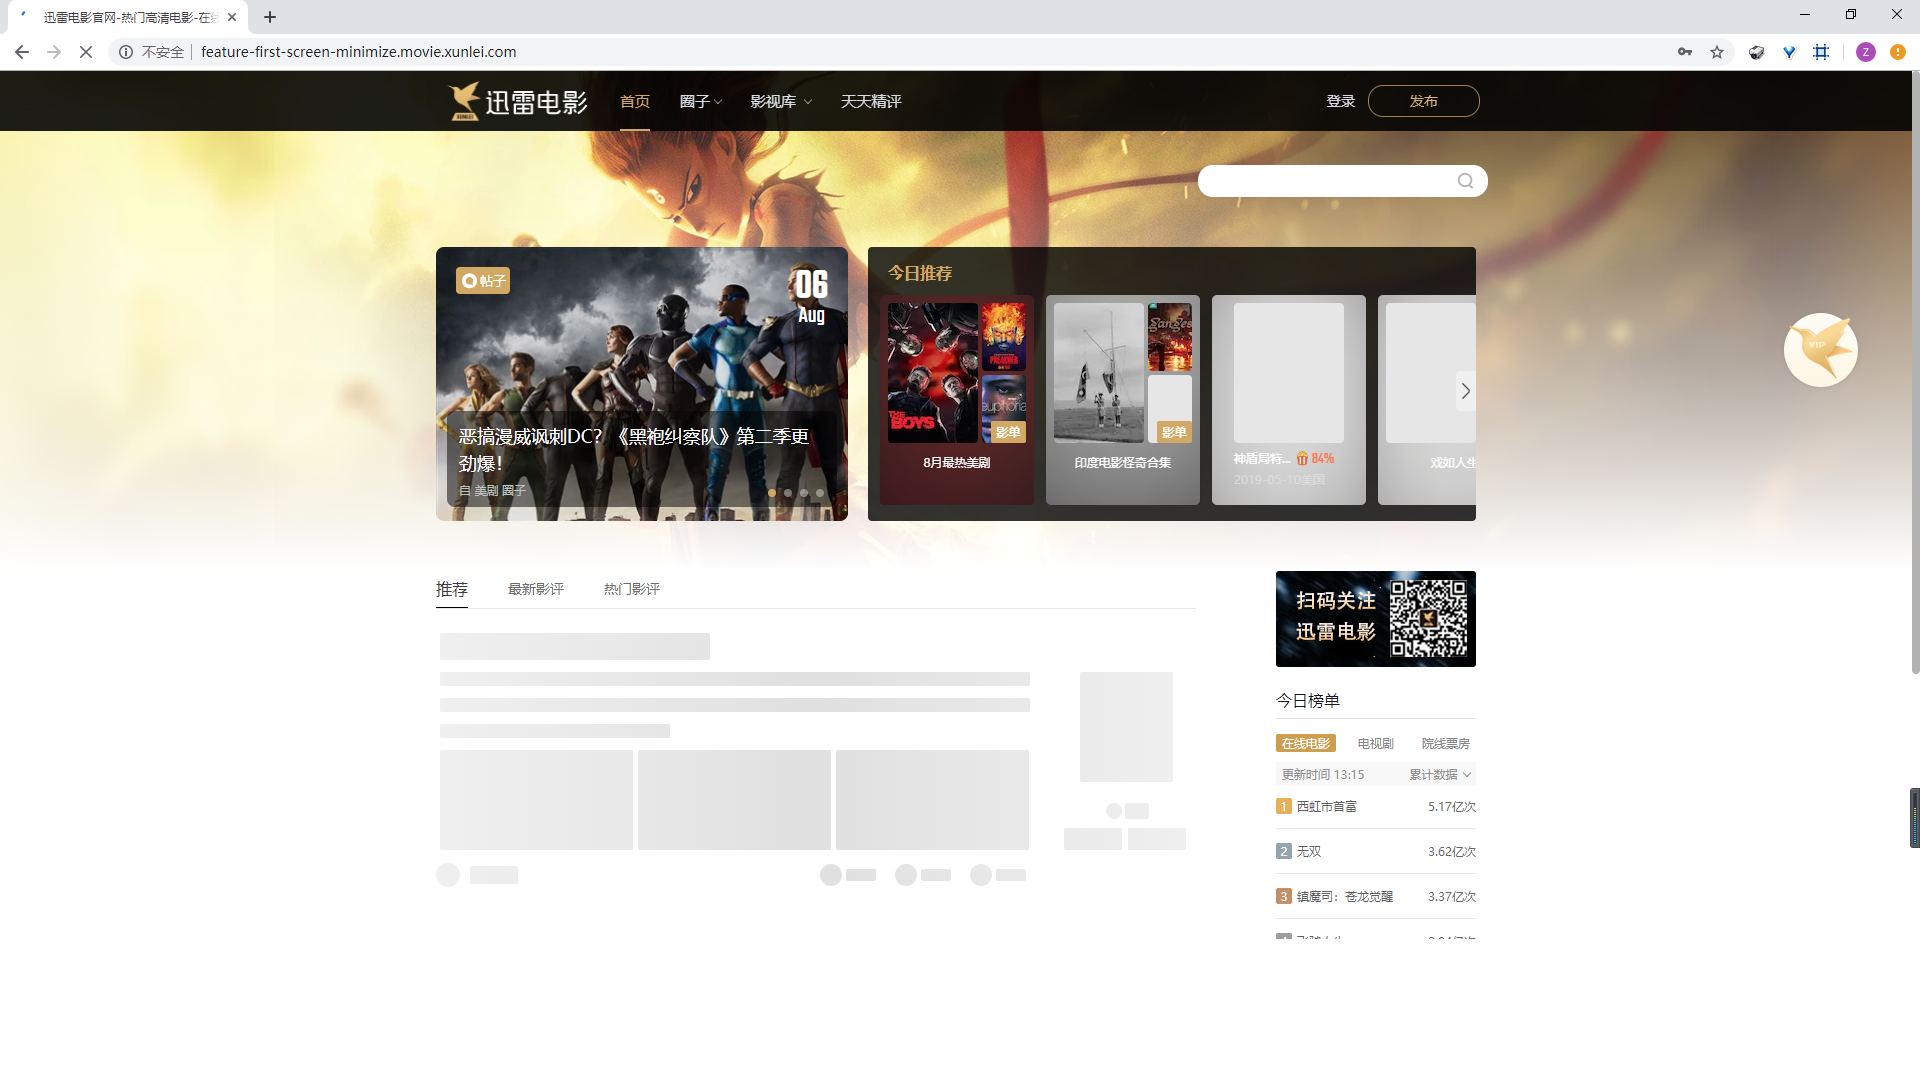
目前项目采用 Nuxt SSR 来完成服务端渲染 ,为满足 SEO 需求,将非首屏内容也进行了请求和服务端直出,导致首屏时间变长(非首屏的资源请求和组件的渲染都会带来额外开销)。对于海量的用户来说,少量的爬虫访问需求反而影响了正常用户的访问,导致 SEO 和用户体验提升存在很大的矛盾。
为了解决这个问题,我们设计和实践了自适应 SSR 方案,来同时满足这两种场景的需求。今天会分享这个方案的技术细节、设计思路以及在实施该方案过程中遇到的一些相关的子问题的实践踩坑经验,欢迎大家一起交流。
分享大纲
- 问题来源和背景
- 问题解决思路
- 自适应 SSR 方案介绍
- 采用自适应 SSR 优化前后数据
- Vue SSR client side hydration 踩坑实践
- 使用 SVG 生成骨架屏踩坑实践
问题来源和背景
目前项目采用 Nuxt SSR 来完成服务端渲染,为满足 SEO 需求,将非首屏资源也进行了请求和服务端直出,导致首屏时间变长(非首屏的资源请求和组件的渲染都会带来额外开销)
优化前的加载流程图
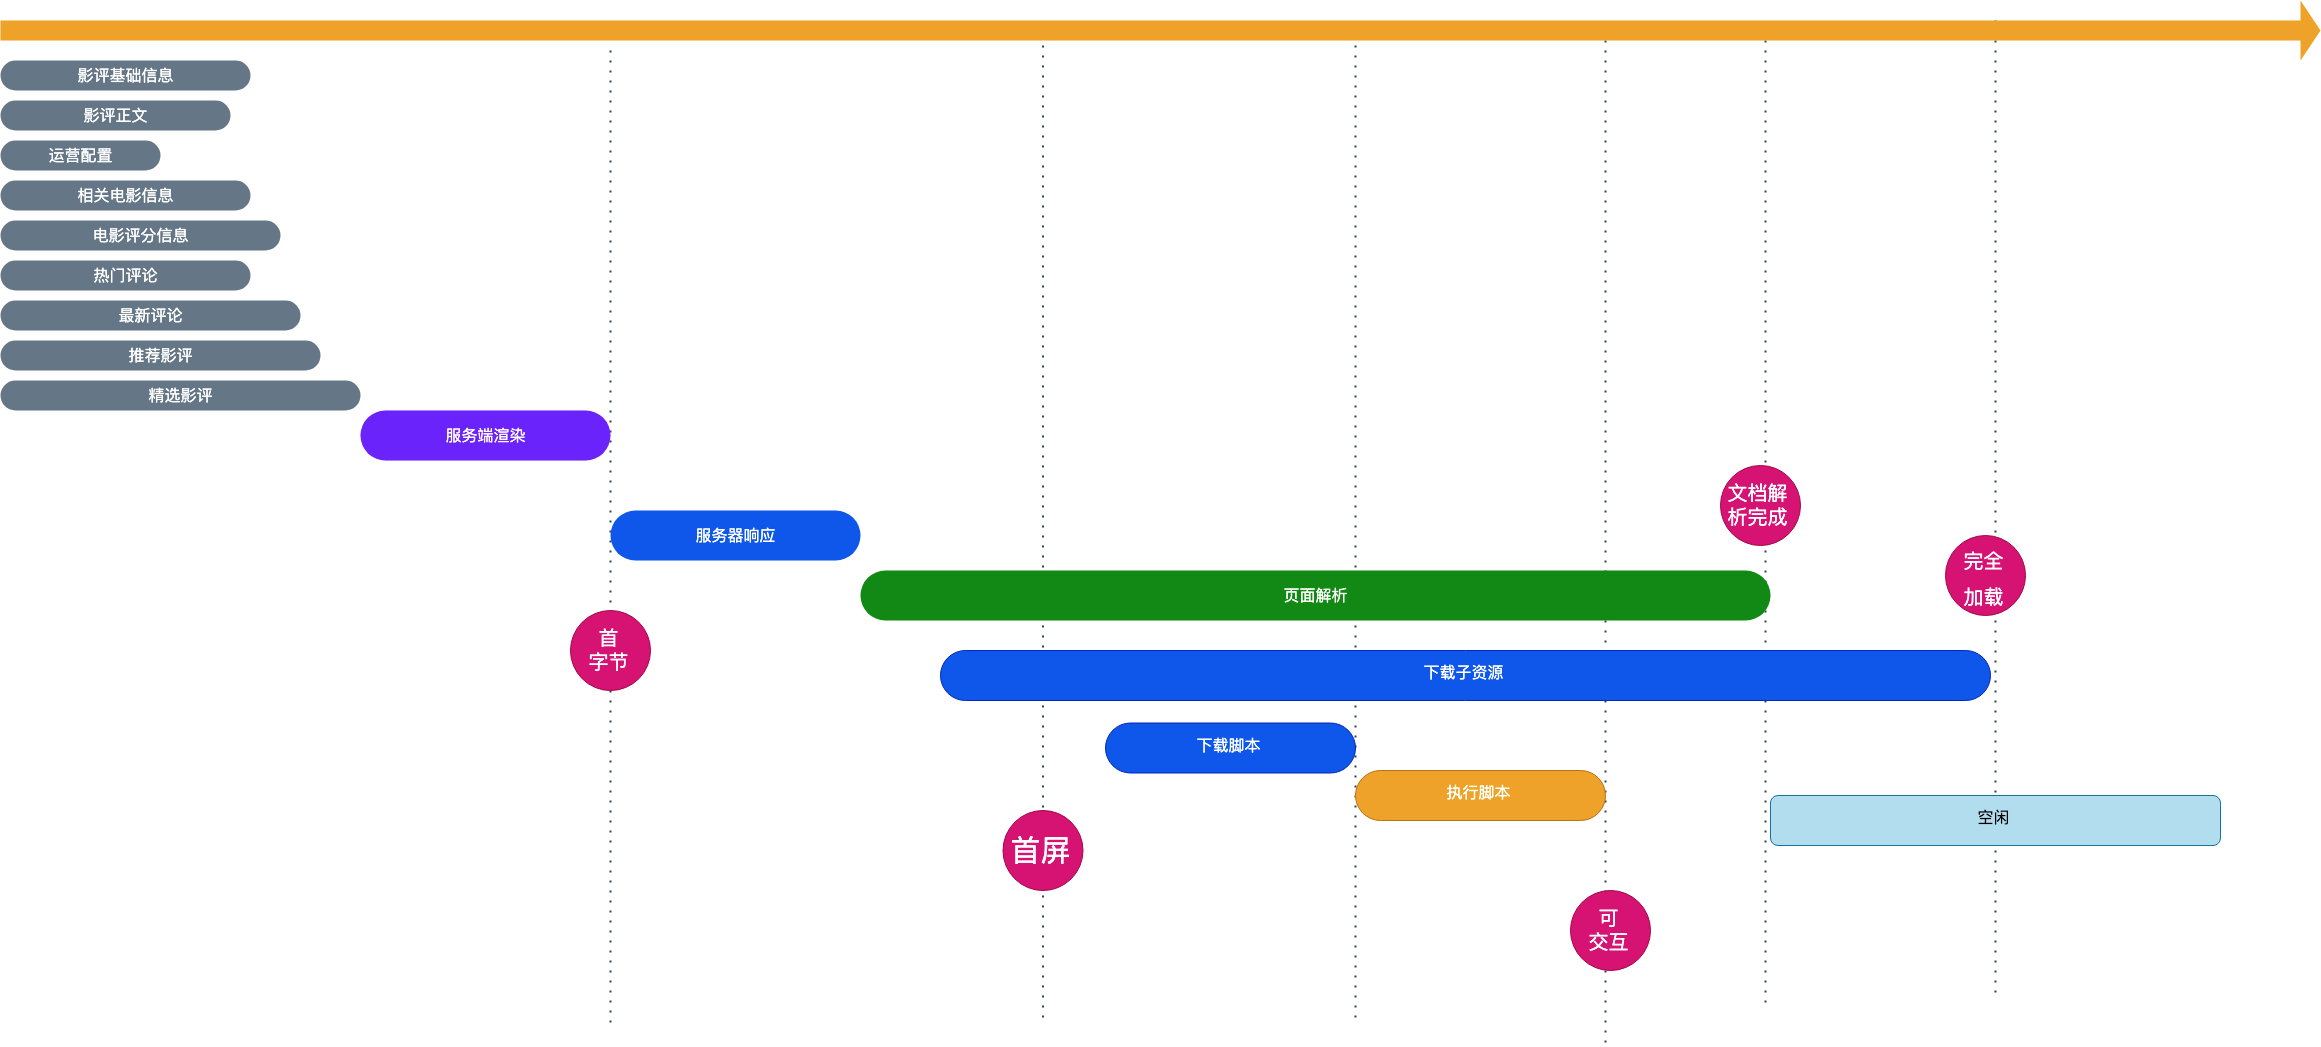
目前我们的 Nuxt 项目采用 fetch 来实现 SSR 数据预取,fetch 中会处理所有关键和非关键请求
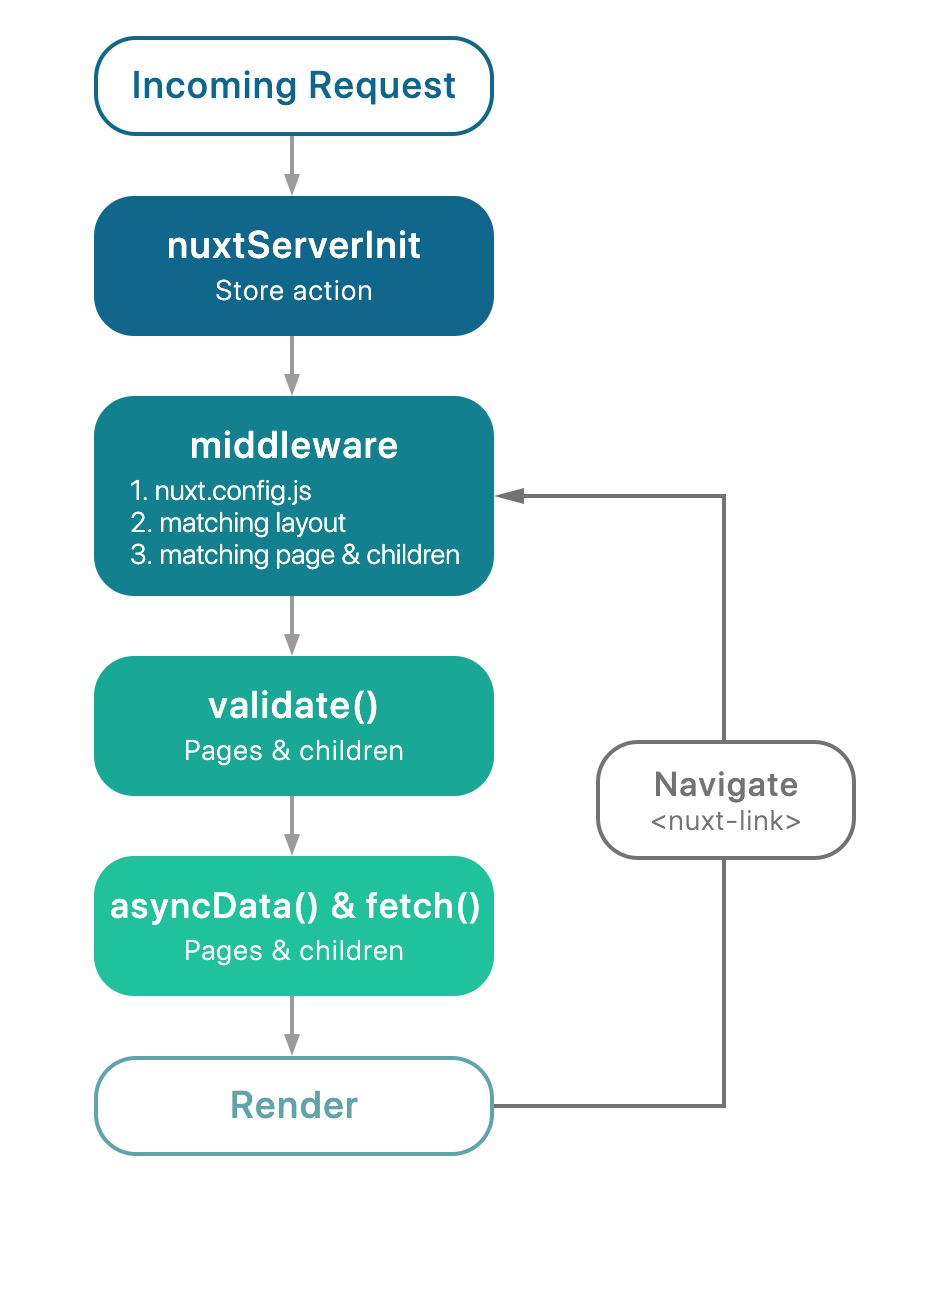
Nuxt 生命周期图
对于海量的用户来说,少量的爬虫访问需求反而影响了正常用户的访问,导致 SEO 和用户体验提升存在很大的矛盾。
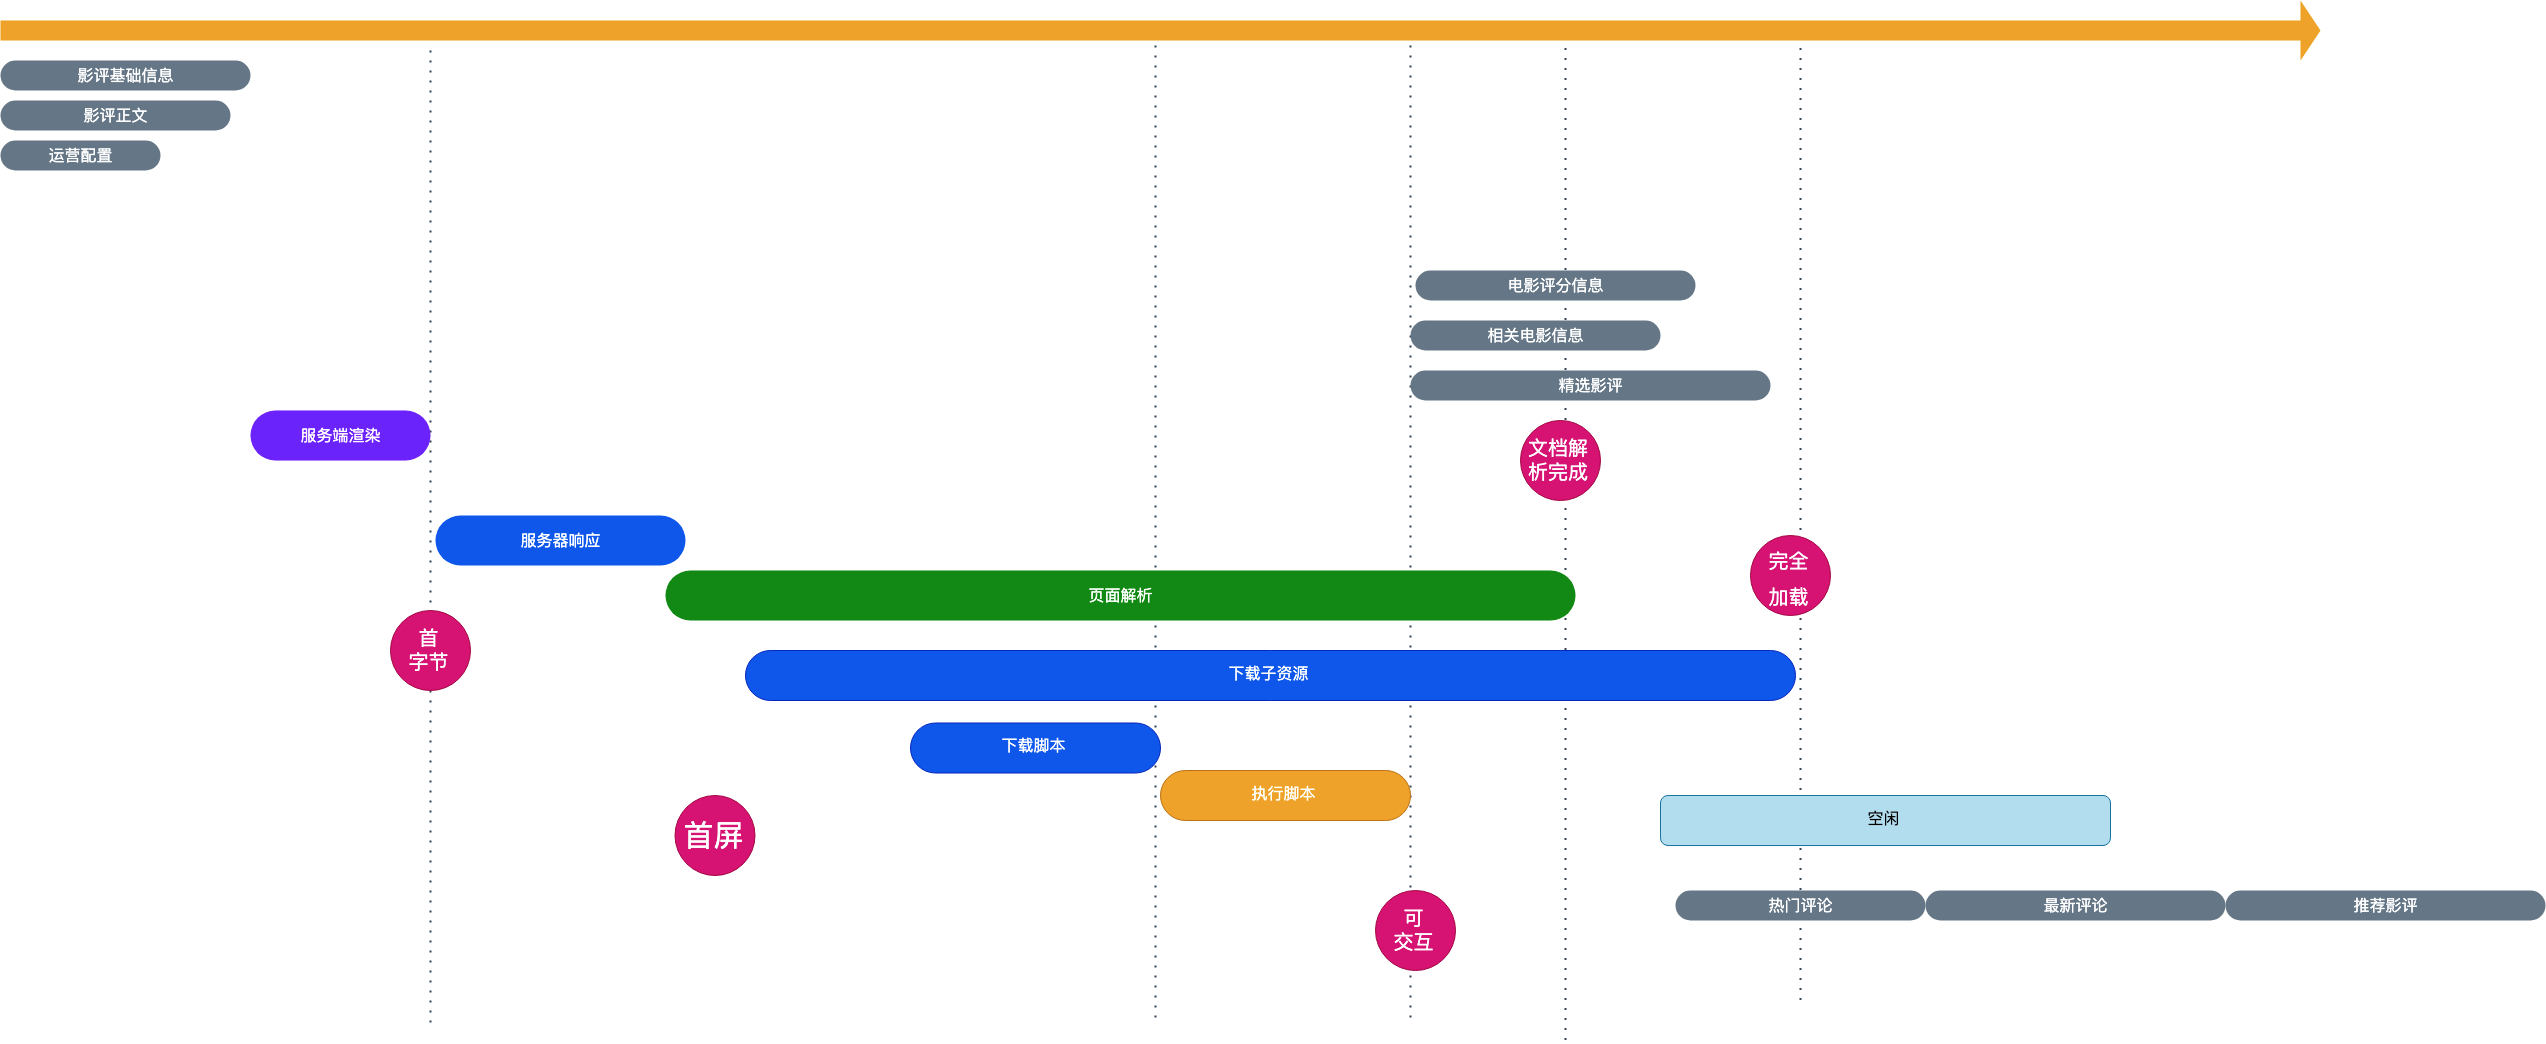
为了解决这个问题,我们希望能区分不同的场景进行不同的直出,SEO 场景全部直出,其他场景只直出最小化的首屏,非关键请求放在前端异步拉取
解决思路
计划通过统一的方式来控制数据加载,将数据加载由专门的插件来控制,插件会根据条件来选择性的加载数据,同时懒加载一部分数据
- 判断是 SEO 情况,fetch 阶段执行所有的数据加载逻辑
- 非 SEO 场景,fetch 阶段只执行最小的数据加载逻辑,等到页面首屏直出后,通过一些方式来懒加载另一部分数据
优化后的项目影评页加载流程图
自适应 SSR 方案介绍
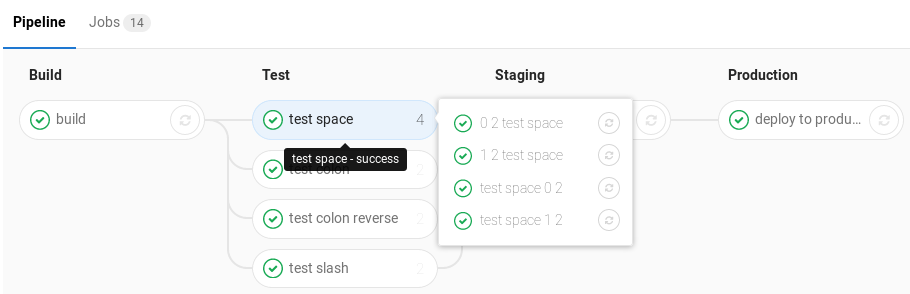
Gitlab CI Pipeline
自研 Nuxt Fetch Pipeline
借鉴 Gitlab CI 持续集成的概念和流程,将数据请求设计为不同的阶段 (Stage ),每个阶段执行不同的异步任务(Job),所有的阶段组成了数据请求的管线(Pipeline)
预置的 Stage
- seoFetch : 面向 SEO 渲染需要的 job 集合,一般要求是全部数据请求都需要,尽可能多的服务端渲染内容
- minFetch:首屏渲染需要的最小的 job 集合
- mounted: 首屏加载完之后,在 mounted 阶段异步执行的 job 集合
- idle: 空闲时刻才执行的 job 集合
每一个页面的都有一个 Nuxt Fetch Pipeline 的实例来控制,Nuxt Fetch Pipeline 需要配置相应的 job 和 stage,然后会自适应判断请求的类型,针对性的处理异步数据拉取:
- 如果是 SEO 场景,则只会执行 seoFetch 这个 stage 的 job 集合
- 如果是真实用户访问,则会在服务端先执行 minFetch 这个 stage 的 job 集合,然后立即返回,客户端可以看到首屏内容及骨架屏,然后在首屏加载完之后,会在 mounted 阶段异步执行 mounted stage 的 job 集合,另外一些优先级更低的 job,则会在 idle stage 也就是空闲的时候才执行。
Nuxt Fetch Pipeline 使用示例
page 页面 index.vue
import NuxtFetchPipeline, {
  pipelineMixin,
  adaptiveFetch,
} from '@/utils/nuxt-fetch-pipeline';
import pipelineConfig from './index.pipeline.config';

const nuxtFetchPipeline = new NuxtFetchPipeline(pipelineConfig);

export default {
  mixins: [pipelineMixin(nuxtFetchPipeline)],

  fetch(context) {
    return adaptiveFetch(nuxtFetchPipeline, context);
  },
};
配置文件 index.pipeline.config.js
export default {
stages: {
// 面向SEO渲染需要的 job 集合,一般要求是全部
seoFetch: {
type: 'parallel',
jobs: [
'task1'
]
},
// 首屏渲染需要的最小的 job 集合
minFetch: {
type: 'parallel',
jobs: [
]
},
// 首屏加载完之后,在 mounted 阶段异步执行的 job 集合
mounted: {
type: 'parallel',
jobs: [
]
},
// 空闲时刻才执行的 job 集合
idle: {
type: 'serial',
jobs: [
]
}
},
pipelines: {
// 任务1
task1: {
task: ({ store, params, query, error, redirect, app, route }) => {
return store.dispatch('action', {})
}
}
}
}
并发控制
Stage 执行 Job 支持并行和串行 Stage 配置 type 为 parallel 时为并行处理,会同时开始每一个 job 等待所有的 job 完成后,这个 stage 才完成 Stage 配置 type 为 serial 时为串行处理,会依次开始每一个 job,前一个 job 完成后,后面的 job 才开始,最后一个 job 完成后,这个 stage 才完成
Job 嵌套
可以将一些可以复用的 job 定义为自定义的 stage,然后,在其他的 Stage 里按照如下的方式来引用,减少编码的成本
{
  seoFetch: {
    type: 'serial',
    jobs:
    [
      'getVideo',
      { jobType: 'stage', name: 'postGetVideo' }
    ]
  },
  postGetVideo: {
    type: 'parallel',
    jobs: [
      'anyjob',
      'anyjob2'
    ]
  }
}
Job 的执行上下文
为了方便编码,以及减少改动成本,每一个 job 执行上下文和 Nuxt fetch 类似,而是通过一个 context 参数来访问一些状态,由于 fetch 阶段还没有组件实例,为了保持统一,都不可以通过 this 访问实例
目前支持的 nuxt context 有
- app
- route
- store
- params
- query
- error
- redirect
Stage 的划分思路
| Stage | 适合的 Job | 是否并行 |
|---|---|---|
| seoFetch | 全部,SEO 场景追求越多越好 | 最好并行 |
| minFetch | 关键的,比如首屏内容、核心流程需要的数据,页面的主要核心内容(例如影评页面是影评的正文,短视频页面是短视频信息,帖子页面是帖子正文)的数据 | 最好并行 |
| mounted | 次关键内容的数据,例如侧边栏,第二屏等 | 根据优先成都考虑是否并行 |
| idle | 最次要的内容的数据,例如页面底部,标签页被隐藏的部分 | 尽量分批进行,不影响用户的交互 |
使用 SVG 生成骨架屏踩坑实践
由于服务端只拉取了关键数据,部分页面部分存在没有数据的情况,因此需要骨架屏来提升体验

Vue Content Loading 使用及原理
例子
<script>
  import VueContentLoading from 'vue-content-loading';

  export default {
    components: {
      VueContentLoading,
    },
  };
</script>

<template>
  <vue-content-loading :width="300" :height="100">
    <circle cx="30" cy="30" r="30" />
    <rect x="75" y="13" rx="4" ry="4" width="100" height="15" />
    <rect x="75" y="37" rx="4" ry="4" width="50" height="10" />
  </vue-content-loading>
</template>
Vue Content Loading 核心代码
<template>
  <svg :viewBox="viewbox" :style="svg" preserveAspectRatio="xMidYMid meet">
    <rect
      :style="rect.style"
      :clip-path="rect.clipPath"
      x="0"
      y="0"
      :width="width"
      :height="height"
    />

    <defs>
      <clipPath :id="clipPathId">
        <slot>
          <rect x="0" y="0" rx="5" ry="5" width="70" height="70" />
          <rect x="80" y="17" rx="4" ry="4" width="300" height="13" />
          <rect x="80" y="40" rx="3" ry="3" width="250" height="10" />
          <rect x="0" y="80" rx="3" ry="3" width="350" height="10" />
          <rect x="0" y="100" rx="3" ry="3" width="400" height="10" />
          <rect x="0" y="120" rx="3" ry="3" width="360" height="10" />
        </slot>
      </clipPath>

      <linearGradient :id="gradientId">
        <stop offset="0%" :stop-color="primary">
          <animate
            attributeName="offset"
            values="-2; 1"
            :dur="formatedSpeed"
            repeatCount="indefinite"
          />
        </stop>

        <stop offset="50%" :stop-color="secondary">
          <animate
            attributeName="offset"
            values="-1.5; 1.5"
            :dur="formatedSpeed"
            repeatCount="indefinite"
          />
        </stop>

        <stop offset="100%" :stop-color="primary">
          <animate
            attributeName="offset"
            values="-1; 2"
            :dur="formatedSpeed"
            repeatCount="indefinite"
          />
        </stop>
      </linearGradient>
    </defs>
  </svg>
</template>

<script>
  const validateColor = color =>
    /^#([A-Fa-f0-9]{3}|[A-Fa-f0-9]{6})$/.test(color);
  export default {
    name: 'VueContentLoading',
    props: {
      rtl: {
        default: false,
        type: Boolean,
      },
      speed: {
        default: 2,
        type: Number,
      },
      width: {
        default: 400,
        type: Number,
      },
      height: {
        default: 130,
        type: Number,
      },
      primary: {
        type: String,
        default: '#f0f0f0',
        validator: validateColor,
      },
      secondary: {
        type: String,
        default: '#e0e0e0',
        validator: validateColor,
      },
    },
    computed: {
      viewbox() {
        return `0 0 ${this.width} ${this.height}`;
      },
      formatedSpeed() {
        return `${this.speed}s`;
      },
      gradientId() {
        return `gradient-${this.uid}`;
      },
      clipPathId() {
        return `clipPath-${this.uid}`;
      },
      svg() {
        if (this.rtl) {
          return {
            transform: 'rotateY(180deg)',
          };
        }
      },
      rect() {
        return {
          style: {
            fill: 'url(#' + this.gradientId + ')',
          },
          clipPath: 'url(#' + this.clipPathId + ')',
        };
      },
    },
    data: () => ({
      uid: null,
    }),
    created() {
      this.uid = this._uid;
    },
  };
</script>
SVG 动画卡顿
使用了 Vue content loading 做骨架屏之后,发现在 js 加载并执行的时候动画会卡住,而 CSS 动画大部分情况下可以脱离主线程执行,可以避免卡顿
CSS animations are the better choice. But how? The key is that as long as the properties we want to animate do not trigger reflow/repaint (read CSS triggers for more information), we can move those sampling operations out of the main thread. The most common property is the CSS transform. If an element is promoted as a layer, animating transform properties can be done in the GPU, meaning better performance/efficiency, especially on mobile. Find out more details in OffMainThreadCompositing. developer.mozilla.org/en-US/docs/…
测试 Demo 地址
看起来浏览器并没有对 SVG 动画做这方面的优化,最终,我们修改了 Vue content loading 的实现,改为了使用 CSS 动画来实现闪烁的加载效果
<template>
  <div :style="style">
    <svg :viewBox="viewbox" preserveAspectRatio="xMidYMid meet">
      <defs :key="uid">
        <clipPath :id="clipPathId" :key="clipPathId">
          <slot>
            <rect x="0" y="0" rx="5" ry="5" width="70" height="70" />
            <rect x="80" y="17" rx="4" ry="4" width="300" height="13" />
            <rect x="80" y="40" rx="3" ry="3" width="250" height="10" />
            <rect x="0" y="80" rx="3" ry="3" width="350" height="10" />
            <rect x="0" y="100" rx="3" ry="3" width="400" height="10" />
            <rect x="0" y="120" rx="3" ry="3" width="360" height="10" />
          </slot>
        </clipPath>
      </defs>
    </svg>
  </div>
</template>

<script>
  const validateColor = color =>
    /^#([A-Fa-f0-9]{3}|[A-Fa-f0-9]{6})$/.test(color);

  export default {
    name: 'VueContentLoading',
    props: {
      rtl: {
        default: false,
        type: Boolean,
      },
      speed: {
        default: 2,
        type: Number,
      },
      width: {
        default: 400,
        type: Number,
      },
      height: {
        default: 130,
        type: Number,
      },
      primary: {
        type: String,
        default: '#F0F0F0',
        validator: validateColor,
      },
      secondary: {
        type: String,
        default: '#E0E0E0',
        validator: validateColor,
      },
      uid: {
        type: String,
        required: true,
      },
    },
    computed: {
      viewbox() {
        return `0 0 ${this.width} ${this.height}`;
      },
      formatedSpeed() {
        return `${this.speed}s`;
      },
      clipPathId() {
        return `clipPath-${this.uid || this._uid}`;
      },
      style() {
        return {
          width: `${this.width}px`,
          height: `${this.height}px`,
          backgroundSize: '200%',
          backgroundImage: `linear-gradient(-90deg, ${this.primary} 0, ${this.secondary} 20%, ${this.primary} 50%,  ${this.secondary} 75%,  ${this.primary})`,
          clipPath: 'url(#' + this.clipPathId + ')',
          animation: `backgroundAnimation ${this.formatedSpeed} infinite linear`,
          transform: this.rtl ? 'rotateY(180deg)' : 'none',
        };
      },
    },
  };
</script>

<style lang="scss">
  @keyframes backgroundAnimation {
    0% {
      background-position-x: 100%;
    }

    50% {
      background-position-x: 0;
    }

    100% {
      background-position-x: -100%;
    }
  }
</style>
Vue SSR client side hydration 踩坑实践
一个例子
<template>
  <div :id="id"> text: {{ id }}</div>
</template>
<script>
  export default {
    data () {
       return {
         id: Math.random()
       }
    }
  }
</script>
client side hydration 的结果会是如何呢?
- A. id 是 client 端随机数, text 是 client 端随机数
- B. id 是 client 端随机数, text 是 server 端随机数
- C. id 是 server 端随机数, text 是 client 端随机数
- D. id 是 server 端随机数, text 是 server 端随机数
为什么要问这个问题 ?
Vue content loading 内部依赖了 this._uid 来作为 svg defs 里的 clippath 的 id,然而 this._uid 在客户端和服务端并不一样,实际跟上面随机数的例子差不多。
client side hydration 的结果是 C
也就是说 id 并没有改变,导致的现象在我们这个场景就是骨架屏闪了一下就没了
为什么会出现这个情况?
初始化 Vue 到最终渲染的整个过程
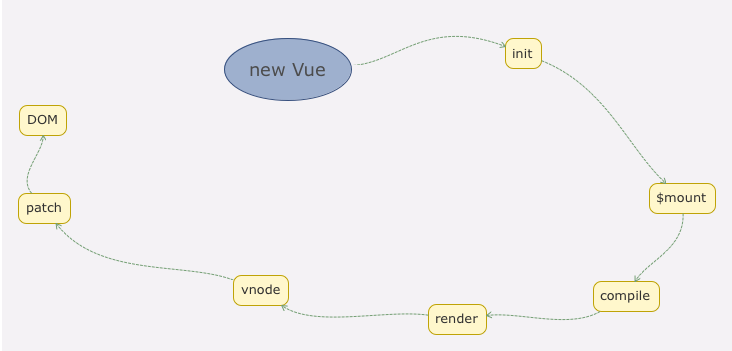
来源:ustbhuangyi.github.io/vue-analysi…
所谓客户端激活,指的是 Vue 在浏览器端接管由服务端发送的静态 HTML,使其变为由 Vue 管理的动态 DOM 的过程。
在 entry-client.js 中,我们用下面这行挂载(mount)应用程序:
// 这里假定 App.vue template 根元素的 `id="app"`
app.$mount('#app');
由于服务器已经渲染好了 HTML,我们显然无需将其丢弃再重新创建所有的 DOM 元素。相反,我们需要"激活"这些静态的 HTML,然后使他们成为动态的(能够响应后续的数据变化)。
如果你检查服务器渲染的输出结果,你会注意到应用程序的根元素上添加了一个特殊的属性:
<div id="app" data-server-rendered="true"></div>
data-server-rendered 特殊属性,让客户端 Vue 知道这部分 HTML 是由 Vue 在服务端渲染的,并且应该以激活模式进行挂载。注意,这里并没有添加 id="app",而是添加 data-server-rendered 属性:你需要自行添加 ID 或其他能够选取到应用程序根元素的选择器,否则应用程序将无法正常激活。
注意,在没有 data-server-rendered 属性的元素上,还可以向 $mount 函数的 hydrating 参数位置传入 true,来强制使用激活模式(hydration):
// 强制使用应用程序的激活模式
app.$mount('#app', true);
在开发模式下,Vue 将推断客户端生成的虚拟 DOM 树 (virtual DOM tree),是否与从服务器渲染的 DOM 结构 (DOM structure) 匹配。如果无法匹配,它将退出混合模式,丢弃现有的 DOM 并从头开始渲染。在生产模式下,此检测会被跳过,以避免性能损耗。
vue 对于 attrs,class,staticClass,staticStyle,key 这些是不处理的
list of modules that can skip create hook during hydration because they are already rendered on the client or has no need
uid 解决方案
根据组件生成唯一 UUID
- props 和 slot 转换为字符串
- hash 算法
太重了,放弃
最终解决方案
干脆让用户自己传 ID
<vue-content-loading
  uid="circlesMediaSkeleton"
  v-bind="$attrs"
  :width="186"
  :height="height"
>
  <template v-for="i in rows">
    <rect
      :key="i + '_r'"
      x="4"
      :y="getYPos(i, 4)"
      rx="2"
      ry="2"
      width="24"
      height="24"
    />
    <rect
      :key="i + '_r'"
      x="36"
      :y="getYPos(i, 6)"
      rx="3"
      ry="3"
      width="200"
      height="18"
    />
  </template>
</vue-content-loading>
优化效果
- 通过减少 fetch 阶段的数据拉取的任务,减少了数据拉取时间
- 同时减少了服务端渲染的组件数和开销,缩短了首字节时间
- 首屏大小变小也缩短了下载首屏所需的时间
综合起来,首字节、首屏时间都将提前,可交互时间也会提前
本地数据
| 类型 | 服务响应时间 | 首页大小 未 Gzip |
|---|---|---|
| 首页修改前 | 0.88s | 561 KB |
| 首页(最小化 fetch 请求) | 0.58s | 217 KB |
在本地测试,服务端渲染首页只请求关键等服务器接口请求时,服务响应时间缩短 0.30s,降低 34%,首页 html 文本大小降低 344 KB,减少 60%
线上数据
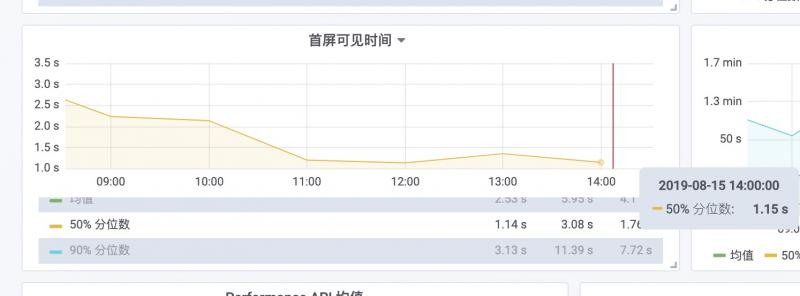
首页的首屏可见时间中位数从 2-3s 降低到了 1.1s 左右,加载速度提升 100%+
总结
本文分享了如何解决 SEO 和用户体验提升之间存在矛盾的问题,介绍了我们如何借鉴 Gitlab CI 的 pipeline 的概念,在服务端渲染时兼顾首屏最小化和 SEO,分享了自适应 SSR 的技术细节、设计思路以及在实施该方案过程中遇到的一些相关的子问题的实践踩坑经验,希望对大家有所启发和帮助。
关于我
binggg(Booker Zhao) @腾讯

- 先后就职于迅雷、腾讯等,个人开源项目有 mrn.js 等
- 创办了迅雷内部组件仓库 XNPM ,参与几个迅雷前端开源项目的开发
- 热衷于优化和提效,是一个奉行“懒惰使人进步”的懒人工程师
社交资料
- 🐙 GitHub: github.com/binggg
- 📕 简书: www.jianshu.com/u/60f22559b…
- 📒 掘金: juejin.cn/user/160934…
- 👁️🗨️ 微博: weibo.com/being99
- 📗 思否: segmentfault.com/u/binggg
- 📚 博客园: www.cnblogs.com/binggg/
- 📖 开源中国: my.oschina.net/u/4217267
- 💻 极术社区: aijishu.com/u/binggg
- 📰 今日头条: www.toutiao.com/c/user/1023…
- 📝CSDN: blog.csdn.net/weixin_4254…
微信公众号 binggg_net, 欢迎关注
