

简介
在iOS 6之前,iOS开发界面都是以frame的方式布局。
开发维护的效率较低,为了更好的体验,在iOS 6时推出了Auto Layout.
来历
在上世纪 90 年代,一个名叫 Cassowary 的布局算法解决了用户界面的布局问题,它通过将布局问题抽象成线性等式和不等式约束来进行求解。
论文: Solving Linear Arithmetic Constraints for User Interface Applications: Algorithm Details
布局方式对比
在ViewController中,设定一个位置相对于父视图(100, 100)的view,宽度为200,高度为100.
Frame布局:
let testView = UIView()
view.addSubview(testView)
testView.frame = CGRect(x: 100, y: 100, width: 200, height: 100)
NSLayoutConstraint布局:
注意translatesAutoresizingMaskIntoConstraints需要设定为false,如果实在xib文件中,默认是false,代码中则需要手动设定,如果设置为true,系统会根据视图的 autoresizing mask 创建一组视图的约束,这些约束是基于你提供的 frame、bounds、center 这些属性.
let testView = UIView()
testView.translatesAutoresizingMaskIntoConstraints = false
view.addSubview(testView)
添加constraint也有两种方式。 第一种:
let widthConstraint = NSLayoutConstraint(item: testView, attribute: .width, relatedBy: .equal, toItem: nil, attribute: .notAnAttribute, multiplier: 1, constant: 200)
let heightConstraint = NSLayoutConstraint(item: testView, attribute: .height, relatedBy: .equal, toItem: nil, attribute: .notAnAttribute, multiplier: 1, constant: 100)
let topConstraint = NSLayoutConstraint(item: testView, attribute: .top, relatedBy: .equal, toItem: view, attribute: .top, multiplier: 1, constant: 100)
let leftConstraint = NSLayoutConstraint(item: testView, attribute: .left, relatedBy: .equal, toItem: view, attribute: .left, multiplier: 1, constant: 100)
view.addConstraints([widthConstraint, heightConstraint, topConstraint, leftConstraint])
第二种:
NSLayoutConstraint.activate([
    testView.widthAnchor.constraint(equalToConstant: 200),
    testView.heightAnchor.constraint(equalToConstant: 100),
    testView.leftAnchor.constraint(equalTo: view.leftAnchor, constant: 100),
    testView.topAnchor.constraint(equalTo: view.topAnchor, constant: 100)])
VFL布局
需要注意,不应该在VFL语句中添加空格,会导致解析失败。
let testView = UIView()
testView.translatesAutoresizingMaskIntoConstraints = false
view.addSubview(testView)
let constraint1 = NSLayoutConstraint.constraints(withVisualFormat: "H:|-100-[testView(200)]", options: .alignAllLeft, metrics: nil, views: ["testView" : testView])
let constraint2 = NSLayoutConstraint.constraints(withVisualFormat: "V:|-100-[testView(100)]", options: .alignAllLeft, metrics: nil, views: ["testView" : testView])
view.addConstraints(constraint1)
view.addConstraints(constraint2)
SnapKit
let testView = UIView()
view.addSubview(testView)
testView.snp.makeConstaints { make in
    make.top.left.height.equalTo(100)
    make.width.equalTo(200)
}
对于Frame布局,Autolayout更强调界面之前的相对关系。
刚推出的时候,语法相对比较复杂,于是推出VFL语言简化逻辑。
总之还是第三方库SnapKit,Masonry好用。
WWDC 2015 Mysteries of Auto Layout
改变约束的最佳实践
使用Activate和Deactivate,而不是Add和Remove。
· Contraints find their own container
· Adds contraints efficiently
· Do not need to own all views
不要对view.constraints进行deactivate操作, 并不是所有约束都属于当前的view。
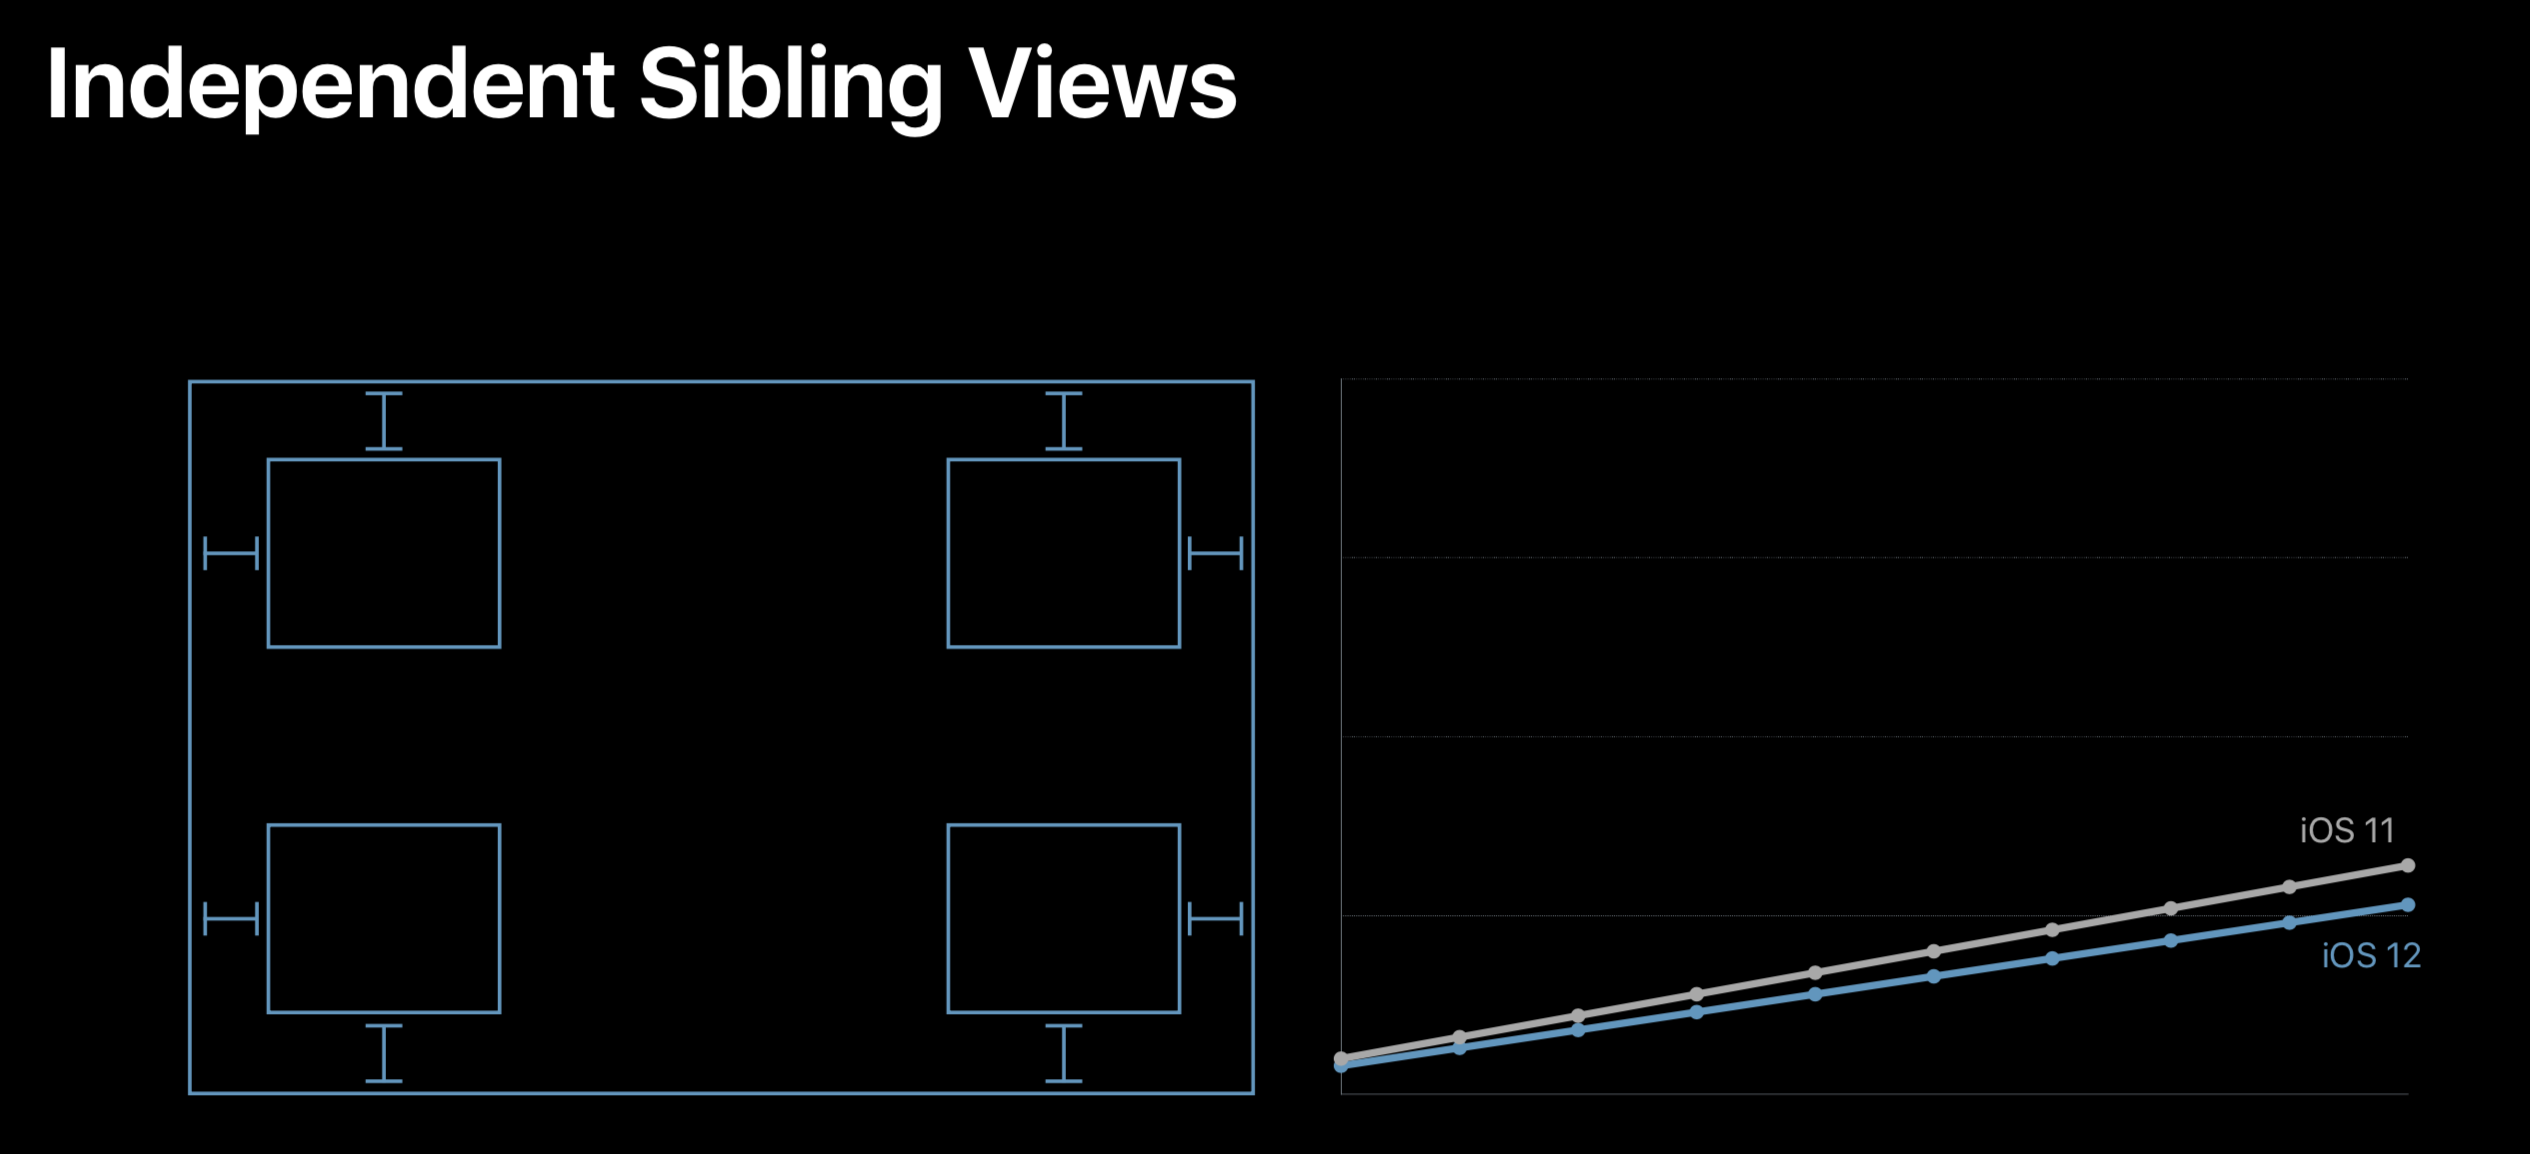
HuggingPriority和CompressionResistance
首先我们设定一个背景。
有两个label, A与B。两个label在同一行。
A左靠父View的左边,右靠B的左边。B右靠父View的右边,左靠A的右边。
这么设定完之后系统会提示布局错误,这是因为对于系统来说会根据label的intrinsicContentSize与约束设定大小,会产生歧义。
比如A宽度100,B宽度100,而父view大小300,因为需要撑满整个view, 那么AB的位置大小都是不能确定的。
又或者是A宽度200,B宽度200,而父view大小300,这时候AB就需要被压缩,压缩方式不确定,位置大小也不能确定。
所以就需要设置两种属性CompressionResistance与HuggingPriority。
如果在layout后还有剩余空间,则根据HuggingPriority(抗拉伸)调整哪一个label需要拉伸。值越高,越不容易拉伸。
如果在layout后没有剩余空间,则根据CompressionResistance(抗压缩),调整哪一个label需要压缩。值越高,越不容易压缩。
UIStackView
UIStackView的内部布局方式也是用Autolayout实现的。
通过水平、竖直布局方式、对其方式、分布方式,完成布局。
中心思想与使用方式与flex大同小异。
推荐阮一峰老师写的Flex 布局教程:语法篇
看完之后会对UIStackView有更清晰的认知。
Layout Cycle
核心布局引擎叫做Layout Engine,这是autolayout的核心,控制整个页面布局.
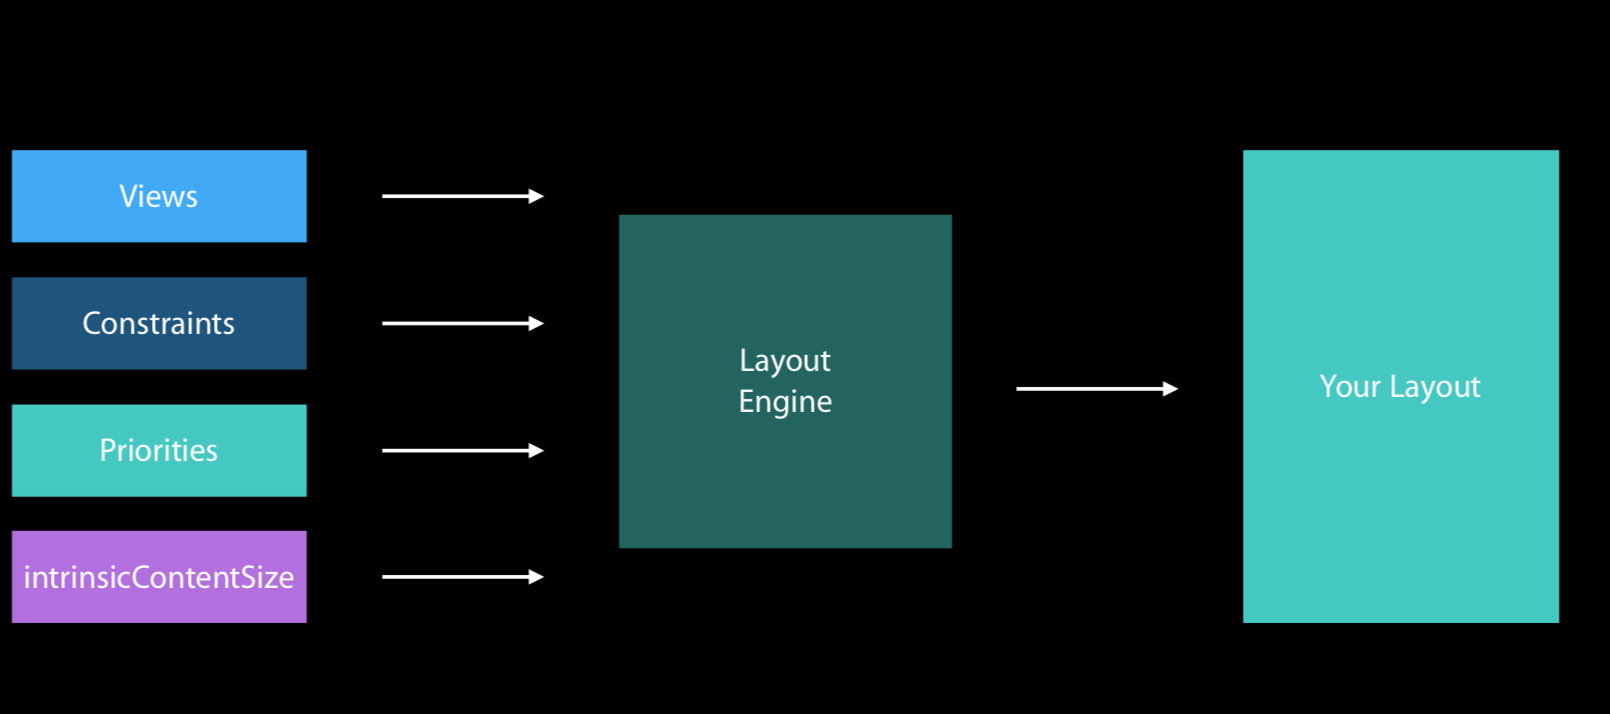
由图可以看出Layout Engine的布局流程:
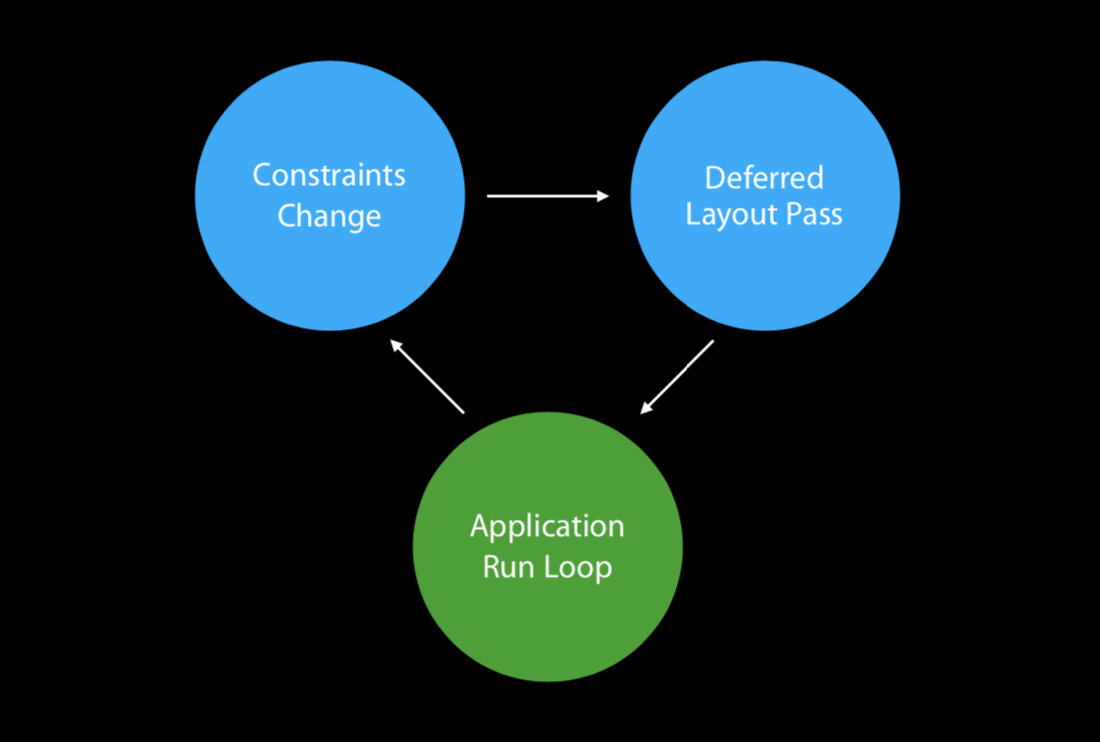
Constraints Changes
- 约束表达式的修改
- constraint的Activating or deactivating
- 修改约束大小或者优先级
- 添加或删除视图
- Engine重新计算布局
- 引擎变量接收由于约束改变得到的新值
- 视图调用
superview.setNeedsLayout ()(进入到Deferred Layout Pass流程中)
Deferred Layout Pass
在这个Deferred Layout Pass过程中,重新定位位置错误的视图,通过视图之间的继承,更新他们的约束与frame。
通过调用setNeedsUpdateConstraints方法后,系统会立刻调用updateConstraints,这时会一次性更新所有的约束。
调用者也可以在约束改变慢的时候调用,以便获得更快的响应。或者一个View有多余的更改时进行调用,则不会触发多余的修改。
更新约束后,系统会调用layoutSubviews。
layoutSubviews需要从上到下遍历,对于自视图的定位,是从Layout Engine中获取frame。也可以通过override去重新定义,去做一些不能通过约束完成的布局(比如 layer)。
在layoutSubviews,可以调用父类的layoutSubviews,但是不能再次重新调用setNeedsUpdateConstraints,因为这时候已经到了布局阶段。
WWDC 2016 whats new in auto layout
Design and Runtime Constraints
当前内容只适用于xib文件。
大部分都会遇到这样一种情况,view的约束需要在回去数据中才能明确,所以在运行时,无法知道全部的约束情况。 目前有三种方法来应对以上问题。
Placeholder Constraints
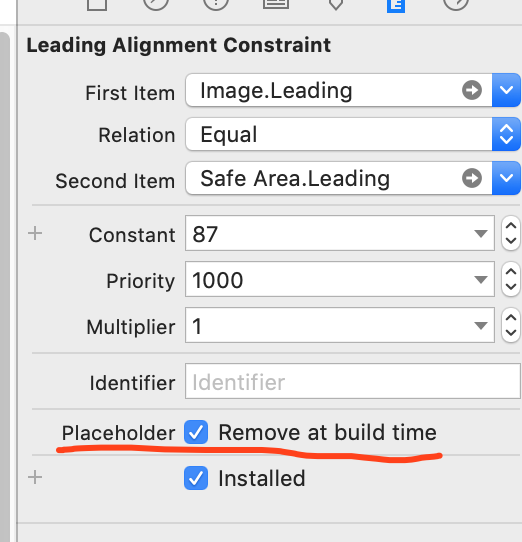
给View设定约束,在设定的约束中点击placeholder。
那么当前约束会在xib中按照设定正常显示,在运行时自动被移除。
Intrinsic Content Size
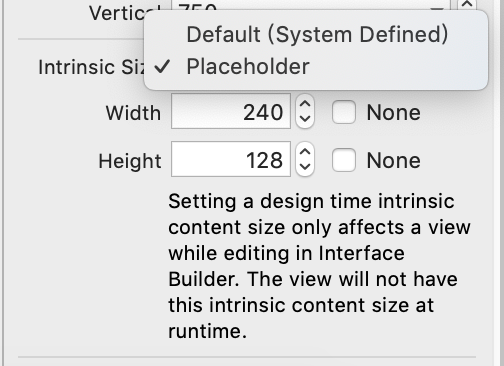
给View设定一个内在的大小设定,也会在运行时会被移除。
Setting a design time intrinsic content size only affects a view while editing in Interface Builder.The view will not have this intrinsic content size at runtime.
Turn Off Ambiguity Per View
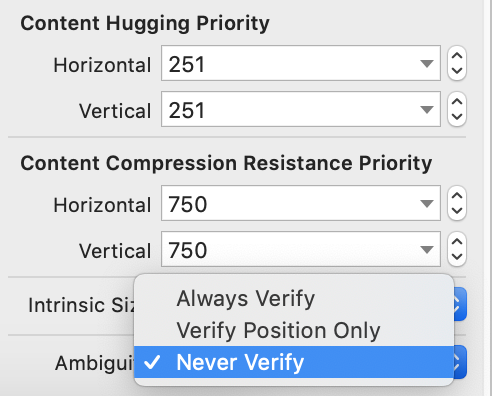
Ambiguity,对view的约束验证做处理。可以选择不验证(Never Verify)或者只验证位置(Verify Position Only)
WWDC 2018 high performance auto layout
iOS 12 性能优化
在iOS 12上,苹果对AutoLayout进行了优化,同一程序,在对比iOS 12与之前的版本,有很大的性能提升。

同样也是用了前面提到过的Cassowary算法,但之前没有用好。现在利用了Cassowary算法的更新策略,完成真正的界面线性高效计算。
Render Loop
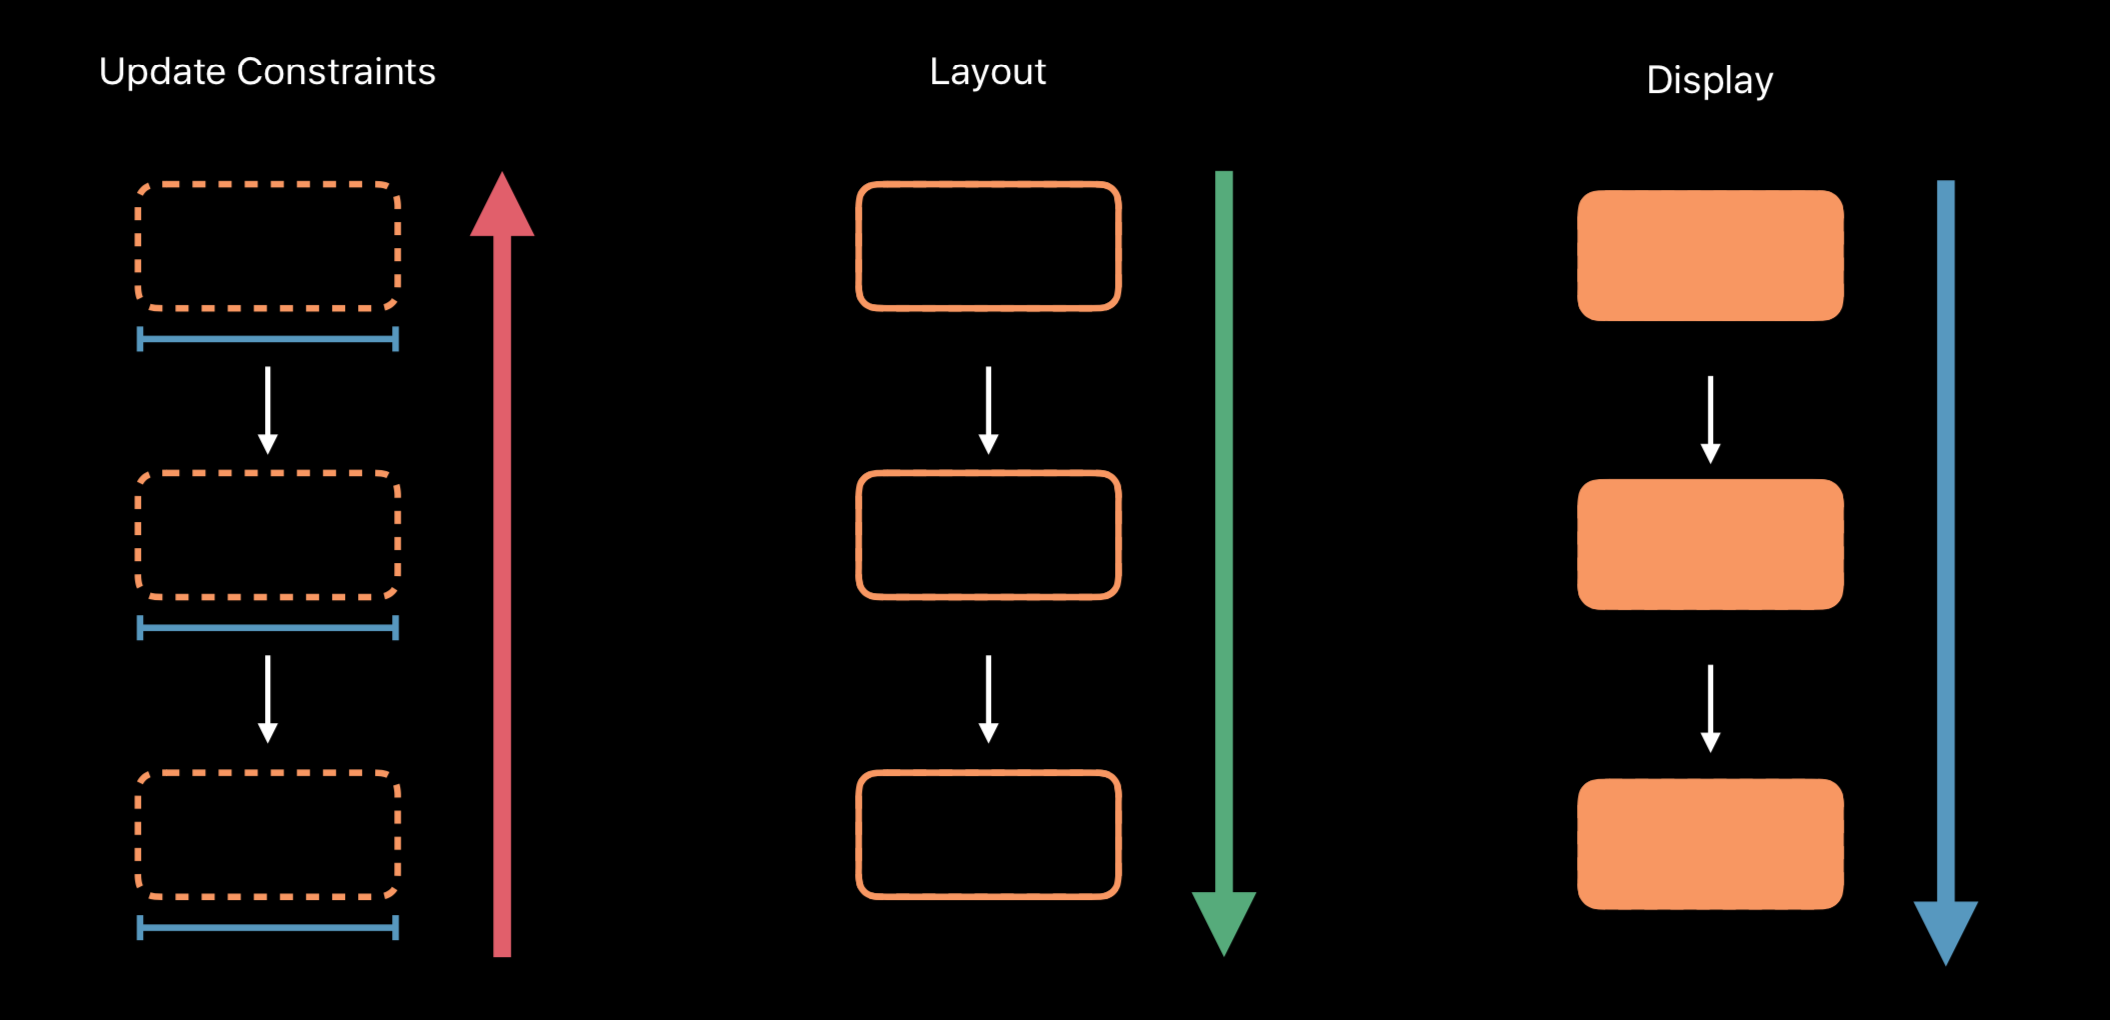
render loop 是一个每秒钟跑120次的一个进程,是为了确保所有的内容都能为每一个frame做好准备。lender loop 一共包括三个步骤来更新约束,布局和渲染。
- 首先,每一个需要接收到更新约束的view会从子view向上传递,直到window
- 然后,每一个接收到的view开始layoutsubviews,和更新约束是从相反的方向开始,layout从window开始到每一个子view进行layout。
- 最后,每一个需要渲染的view,和layout相同,从父view向子view开始渲染。

最后
大概总结了大部分Auto Layout的内容,部分笔者认为不重要的部分没有写入,如果还有漏掉的重要部分,可以在评论处提醒。
