这是Android资源系列专题第二篇,主要分析运行时资源的访问流程。
资源系列更新计划,欢迎持续关注:
-
Android资源初探(三)换肤框架原理解析
-
Android资源初探(四)资源的插件化和热修复
从一行代码说起
平时开发中访问资源最常见的形式: getContext().getResources().getColor(R.id.text_color) 接下来以android 6.0源码分析此过程 对Context不太熟悉的可以参考之前的文章Android Context解析, 我们先来看 getContext().getResources()得到Resources对象的过程,
//-------------------Context.java--------------------
/** Return a Resources instance for your application's package. */
//具体实现在对应的ContextImpl
public
abstract
Resources getResources();
//------------------ContextImpl.java-----------------
@Override
public
Resources getResources
() {
//mResource通过setResources()
return mResources;
}
//我们需要关注context的setResources何时被调用
void
setResources(Resources
r)
{
mResources
= r;
}
/*
* 从[Android Context解析]中我们知道Application级别的Context是
* ActivityThread main中设置完成的
*/
//--------------------ActivityThread.java-----------------
public
static
void main(
String[] args
) {
//...
ActivityThread thread =
new
ActivityThread();
thread
.attach(
false);
//...
}
private
void attach
(boolean system
) {
//...
try {
mInstrumentation
= new
Instrumentation();
//分析创建Application context----->ContextImpl.createAppContext
ContextImpl context =
ContextImpl.
createAppContext(this
, getSystemContext().
mPackageInfo);
// new application, attachBaseContext
mInitialApplication
= context.
mPackageInfo.makeApplication
(true,
null);
//onCreate
mInitialApplication
.onCreate();
} catch
(Exception
e)
{
throw new
RuntimeException(
"Unable to instantiate Application():" + e
.toString(),
e);
}
}
//------------------ContextImpl.java-----------------
static
ContextImpl createAppContext
(ActivityThread mainThread
, LoadedApk
packageInfo)
{
if (
packageInfo ==
null)
throw new
IllegalArgumentException("packageInfo"
);
ContextImpl context =
new
ContextIml(null
, mainThread,
packageInfo,
null,
null,
null,
null);
//!!!这里设置了Resources----> LoadedApk.getResources()
context
.setResources(
packageInfo.getResources
);
}
//----------LoadedApk.java (简单理解这个类用来描述已安装的apk)---
public
Resources getResources
() {
if (
mResources ==
null)
{
//注意传入mResDir /data/app/com.....xxx/base.apk ....
mResources
= ResourcesManager
.getInstance().
getResources(null
, mResDir,
splitPaths
, mOverlayDirs,
mApplicationInfo.sharedLibraryFiles
,
Display.DEFAULT_DISPLAY
, null
, getCompatibilityInfo(),
getClassLoader
());
}
return mResources();
}
//---------------------ResourcesManager.java---------------
public
Resources getResources
(@Nullable
IBinder activityToken,
@Nullable String
resDir,
@Nullable String
[] splitResDirs,
@Nullable String
[] overlayDirs,
@Nullable String
[] libDirs,
int displayId,
@Nullable Configuration
overrideConfig,
@NonNull CompatibilityInfo
compatInfo,
@Nullable ClassLoader
classLoader)
{
//...
//传入resDir构造一个ResoucesKey, ,
final ResourcesKey
key =
new ResourcesKey
(
resDir
,..);
return getOrCreateResources(
activityToken, key
, classLoader);
...
}
/*
* 通过ResourceKey看缓存map中是否有,如果没有就生成新的Resources
*/
private
Resources getOrCreateResources
(IBinder activityToken
, ResourcesKey
key,
ClassLoader classloader)
{
//....
ResourcesImpl resourcesImpl =
findResourcesImplForKeyLocked(key
);
if (
resourcesImpl !=
null)
{
return getOrCreateResourcesLocked(
classLoader, resourcesImpl
, key.
mCompatInfo);
}
//通过key创建一个ResourceImpl!!! 后续分析ResourcesImpl的构造
ResourcesImpl resourcesImpl =
createResourcesImpl(key
);
synchronized (
this)
{
ResourcesImpl existingResourcesImpl = findResourcesImplForKeyLocked
(key);
if (
existingResourcesImpl !=
null)
{
resourcesImpl
.getAssets().
close();
resourcesImpl
= existingResourcesImpl;
} else
{
// 加到cache里面.
mResourceImpls
.put(
key,
new WeakReference
<>(resourcesImpl));
}
final Resources
resources;
//传入构造出来的resoucesImpl 生成一个Resources
resources
= getOrCreateResourcesLocked(
classLoader, resourcesImpl
, key.
mCompatInfo);
//...
return resources;
}
}
private
Resources getOrCreateResourcesForActivityLocked
(IBinder activityToken
, ClassLoader
classLoader,
ResourcesImpl impl,
CompatibilityInfo compatInfo)
{
//...
Resources resources =
new
Resources(classloader
);
//resources设入resourcesImpl并持有
resources
.setImpl(
impl);
return resources;
}
综上,可以看到,在应用application初始化的时候会创建对应的Context,然后在context的创建过程中会以当前应用的安装目录为参数构造出一个ResourcesImpl对象(并缓存起来),然后构造一个Resources对象持有它。大概流程下图所示,
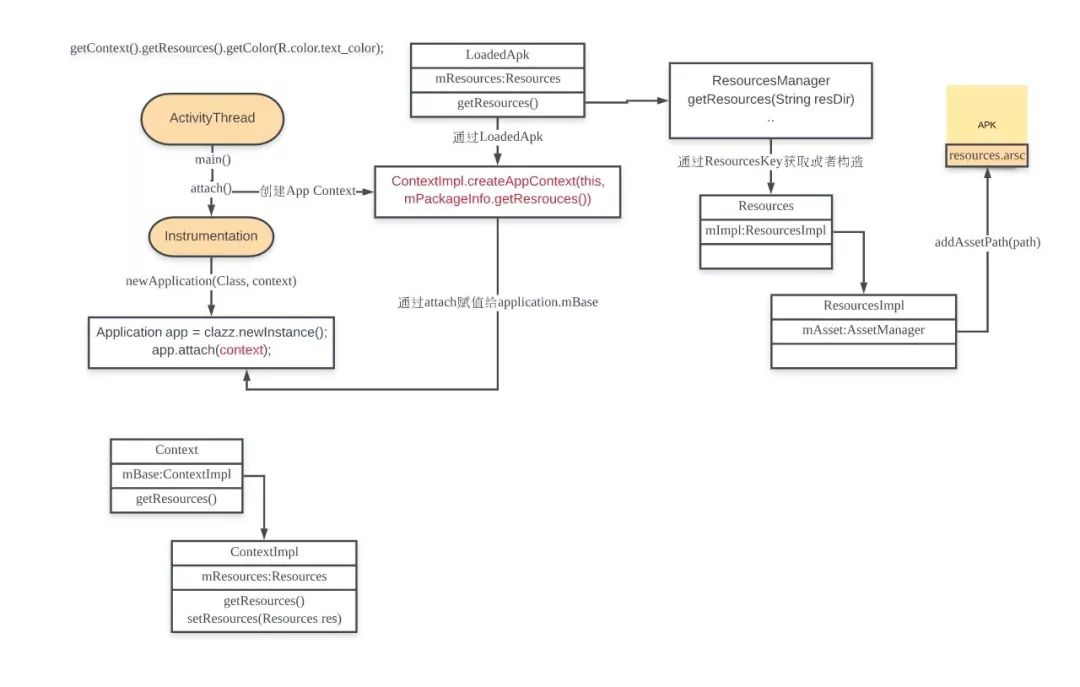
目前为止,我们已经可以通过Context得到可以访问当前应用资源的Resources和对应ResourcesImpl对象,接下来我们来分析,对应的Resources是如何在资源访问中发挥作用的。
ResourcesImpl|AssetManager的初始化
经过上面的流程我们已经得到了访问资源的Resources对象,我们来分析 getResource().getColor(R.color.text_color)流程
//---------------------Resources.java----------------
public
int getColor
(@ColorRes
int id)
throws
NotFoundException
{
return getColor(
id,
null);
}
public
int getColor
(@ColorRes
int id,
@Nullable
Theme theme)
throws
NotFountException
{
final TypedValue
value = obtainTempTypedValue
();
try {
//mResourcesImpl 通过前面分析的setImpl()设入
final ResourcesImpl
impl = mResourcesImpl
;
//最终通过ResourcesImpl getValue()
impl
.getValue(
id, value
, true
);
} finally
{
//...
}
}
/*
* 通过分析Resources.java中其他方法可以看到Resources中的getXXX()
* 方法最终都是调用ResourcesImpl中相关关方法完成
*/
//-------------------ResourcesImpl.java----------------
void
getValue(int
id,
TypedValue outValue,
boolean resolveRefs
) {
//调用AssetManager getResourceValue
boolean found =
mAssets.getResourceValue
(id,
0,
outValue, resolveRefs
);
if (
found)
{
return;
}
throw new
NotFoundException(
"Resource ID #0x" +
Integer.
toHexString(id));
}
/*
* 分析源码可以看出ResourcesImpl的相关调用最终调用的是其成员变
* mAsset的相关方法,mAssets是在ResourcesImpl构造时传入
*/
public
ResourcesImpl(
AssetManager assets,
...)
{
//...
mAssets
= assets;
mAssets
.ensureStringBlocks();
//...
}
/*
* 回到前面ResourcesManager中ApplicationContext对
* ResourcesImpl的构造
*/
//------------------ResourcesManager.java----------------
private
ResourcesImpl createResourcesImpl
(ResourcesKye key
) {
//...通过ResourcesKey构造一个AssetManager
final AssetManager
assets = createAssetManager
(key);
//将assetManager用于 构造 resourceImpl
final ResourceImpl
impl =
new ResourcesImpl
(assets,
dm, config
, daj);
return impl;
}
protected
AssetManager createAssetManager
(final
ResourcesKey key)
{
//构造一个AssetManager
AssetManager assets =
new
AssetManager();
//传入apk安装路径
if(key
.mResDir !=
null)
{
//调用addAssetPath
if (
assets.addAssetPath
(key.
mResdir)
== 0
) {
return null
;
}
}
//...
}
/*
* 接下来看AssetManager的初始化与对应addAssetPath
*/
//----------------------AssetManager.java---------------
public
AssetManager()
{
synchronized (
this)
{
// isSystem = false -> native init
init
(false)
ensureSystemAssets
();
}
}
//native init
private
native
final void
init(boolean
isSystem);
/*
* 此方法主要是为了给当前AssetManager赋值一个可以访问system资源能力的
* AssetManager
*/
private
static
void ensureSystemAssets()
{
synchronized (
sSync)
{
if (
sSystem ==
null)
{
AssetManager system =
new
AssetManager(true
);
system
.makeStringBlocks(
null);
sSystem
= system;
}
}
}
public
final
int addAssetPath(
String path)
{
return addAssetPathINternal(
path,
false);
}
public
final
int addAssetPathInternal(String
path, booean appAsLib
) {
synchronized(this
) {
//调用Native方法
int res =
addAssetPathNative(path
, appAsLib);
makeStringBlocks
(mStringBlocks);
return res;
}
}
//调用native
private
native
final int
addAssetPathNative(String
path,
boolean appAsLib);
可以看到最终Java层的AssetManager的初始化和资源访问最终都是调用到Native层,下面看Native层相关代码
//---------------android_util_AssetManager.cpp-----------
/*
* AssetManager.java init()对应Native方法
*/
static void android_content_AssetManager_init(JNIEnv* env, jobject clazz, jboolean isSystem) {
//传入init(isSystem)
if (isSystem) {
verifySystemIdmaps();
}
//构造一个Native层的AssetManager
AssetManager* am = new AssetManager();
//...
am->addDefaultAssets();
//将Native层AssetManager赋值给Java层AssetManager的mObject变量
env->SetLongFiled(clazz, gAssetManagerOffsets.mObject, reinterpret_cast<jlong>(am));
}
//Java层AssetManager addAssetPathNative对应Native实现
static jint android_content_AssetManager_addAssetPath(JNIEnv* env, jobject clazz, jstring) {
ScopedUtfChars path8(env, path);
//通过当前Java层的AssetManager对象中的mObject得到native assetManager
AssetManager* am = assetManagerForJavaObject(env, clazz);
bool res = am->addAssetPath(String8(path8.c_str()), &cookie);
//添加成功,返回 !=0
return (res) ? static_cast<jint>(cookie) : 0
}
/*
* Java层AssetManager 的init和addAssetPath均是通过Native层
* AssetManager来实现,接下来分析AssetManager.cpp的相关实现
*/
//--------------------AssetManager.cpp-----------------
AssetManager::AssetManager(CacheMode cacheMode)
: mLocale(NULL), mVendor(NULL),
mResources(NULL), mConfig(new ResTable_config),
mCacheMode(cacheMode), mCacheValid(false)
{
memset(mConfig, 0, sizeof(ResTable_config));
}
//前面native init时调用此方法,添加系统资源路径
bool AssetManager::addDefaultAssets()
{
//得到系统资源路径 /system/framework/framework-res.apk
const char* root = getenv("ANDROID_ROOT");
LOG_ALWAYS_FATAL_IF(root == NULL, "ANDROID_ROOT not set");
String8 path(root);
path.appendPath(kSystemAssets);
//还是调用addAssetPath
return addAssetPath(path, NULL);
}
//addAssetPath
bool AssetManager::addAssetPath(const String8& path, int32_t* cookie)
{
AutoMutex _l(mLock);
asset_path ap;
//当前传入Path
String8 realPath(path);
...
//检查添加路径中是否包含AndroidManifest.xml文件
Asset* manifestAsset = const_cast<AssetManager*>(this)->openNonAssetInPathLocked(
kAndroidManifest, Asset::ACCESS_BUFFER, ap);
if (manifestAsset == NULL) {
// This asset path does not contain any resources.
delete manifestAsset;
return false;
}
delete manifestAsset;
//见AssetManager.h Vector<asset_path> mAssetPaths;用于保存add进来的asset_path
mAssetPaths.add(ap);
//...
//见AssetManager.h mutable ResTable* mResources
if (mResources != NULL) {
appendPathToResTable(ap);
}
return true;
}
//添加path到ResTable
bool AssetManager::appendPathToResTable(const asset_path& ap) const {
//...
//构造Asset
Asset* ass = NULL;
ResTable* sharedRes = NULL;
bool shared = true;
bool onlyEmptyResources = true;
if (ap.type != kFileTypeDirectory) {
...
if (sharedRes == NULL) {
//第一次未解析过,为null
ass = const_cast<AssetManager*>(this)->
mZipSet.getZipResourceTableAsset(ap.path);
if (ass == NULL) {
//读取解析resouces.arsc
ass = const_cast<AssetManager*>(this)->
openNonAssetInPathLocked("resources.arsc",
Asset::ACCESS_BUFFER,ap);
if (ass != NULL && ass != kExcludedAsset) {
ass = const_cast<AssetManager*>(this)->
mZipSet.setZipResourceTableAsset(ap.path, ass);
}
}
if (nextEntryIdx == 0 && ass != NULL) {
sharedRes = new ResTable();
sharedRes->add(ass, idmap, nextEntryIdx + 1, false);
//...
sharedRes = const_cast<AssetManager*>(this)->
mZipSet.setZipResourceTable(ap.path, sharedRes);
}
}
} else {
//解析对应path下的resources.arsc得到Asset
ass = const_cast<AssetManager*>(this)->
openNonAssetInPathLocked("resources.arsc",
Asset::ACCESS_BUFFER,
ap);
shared = false;
}
//最终ResTable add(Asset)
if ((ass != NULL || sharedRes != NULL) && ass != kExcludedAsset) {
if (sharedRes != NULL) {
mResources->add(sharedRes);
} else {
mResources->add(ass, idmap, nextEntryIdx + 1, !shared);
}
onlyEmptyResources = false;
if (!shared) {
delete ass;
}
} else {
mResources->addEmpty(nextEntryIdx + 1);
}
return onlyEmptyResources;
}
/*
* 我们先来看如何通过path中的resources.arsc构造出对应Asset对象
* 再来看如何将解析得到的asset对象add到ResTable对象中
*/
//解析ap路径下的resources.arsc文件
Asset* AssetManager::openNonAssetInPathLocked(const char* fileName, AccessMode mode,
const asset_path& ap)
{
Asset* pAsset = NULL;
//区分是压缩包还是目录
/* look at the filesystem on disk */
if (ap.type == kFileTypeDirectory) {
String8 path(ap.path);
path.appendPath(fileName);
//open File
pAsset = openAssetFromFileLocked(path, mode);
if (pAsset == NULL) {
/* try again, this time with ".gz" */
path.append(".gz");
pAsset = openAssetFromFileLocked(path, mode);
}
//asset source赋值
if (pAsset != NULL) {
//printf("FOUND NA '%s' on disk\n", fileName);
pAsset->setAssetSource(path);
}
} else {
String8 path(fileName);
//open zip:对应base.apk这种情况
/* check the appropriate Zip file */
ZipFileRO* pZip = getZipFileLocked(ap);
if (pZip != NULL) {
ZipEntryRO entry = pZip->findEntryByName(path.string());
if (entry != NULL) {
pAsset = openAssetFromZipLocked(pZip, entry, mode, path);
pZip->releaseEntry(entry);
}
}
if (pAsset != NULL) {
/* create a "source" name, for debug/display */
pAsset->setAssetSource(
createZipSourceNameLocked(ZipSet::getPathName(ap.path.string()), String8(""),
String8(fileName)));
}
}
return pAsset;
}
//我们以打开zip中的resources.arsc为例
Asset* AssetManager::openAssetFromZipLocked(const ZipFileRO* pZipFile,
const ZipEntryRO entry, AccessMode mode, const String8& entryName)
{
Asset* pAsset = NULL;
//解压文件得到dataMap
//...
pAsset = Asset::createFromCompressedMap(dataMap,
static_cast<size_t>(uncompressedLen), mode);
return pAsset;
}
//-------------------Asset.cpp, Asset.h------------------
void setAssetSource(const String8& path) { mAssetSource = path; }
/*
* Create a new Asset from compressed data in a memory mapping.
*/
Asset* Asset::createFromCompressedMap(FileMap* dataMap,
size_t uncompressedLen, AccessMode mode)
{
_CompressedAsset* pAsset;
status_t result;
pAsset = new _CompressedAsset;
//读取resources.arsc data
result = pAsset->openChunk(dataMap, uncompressedLen);
//...
pAsset->mAccessMode = mode;
return pAsset;
}
//读取resources.arsc
status_t _FileAsset::openChunk(const char* fileName, int fd, off64_t offset, size_t length)
{
//根据文件描述符打开文件
/* after fdopen, the fd will be closed on fclose() */
mFp = fdopen(fd, "rb");
if (mFp == NULL)
return UNKNOWN_ERROR;
mStart = offset;
mLength = length;
assert(mOffset == 0);
// fseek
/* seek the FILE* to the start of chunk */
if (fseek(mFp, mStart, SEEK_SET) != 0) {
assert(false);
}
mFileName = fileName != NULL ? strdup(fileName) : NULL;
return NO_ERROR;
}
/*
* 以上得到一个打开了path 下 resources.arsc文件的Asset对象, 然后将
* 其add到ResTable结构中去
*/
//------------------ResourcesTypes.cpp-------------
status_t ResTable::add(Asset* asset, const int32_t cookie, bool copyData) {
//Asset getBuffer
const void* data = asset->getBuffer(true);
if (data == NULL) {
ALOGW("Unable to get buffer of resource asset file");
return UNKNOWN_ERROR;
}
//调用自身addInternal
return addInternal(data, static_cast<size_t>(asset->getLength()), NULL, 0, cookie, copyData);
}
//解析具体resources.arsc中的data,构造Header, ResChunk_header
status_t ResTable::addInternal(const void* data, size_t dataSize, const void* idmapData, size_t idmapDataSize,
const int32_t cookie, bool copyData)
{
//...
Header* header = new Header(this);
header->index = mHeaders.size();
header->cookie = cookie;
//...
mHeaders.add(header);
const bool notDeviceEndian = htods(0xf0) != 0xf0;
if (copyData || notDeviceEndian) {
header->ownedData = malloc(dataSize);
if (header->ownedData == NULL) {
return (mError=NO_MEMORY);
}
memcpy(header->ownedData, data, dataSize);
data = header->ownedData;
}
header->header = (const ResTable_header*)data;
header->size = dtohl(header->header->header.size);
//...
header->dataEnd = ((const uint8_t*)header->header) + header->size;
// Iterate through all chunks.
size_t curPackage = 0;
//ResChunk_header
const ResChunk_header* chunk =
(const ResChunk_header*)(((const uint8_t*)header->header)
+ dtohs(header->header->header.headerSize));
while (((const uint8_t*)chunk) <= (header->dataEnd-sizeof(ResChunk_header)) &&
((const uint8_t*)chunk) <= (header->dataEnd-dtohl(chunk->size))) {
status_t err = validate_chunk(chunk, sizeof(ResChunk_header), header->dataEnd, "ResTable");
if (err != NO_ERROR) {
return (mError=err);
}
//....
const size_t csize = dtohl(chunk->size);
const uint16_t ctype = dtohs(chunk->type);
//字符串池
if (ctype == RES_STRING_POOL_TYPE) {
if (header->values.getError() != NO_ERROR) {
...
}
} else if (ctype == RES_TABLE_PACKAGE_TYPE) {
if (curPackage >= dtohl(header->header->packageCount)) {
...
}
//解析package
if (parsePackage((ResTable_package*)chunk, header) != NO_ERROR) {
return mError;
}
curPackage++;
} else {
}
chunk = (const ResChunk_header*)
(((const uint8_t*)chunk) + csize);
}
if (curPackage < dtohl(header->header->packageCount)) {
...
}
return mError;
}
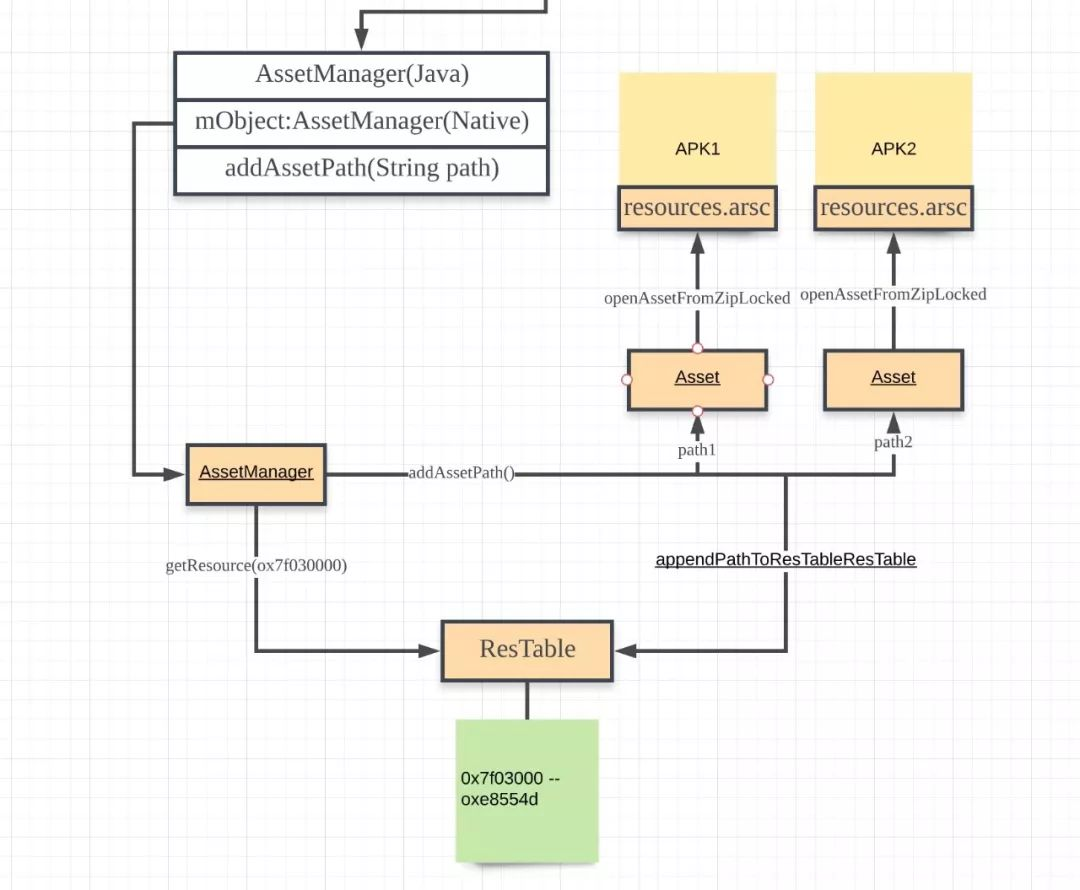
综上,可以看到ResourcesImpl最终访问资源均是通过其成员变量mAsset来实现的,而mAsset对资源的访问均是通过其成员变量 mObject所对应的Native AssetManager对象,每当调用其 addAssetPath(Stringpath)就会解析其path下的resources.arsc文件得到一个Asset对象,然后将其add进当前应用对应的ResTable对象中(进一步解析得到ResChunkHeader等的过程)。示意图如下:
资源的查找
通过上述流程,已经持有一个可以访问资源的assetManager对象了,并且native层也构造好了可供查找的数据结构(ResTable);接下来我们以 getColor(R.color.text_color)为例,分析相关实现:
//---------------------R.java------------------
/*
* 由之前的《Android资源初探(一)资源打包》可以知道打包过程中生成
* R.java中保存着不同Type的资源对应的id,格式为0xPPTTEEEE
*/
public
final
class R {
public static
final
class color {
public static
final
int text_color=0x7f030000
;
}
}
/*
* 由之前ResourcesImpl.java的分析,getColor最终调
* mAssets.getResourceValue()
*/
//-------------------AssetManager.java------------------
synchronized
(this
) {
//native 方法, return true,更改传入的outValue值
final int
block = loadResourceValue
(resId,
(short
) densityDpi
, outValue
, resolveRefs
);
if (
block <
0)
{
return false
;
}
//TODO: 注意TypedValue类,自带方法对取得的值进行了转化 if (outValue.type == TypedValue.TYPE_STRING) {
outValue
.string =
mStringBlocks[block].
get(outValue
.data);
}
return true
;
}
private
native
final int
loadResourceValue(
int ident,
short density
, TypedValue outValue
,
boolean resolve);
//----------------android_util_AssetManager.cpp--------
//java loadResouceValue
static
jint android_content_AssetManager_loadResourceValue(
JNIEnv* env
, jobject clazz,
jint ident
,
jshort density
,
jobject outValue
,
jboolean resolve
)
{
//通过当前Java层AssetManager对象 mObject拿到对应Native AssetManager
AssetManager* am
= assetManagerForJavaObject
(env,
clazz);
//拿到当前ResTable:持有add了一堆Path的Asset
const ResTable
& res(
am->getResources
());
Res_value value;
ResTable_config config;
uint32_t typeSpecFlags;
//通过id查看对应的block--->ResTable
ssize_t block =
res.getResource
(ident,
&value,
false, density
, &typeSpecFlags
,
&config
);
//...
uint32_t ref =
ident;
if (
resolve)
{
block
= res.
resolveReference(&
value, block
, &
ref, &
typeSpecFlags,
&
config);
}
//将值赋值给outValue
if (
block >=
0)
{
return copyValue(env
, outValue,
&res
, value, ref
, block, typeSpecFlags
, &config
);
}
//返回给java层
return static_cast<jint
>(block);
}
/*
* 还记得之前Native AssetManager初始化时通过解析Resources.arsc生
* 的ResTable对象嘛,它持有解析resources.arsc后的ResChunk_header
* 等数据
*/
//----------------------ResourceTypes.cpp--------------
//查找资源, 先通过PackageId,找到对应PackageGroup,然后通
// typeId,找到type数组,然后在其中找entry
ssize_t
ResTable::
getResource(uint32_t resID
, Res_value
* outValue, bool mayBeBag
, uint16_t density
,
uint32_t* outSpecFlags
, ResTable_config
* outConfig)
const
{
//packageId: 0x7f, typeId 03, entryId:0000
const ssize_t
p = getResourcePackageIndex
(resID);
const int
t =
Res_GETTYPE(resID);
const int
e =
Res_GETENTRY(resID);
//通过packageId对应的PackageGroup ==> 注意mPackageGroup的构造
const PackageGroup
* const
grp = mPackageGroups
[p];
Entry entry;
status_t err =
getEntry(grp
, t,
e,
&desiredConfig
, &entry
);
if ((
dtohs(entry
.entry->
flags) &
ResTable_entry
::FLAG_COMPLEX
)
!=
0)
{
if (!
mayBeBag)
{
ALOGW
("Requesting resource 0x%08x failed because it is complex\n"
, resID);
}
return BAD_VALUE;
}
//得到value
const Res_value
* value =
reinterpret_cast<
const Res_value*>(
reinterpret_cast
<const
uint8_t*>(entry.
entry)
+ entry.entry
->size
);
outValue
->size =
dtohs(value
->size);
outValue
->res0 =
value->res0
;
outValue
->dataType =
value->dataType
;
outValue
->data =
dtohl(value
->data);
if (
grp->dynamicRefTable
.lookupResourceValue
(outValue)
!= NO_ERROR
) {
return BAD_VALUE;
}
if (
outSpecFlags != NULL)
{
*outSpecFlags =
entry.specFlags
;
}
if (
outConfig != NULL)
{
*outConfig =
entry.config
;
}
//package header index
return entry.
package->header->
index;
}
综上,整个访问机制,就是通过 0xPPTTEEEE的id去Native层通过其PackageId, TypeId, EntryId最终得到值得过程。
总结
上述流程一张图就可以表示清楚:
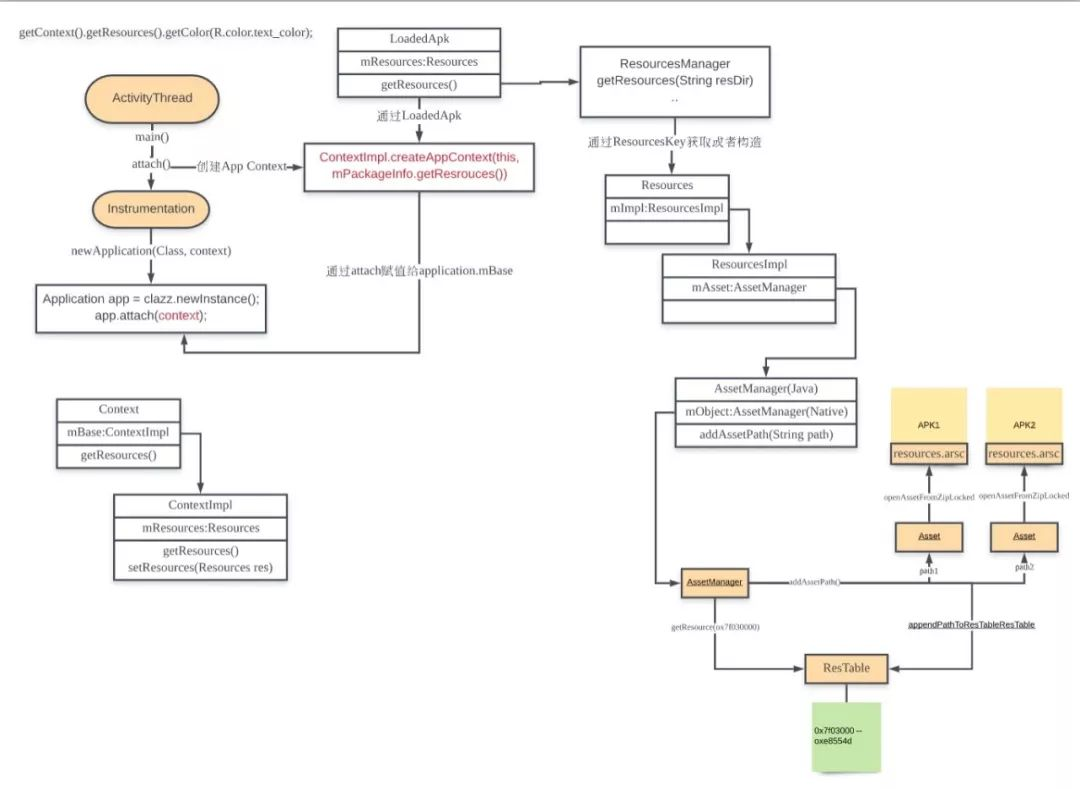
在打包流程和访问机制中都是着重梳理流程和源码思路,未过多涉及细节,这里尤其resources.arsc文件是比较复杂和重要的,限于篇幅,这两篇中没有深入介绍,我们在后续第四篇《资源的插件化和热修复》中再详细介绍resources.arsc的文件格式。
备注:公众号对源码分析类阅读不太友好,后续文章将同步发布到博客,点击阅读原文即可。
推荐阅读: