在上一篇里,我们主要聊了下Vue数据绑定简析,明白了其观察者模式的基本原理。我们知道在观察者中有一种属于渲染函数观察者(vm._watcher),通过对渲染函数的求值计算来触发依赖收集,进而进行响应式的数据绑定,但是对于渲染函数如何编译却不曾了解。 这一篇我们将通过compiler编译模板字符串template,生成AST语法树这一过程来看看Vue的编译原理。
compilerOption
在我们编写的Vue组件中,要渲染一条文本的UI可能会是如下写法:
<template>
    <p class="foo">{{text}}</p>
</template>
编译后变成:
var render = function() {
    var _vm = this
    _vm._c("p", {
        staticClass: "foo"
    }, [
        _vm._v(_vm._s(_vm.text))
    ])
}
经过编译,将一段template的html代码变成一个js函数,通过对该函数的调用来收集到依赖_vm.text,实现数据变化时实时更新
UI。那么它是如何识别class这些attr的,又是如何编译成一个完整的渲染函数的呢?
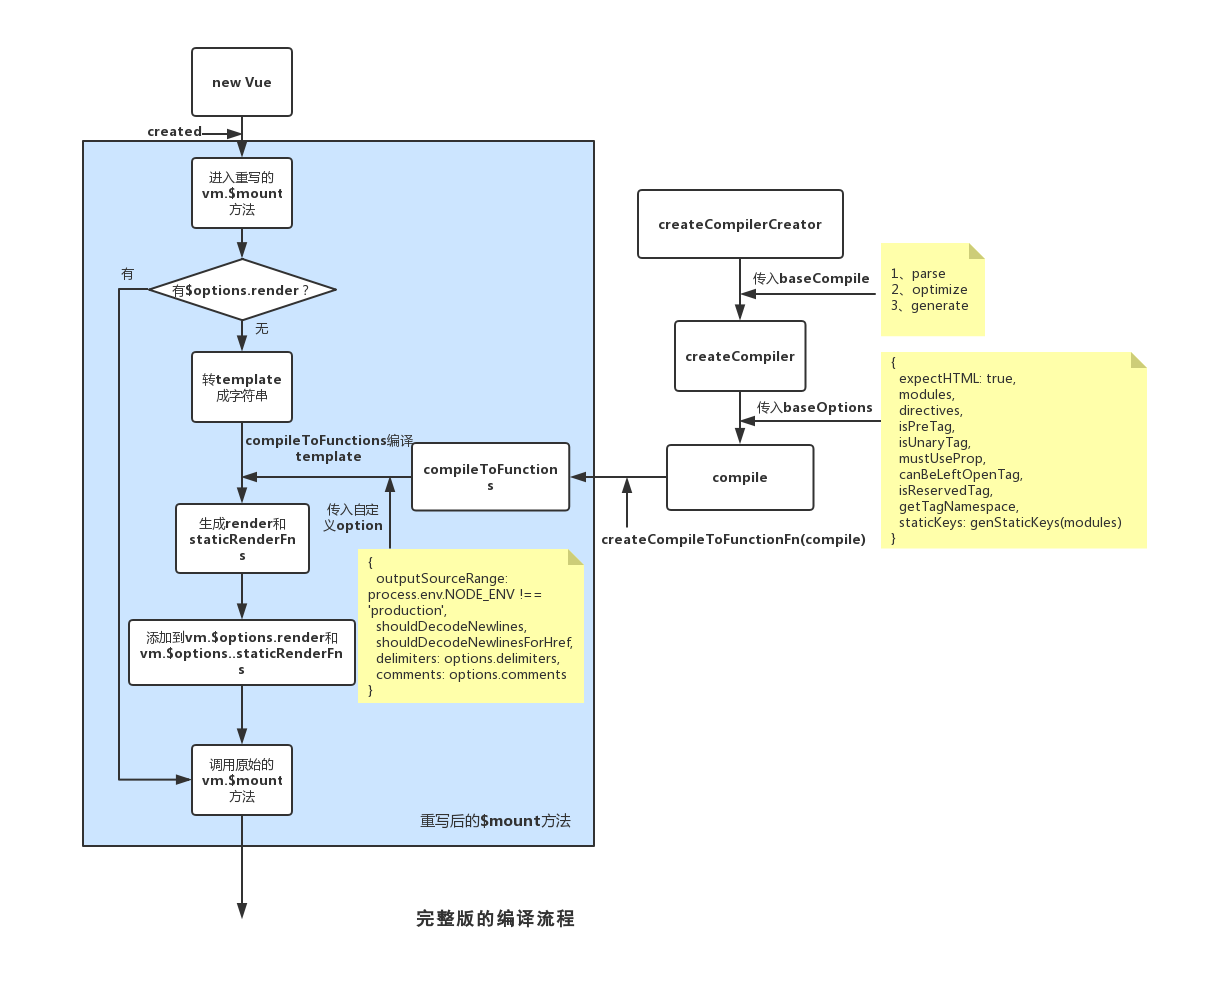
为了探究Compiler的原理,我们找到完整版的入口文件entry-runtime-with-compiler.js,发现其重写了$mount函数:如果没有render函数,则转换template为字符串,再调用compileToFunctions进行编译,最终将render和staticRenderFns挂到$options下并调用原始的$mount。通过对compileToFunctions的层层剥离,我们可以得到最终的结果:
const { compile, compileToFunctions } = createCompilerCreator(function baseCompile() {
  ...
})(baseOptions)
可以看到,其利用闭包将baseCompile函数和baseOptions对象依次传入createCompilerCreator函数并保存,相当于对工厂函数进行柯理化以提高模块解耦下的代码复用性,最终返回compile和compileToFunctions两个编译函数。
baseOptions属于编译时的配置项,与具体的目标平台有关,web平台下的代码如下:
// src/platforms/web/compiler/options.js
export const baseOptions: CompilerOptions = {
  expectHTML: true,
  modules,
  directives,
  isPreTag,
  isUnaryTag,
  mustUseProp,
  canBeLeftOpenTag,
  isReservedTag,
  getTagNamespace,
  staticKeys: genStaticKeys(modules)
}
modules:主要包含了一些编译时做的转换和前置转换的操作,包括对class和style做一些staticAttr和bindingAttr相关的处理,对<input />的bindingType做了动态匹配type的处理等。directives:包含了v-html、v-text及v-model的指令编译。staticKeys:将modules里的staticKeys拼接成字符串,这里是staticClass,staticStyle。- 剩下的主要是一些对
tag的判断函数,待用到时再来具体分析。
了解了baseOptions,我们再来看看baseCompile:
// src/compiler/index.js
export const createCompiler = createCompilerCreator(function baseCompile (
  template: string,
  options: CompilerOptions
): CompiledResult {
  const ast = parse(template.trim(), options)
  if (options.optimize !== false) {
    optimize(ast, options)
  }
  const code = generate(ast, options)
  return {
    ast,
    render: code.render,
    staticRenderFns: code.staticRenderFns
  }
})
parse:根据字符串template和options生成AST语法树。optimize:用来给root递归添加各种static属性,配合VNode和patch使用,避免不必要的re-render,提高性能。generate:根据ast语法树,生成String类型的render和Array<String>类型的staticRenderFns,供后续的new Function构造生成最终的render和staticRenderFns。
以上只是对compiler有个粗略的了解,明白了其编译的主要工作流程,现在我们需要了解第一步(parse生成AST),加深对其编译原理的理解。首先我们回到createCompilerCreator,为了避免无关代码干扰阅读,这里去掉了一些和开发调试相关的代码,来看具体的compile函数:
function compile (
  template: string,
  options?: CompilerOptions
): CompiledResult {
  const finalOptions = Object.create(baseOptions)
  const errors = []
  const tips = []

  let warn = (msg, range, tip) => {
    (tip ? tips : errors).push(msg)
  }

  if (options) {
    ...
    // merge custom modules
    if (options.modules) {
      finalOptions.modules =
        (baseOptions.modules || []).concat(options.modules)
    }
    // merge custom directives
    if (options.directives) {
      finalOptions.directives = extend(
        Object.create(baseOptions.directives || null),
        options.directives
      )
    }
    // copy other options
    for (const key in options) {
      if (key !== 'modules' && key !== 'directives') {
        finalOptions[key] = options[key]
      }
    }
  }

  finalOptions.warn = warn

  const compiled = baseCompile(template.trim(), finalOptions)
  if (process.env.NODE_ENV !== 'production') {
    detectErrors(compiled.ast, warn)
  }
  compiled.errors = errors
  compiled.tips = tips
  return compiled
}
显而易见,这里主要通过继承、拷贝等生成finalOptions,并执行baseCompile方法。我们以web下的编译为例,在$mount方法中编译传入的options如下:
// src/platforms/web/entry-runtime-with-compiler.js
{
  outputSourceRange: process.env.NODE_ENV !== 'production', // 开发模式下标记start和end,便于定位编译出错信息
  shouldDecodeNewlines, // 是否对换行符进行转码
  shouldDecodeNewlinesForHref, // 是否对href内的换行符进行转码
  delimiters: options.delimiters, // 改变纯文本插入分隔符,用来自定义<p>{{a}}</p>中的'{{}}'
  comments: options.comments // 是否保留模板HTML中的注释,默认false
}
这里我们以一张流程图来简要梳理下编译过程:
parse
了解了编译参数的生成过程后,我们再来看parse的工作原理。现在回到之前的baseCompile,其中template在经过$mount函数转换后,统一转为字符串:
const ast = parse(template.trim(), options)
进入parse方法体,首先是:
// src/compiler/parser/index.js
transforms = pluckModuleFunction(options.modules, 'transformNode')
preTransforms = pluckModuleFunction(options.modules, 'preTransformNode')
postTransforms = pluckModuleFunction(options.modules, 'postTransformNode')
pluckModuleFunction方法用以将modules数组中的各元素target对应的target[key]组成新的数组,用以后续进行遍历操作,详见src/compiler/helper.js,在后续调用时再做具体说明。
而后声明一个变量root,并调用parseHTML(传入template和option,包括start、end、chars和comment方法),最终返回root,而这就是我们所需要的AST。
parseHTML
parseHTML,如其命名,用于解析我们的HTML字符串。首先是初始化stack,用以维护非自闭合的element栈,之后利用while(html)对html进行标签正则匹配、循环解析,这里我们用一张导图来更加直观地展示其解析逻辑:
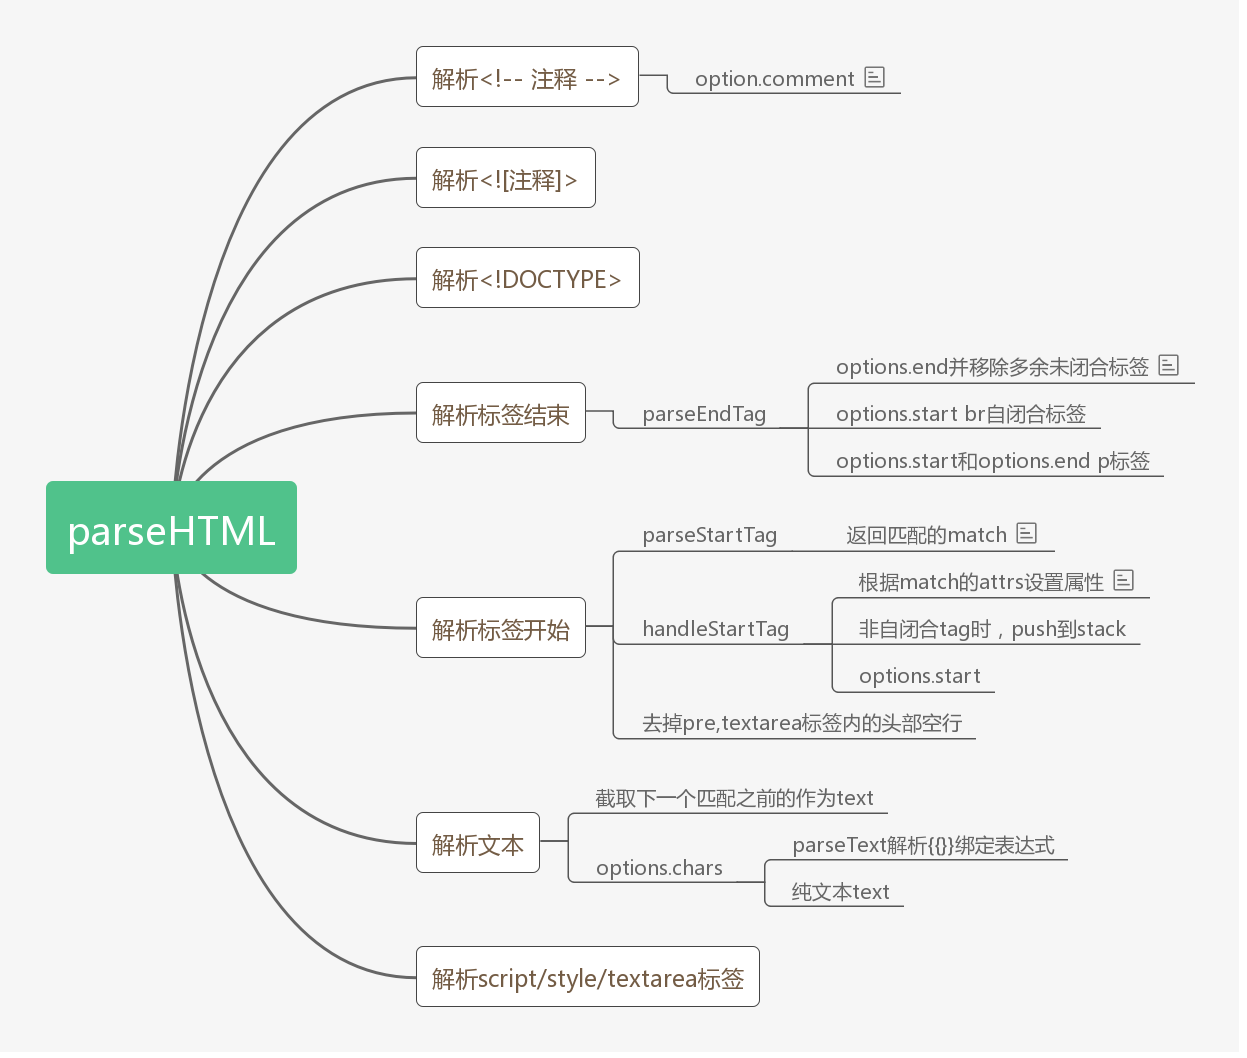
通过调用advance来截断更新html字符串,供下一次循环解析,并调用option中的start、end、chars和comment方法将其添加到root对象中,最终完成AST语法树的输出。在parseHTML中,最核心的当属解析标签的开始,因此我们以parseStartTag为入口,来进行代码阅读。
const start = html.match(startTagOpen)
if (start) {
  const match = {
    tagName: start[1],
    attrs: [],
    start: index
  }
  // 正则匹配标签,并截断正在解析的html字符串
  advance(start[0].length)
  let end, attr
  while (!(end = html.match(startTagClose)) && (attr = html.match(dynamicArgAttribute) || html.match(attribute))) {
    // 正则获取标签上的attrs,并存入match的attrs数组
    attr.start = index
    advance(attr[0].length)
    attr.end = index
    match.attrs.push(attr)
  }
  // 解析到'>'字符
  if (end) {
    match.unarySlash = end[1] // '/>'时为自闭合标签,否则为false
    advance(end[0].length)
    match.end = index
    return match
  }
}
以如下template为例:
<my-component :foo.sync="foo" :key="index" @barTap="barTap" v-for="(item, index) in barList">
  <input v-model.number="value" />
  <template #bodySlot="{link, text}">
    <a v-if="link" :href="link">链接地址为:{{text | textFilter | linkFilter}}!</a>
    <p v-else>{{text | filter}}</p>
  </template>
</my-component>
可以得到如下match:
{
  tagName: 'my-component',
  attrs: [
    [ ' :foo.sync="foo"',
       ':foo.sync',
       '=',
       'foo',
       undefined,
       undefined,
       index: 0,
       input: ' :foo.sync="foo" :key="index" @barTap="barTap" v-for="(item, index) in barList">'],
    [ ' :key="index"',
       ':key',
       '=',
       'index',
       undefined,
       undefined,
       index: 0,
       input: ' :key="index" @barTap="barTap" v-for="(item, index) in barList">'],
    [ ' @barTap="barTap"',
       '@barTap',
       '=',
       'barTap',
       undefined,
       undefined,
       index: 0,
       input: ' @barTap="barTap" v-for="(item, index) in barList">'],
    [ ' v-for="(item, index) in barList"',
       'v-for',
       '=',
       '(item, index) in barList',
       undefined,
       undefined,
       index: 0,
       input: ' v-for="(item, index) in barList">']
  ],
}
获取到match后,接着调用handleStartTag方法:
- 判断
if (expectHTML),主要是对于编写自闭合标签时做自动纠错的功能,确保lastTag的正确解析。 const unary = isUnaryTag(tagName) || !!unarySlash来获取当前标签的闭合属性,其中isUnaryTag为当前编译的web平台下自闭合的标签,可见于src/platforms/web/compiler/util.js。- 解析
match到的attrs数组,其中需要对属性的值做反转义处理,确保值能正确运算执行。 - 判断
if (!unary),如果非自闭合,则将当前标签的所有信息存入stack栈里,同时将lastTag替换为当前tagName,确保后续parseEndTag的正常解析。 - 最后通过传入的
options.start方法,调用options.start(tagName, attrs, unary, match.start, match.end)。
回到parseHTML时的start方法,首先创建了一个ASTElement:
let element: ASTElement = createASTElement(tag, attrs, currentParent)
得到element如下:
// 去掉了与调试相关的start和end属性
{
  type: 1,
  tag: 'my-component',
  attrsList: [
    {name: ':foo.sync', value: 'foo'},
    {name: ':key', value: 'index'},
    {name: '@barTap', value: 'barTap'},
    {name: 'v-for', value: '(item, index) in barList'},
  ],
  attrsMap: {
    ':foo.sync': 'foo',
    ':key': 'index',
    '@barTap': 'barTap',
    'v-for': '(item, index) in barList',
  },
  rawAttrsMap: {},
  parent, // parent为其父element
  children: []
}
接着是
for (let i = 0; i < preTransforms.length; i++) {
  element = preTransforms[i](element, options) || element
}
在parseHTML开头提到preTransforms = pluckModuleFunction(options.modules, 'preTransformNode')(用以执行options.modules数组中每个元素的preTransformNode方法),通过查看编译时的finalOptions,我们得到options.modules为baseOptions.modules(详见src/platforms/web/compiler/options.js)。在这里主要是执行input标签里v-model指令的前置转换,具体等解析input标签时我们再来看。接着是一连串的判断:
if (!inVPre),用来判断其某个parent是否包含v-pre指令,我们知道包含v-pre指令,则跳过这个元素和它的子元素的编译过程。如果没有,则调用processPre来判断当前元素是否包含v-pre,若是则设置inVPre。platformIsPreTag(element.tag)判断element是否为pre标签。- 根据
inVPre执行process编译,若inVPre为true,则将el.attrsList的各元素value调用JSON.stringify为字符串。 - 若
inVPre为false,则根据element.processed判断当前element是否已编译完成,依次调用processFor(element)、processIf(element)、processOnce(element)。
processFor
在利用processFor解析v-for指令时:
- 首先是获取
v-for的attr值,exp = getAndRemoveAttr(el, 'v-for'),根据上面得到的element和getAndRemoveAttr方法,我们可以得到exp为'(item, index) in barList',同时在element的attrsList移除当前元素 - 之后调用
const res = parseFor(exp)解析for语句:
export function parseFor (exp: string): ?ForParseResult {
  const inMatch = exp.match(forAliasRE)
  // 简化后 inMatch = ['(item, index) in barList', '(item, index)', 'barList']
  if (!inMatch) return
  const res = {}
  res.for = inMatch[2].trim()
  const alias = inMatch[1].trim().replace(stripParensRE, '') // 取括号内的alias如:item, index
  const iteratorMatch = alias.match(forIteratorRE)
  if (iteratorMatch) {
    res.alias = alias.replace(forIteratorRE, '').trim()
    // iterator1和iterator2,依次取for的后两项迭代属性
    res.iterator1 = iteratorMatch[1].trim()
    if (iteratorMatch[2]) {
      res.iterator2 = iteratorMatch[2].trim()
    }
  } else {
    res.alias = alias
  }
  return res
}
在我们的例子中,可以得到res为{for: 'barList', alias: 'item', iterator1: 'index'}
- 得到
res后,我们调用extend(el, res)将其合并到element里,得到此时的element为:
{
  type: 1,
  tag: 'my-component',
  attrsList: [
    {name: ':foo.sync', value: 'foo'},
    {name: '@barTap', value: 'barTap'},
  ],
  attrsMap: {
    ':foo.sync': 'foo',
    '@barTap': 'barTap',
    'v-for': '(item, index) in barList',
  },
  rawAttrsMap: {},
  parent, // parent为其父element
  children: [],
  key: 'index',
  for: 'barList',
  alias: 'item',
  iterator1: 'index'
}
接着是processIf和processOnce,processOnce用来给element添加once标志,processIf这里未涉及到,将在解析a标签那里去展开。
之后便是判断是否为根节点,如果之前未解析过标签,则将当前element赋值给root,同时,由于<my-component></my-component>非自闭合标签,因此暂存至currentParent变量,同时将其推入stack栈,至此,我们简单的解析完了一个标签的开始部分。
preTransformNode
此时的html字符串变成了:
  <input v-model.number="value" />
  <template #bodySlot="{link, text}">
    <a v-if="link" :href="link">链接地址为:{{text | textFilter | linkFilter}}!</a>
    <p v-else>{{text | filter}}</p>
  </template>
</my-component>
接着我们重复parseHTML的while方法,此时解析到的是一个input的自闭合标签,因此不需要进入stack,其他与上一个标签类似,这里主要来看下之前提到的preTransforms:
// src/platforms/web/compiler/modules/model.js
function preTransformNode (el: ASTElement, options: CompilerOptions) {
  if (el.tag === 'input') {
    const map = el.attrsMap
    if (!map['v-model']) {
      return
    }
    let typeBinding
    if (map[':type'] || map['v-bind:type']) {
      typeBinding = getBindingAttr(el, 'type')
    }
    if (!map.type && !typeBinding && map['v-bind']) {
      // 取v-bind的对象中type值
      typeBinding = `(${map['v-bind']}).type`
    }
    if (typeBinding) {
      // 判断是否有v-if指令
      const ifCondition = getAndRemoveAttr(el, 'v-if', true)
      const ifConditionExtra = ifCondition ? `&&(${ifCondition})` : ``
      const hasElse = getAndRemoveAttr(el, 'v-else', true) != null
      const elseIfCondition = getAndRemoveAttr(el, 'v-else-if', true)
      // 1. checkbox
      const branch0 = cloneASTElement(el)
      // process for on the main node
      processFor(branch0)
      addRawAttr(branch0, 'type', 'checkbox')
      processElement(branch0, options)
      branch0.processed = true // prevent it from double-processed
      branch0.if = `(${typeBinding})==='checkbox'` + ifConditionExtra
      addIfCondition(branch0, {
        exp: branch0.if,
        block: branch0
      })
      // 2. add radio else-if condition
      const branch1 = cloneASTElement(el)
      getAndRemoveAttr(branch1, 'v-for', true)
      addRawAttr(branch1, 'type', 'radio')
      processElement(branch1, options)
      addIfCondition(branch0, {
        exp: `(${typeBinding})==='radio'` + ifConditionExtra,
        block: branch1
      })
      // 3. other
      const branch2 = cloneASTElement(el)
      getAndRemoveAttr(branch2, 'v-for', true)
      addRawAttr(branch2, ':type', typeBinding)
      processElement(branch2, options)
      addIfCondition(branch0, {
        exp: ifCondition,
        block: branch2
      })

      if (hasElse) {
        branch0.else = true
      } else if (elseIfCondition) {
        branch0.elseif = elseIfCondition
      }

      return branch0
    }
  }
}
- 判断
ASTElement的tag及attrsMap,当包含v-model的input标签时才继续执行,并根据多种绑定方式,获取typeBinding。 - 生成
checkbox情况下的ASTElement代码块,并添加到branch0。 - 生成
radio下的ASTElement代码块,并添加到branch1。 - 其他
type情况,保留:type,并添加到branch2。
在preTransformNode方法里,通过cloneASTElement克隆各种type的branch,用processFor来解析branch0根节点的v-for指令,并调用getAndRemoveAttr删除其余branch的v-for属性和addRawAttr添加type属性。再调用processElement来编译解析各个branch0,并添加到ifConditions数组(元素对象有两个属性:exp和block,用以后续genIf循环遍历,并根据exp是否成立而返回对应block),最后根据v-if、v-else和v-else-if来设置branch0对应的属性,并返回branch0。
input是自闭合标签,因而不需要放入stack,直接执行closeElement。在preTransformNode已设置element.processed为true,只需将my-component和input设置children和parent互相引用即可。最后执行postTransforms,完成当前element的编译。
接着解析template标签<template #bodySlot="{link, text}">,将对应的attr放入attrsList和attrsMap,过程与上述类似,在此不再赘述。
parseText
接着是一组a标签和p标签,首先是一组v-if和v-else:
<a v-if="link" :href="link">链接地址为:{{text | textFilter | linkFilter}}!</a>
<p v-else>{{text | filter}}</p>
可以看到,processIf方法里通过对v-if的判断来调用addIfCondition,而v-else-if没有调用,是因为在closeElement里会通过processIfConditions向前查找最近一个v-if表达式的element并对其调用addIfCondition方法。之后通过传入的option.char方法来解析字符串。在方法里,我们可以看到根据(res = parseText(text, delimiters))用来生成不同的child,下面我们来看下parseText是如何编译的。
首先会根据compilerOption里传入的delimiters来确定text的匹配规则,默认为{{}},接着通过while循环匹配"链接地址为:{{text | textFilter | linkFilter}}!"字符串,并将结果依次存入rawTokens和tokens,最终返回expression和tokens。
增加
index > lastIndex及循环结束时的lastIndex < text.length,是为了将未包含在delimiters之内的字符串也一起解析保存。
在while循环体内,还有一个parseFilter用来解析我们的过滤器,利用for循环去识别各个i位置的char
这里增加对 ` ' " / 等的判断,是为了避免把字符串和正则里的 | 当做过滤器操作符
首先是取出需要操作的表达式expression,之后将匹配到的过滤器依次存入filters数组,最后调用wrapFilter方法,根据过滤器有无其他参数, 返回真正的表达式。据此我们可以得到最终的expression为_f("linkFilter")(_f("textFilter")(text)),可以看到当同一表达式存在多个过滤器时,其将按照从左往右的顺序执行。_f是挂载在Vue原型链上的方法,用以运行时根据vm.$options来获取到对应的过滤器函数,后续类似的_s, _c等方法,可从src/core/instance/render-helpers/index.js进行查看,具体不做展开。
在parseText方法最后,我们可以得到:
{
  expression: '"链接地址为:" + _s(_f("linkFilter")(_f("textFilter")(text))) + "!"'
  tokens: ["链接地址为:", {@binding: '_f("linkFilter")(_f("textFilter")(text))'}, "!"]
}
closeElement
之后解析</template>的闭合标签:
  </template>
</my-component>
我们先取到之前的element:
{
  type: 1,
  tag: 'template',
  attrsList: [
    {name: '#bodySlot', value: '{link, text}'},
  ],
  attrsMap: {
    '#bodySlot': '{link, text}',
  },
  parent, // parent为其父my-component
  children: [],
}
之后先执行processElement方法,processElement函数在src/compiler/parser/index.js,主要负责element本身的编译解析。
processSlotContent
调用核心方法
processSlotContent用来编译slot。
-
先是兼容
template的scope属性,并解析slot-scope至el.slotScope,用来保存作用域插槽需要传递的props。 -
解析
slot用来处理默认插槽和具名插槽,插槽名设置到el.slotTarget,el.slotTargetDynamic用以判断是否为动态解析的插槽,支持:slot="dynamicSlot"这种动态写法。 -
v-slot在tag为template的标签上时,等效于将slot和slot-scope作合并处理。 -
v-slot在component上时,此时的slotScope为component自身的插槽上所提供。the scope variable provided by a component is also declared on that component itself.getAndRemoveAttrByRegex(el, slotRE)根据正则取到slotBinding,并将其从attrsList里移除。getSlotName(slotBinding)得到{name: "bodySlot", dynamic: false}。slotContainer = el.scopedSlots.bodySlot调用createASTElement('template', [], el)增加一层新的ASTElement,用以传递slotScope至slotContainer,使得与template解析方式保持一致。- 将
el.children过滤带有slotScope的element,并添加至slotContainer.children,因为重新梳理了el.children中element的父子关系,故而需要移除el.children。
如果
component的el.children中有element存在slotScope,如下示例,此时在my-component和template上均有slotScope,然而事实上这些域变量均来自于my-component,因而为避免scope ambiguity,在开发模式下会给出错误提示!
<my-component v-slot="{msg}">
  <template v-slot="{foo}"></template>
</my-component>
至此完成了processSlotContent对当前element及其children的插槽语法编译。
processAttrs
for (let i = 0; i < transforms.length; i++) {
  element = transforms[i](element, options) || element
}
继续执行processElement,便是对element依次调用transforms,通过查看对应文件src/platforms/web/compiler/modules/index.js,该方法主要处理class和style的静态属性和动态绑定,并设置到el的staticClass、classBinding、staticStyle、styleBinding四个属性。
最后通过processAttrs方法来处理attrs各个属性:
modifiers = parseModifiers(name.replace(dirRE, ''))将各个attr的修饰符依次存入对应的modifiers,并设置为true。如:foo.sync返回{sync: true}。
syncGen = genAssignmentCode(value, `$event`)
返回一个foo=$event字符串(也支持foo.bar、foo['bar'].tab等这种属性绑定)。
之后调用addHandler方法,根据有无.native修饰符将update:foo方法添加到el.events或el.nativeEvents。
根据是否为.prop修饰符或非动态component、DOM保留的Property,分别调用addProp添加到el.props和addAttr添加至el.attrs、el.dynamicAttrs。最后将未匹配上的v-指令调用addDirective添加到el.directives,至此完成了一个完整element包括其子element的编译工作。
通过parse我们就能根据一段字符串html解析得到一个root节点及其children和子孙后代,生成一棵完整的AST语法树,最终得到如下结构的root:
{
  alias: 'item',
  attrs: [{name: 'foo', value: 'foo', dynamic: false}],
  attrsList: [{name: ':foo.sync', value: 'foo'}, {name: '@barTap', value: 'barTap'}],
  attrsMap: {
    ':foo.sync': 'foo',
    '@barTap': 'barTap',
    'v-for': '(item, index) in barList',
  },
  children: [{
    attrsList: [{name: 'v-model.number', value: 'value'}],
    attrsMap: {'v-model.number': 'value'},
    directives: [{
      arg: null,
      isDynamicArg: false,
      modifiers: {number: true},
      name: 'model',
      rawName: "v-model.number",
      value: "value",
    }],
    plain: false,
    prop: [{name: 'value', value: '(value)', dynamic: undefined}],
    tag: 'input',
    type: 1,
  }],
  events: {
    barTap: {value: 'barTap', dynamic: false},
    'update:foo': {value: 'foo=$event', dynamic: undefined},
  },
  for: 'barList',
  forProcessed: true,
  hasBindings: true,
  iterator1: 'index',
  key: 'index',
  plain: false,
  scopedSlots: {
    'bodySlot': {
      ...,
      children: [{
        ...,
        if: 'link',
        // aElement和pElement分别为<a>和<p>创建的两个ASTElement
        ifConditions: [{exp: 'link', block: aElement}, {exp: undefined, block: pElement}],
        ifProcessed: true,
      }],
      slotScope: '{link, text}',
      slotTarget: '"bodySlot"',
      slotTargetDynamic: false,
      tag: "template",
      type: 1,
      }
    }
  },
  tag: 'my-component',
  type: 1,
}
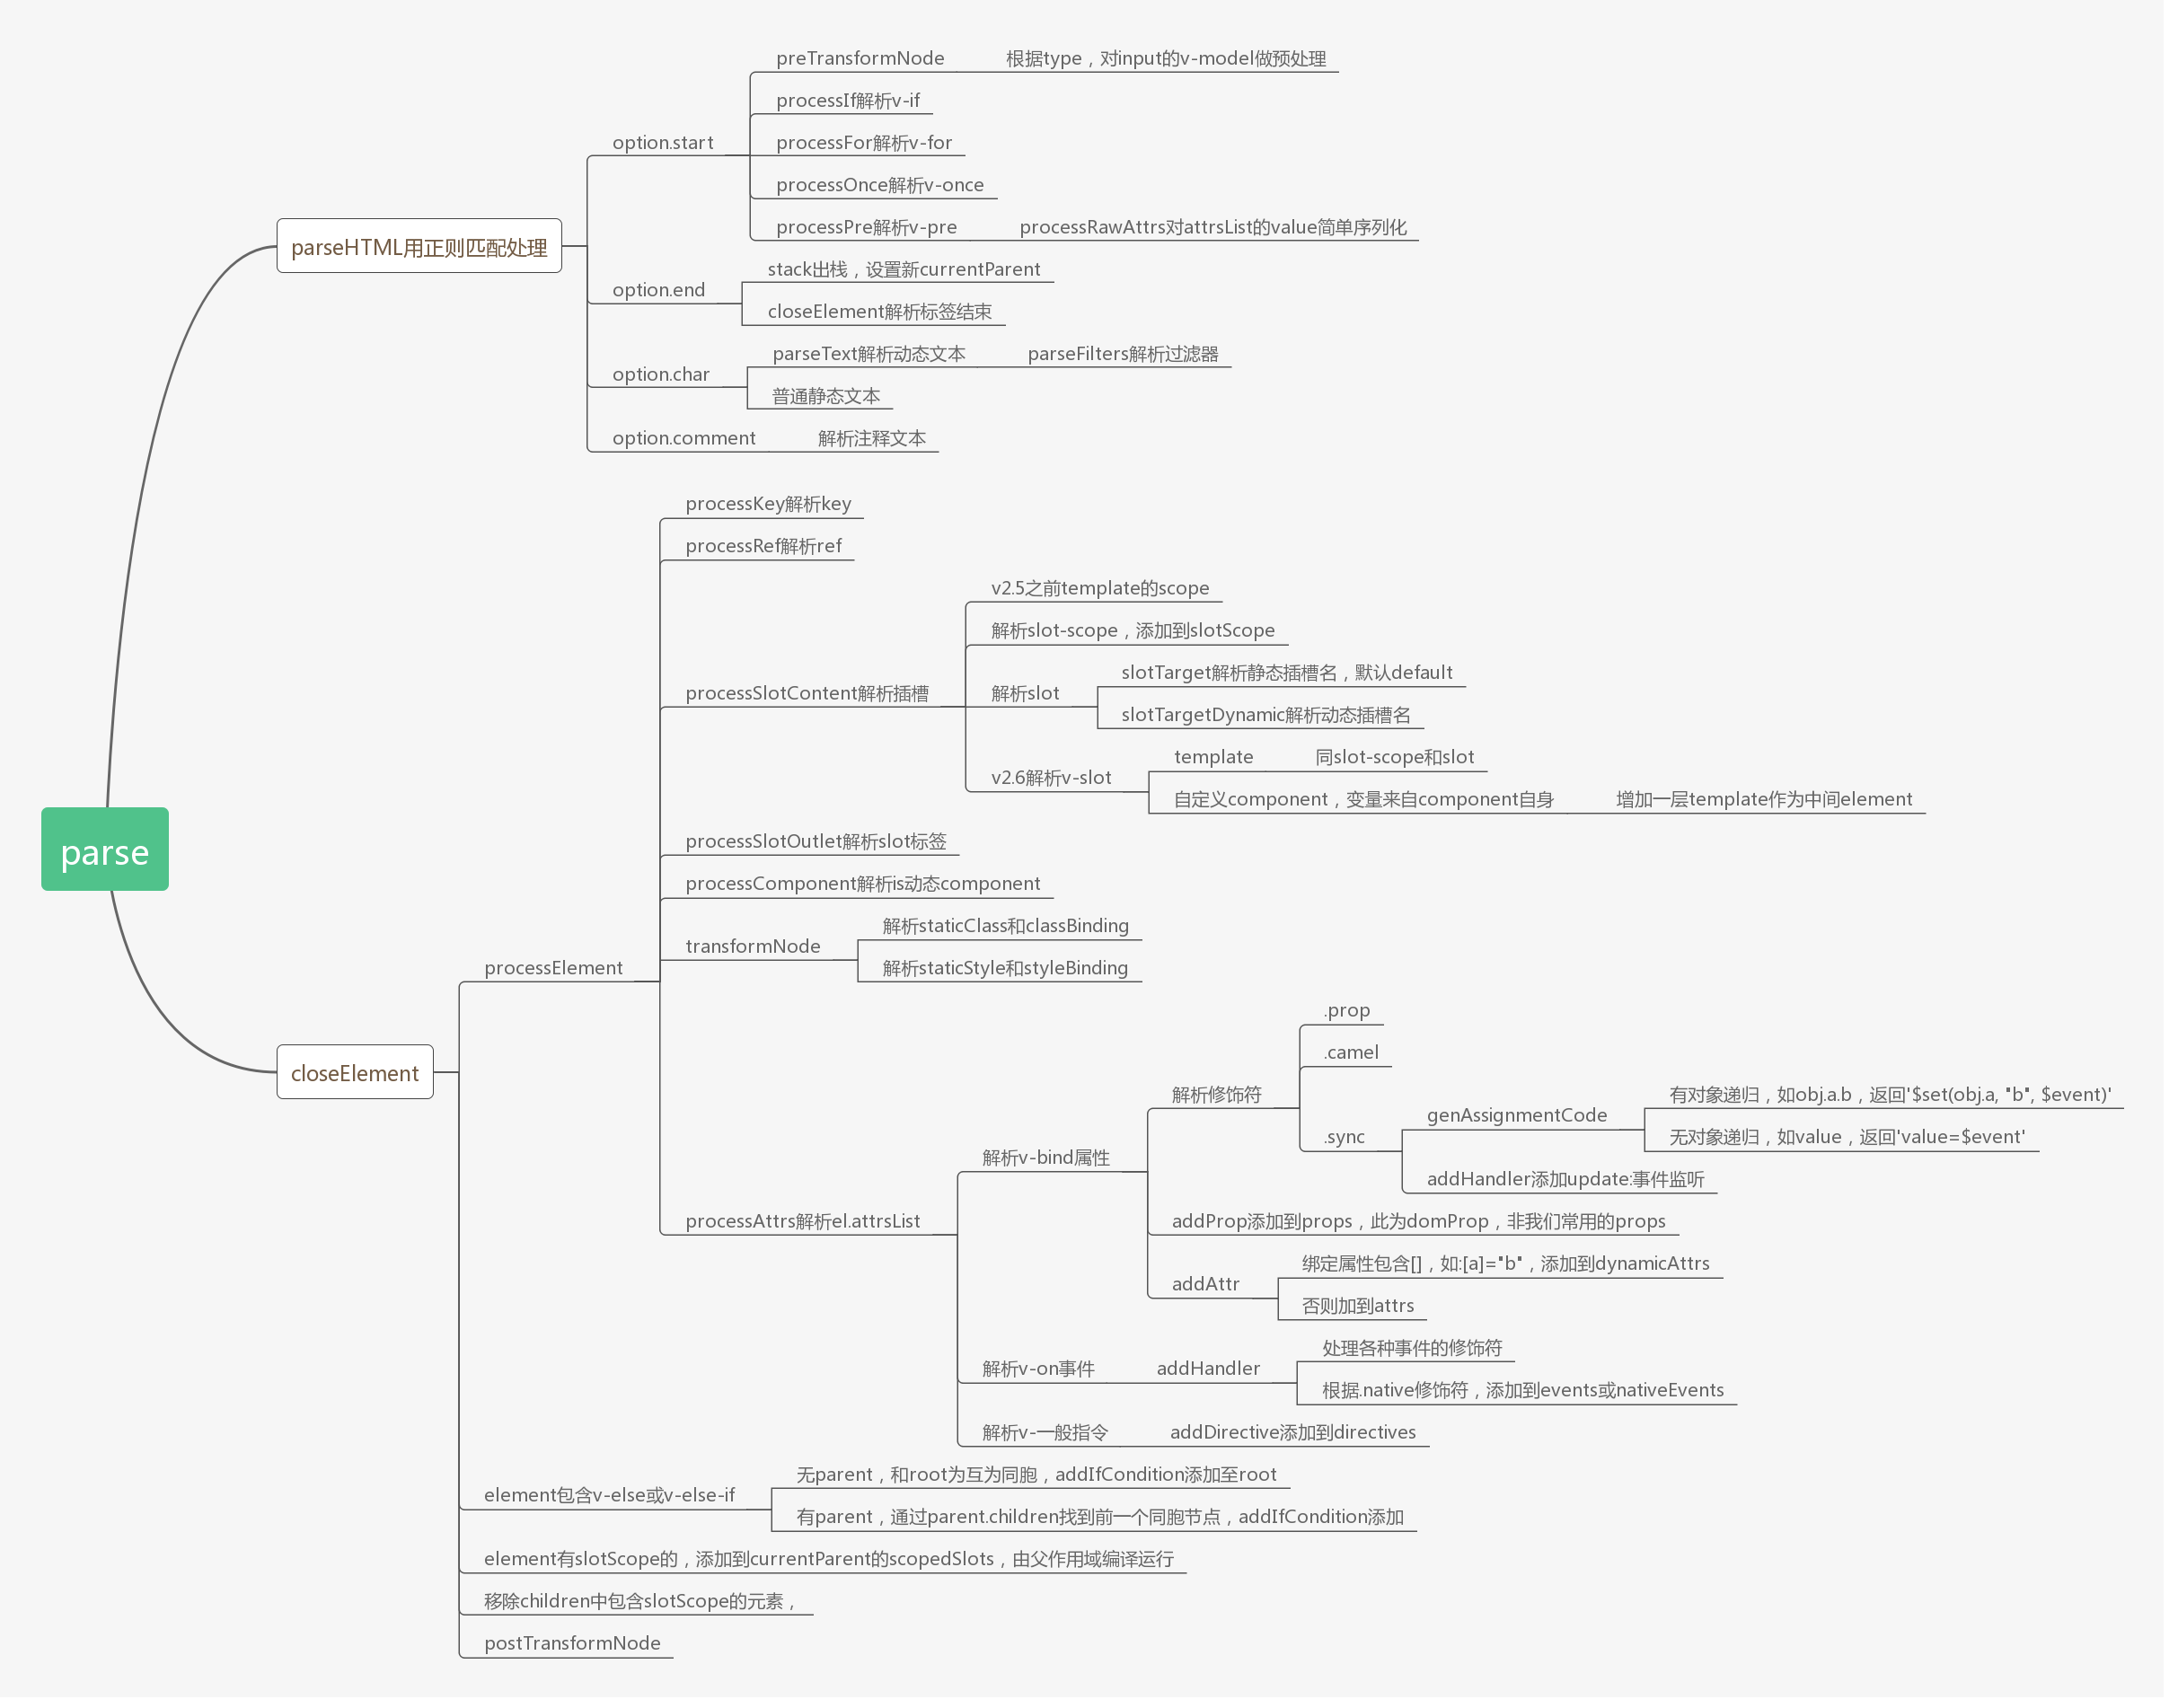
最后用一张导图来梳理下
parse生成AST过程中的主要知识