

专注于大数据及容器云核心技术解密,可提供全栈的大数据+云原生平台咨询方案,请持续关注本套博客。如有任何学术交流,可随时联系。更多内容请关注《数据云技术社区》公众号。

1 RunC create 启动流程(2:创建容器 3:运行容器)
1.1 核心流程
create.go:
setupSpec(context)
utils_linux.go:
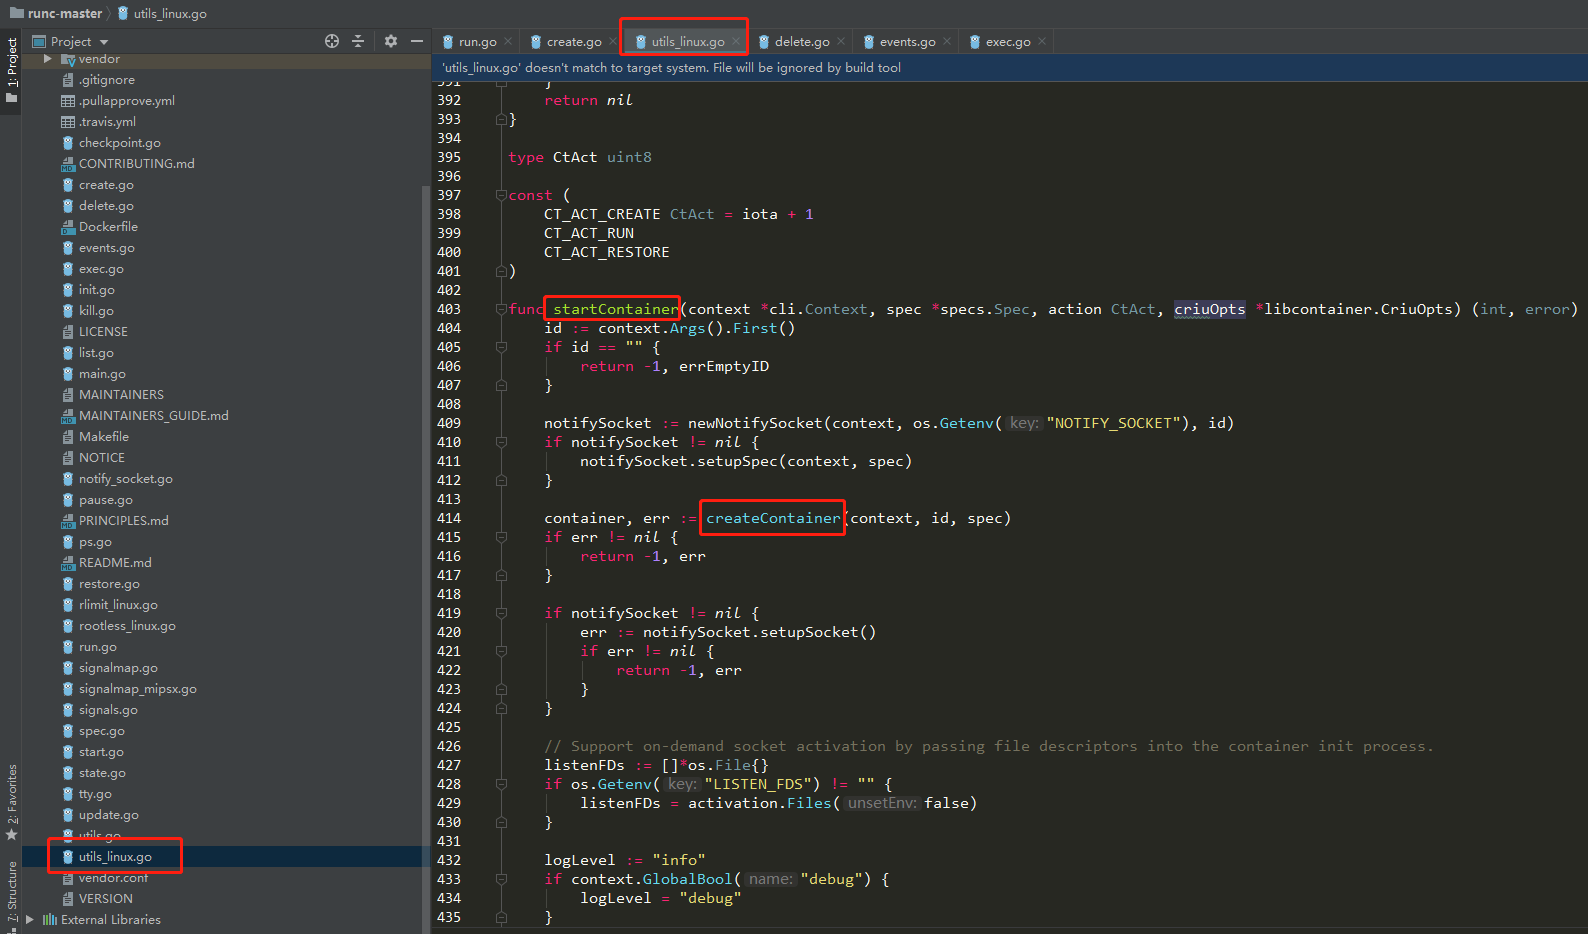
startContainer(context, spec, CT_ACT_CREATE, nil)
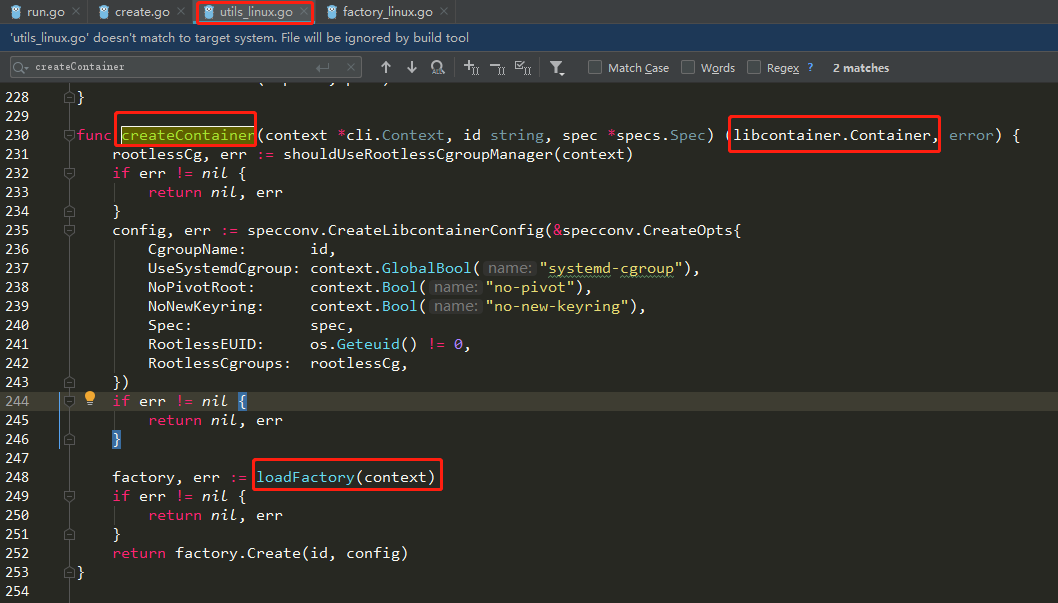
|- createContainer
|- specconv.CreateLibcontainerConfig
|- loadFactory(context)
|- libcontainer.New(......)
|- factory.Create(id, config)
1.2 startContainer总驱动
- create命令的响应入口在 create.go
使用 create 命令创建容器
sudo runc create mybusybox
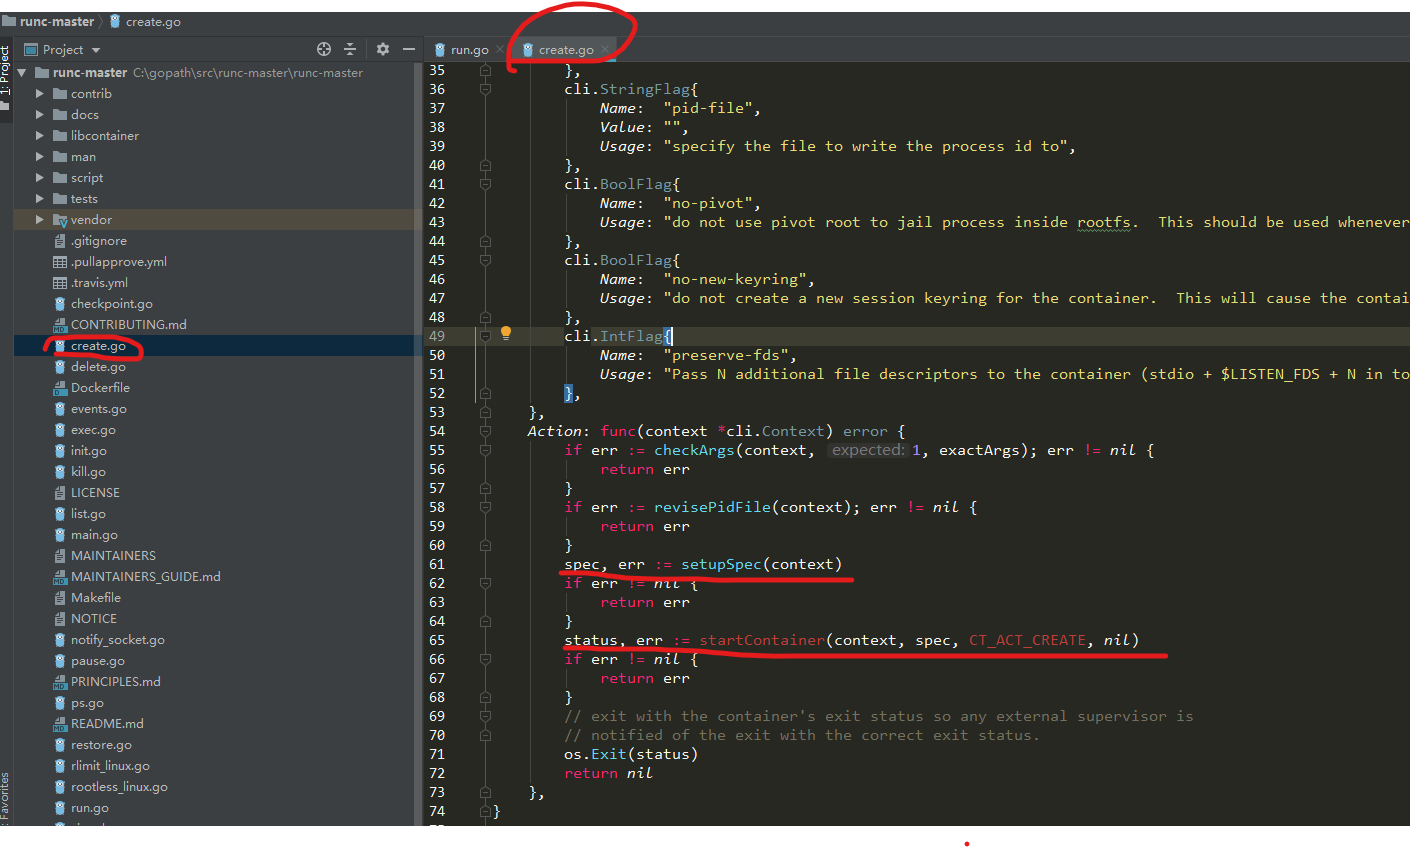
- setupSpec:从命令行输入中找到-b 指定的 OCI bundle 目录,若没有此参数,则默认是当前目录。读取config.json文件,将其中的内容转换为Go的数据结构specs.Spec,该结构定义在文件 github.com/opencontainers/runtime-spec/specs-go/config.go,里面的内容都是OCI标准描述的。
1.3 总驱动startContainer-(创建容器并运行:startContainer->createContainer|runner.run)
- startContainer:尝试创建启动容器,注意这里的第三个参数是 CT_ACT_CREATE, 表示仅创建容器。本文使用linux平台,因此实际调用的是 utils_linux.go 中的startContainer()。startContainer()根据用户将用户输入的 id 和刚才的得到的 spec 作为输入,调用 createContainer() 方法创建容器,再通过一个runner.run()方法启动它。
2 创建容器
- 在runC中,Container用来表示一个容器对象,它是一个抽象接口,它内部包含了BaseContainer接口。从其内部的方法的名字就可以看出,都是管理容器的基本操作。
2.1 loadFactory架构
- 对于linux平台,Factory 创建 Container 实际上就是 LinuxFactory 创建 linuxContainer
/* utils/utils_linux.go */
func loadFactory(context *cli.Context) (libcontainer.Factory, error) {
    .....
    return libcontainer.New(abs, cgroupManager, intelRdtManager,
        libcontainer.CriuPath(context.GlobalString("criu")),
        libcontainer.NewuidmapPath(newuidmap),
        libcontainer.NewgidmapPath(newgidmap))
}
2.2 runc init核心(开启新进程:/proc/self/exe init)
- 为了创建新namespace,注意这里有拦截操作
/* libcontainer/factory_linux.go */
func New(root string, options ...func(*LinuxFactory) error) (Factory, error) {
    .....
    l := &LinuxFactory{
        .....
        InitPath:  "/proc/self/exe",
        InitArgs:  []string{os.Args[0], "init"},
    }
    ......
    return l, nil
}
2.3 factory.Create 创建容器
func (l *LinuxFactory) Create(id string, config *configs.Config) (Container, error) {
    ....
    c := &linuxContainer{
        id:            id,
        config:        config,
        initPath:      l.InitPath,
        initArgs:      l.InitArgs,
    }
     .....
    return c, nil

}
- 将配置存放到 config, 数据类型是 Config.config
- 加载 Factory,实际返回 LinuxFactory
- 调用 Factory 的Create()方法
3 运行容器
3.1 核心流程
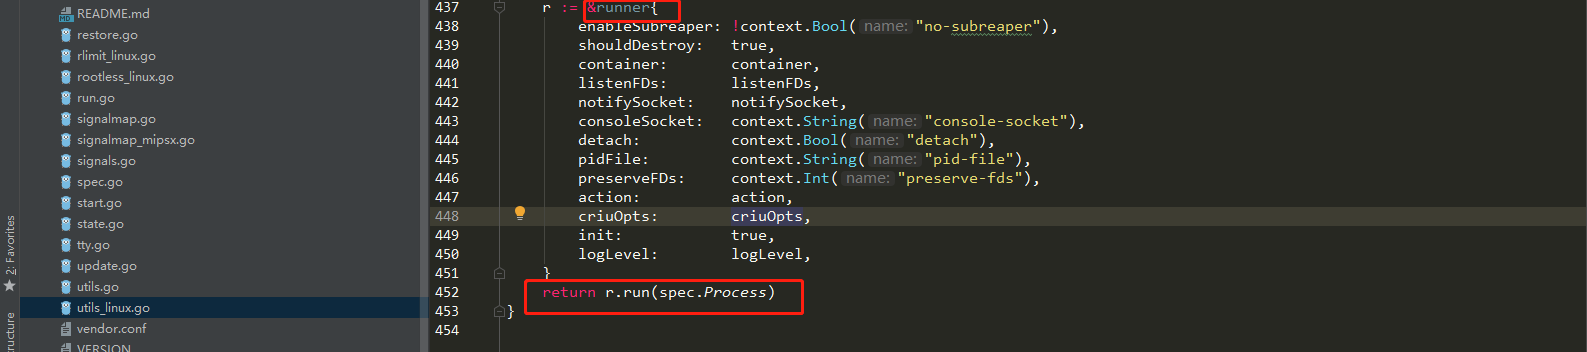
 |- runner.run(spec.Process)
      |- newProcess(*config, r.init)
      |- r.container.Start(process)
         |- c.createExecFifo()
         |- c.start(process)
            |- c.newParentProcess(process)
            |- parent.start()
3.2 运行容器
- 调用 newProcess() 方法, 用 spec.Process 创建 libcontainer.Process,注意第二个参数是 true ,表示新创建的 process 会作为新创建容器的第一个 process。
- 根据 r.action 的值决定如何操作得到的 libcontainer.Process
/* libcontainer/factory_linux.go */
func New(root string, options ...func(*LinuxFactory) error) (Factory, error) {
    .....
    l := &LinuxFactory{
        .....
        InitPath:  "/proc/self/exe",
        InitArgs:  []string{os.Args[0], "init"},
    }
    ......
    return l, nil
}

/* libcontainer/factory_linux.go */
func New(root string, options ...func(*LinuxFactory) error) (Factory, error) {
    .....
    l := &LinuxFactory{
        .....
        InitPath:  "/proc/self/exe",
        InitArgs:  []string{os.Args[0], "init"},
    }
    ......
    return l, nil
}

func (r *runner) run(config *specs.Process) (int, error) {
    ......
    process, err := newProcess(*config, r.init)                                  /*  第1部分 */
    ......
    switch r.action {
    case CT_ACT_CREATE:
        err = r.container.Start(process)   /* runc start */                      /*  第2部分 */
    case CT_ACT_RESTORE:
        err = r.container.Restore(process, r.criuOpts) /* runc restore */
    case CT_ACT_RUN:
        err = r.container.Run(process)     /* runc run */
    default:
        panic("Unknown action")
    }
    ......
    return status, err
}
3.3 container.Start
func (c *linuxContainer) Start(process *Process) error {

    if process.Init {
        if err := c.createExecFifo(); err != nil {  /* 1.创建fifo   */
            return err
        }
    }
    if err := c.start(process); err != nil {        /* 2. 调用start() */
        if process.Init {
            c.deleteExecFifo()
        }
        return err
    }
    return nil
}
3.4 parent.start()
func (c *linuxContainer) start(process *Process) error {
    parent, err := c.newParentProcess(process) /*  1. 创建parentProcess */

    err := parent.start();                     /*  2. 启动这个parentProcess */
    ......


func (c *linuxContainer) newParentProcess(p *Process) (parentProcess, error) {
    parentPipe, childPipe, err := utils.NewSockPair("init")  /* 1.创建 Socket Pair */

    cmd, err := c.commandTemplate(p, childPipe)              /* 2. 创建 *exec.Cmd */

    if !p.Init {
        return c.newSetnsProcess(p, cmd, parentPipe, childPipe)
    }

    if err := c.includeExecFifo(cmd); err != nil {           /* 3.打开之前创建的fifo */
        return nil, newSystemErrorWithCause(err, "including execfifo in cmd.Exec setup")
    }
    return c.newInitProcess(p, cmd, parentPipe, childPipe)   /* 4.创建 initProcess */
}

- includeExecFifo() 方法打开之前创建的 fifo,也将其 fd 放到 cmd.ExtraFiles 中,同时将_LIBCONTAINER_FIFOFD=%d记录到 cmd.Env。
- 创建 InitProcess 了,这里首先将_LIBCONTAINER_INITTYPE="standard"加入cmd.Env,然后从 configs 读取需要新的容器创建的 Namespace 的类型,并将其打包到变量 data 中备用,最后再创建 InitProcess 自己,可以看到,这里将之前的一些资源和变量都联系了起来

func (c *linuxContainer) newInitProcess(p *Process, cmd *exec.Cmd, parentPipe, childPipe *os.File) (*initProcess, error) {
    cmd.Env = append(cmd.Env, "_LIBCONTAINER_INITTYPE="+string(initStandard))
    nsMaps := make(map[configs.NamespaceType]string)
    for _, ns := range c.config.Namespaces {
        if ns.Path != "" {
            nsMaps[ns.Type] = ns.Path
        }
    }
    _, sharePidns := nsMaps[configs.NEWPID]
    data, err := c.bootstrapData(c.config.Namespaces.CloneFlags(), nsMaps)
    if err != nil {
        return nil, err
    }
    return &initProcess{
        cmd:             cmd,
        childPipe:       childPipe,
        parentPipe:      parentPipe,
        manager:         c.cgroupManager,
        intelRdtManager: c.intelRdtManager,
        config:          c.newInitConfig(p),
        container:       c,
        process:         p,          /*  sleep 5 在这里 */
        bootstrapData:   data,
        sharePidns:      sharePidns,
    }, nil
}
3.5 initProcess.start()
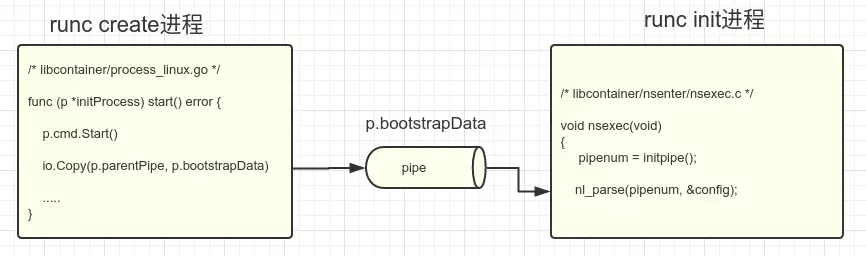
- p.cmd.Start() 启动 cmd 中设置的要执行的可执行文件 /proc/self/exe,参数是 init,这个函数会启动一个新的进程去执行该命令,并且不会阻塞。
- io.Copy 将 p.bootstrapData 中的数据通过 p.parentPipe 发送给子进程
/* libcontainer/process_linux.go */
func (p *initProcess) start() error {

    p.cmd.Start()
    p.process.ops = p
    io.Copy(p.parentPipe, p.bootstrapData)

    .....
}

/proc/self/exe 正是runc程序自己,所以这里相当于是执行runc init,也就是说,
我们输入的是runc create命令,隐含着又去创建了一个新的子进程去执行runc init。
为什么要额外重新创建一个进程呢?原因是我们创建的容器很可能需要运行
在一些独立的 namespace 中,比如 user namespace,这是通过 setns() 系统调用完成的,
4 拦截(CGO)
- 先执行C代码nsenter模块(nsexec)--->在runc create namespace 中设置 clone 了三个进程parent、child、init)
- 后执行go代码(init.go)--->初始化其它部分(网络、rootfs、路由、主机名、console、安全等)
4.1 容器启动(聚焦p.cmd.Start)
- 先执行 nsenter C代码部分,实现对container的process进行Namespace相关设置如uid/gid、pid、uts、ns、cgroup等。
libcontainer/process_linux.go:282

func (p *initProcess) start() error {
  //  当前执行空间进程称为bootstrap进程
  //  启动了 cmd,即启动了 runc init 命令,创建 runc init 子进程
  //  同时也激活了C代码nsenter模块的执行(在runc create namespace 中设置 clone 了三个进程parent、child、init))

  //  C 代码执行后返回 go 代码部分,最后的 init 子进程为了好区分此处命名为" nsInit "(即配置了Namespace的init)
  //  后执行go代码(init.go)--->初始化其它部分(网络、rootfs、路由、主机名、console、安全等)

    err := p.cmd.Start()   // +runc init 命令执行,Namespace应用代码执行空间时机
  //...
      if p.bootstrapData != nil {
     // 将 bootstrapData 写入到 parent pipe 中,此时 runc init 可以从 child pipe 里读取到这个数据
        if _, err := io.Copy(p.messageSockPair.parent, p.bootstrapData); err != nil {
            return newSystemErrorWithCause(err, "copying bootstrap data to pipe")
        }
    }
  //...
}
4.2 拦截(先执行C代码,再执行runc init)
- GO语言调用C代码的做法,叫做preamble,也就是说只要import这个nsenter模块就会在GO的runtime启动前先执行这个先导代码块,最终会执行nsexec这段亲切的C代码。
- 而nsenter包中开头通过 cgo 嵌入了一段 C 代码, 调用 nsexec()
package nsenter
/*
/* nsenter.go */
#cgo CFLAGS: -Wall
extern void nsexec();
void __attribute__((constructor)) init(void) {
    nsexec();
}
*/
import "C"

void nsexec(void)
{
	/*
	 * If we don't have an init pipe, just return to the go routine.
	 * We'll only get an init pipe for start or exec.
	 */
	pipenum = initpipe();
	if (pipenum == -1)
		return;

	/* Parse all of the netlink configuration. */
	nl_parse(pipenum, &config);

	update_oom_score_adj(config.oom_score_adj, config.oom_score_adj_len);
    ....
}
- p.cmd.start就是fork子进程执行cmd里的参数,之前的部分我也两次提到了这个cmd的设置非常重要,下面就来具体看看 exec.Command(c.initArgs[0], c.initArgs[1:]...) 其实就是exec.Command("/proc/self/exe", "init"),也就是fork一个子进程执行‘runc init’的动作。
init.go
import (
    "os"
    "runtime"

    "github.com/opencontainers/runc/libcontainer"
    _ "github.com/opencontainers/runc/libcontainer/nsenter"
    "github.com/urfave/cli"
)

factory, _ := libcontainer.New("")
if err := factory.StartInitialization(); err != nil {
}
4.3 进程通信
- 上面这段 C 代码中,initpipe() 从环境中读取父进程之前设置的pipe(_LIBCONTAINER_INITPIPE记录的的文件描述符),然后调用 nl_parse 从这个管道中读取配置到变量 config ,那么谁会往这个管道写配置呢 ? 当然就是runc create父进程了。父进程通过这个pipe,将新建容器的配置发给子进程,
- 发送的具体数据在 linuxContainer 的 bootstrapData() 函数中封装成netlink msg格式的消息。忽略大部分配置,要创建哪些类型的namespace,这些都是源自最初的config.json文件。
4.4 子进程孙进程
- 子进程就从父进程处得到了namespace的配置,继续往下, nsexec() 又创建了两个socketpair,从注释中了解到,这是为了和它自己的子进程和孙进程进行通信。
void nsexec(void)
{
   .....
    /* Pipe so we can tell the child when we've finished setting up. */
    if (socketpair(AF_LOCAL, SOCK_STREAM, 0, sync_child_pipe) < 0)  //  sync_child_pipe is an out parameter
        bail("failed to setup sync pipe between parent and child");

    /*
     * We need a new socketpair to sync with grandchild so we don't have
     * race condition with child.
     */
    if (socketpair(AF_LOCAL, SOCK_STREAM, 0, sync_grandchild_pipe) < 0)
        bail("failed to setup sync pipe between parent and grandchild");

}
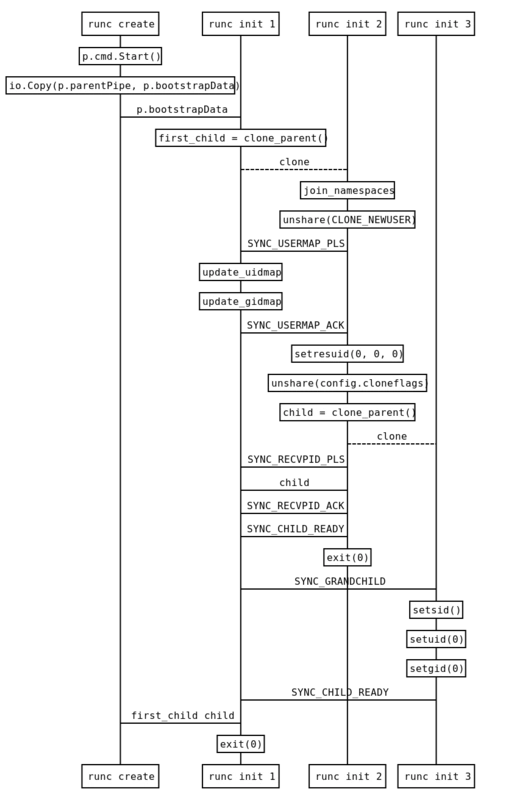
- switch case 编写的状态机,大体结构如下,当前进程通过clone()系统调用创建子进程,子进程又通过clone()系统调用创建孙进程,而实际的创建/加入namespace是在子进程完成的
namespaces在runc init 2完成创建
runc init 1和runc init 2最终都会执行exit(0),

但runc init 3不会,它会继续执行runc init命令的后半部分。
因此最终只会剩下runc create进程和runc init 3进程

switch (setjmp(env)) {
  case JUMP_PARENT:{
           .....
           clone_parent(&env, JUMP_CHILD);
           .....
       }
  case JUMP_CHILD:{
           ......
           if (config.namespaces)
                join_namespaces(config.namespaces);
           clone_parent(&env, JUMP_INIT);
           ......
       }
  case JUMP_INIT:{
       }
详情参考:https://segmentfault.com/a/1190000017576314
4.5 runc create进程和runc init 3进程通讯
- namespaces在runc init 2完成创建,runc init 1和runc init 2最终都会执行exit(0),但runc init 3不会,它会继续执行runc init命令的后半部分。因此最终只会剩下runc create进程和runc init 3进程。
4.6 newContainerInit
- newContainerInit() 函数首先尝试从 pipe 读取配置存放到变量 config 中,再存储到变量 linuxStandardInit 中返回
func (p *initProcess) start() error {

    ......
    p.execSetns()

    fds, err := getPipeFds(p.pid())
    p.setExternalDescriptors(fds)
    p.createNetworkInterfaces()

    p.sendConfig()

    parseSync(p.parentPipe, func(sync *syncT) error {
        switch sync.Type {
        case procReady:
            .....
            writeSync(p.parentPipe, procRun);
            sentRun = true
        case procHooks:
            .....
            // Sync with child.
            err := writeSync(p.parentPipe, procResume);
            sentResume = true
        }

        return nil
    })
    ......

/* libcontainer/init_linux.go */
func newContainerInit(t initType, pipe *os.File, consoleSocket *os.File, fifoFd int) (initer, error) {
    var config *initConfig

    /* read config from pipe (from runc process) */
    son.NewDecoder(pipe).Decode(&config);
    populateProcessEnvironment(config.Env);
    switch t {
    ......
    case initStandard:
        return &linuxStandardInit{
            pipe:          pipe,
            consoleSocket: consoleSocket,
            parentPid:     unix.Getppid(),
            config:        config, // <=== config
            fifoFd:        fifoFd,
        }, nil
    }
    return nil, fmt.Errorf("unknown init type %q", t)
}

   runc create                    runc init 3
       |                               |
  p.sendConfig() --- config -->  NewContainerInit()
- 回到 StartInitialization(),在得到 linuxStandardInit 后,便调用其 Init()方法了,也即初始的sleep 方法。
/* init.go */
func (l *LinuxFactory) StartInitialization() (err error) {
    ......
    i, err := newContainerInit(it, pipe, consoleSocket, fifofd)

    return i.Init()
}

func (l *linuxStandardInit) Init() error {
   ......
   name, err := exec.LookPath(l.config.Args[0])

   syscall.Exec(name, l.config.Args[0:], os.Environ())
}
4.7 开始执行用户最初设置程序
func (l *linuxStandardInit) Init() error {
   ......
   name, err := exec.LookPath(l.config.Args[0])

   syscall.Exec(name, l.config.Args[0:], os.Environ())
}
5 总结
namespace创建源码比较深奥,再次总结于此,留记!!!
专注于大数据及容器云核心技术解密,可提供全栈的大数据+云原生平台咨询方案,请持续关注本套博客。如有任何学术交流,可随时联系。更多内容请关注《数据云技术社区》公众号。
