

Vue 源码剖析 —— 模板编译原理
什么是模板编译?
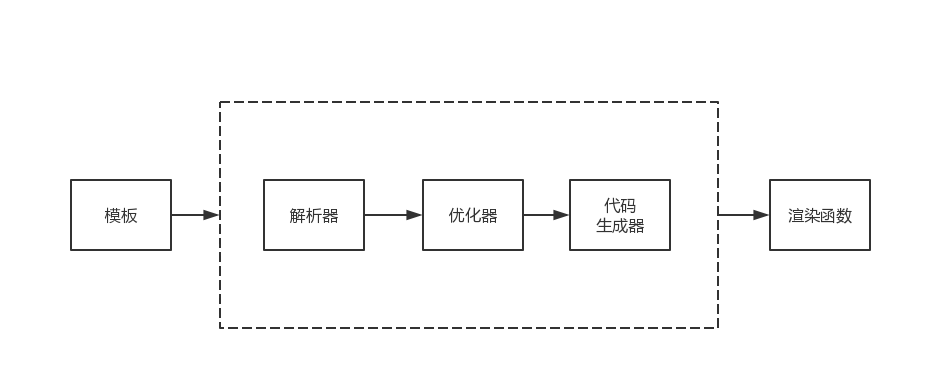
日常工作中可能大家或多或少的在 JS 中使用 HTML 渲染模板,特别是在 jQuery 时代,我们可以在模板中方便的使用 JS 表达式甚至是一些指令。在 Vue.js 中模板功能变得更为灵活,这依赖于其强大的模板编译功能。模板编译的主要功能是将模板编译成为渲染函数,而渲染函数则会根据应用状态生成 vnode,再通过 vnode 进行渲染。
在 Vue.js 中,模板编译可分为下面三个部分:
- 解析器:将模板解析为 AST
- 优化器:遍历 AST 标记静态节点
- 代码生成器:使用 AST 生成渲染函数
解析器
前面提到解析器的作用就是将模板解析成 AST,其中又包括过滤器解析器,文本解析器和 HTML 解析器。过滤器解析器顾名思义是用来解析模板中的过滤器的,文本解析器是用来解析带变量的文本,最重要的就是 HTML 解析器。HTML 解析器用于解析 HTML 标签的起始位置,结束位置,文本,注释等等,并触发钩子函数,每当钩子函数被触发,就会生成一个对应的 AST 节点。AST 节点其实和 vNode 有些类似,都是用对象来表明的,一个对象表示一个节点,对象中的属性用于存储节点的各类信息,可以看下面的例子;
// 原始模板
<div>
  <p>{{name}}</p>
</div>
// 转为AST后
{
  tag: 'div',
  type: 1,
  staticRoot: false,
  static: false,
  plain: true,
  parent: undefined,
  attrsList: [],
  attrsMap: {},
  children: [
    {
      tag: 'p',
      type: 1,
      staticRoot: false,
      static: false,
      plain: true,
      parent: {tag: 'div', ...},
      attrsList: [],
      attrsMap: {},
      children: [
        {
          type: 2,
          text: '{{name}}',
          static: false,
          expression: '_s(name)'
        }
      ]
    }
  ]
}
HTML 解析器
前面提到 HTML 解析器在解析过程中会触发各种钩子函数,包括标签钩子函数、结束钩子函数、文本钩子函数以及注释钩子函数。伪代码如下:
parseHTML(template, {
  start(tag, attrs, unary) {
    // 每当解析到标签开始位置时,触发该函数
  },
  end () {
    // 解析到标签结束位置时触发
  },
  chars(text) {
    // 解析到文本时触发
  },
  comment(text) {
    // 解析到注释时触发
  }
})
正是这些钩子函数的存在帮助我们构建 AST 节点。在 start 函数中创建构建元素内容的节点,在 chars 函数中创建文本节点,在 comment 函数中构建注释节点。当钩子函数不再触发后,就说明模板解析完毕,AST 构建完成。
我们先看 start 函数,它有三个参数,分别是 tag, attrs, unary,分别是元素标签,标签属性以及是否是自闭合标签。使用这三个参数就能创建一个元素类型的 AST 节点:
function createASTElement(tag, attrs, parent) {
  return {
    type: 1,
    tag,
    attrsList: attrs,
    parent,
    children: []
  }
}

parseHTML(template, {
  start (tag, attrs, unary) {
    let element = createASTElement(tag, attrs, currentParent)
  },
  chars (text) {
    let element = {
      type: 2,
      text
    }
  },
  comment (text) {
    let element = {
      type: 3,
      text,
      isComment: true
    }
  }
})
从上面的代码部分,可以看出 AST 的层级关系,但是创建节点的过程并不是一层一层的,是被拉平的,所以我们引入了栈来解决这个问题。每当触发 start 函数,就把当前构建的节点推入栈中,触发 end 函数时,从栈中弹出节点。这样就能保证每当触发 start 函数时,栈的最后一个节点就是当前正在构建节点的父节点。
现在回到具体的解析过程,解析 HTML 模板的过程就是一个循环,每轮循环只截取一小段字符串,然后重复上述过程,直到模板变为一个空字符串后结束,则解析完毕。先具体分析如何解析各类字符串:
-
截取开始标签
当字符串第一个字符是
<时,且不是结束标签时,就可以借助正则表达式来截取开始标签。实际上,不止是开始标签,正则表达式接下来要被用于截取各类字符串。截取开始标签,并不只限于截取标签名,还有属性以及结尾。可以看下面这段代码:
const ncname = `[a-zA-Z_][\\-\\.0-9_a-zA-Z${unicodeRegExp.source}]*`
const qnameCapture = `((?:${ncname}\\:)?${ncname})`
const startTagOpen = new RegExp(`^<${qnameCapture}`) // 用于捕获标签名
const attribute = /^\s*([^\s"'<>\/=]+)(?:\s*(=)\s*(?:"([^"]*)"+|'([^']*)'+|([^\s"'=<>`]+)))?/ // 用于捕获属性
const startTagClose = /^\s*(\/?)>/

function advance (n) {
  html = html.substring(n)
}

function parseStartTag () {
  const start = html.match(startTagOpen)
  if (start) {
    const match = {
      tagName: start[1],
      attrs: []
    }
    advance(start[0].length)

    let end, attr
    while (!(end = html.match(startTagClose)) && (attr = html.match(attribute))) {
      advance(attr[0].length)
      match.attrs.push(attr)
    }

    if (end) {
      match.unarySlash = end[1]
      advance(end[0].length)
      return match
    }
  }
}
这段代码首先将模板开始部分的开始标签解析出来,如果剩余部分不符合开始标签的规则,就返回
undefined;如果符合,将match中的信息传递给start钩子函数即可。 -
截取结束标签
结束标签的截取相对而言更简单,因为这一步不需要抽取信息,只要判断当前标签是否已经结束即可,如果是,则触发钩子函数。具体实现如下:
const endTag = new RegExp(`^<\\/${qnameCapture}[^>]*>`) const endTagMatch = html.match(endTag) if (endTagMatch) { advance(endTagMatch[0].length) options.end(endTagMatch[1]) // 触发 end 钩子函数 continue } -
截取注释标签
注释标签的截取要先判断字符串是否匹配注释标签开始,然后找到结束位置截取即可:
const comment = /^<!\--/ if (comment.test(html)) { const commentEnd = html.indexOf('-->') if (commentEnd >= 0) { if (options.shouldKeepComment) { // 只有当 shouldKeepComment 为真时,才会触发钩子函数 options.comment(html.substring(4, commentEnd)) } } html = html.substring(commentEnd + 3) continue } -
截取条件注释与截取 DOCTYPE
原理和截取注释类似,只不过不会触发钩子函数,而是直接截取,在此就不赘述。
-
截取文本 在上面的标签类型中,都是以
<开头,那么对于不是以<的字符串呢?那就是文本!在 HTML 模板中,只有文本是不以<开头的。而判断文本结束位置也是根据这个特性,只要找到下一个<的位置,那么在这个位置之前的所有字符都属于文本。但是这样做有个坑,如果文本中出现了
1<2,显然就会出现问题。所以我们需要额外添加一个判断,如果<前面的字符串解析完之后,剩余的模板不符合任何需要前面提到的解析类型,那么这个<就是文本的一部分。实现思路如下:while (html) { let text, rest, next let textEnd = html.indexOf('<') if (textEnd >= 0) { rest = html.slice(textEnd) while ( !endTag.test(rest) && !startTag.test(rest) && !comment.test(rest) && !conditionalComment.test(rest) ) { next = rest.indexOf('<', 1) // 被当做纯文本对待 if (next < 0) break testEnd += next rest = html.slice(textEnd) } text = html.substring(0, textEnd) advance(textEnd) } if (textend < 0) { text = html html = '' } if (options.char && text) { options.chars(text) } } -
截取纯文本内容元素
首先要清楚纯文本内容元素的定义,包含
style,script和textarea三种元素。解析这三种元素的时候会把标签内所有内容都当做文本内容去解析。 由于解析的逻辑和上述类型都不相同,所以在解析字符串的一开始就要判断是否是纯文本元素。while (html) { // lastTag 表示父元素 if (!lastTag || !isPlainTextElement(lastTag)) { // 父元素为正常元素的处理逻辑 } else { // 父元素为纯文本元素的逻辑 const stackedTag = lastTag.toLowerCase() const reStackedTag = reCache[stackedTag] || (reCache[stackedTag] = new RegExp('([\\s\\S]*?)(</' + stackedTag + '[^>]*>)', 'i')) const rest = html.replace(reStackedTag, function(all, text) { if (options.chars) { options.chars(text) } return '' }) html = rest options.end(stackedTag) } }
最后,一起来梳理一遍整体流程。首先要明确 HTML 解析器是一个函数,最终要实现的是解析模板,并在解析过程中触发各个钩子函数。而我们的解析是一小段一小段的,所以是通过一个 while 循环去实现的,直到全部解析完毕。在循环中先判断父元素是否是纯文本元素,如果是则按上述过程实现;如果不是,则根据 < 的位置判断要解析的字符是文本还是其他,如果是其他类型再使用正则表达式依次去做匹配,匹配到了就截取对应字符串,触发相应钩子函数,并跳出本次循环。
文本解析器
由于模板中的文本分为带变量和不带变量两种,带变量的文本需要额外处理。由于每次解析到文本时,都会触发 chars 钩子函数,所以直接在这个函数中处理即可:
chars (text) {
  text = text.trim()
  if (text) {
    const children = currentParent.children
    let expression
    if (expression = parseText(text)) {
      children.push({
        type: 2,
        expression,
        text
      })
    } else {
      children.push({
        type: 3,
        text
      })
    }
  }
}

function parseText (text) {
  const tagRE =  /\{\{((?:.|\r?\n)+?)\}\}/g
  if (!tagRE.test(text)) {
    return
  }
  const tokens = []
  let lastIndex = tagRE.lastIndex = 0
  let match, index
  while ((match = tagRE.exec(text))) {
    index = match.index
    // 先把 {{ 前的文本添加到 tokens 中
    if (index > lastIndex) {
      tokens.push(JSON.stringify(text.slice(lastIndex, index)))
    }
    tokens.push(`_s(${match[1].trim()})`)
    // 设置下一轮的解析起点
    lastIndex = index + match[0].length
  }

  if (lastIndex < text.length) {
    tokens.push(JSON.stringify(text.slice(lastIndex)))
  }
  return tokens.join('+')
}
优化器
优化器的作用就是在 AST 中找出静态子树并打上标记,这样会带来两点好处:
-
每次重新渲染时,不需要为静态子树创建新节点
-
在虚拟 DOM 中打补丁的过程可以跳过
也就是说,在生成 VNode 的过程中,如果一个节点被标记为静态子树,那么除了首次渲染会生成节点外,在重新渲染时并不会生成新的子节点树,而是克隆已经存在的静态子树。 优化器的实现也分为两步:
-
在 AST 中找出所有静态节点并打上标记,也即
static: true -
在 AST 中找出所有静态根节点并打上标记,也即
staticRoot: true
静态节点的定义前面提到过,那什么是静态根节点呢?如果一个节点下面所有子节点都是静态节点,并且它的父级是动态节点,那么它就是动态根节点。
找出静态节点并标记
要找出所有静态子节点并不难,只需要从根节点开始,先判断根节点是不是静态节点,再用相同方式处理子节点,接着递归这个过程。
function markStatic (node) {
  node.static = isStatic(node)
   if (node.type === 1) {
     for (let i = 0, l = node.children.length; i < l; i++) {
       const child = node.children[i]
       markStatic(child)
       if (!child.static) {
         node.static = false
       }
     }
   }
}

function isStatic (node) {
  if (node.type === 2) { // expression
    return false
  }
  if (node.type === 3) { // text
    return true
  }
  return !!(node.pre || (
    !node.hasBindings && // no dynamic bindings
    !node.if && !node.for && // not v-if or v-for or v-else
    !isBuiltInTag(node.tag) && // not a built-in
    isPlatformReservedTag(node.tag) && // not a component
    !isDirectChildOfTemplateFor(node) &&
    Object.keys(node).every(isStaticKey)
  ))
}
找到所有静态根节点并标记
大部分情况下我们找到的第一个静态节点会被标记为静态根节点,但是存在一种情况,一个元素节点底下只有一个文本节点,这种情况下,优化是没有收益的,故不会被标记为静态根节点,具体实现如下:
function markStaticRoots (node) {
  if (node.type === 1) {
    if (node.static && node.children.length && !(
      node.children.length === 1 &&
      node.children[0].type === 3
    )) {
      node.staticRoot = true
      return
    } else {
      node.staticRoot - false
    }
    if (node.children) {
      for (let i = 0, l = node.children.length; i < l; i++) {
        markStaticRoots(node.children[i])
      }
    }
  }
}
代码生成器
前面有提到 VNode 是渲染函数生成的,代码生成器最后生成的正是渲染函数的代码字符串。依旧还是看前面的例子:
// 原始模板
<div>
  <p>{{name}}</p>
</div>
// 转为AST后
{
  tag: 'div',
  type: 1,
  staticRoot: false,
  static: false,
  plain: true,
  parent: undefined,
  attrsList: [],
  attrsMap: {},
  children: [
    {
      tag: 'p',
      type: 1,
      staticRoot: false,
      static: false,
      plain: true,
      parent: {tag: 'div', ...},
      attrsList: [],
      attrsMap: {},
      children: [
        {
          type: 2,
          text: '{{name}}',
          static: false,
          expression: '_s(name)'
        }
      ]
    }
  ]
}
上面生成的 AST 会被生成器转为如下的代码字符串:
`with(this){return _c("div", [_v(_s(name))])}
可以猜到上面的 _c 其实就是 createElement 函数,它的作用就是生成 VNode。
- 元素节点
function getElement (el, state) {
  const data = el.plain ? undefined : genData(el, state)

  const children = genChildren(el, state)
  code = `_c(`${el.tag}`${data ? `,${data}` : ''}${children ? `,${children}` : ''})`
  return code
}
先判断节点是否存在属性,若存在就生成属性数据;再判断是否存在子节点,若存在就生成子节点代码字符串。那么 data 和 children 到底是怎么生成的呢?看下源码的实现:
function genData(el, state) {
  let data = '{'
  if (el.key) {
    data += `key: ${el.key},`
  }

  if (el.ref) {
    data += `ref: ${el.ref},`
  }

  if (el.pre) {
    data += 'pre: true,'
  }
  // 还有很多属性比如 attrs, props 等等,具体可以看源码 src/compiler/codegen/index.js
  data = data.replace(/,$/, '') + '}'
  return data
}
生成子节点代码字符串其实就是一个循环的过程,再将它们拼接到一起,具体实现如下:
function genChildren (el, state) {
  const children = el.children
  if (children.length) {
    return `[${children.map(c => gen(c, state)).join(',')}]`
  }
}

function genCode (node, state) {
  if (node.type ===1) {
    return genElement(node, state)
  } else if (node.type === 3 && node.isComment) {
    return genComment(node)
  } else {
    return genText(node)
  }
}
- 文本节点 文本节点比较简单,只需要传入 _v 函数即可:
function genText (text) {
  retutn `_v(${text.type === 2
    ? text.expression
    : JSON.stringify(text.text)
  }`
}
可能有人会困惑为什么要对字符串使用 JSON.stringify,要注意动态文本是这样存储的:"Hello " + _s(name),而静态文本是这样:"Hello World",所以我们需要给静态文本额外添加一层字符串包裹。
- 注释节点
function genComment (comment) {
  return `_e(${JSON.stringify(comment.text)})`
}
本系列文章均是深入浅出 Vue.js的学习笔记,有兴趣的小伙伴可以去看书哈。
