

知乎:zhuanlan.zhihu.com/p/78031282
HashMap浅析
HashMap概述:
HashMap实现了映射关系接口Map,是一种可处理键值对的数据结构。在日常开发中,HashMap 经常用来临时存放数据。其底层数据结构基本能达到 O(1) 的查询性能。
HashMap数据结构:
在 JDK7 中 HashMap 底层数据结构采用的是: 数组 + 链表。 该中数据结构的组合基本能满足 HashMap 的功能。但是随着数据量激增的情况下,频繁的 Hash 冲突使链表的长度逐渐增长,有可能查询性能退化成 O(n)。 JDK8 中引入了红黑树,利用红黑树的强大性能来提升 HashMap 的性能。 下面是 HashMap 底层数据结构的声明定义:
数组:Node<K,V>[] table
链表:
static class Node<K,V> implements Map.Entry<K,V> {
        final int hash;
        final K key;
        V value;
        Node<K,V> next;
        ...
        }
红黑树(JDK8):
static final class TreeNode<K,V> extends LinkedHashMap.Entry<K,V> {
        TreeNode<K,V> parent;  // red-black tree links
        TreeNode<K,V> left;
        TreeNode<K,V> right;
        TreeNode<K,V> prev;    // needed to unlink next upon deletion
        boolean red;
        ...
        }
HashMap功能实现:
熟悉 HashMap 的功能实现之前,先来看下 HashMap 中几个基本概念:
基本概念:
1、length:table的长度

2、loadFactor: map 负载因子

3、threshold: threshold = length * loadFactor: 当 HashMap 中的 key 的数量达到该值时会自动扩容。
有参构造方法:
HashMap 默认无参构造方法会初始化一个默认大小为 16 的实例。这里主要看下有参构造方法:
public HashMap(int initialCapacity, float loadFactor) {
        if (initialCapacity < 0)
            throw new IllegalArgumentException("Illegal initial capacity: " +
                                               initialCapacity);
        if (initialCapacity > MAXIMUM_CAPACITY)
            initialCapacity = MAXIMUM_CAPACITY;
        if (loadFactor <= 0 || Float.isNaN(loadFactor))
            throw new IllegalArgumentException("Illegal load factor: " +  loadFactor);

        this.loadFactor = loadFactor; // 初始化负载因子
        this.threshold = tableSizeFor(initialCapacity); // threshold 存放初始hash桶数组大小,后边在首次put对象过程中初始化hashTable时会用到
    }
tableSizeFor 解析(NB):
在构造hashMap时,构造方法会根据实参(cap)来计算hash桶数组长度。计算方法为:tableSizeFor 该函数作用:根据传进来的参数得到大于且最接近该参数并且是2的幂次方的数字作为hash桶数组的长度。
/**
  * Returns a power of two size for the given target capacity.
 */
static final int tableSizeFor(int cap) {
        int n = cap - 1;
        n |= n >>> 1;
        n |= n >>> 2;
        n |= n >>> 4;
        n |= n >>> 8;
        n |= n >>> 16;
        return (n < 0) ? 1 : (n >= MAXIMUM_CAPACITY) ? MAXIMUM_CAPACITY : n + 1;
    }
函数第一行 int n = cap -1 这里的 cap 为什么要减 1 ? 弄清原因之前我们需要先来看下该函数主要做了什么操作:该函数主要对cap 进行了一系列的移位或操作,这些操作的目的是什么?我们取一个数字并将以为过程展示出来:
这里我们假设
![[公式]](https://p1-jj.byteimg.com/tos-cn-i-t2oaga2asx/gold-user-assets/2019/9/2/16cf0030063781bf~tplv-t2oaga2asx-jj-mark:3024:0:0:0:q75.png)
则每次的移位或操作如下:
      n=  ***     ;  1000 0000  0000 0000  0000 0000  0000 0000
      n |= n >>> 1;  1100 0000  0000 0000  0000 0000  0000 0000  将最高位拷贝到下1位
      n |= n >>> 2;  1111 0000  0000 0000  0000 0000  0000 0000  将上述2位拷贝到紧接着的2位
      n |= n >>> 4;  1111 1111  0000 0000  0000 0000  0000 0000  将上述4位拷贝到紧接着的4位
      n |= n >>> 8;  1111 1111  1111 1111  0000 0000  0000 0000  将上述8位拷贝到紧接着的8位
      n |= n >>> 16; 1111 1111  1111 1111  1111 1111  1111 1111  将上述16位拷贝到紧接着的16位
上述操作的最终目的是要把 n 的最高位右边的所有位置 1 。一遍可以找出大于该数并且是2的幂次方。那为什么要在移位或操作前先进行 cap -1 操作呢?因为如果 cap 已经是2的幂次方了(说明cap 已经满足要求,那该函数最终应该返回cap),如果不进行 cap -1 操作的话,该函数最终将返回 cap * 2,这显然不符合要求。
定位Node所在哈希桶索引:
hash(key) -> 高位运算 -> 取模运算
1、key hashcode + 高位运****算: hashMap 中针对 key 有专门的 hash 函数,该函数在 Object hash 值的基础上取其高 16 位进行了异或操作。这样做的目的是在hash桶 length 长度比较小的时候,让 Object hash 的高位也能参与到取模操作中,能在一定程度上减少 hash 冲突。
static final int hash(Object key) {
        int h;
        return (key == null) ? 0 : (h = key.hashCode()) ^ (h >>> 16);
    }
2、取模运算: hash & (table.length - 1) 在计算 Node 在 hash 桶数组的位置时,通常需要将 hash 值与桶数组长度取模操作:hash % table.length。 上文中在构造hashMap时 tableSizeFor函数的返回值即 hash 桶数组的长度。该返回值是一个 2 的幂次方的数字。 而 hash & (table.length - 1) 与 hash % table.length 在table.length是 2 的幂次方时的作用是一样的, 且 & 操作 比 % 操作 占用的 cpu 周期更少,所以其效率更高。 下面是 HashMap get(Object key) 底层获取 Node 的源码, 在代码中我们可以看到使用位运算确定 Node 下标的代码:
final Node<K,V> getNode(int hash, Object key) {
        Node<K,V>[] tab; Node<K,V> first, e; int n; K k;
        if ((tab = table) != null && (n = tab.length) > 0 &&
            (first = tab[(n - 1) & hash]) != null) {// 根据 key 的 hash 值确定 key 在 Hash 桶数组中的下标
            if (first.hash == hash && // always check first node
                ((k = first.key) == key || (key != null && key.equals(k))))
                return first;
            if ((e = first.next) != null) {
                if (first instanceof TreeNode)
                    return ((TreeNode<K,V>)first).getTreeNode(hash, key);
                do {
                    if (e.hash == hash &&
                        ((k = e.key) == key || (key != null && key.equals(k))))
                        return e;
                } while ((e = e.next) != null);
            }
        }
        return null;
    }
向HashMap中加入键值对:
下面看下 HashMap 在插入键值对时做了什么操作:
public V put(K key, V value) {
        return putVal(hash(key), key, value, false, true);
    }

final V putVal(int hash, K key, V value, boolean onlyIfAbsent,
                   boolean evict) {
        Node<K,V>[] tab; Node<K,V> p; int n, i;
        // 如果该Map第一次put对象,则初始化hash桶数组。
        if ((tab = table) == null || (n = tab.length) == 0)
            n = (tab = resize()).length;
        // 如果指定索引位置没有元素,则创建节点并放入改索引对应的数组中
        if ((p = tab[i = (n - 1) & hash]) == null)
            tab[i] = newNode(hash, key, value, null);
        else {
        // 指定索引位置有元素
            Node<K,V> e; K k;
            if (p.hash == hash &&
                ((k = p.key) == key || (key != null && key.equals(k))))
                // 如果存在的节点与将要插入的节点相同,则直接替换
                e = p;
            else if (p instanceof TreeNode)
               //如果不相同,则判断存在节点是否是树化节点,是,则将插入节点插入红黑树
                e = ((TreeNode<K,V>)p).putTreeVal(this, tab, hash, key, value);
            else {
               // 不是树化节点,则遍历该索引桶中的链表,将节点插入链表末尾
                for (int binCount = 0; ; ++binCount) {
                    if ((e = p.next) == null) {
                        p.next = newNode(hash, key, value, null);
                        //插入过程中判断链表是否需要转成红黑树
                        if (binCount >= TREEIFY_THRESHOLD - 1) // -1 for 1st
                            treeifyBin(tab, hash);
                        break;
                    }
                    if (e.hash == hash &&
                        ((k = e.key) == key || (key != null && key.equals(k))))
                        break;
                    p = e;
                }
            }
            if (e != null) { // existing mapping for key
                V oldValue = e.value;
                if (!onlyIfAbsent || oldValue == null)
                // 初始化value或者替换老的value
                    e.value = value;
                afterNodeAccess(e);
                return oldValue;
            }
        }
        ++modCount;
        // 判断是否需要扩容
        if (++size > threshold)
            resize();
        afterNodeInsertion(evict);
        return null;
}从put() 源码中我们可以看到,HashMap 在首次 put 时才初始化 hash 桶数组,这种设计理念很好的避免了初始加载的内存浪费问题(要避免占着坑位不拉**的场景)。
HashMap 扩容:
HashMap 在元素数量达到 threshold 时会进行扩容操作。JDK8 较 JDK7 在扩容操作上作了一定优化,但是基本过程相差不大,下面先看下 JDK7 中的扩容代码: 1、JDK7:
final Node<K,V>[] resize() {
void resize(int newCapacity) { //传入新的容量
     Entry[] oldTable = table;    //引用扩容前的Entry数组
     int oldCapacity = oldTable.length;
     if (oldCapacity == MAXIMUM_CAPACITY) {  //扩容前的数组大小如果已经达到最大(2^30)了
          threshold = Integer.MAX_VALUE; //修改阈值为int的最大值(2^31-1),这样以后就不会扩容了
          return;
      }

      Entry[] newTable = new Entry[newCapacity];  //初始化一个新的Entry数组
     transfer(newTable);                         //!!将数据转移到新的Entry数组里
     table = newTable;                           //HashMap的table属性引用新的Entry数组
     threshold = (int)(newCapacity * loadFactor);//修改阈值
 }
}
JDK7 当HashMap 扩容时直接创建一个新的 hash 桶数组其大小为原数组长度2倍,并将原数组 Node 重新 hash 迁移到新数组中:
void transfer(Entry[] newTable) {
      Entry[] src = table;                   //src引用了旧的Entry数组
      int newCapacity = newTable.length;
      for (int j = 0; j < src.length; j++) { //遍历旧的Entry数组
          Entry<K,V> e = src[j];             //取得旧Entry数组的每个元素
          if (e != null) {
              src[j] = null;//释放旧Entry数组的对象引用(for循环后,旧的Entry数组不再引用任何对象)
              do {
                  Entry<K,V> next = e.next;
                 int i = indexFor(e.hash, newCapacity); //!!!重新计算每个元素在数组中的位置(重新取模操作计算新数组下标)
                 e.next = newTable[i]; //记录原索引指向的节点
                 newTable[i] = e;      //将元素放在数组上
                 e = next;             //访问下一个Entry链上的元素
             } while (e != null);

             // 这里迁移后的数据中,同一个索引的链表会出现倒置问题,详情看下图
         }
     }
 }
下面以图例简单描述下迁移过程:
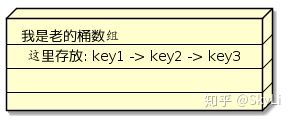
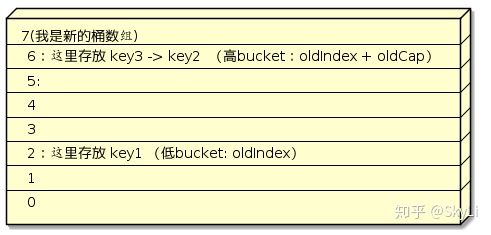
上图中两个示例图代表 JDK7 扩容前与扩容后元素转移位置图,转以后的 Node 是存在倒置问题的 (JDK8的转移后最终位置和上图相同,但元素同桶中转以后的元素位置与转移前的位置相同,即 6 桶中的 Node 的顺序将会是:key2 ->key3)。
下面是 JDK8 转移中的优化,这里注意下元素迁移过程中的规律,假设 oldCap = 4 则新数组长度变为 oldCap * 2 = 8 时,则hash & (table.length - 1) 的转变过程为:
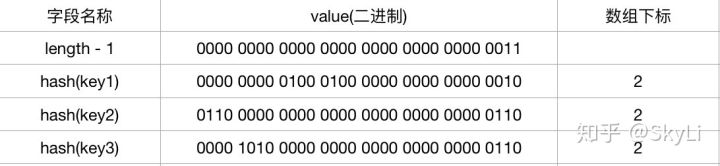
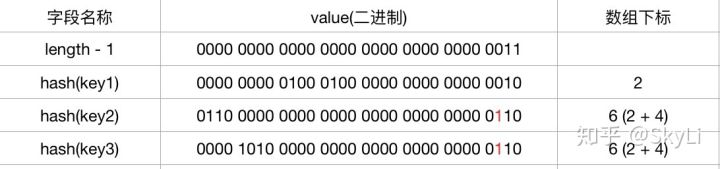
当数组扩容后,则length -1 二进制在高位会多一个 1, 即:上表(length -1 最低4位)中的 0011 -> 0111, 所以凡是hash(key) 的二进制位(上表中参与运算的最低 4 位)与扩容前的 length 的二进制非零最高位(即0100 )相与不为 0 的,则在扩容后的数组中下标为 oldIndex + oldCap.
JDK8 的这种设计非常巧妙,不仅在针对将老 Hash 桶数组中的数据迁移到新数组中不用重新计算每个 Node 的 hash 值与新数组的取模操作;而且由于每个 key 的 hash 值中对应新增的 1bit 是 0 还是 1 是随机的,这就保证了在扩容前由于 hash 冲突而组成链表节点可以均匀的分散到新的 bucket 中。 并且迁移后的数据不存在倒置问题。 详情看 JDK8 的 resize():
final Node<K,V>[] resize() {
        Node<K,V>[] oldTab = table;
        int oldCap = (oldTab == null) ? 0 : oldTab.length;
        int oldThr = threshold;
        int newCap, newThr = 0;
        if (oldCap > 0) {
            if (oldCap >= MAXIMUM_CAPACITY) {
                threshold = Integer.MAX_VALUE;// 如果数组容量已经达到最大值,则调整阈值后直接返回不进行扩容。
                return oldTab;
            }
            // 否则直接将通数组length * 2
            else if ((newCap = oldCap << 1) < MAXIMUM_CAPACITY &&
                     oldCap >= DEFAULT_INITIAL_CAPACITY)
                newThr = oldThr << 1; // double threshold
        }
        else if (oldThr > 0) // initial capacity was placed in threshold
            newCap = oldThr;// 这里第一次初始化通数组时容量取tableSizeFor函数的返回值。该值被复制在 threshold 变量中。
        else {               // zero initial threshold signifies using defaults
            newCap = DEFAULT_INITIAL_CAPACITY;
            newThr = (int)(DEFAULT_LOAD_FACTOR * DEFAULT_INITIAL_CAPACITY);
        }
        if (newThr == 0) {
            float ft = (float)newCap * loadFactor;
            newThr = (newCap < MAXIMUM_CAPACITY && ft < (float)MAXIMUM_CAPACITY ?
                      (int)ft : Integer.MAX_VALUE);
        }
        threshold = newThr;
        @SuppressWarnings({"rawtypes","unchecked"})
        Node<K,V>[] newTab = (Node<K,V>[])new Node[newCap];// 创建新的length的数组
        table = newTab;
        // 数据迁移
        if (oldTab != null) {
            for (int j = 0; j < oldCap; ++j) {// 遍历原数组的所有链表
                Node<K,V> e;
                if ((e = oldTab[j]) != null) {
                    oldTab[j] = null;// 释放原节点空间
                    if (e.next == null)
                        newTab[e.hash & (newCap - 1)] = e;// 如果链表只有一个节点,则直接将节点放入对应下标的新hash桶数组中。
                    else if (e instanceof TreeNode)
                        ((TreeNode<K,V>)e).split(this, newTab, j, oldCap);
                    else { // preserve order
                        Node<K,V> loHead = null, loTail = null;
                        Node<K,V> hiHead = null, hiTail = null;
                        Node<K,V> next;
                        // 遍历链表
                        do {
                            next = e.next;
                            if ((e.hash & oldCap) == 0) {// 这一步非常NB, 判断key的hash值在新增的1 bit 是否是 1, 如果是 则将其放入hiHead或者hiTail链表中。
                                if (loTail == null)// 尾插
                                    loHead = e;
                                else
                                    loTail.next = e;
                                loTail = e;
                            }
                            else {
                                if (hiTail == null) // 尾插
                                    hiHead = e;
                                else
                                    hiTail.next = e;
                                hiTail = e;
                            }
                        } while ((e = next) != null);
                        if (loTail != null) {
                            loTail.next = null;
                            newTab[j] = loHead; // 将loHead指向的链表放入低bucket(见元素转移图)
                        }
                        if (hiTail != null) {
                            hiTail.next = null;
                            newTab[j + oldCap] = hiHead; // 直接将hiHead 指向的链表放入高bucket中(见元素转移图)
                        }
                    }
                }
            }
        }
        return newTab;
    }
JDK8 中采用 4 个 Node(hiHead、hiTail、loHead、loTail)节点(采用尾插发)来保证转移后的高低 bucket 中的链表顺序,不会出现 JDK7 中链表转移到新数组中的倒置问题。
HashMap使用注意事项:
1、禁止使用可变对象作为key.任何对象的 hashcode 方法继承于 Object 基类。其取对象在堆内存中的对象的起始地址,如果选择重写对象的 hashcode 方法,则 hashcode 的生成应尽量避免关联对象属性。否则,在改变对象的 field 属性时,对应的 hashcode 值也会变更,从而无法操作先前存入的 value,造成内存泄漏。
2、非线程安全,多线程并发可能会产生数据不一致问题。可使用 Hashtable 或者 ConcurrentHashMap 替换。
Q&A
Q1 mackong
tableSizeFor 方法中,求 hashTable 的长度时,为什么取capacity -1?
A1 说为什么要用 capacity -1 之前,需要先说明一下
n |= n >>> 1;
n |= n >>> 2;
n |= n >>> 4;
n |= n >>> 8;
n |= n >>> 16;
(移位并或运算)的作用是什么:这5次操作可将任何一个int类型的数字最高位右边的所有二进制位置 1。 hashMap 要求桶数组长度必须为 2 的幂次方。所以假设 capacity 已经是2的幂次方,如果不进行capacity-1操作的话,经过上述移位并或运算后,最终函数返回的是capacity * 2的大小。这是不符合 tableSizeFor 函数的功能的。
Q2 mackong
为什么取模操作使用&(table.length - 1)而不是%table.length?
A2 由上文的tableSizeFor 方法可知, hashMap 的 bucket 桶数组长度是 2 的幂次方。 所以 hash(key) & (table.length - 1) 功能上等价于 hash(key) % table.length, 但是 & 操作 比 % 操作在底层计算时占用的 cpu 周期数更少, 在性能上 & 运算要优于直接 %。
